本文主要是介绍SpringBoot+Vue构建同学回忆录前台系统,希望对大家解决编程问题提供一定的参考价值,需要的开发者们随着小编来一起学习吧!
SpringBoot+Vue构建同学回忆录前台系统
前后端分离:
前端开发:
介绍一下vue的项目结构
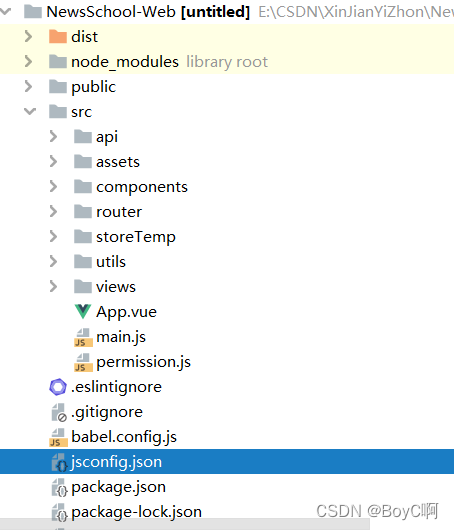
dist:为编译后直接运行的目标文件
node_modules:为一些使用的模块和包
public:是一些项目的基本结构,里面包含着index.html,实际上也就是访问的是index.html
src:这就是我们的工程文件了
api:就是一些使用后端接口的前端接口
asset:这里面存放的是一些静态文件
components:这里用来编写一些通用组件,例如footer
router:用于编写路由
store:该项目里面的storeTemp就是,用来编写一些项目中用于保存一些中间数据的数据,例如token,账号信息。
utils:用来编写一些工具,可以对axios做二次封装
views:用来编写一些页面组件,和页面
之后的文件就不做赘述了,大家可以往后阅读就知道了
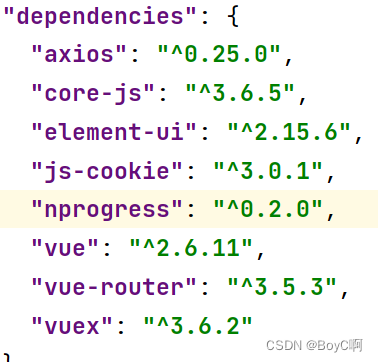
版本介绍:
Vue:3.0+
Element-ui:^2.15.6
这里不做过多的赘述:直接上图
开发过程:
1.通过webStrom直接选择vue项目搭建,自动生成vue-cli
2.配置vue.config.js
module.exports={//关闭代码校验lintOnSave:false,productionSourceMap: false,publicPath: './',outputDir: 'dist',assetsDir: 'assets',devServer: {port: 8090,host: 'localhost',https: false,open: false,proxy: {'/api': {target: `http://localhost:8001`,pathRewrite: { '^/api': '' },changeOrigin: true,}},disableHostCheck: true},}
上述有一个点并不是很明白,就是proxy的target,代理的目标地址,这里主要是用来指定后端的映射地址,也就是要改变index的proxyTable中的后端映射地址(默认是localhost:8080)我这里没有调试成功,所以直接在axios中配置了后端映射地址,这是错误的做法,后面会请教一些大佬更改过来。有知道的大佬也希望教教我这个小白。
好吧,这里配置并没有多少。现在介绍一下这个vue.config.js,这个对比vue2.0就好比是dev.config.js,有些人也会使用config包去做配置,这都是差不多的。不用纠结那么多。
可以看到上面有一个关闭代码校验的配置。
所以我们来配置一下哪些不用做代码校验的包,相信大家都对代码校验了如指掌。
创建一个.eslintignore文件
src/*
src/view/*
作完这些你以为我们的开发开始啦吗?其实并没有,我没还需要将src包做一下映射
创建一个jsconfig.json文件,将src包起一个别名@/
{"compilerOptions": {"baseUrl": "./","paths": {"@/*": ["src/*"]}},"exclude": ["node_modules","dist"]
}
好吧,配置了一堆,现在开始开发吧!
编写路由:
在src中创建一个router包,用来管理路由:
import Vue from "vue"
import VueRouter from "vue-router"
Vue.use(VueRouter)// import login from "@/views/login"export default new VueRouter({routes:[{path:"/",redirect:"/login",},{path:"/login",// redirect:"/hello",// component:login,component:()=>import("@/views/login"),// name:"登录",meta:{show:false},},{path:"/home",component:()=>import("@/views/Home"),meta:{show:true}}]
})
编写路由的时候要使用vue-router,先确保vue-router已经加入配置中。
编写之后还要继续在main.js中使用它哦

这里不展示import,也要加入我们刚刚写的包。
这里的meta信息是用于后面的v-show或者v-if
写了这么多,页面在哪里啊?
好吧,那我们就直接开整吧!
根据你编写的路由映射来views中编写页面
其实的话都是先编写页面,再来映射,不过问题不大
views开发:
<template><div class="hello"><div class="obj_body"><div class="login_body"><div class="login_left"></div><div class="login_right"><div class="login_form"><div class="filed"><input type="text" id="log_id" v-model = remUser.user_name @click="defaultChange"></div><div class="filed"><input type="password" id="log_paw" v-model = remUser.user_password ></div><div class="filed"><div class="two_fileds"><div><input type="checkbox" id="log_rem" name="log_rem_"><label >记住我</label></div></div><div class="two_fileds"><div><p><a href="#">注册</a></p></div></div></div><div class="filed"><button id="log_btn" @click="loginUser" @keydown="loginUser">登录</button></div></div></div></div></div><hr style="height:1px;border:none;border-top:1px solid #555555;" /><div class="obj_tail"><div class="tail_body"><div class="a_box"><ul><li id="th_list"><label id="_ha">关于我们</label></li><li><a href="#" id="com_a0_1">nihao</a></li><li><a href="#" id="com_a0_2">nihao</a></li><li><a href="#" id="com_a0_3">nihao</a></li></ul></div><div class="a_box"><ul><li id="th_list"><label id="_ha">关于我们</label></li><li><a href="#" id="com_a1_1">nihao</a></li><li><a href="#" id="com_a1_2">nihao</a></li><li><a href="#" id="com_a1_3">nihao</a></li><li><a href="#" id="com_a1_4">nihao</a></li><li><a href="#" id="com_a1_5">nihao</a></li><li><a href="#" id="com_a1_6">nihao</a></li></ul></div><div class="a_box"><ul><li id="th_list"><label id="_ha">关于我们</label></li><li><a href="#" id="com_a2_1">nihao</a></li><li><a href="#" id="com_a2_2">nihao</a></li><li><a href="#" id="com_a2_3">nihao</a></li></ul></div><div class="a_box"><ul><li id="th_list"><label id="_ha">关于我们</label></li><li><a href="#" id="com_a3_1">nihao</a></li><li><a href="#" id="com_a3_2">nihao</a></li><li><a href="#" id="com_a3_3">nihao</a></li></ul></div></div></div><div class="admin_user"><a id="a_img" href="#"><img src="images/R-C.jfif"  alt="图片加载失败"/></a><div class="tip_"><label>联系客服</label></div></div></div>
</template><script>
import {login}from "@/api/login"
export default {data() {return {remUser:{user_name:"账号",user_password:"",},}},methods:{defaultChange(){if(this.remUser.user_name === "账号"){this.remUser.user_name = ""}},loginUser(){this.$store.dispatch("Login",this.remUser).then(response=>{this.$message({type:"success",message:"登录成功"})this.$router.push({path:'/home'})}).catch(err=>{this.$message({type:"error",message:"登录失败"})console.log(err)})// login(this.remUser)//     .then(response=>{//       if(response.data.code === 20000){//         this.$message({//           type:"success",//           message:"登录成功"//         })//         this.$router.push({path:'/home'})//       }else{//         this.$message({//           type:"error",//           message:"登录失败"//         })//       }// }).catch(err=>{//   console.log(err)// })},enterLogin() {document.onkeydown = (e) => {e = window.event || e;if (this.$route.path === '/login' && (e.code === 'Enter' || e.code === 'enter')) {//调用登录事件方法this.loginUser();}}}},created() {this.enterLogin()}
}
</script><!-- Add "scoped" attribute to limit CSS to this component only -->
<style scoped>
* {margin: 0;padding: 0;
}.obj_body {height: 700px;position: relative;background-color: rgb(223, 221, 221);
}.obj_tail {height: 200px;/* background-color: yellow; */position: relative;background-color: rgb(223, 221, 221);
}.obj_body .login_body {border-radius: 20px;width: 800px;height: 500px;background-image: url("images/森林1.jpg");background-repeat: no-repeat;background-size: 800px 500px;position: absolute;top: 50%;left: 50%;transform: translate(-50%, -50%);box-shadow: 0 0 10px 5px dimgray;
}.login_body .login_left {width: 50%;height: 100%;/* border-top-left-radius: 20px; *//* border-bottom-left-radius: 20px; */float: left;
}.login_body .login_right {position: relative;width: 50%;height: 100%;/* border-radius: 20px; */border-top-right-radius: 20px;border-bottom-right-radius: 20px;background-image: linear-gradient(to right, aqua, green);float: left;
}.login_right .login_form {position: absolute;bottom: 100px;right: 50px;text-align: center;
}.filed {overflow: hidden;margin-bottom: 10px;
}.filed input {width: 250px;height: 30px;border-radius: 15px;font-size: 18px;
}.filed input:first-child {color: dimgray;
}.filed #log_rem {width: 15px;height: 15px;box-shadow: 0 0 2px 2px dimgray;border-radius: 2px;
}.filed .two_fileds:first-child {text-align: left;
}.filed .two_fileds:last-child {text-align: right;
}.filed .two_fileds {float: left;width: 50%
}.two_fileds p a {text-decoration: none;color: black;
}.two_fileds p a:hover {color: rgb(134, 77, 77);
}.filed #log_btn {width: 150px;height: 30px;background-color: aqua;color: black;text-align: center;line-height: 30px;border-radius: 10px;
}.obj_tail .tail_body {position: absolute;width: 1000px;height: 160px;/* background-color: rgba(236, 233, 233, 0.904); */top: 50%;left: 50%;transform: translate(-50%, -50%);
}.tail_body .a_box {border-left: 1px solid rgb(83, 82, 82);width: 200px;height: 160px;margin-left: 10px;display: inline-block;
}.tail_body .a_box:first-child {margin-left: 75px;
}.tail_body .a_box:last-child {border-right: 1px solid rgb(83, 82, 82);
}.a_box li {float: left;width: 200px;height: 40px;display: block;
}.a_box #th_list {border-radius: 2px;/* background-color: rgb(223, 221, 221); */
}.a_box ul {height: 160px;list-style-type: none;margin: 0;padding: 0;overflow-y: auto;
}.a_box ul::-webkit-scrollbar {display: none;
}li>a {display: inline-block;width: 200px;height: 40px;text-decoration: none;text-align: center;line-height: 40px;font-size: 18px;color: rgb(68, 67, 67);
}#_ha {display: inline-block;width: 200px;height: 40px;text-align: center;line-height: 40px;font-size: 20px;color: rgb(68, 67, 67);
}li>a:hover {font-size: 21px;color: rgb(134, 77, 77);
}.admin_user a {margin: 0;padding: 0;display: inline-block;position: fixed;right: 30px;bottom: 30px;width: 60px;height: 60px;
}.admin_user a img {width: 60px;height: 60px;background-repeat: no-repeat;
}.admin_user .tip_ {display: none;/* visibility: hidden; */width: 100px;height: 40px;background-color: rgb(158, 154, 154);color: rgb(42, 20, 235);/* word-break: break-all; */text-align: center;border-radius: 6px;/* 定位 */position: fixed;right: 110px;bottom: 40px;
}.tip_ label {font-size: 18px;color: white;text-align: center;line-height: 40px;
}
</style>
你可以使用你熟悉的任何前端知识,我的目标不是前端工程师,所以对前端并不了解,但我也会努力去学习,css的话可以改用less开发。
这个文件是生存在Login包下的
里面引入了两张图片,在Login中添加一个image文件夹,然后将图片加入就好
还有一个首页哇!
首页的话又要编写头部组件,也是熟练工就好,那我们就交流到这里吧!
还希望大佬帮我解决一下上面的问题,十分感谢!
这篇关于SpringBoot+Vue构建同学回忆录前台系统的文章就介绍到这儿,希望我们推荐的文章对编程师们有所帮助!


