本文主要是介绍html文件Js写输入框和弹框调接口jQuery,希望对大家解决编程问题提供一定的参考价值,需要的开发者们随着小编来一起学习吧!

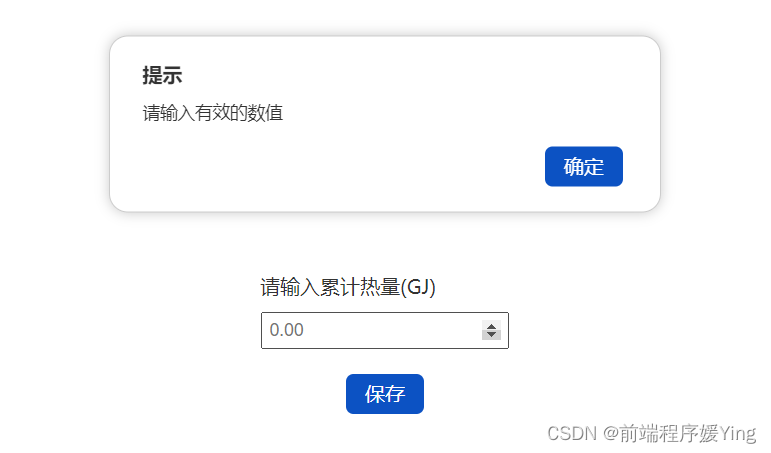
业务场景:需要使用写一个html文件,实现输入数字,保存调接口。
1、使用 JS原生写法, fetchAPI调接口,使用
alert方法弹框会阻塞线程,所以写了一个弹框。
<!DOCTYPE html>
<html lang="en"><head><meta charset="UTF-8"><meta name="viewport" content="width=device-width, initial-scale=1.0"><title>Document</title><style>* {/* 清空上下边距*/margin: 0;padding: 0;}.container {display: flex;justify-content: center;align-items: center;height: 80vh;}.form-group {padding: 20px;border-radius: 10px;width: 200px;display: flex;flex-direction: column;align-items: center;/* background-color: lightblue; */}.name {width: 200px;text-align: left;font-size: 16px;font-weight: 400;font-family: MicrosoftYaHei;}input {margin-top: 10px;padding: 5px;font-size: 14px;width: 185px;outline: none;/* 去掉焦点边框 */}button {padding: 8px 15px;font-size: 16px;line-height: 16px;background-color: #0C52C3;color: white;border: none;border-radius: 6px;cursor: pointer;margin-top: 20px;&:hover {background-color: #5586d5;}}#tip-box {position: fixed;top: 15%;left: 50%;transform: translate(-50%, -50%);width: 400px;border: 1px solid #ccc;border-radius: 15px;box-shadow: 0 0 10px rgba(0, 0, 0, .2);padding: 10px 20px;background-color: #fff;z-index: 99999;text-align: left;animation: tip-show .3s forwards;}.tip-header {font-size: 16px;font-weight: bold;color: #333;padding: 9px 6px 3px;}.close-btn {float: right;margin: 10px;}/* .close-btn:hover {background-color: #ccc;} */.tip-content {font-size: 14px;color: #333;padding: 8px 6px;}@keyframes tip-show {0% {opacity: 0;}100% {opacity: 1;}}@keyframes tip-hide {0% {opacity: 1;}100% {opacity: 0;}}</style><script src="jquery.min.js"></script></head><body><div class="container"><div class="form-group"><div class="name">请输入累计热量(GJ)</div><input type="number" name="" id="input" class="form-control" value="" min="0" step="0.01" required="required"title="" placeholder="0.00" required="required" onblur="handleInputChange(event)"onkeydown="handlekeyDown(event)" /><button class="btn btn-primary" onclick="handleButtonClick()">保存</button></div><div id="tip-box" style="display: none;" onclick="hideTip()"><div class="tip-header">提示</div><div class="tip-content">提示内容</div><button class="close-btn" onclick="hideTip()">确定</button></div></div><script>let url = 'http://1x.1x.6.1xxx:12xxx';let api = '/base/xxxxxDXZZConfig';function handleInputChange(event) {event.target.value = Number(event.target.value).toFixed(2);}function handlekeyDown(event) {console.log(event);if (event.keyCode === 69) {event.preventDefault();}}function handleButtonClick() {let value = input.value;console.log(value);if (!value) {showTip('请输入有效的数值');return;}let data = { value };// 使用 URLSearchParams 将数据对象转换为查询字符串let params = new URLSearchParams(data).toString();let requestUrl = `${url}${api}?${params}`;let options = { method: "GET" }try {fetch(requestUrl, options).then(res => res.json()).then(json => {console.log(json);if (json.code == '0') {showTip('保存成功');} else {showTip(json.msg);}input.value = null;}).catch(error => {showTip('请求失败,请稍后再试');console.error('Fetch Error:', error);input.value = null;});} catch (error) {showTip('请求失败,请稍后再试');console.error('Fetch Error:', error);input.value = null;}}var tipBox = document.querySelector('#tip-box');var closeBtn = tipBox.querySelector('.close-btn');function showTip(message) {tipBox.querySelector('.tip-content').innerHTML = message;tipBox.style.display = 'block';}function hideTip() {tipBox.style.animation = 'tip-hide .3s forwards';setTimeout(function () {tipBox.style.display = 'none';tipBox.style.animation = '';}, 300);}</script>
</body></html>
2、使用jQuery,先 npm install jquery,然后引入
<!DOCTYPE html>
<html lang="en"><head><meta charset="UTF-8"><meta name="viewport" content="width=device-width, initial-scale=1.0"><title>表底录入</title><style>* {/* 清空上下边距*/margin: 0;padding: 0;}.container {display: flex;justify-content: center;align-items: center;height: 80vh;}.form-group {padding: 20px;border-radius: 10px;width: 200px;display: flex;flex-direction: column;align-items: center;/* background-color: lightblue; */}.name {width: 200px;text-align: left;font-size: 16px;font-weight: 400;font-family: MicrosoftYaHei;color: #333;}input {margin-top: 10px;padding: 5px;font-size: 14px;width: 185px;outline: none;/* 去掉焦点边框 */color: #333;}button {padding: 8px 15px;font-size: 16px;line-height: 16px;background-color: #0C52C3;color: white;border: none;border-radius: 6px;cursor: pointer;margin-top: 20px;&:hover {background-color: #5586d5;}}#tip-box {position: fixed;top: 15%;left: 50%;transform: translate(-50%, -50%);width: 400px;border: 1px solid #ccc;border-radius: 15px;box-shadow: 0 0 10px rgba(0, 0, 0, .2);padding: 10px 20px;background-color: #fff;z-index: 99999;text-align: left;animation: tip-show .3s forwards;}.tip-header {font-size: 16px;font-weight: bold;color: #333;padding: 9px 6px 3px;}.close-btn {float: right;margin: 10px;}.tip-content {font-size: 14px;color: #333;padding: 8px 6px;}</style><script src="./node_modules/jquery/dist/jquery.min.js"></script></head><body><div class="container"><div class="form-group"><div class="name">请输入累计热量(GJ)</div><input type="number" name="" id="input" class="form-control" value="" min="0" step="0.01" required="required"title="" placeholder="0.00" required="required" onblur="handleInputChange(event)"onkeydown="handlekeyDown(event)" /><button class="btn btn-submit">保存</button></div><div id="tip-box" style="display: none;"><div class="tip-header">提示</div><div class="tip-content">提示内容</div><button class="close-btn">确定</button></div></div><script>let url = 'http://1x.1x.6.1xxx:12xxx';let api = '/base/xxxxxDXZZConfig';function handleInputChange(event) {event.target.value = Number(event.target.value).toFixed(2);}function handlekeyDown(event) {// 阻止键盘输入e的情况if (event.keyCode === 69) {event.preventDefault();}}// 点击保存$('.btn-submit').click(function () {let value = input.value;console.log(value);if (!value) {$('.tip-content').html('请输入有效的数值')$('#tip-box').show();return;}let requestUrl = `${url}${api}`;$.ajax({type: 'GET',url: requestUrl,data: { value },success: function (res) {console.log(res);if (res.code == '0') {$('.tip-content').html('保存成功');$('#tip-box').show();} else {$('.tip-content').html(res.msg);$('#tip-box').show();}input.value = null;},error: function (xhr, status, error) {console.error('请求失败: ' + status + ' - ' + error);input.value = null;}})})$('.close-btn').click(function () {$('#tip-box').hide()})$('#tip-box').click(function () {$('#tip-box').hide()})</script>
</body></html>
这篇关于html文件Js写输入框和弹框调接口jQuery的文章就介绍到这儿,希望我们推荐的文章对编程师们有所帮助!


