本文主要是介绍c# OpenCvSharp透视矫正六步实现透视矫正(八),希望对大家解决编程问题提供一定的参考价值,需要的开发者们随着小编来一起学习吧!
透视矫正,引用文档拍照扫描,相片矫正这块。
- 读取图像Cv2.ImRead();
- 预处理(灰度化,高斯滤波、边缘检测)
- 轮廓检测(获取到最大轮廓)
- 获取最大面积轮廓的四个顶点
- 标识最小矩形坐标
- 透视矫正显示
完整代码
// 1、读取图像Mat image = Cv2.ImRead("2.jpg", ImreadModes.Color);//2、预处理(灰度化,高斯滤波、边缘检测)Mat src_gray = new Mat();Cv2.CvtColor(image, src_gray, ColorConversionCodes.BGR2GRAY); // 转换为灰度图像Cv2.GaussianBlur(src_gray, src_gray, new Size(5, 5), 0, 0); // 进行高斯模糊Mat canny_Image = new Mat();Cv2.Canny(src_gray, canny_Image, 75, 200);//3、轮廓检测Point[][] contours;HierarchyIndex[] hierarchy;Cv2.FindContours(canny_Image, out contours, out hierarchy, RetrievalModes.External, ContourApproximationModes.ApproxSimple);// 计算轮廓的面积double maxArea = 0;int maxAreaIndex = -1;for (int i = 0; i < contours.Length; i++){double area = Cv2.ContourArea(contours[i]);if (area > maxArea){maxArea = area;maxAreaIndex = i;}}// 获取最大面积的轮廓Point[] largestContour = contours[maxAreaIndex];//4、获取最大面积轮廓的四个顶点。Point[] approx = Cv2.ApproxPolyDP(contours[maxAreaIndex], 0.02 * Cv2.ArcLength(contours[maxAreaIndex], true), true);Cv2.DrawContours(image, new Point[][] { approx }, -1, Scalar.Blue, 2);//可以注释掉for (int i = 0; i < 4; i++){// 设置目标图像的四个顶点坐标//Cv2.PutText(image, "H"+i, new Point(approx[i].X, approx[i].Y), HersheyFonts.HersheySimplex, 1, new Scalar(0, 0, 255), 2, LineTypes.Link4);}//5、透视转换OpenCvSharp.Point2f[] srcPt = new OpenCvSharp.Point2f[4];srcPt[0] = approx[0];srcPt[1] = approx[3];srcPt[2] = approx[2];srcPt[3] = approx[1];RotatedRect rect = Cv2.MinAreaRect(srcPt);Rect box = rect.BoundingRect();OpenCvSharp.Point2f[] dstPt = new OpenCvSharp.Point2f[4];//可以注释掉用于观察坐标点是否对齐dstPt[0].X = 0;dstPt[0].Y = 0;dstPt[1].X = 0 + box.Width;dstPt[1].Y = 0;dstPt[2].X = 0 + box.Width;dstPt[2].Y = 0 + box.Height;dstPt[3].X = 0;dstPt[3].Y = 0 + box.Height;Mat final = new Mat(box.Height, box.Width, MatType.CV_8UC3);Mat warpmatrix = Cv2.GetPerspectiveTransform(srcPt, dstPt);//获得变换矩阵Cv2.WarpPerspective(image, final, warpmatrix, final.Size());//投射变换,将结果赋给finalCv2.ImShow("获取新正四边形", final);Cv2.WaitKey(0);Rect roi = new Rect(box.X, box.Y, box.Width, box.Height);//坐标 x,y 尺寸 长宽Mat croppedImage = new Mat(final, roi);for (int i = 0; i < 4; i++){// 设置目标图像的四个顶点坐标Cv2.PutText(image, "A" + i, new Point(dstPt[i].X, dstPt[i].Y), HersheyFonts.HersheySimplex, 1, new Scalar(0, 0, 255), 2, LineTypes.Link4);}// 显示结果Cv2.ImShow("透视矫正图像", image);Cv2.WaitKey(0);一 、读取图像Cv2.ImRead()
// 1、读取图像
Mat image = Cv2.ImRead("2.jpg", ImreadModes.Color);

二、预处理(灰度化,高斯滤波、边缘检测)
灰度化:Cv2.CvtColor();
高斯滤波:Cv2.GaussianBlur();
边缘检测:Cv2.Canny();
//2、预处理(灰度化,高斯滤波、边缘检测)Mat src_gray = new Mat();
Cv2.CvtColor(image, src_gray, ColorConversionCodes.BGR2GRAY); // 转换为灰度图像
Cv2.GaussianBlur(src_gray, src_gray, new Size(5, 5), 0, 0); // 进行高斯模糊
Mat canny_Image = new Mat();
Cv2.Canny(src_gray, canny_Image, 75, 200);
三、轮廓检测(获取到最大轮廓)
通过Cv2.ContourArea()计算轮廓的面积,选出最大轮廓
//3、轮廓检测
Point[][] contours;
HierarchyIndex[] hierarchy;
Cv2.FindContours(canny_Image, out contours, out hierarchy, RetrievalModes.External, ContourApproximationModes.ApproxSimple);// 计算轮廓的面积
double maxArea = 0;
int maxAreaIndex = -1;
for (int i = 0; i < contours.Length; i++)
{double area = Cv2.ContourArea(contours[i]);if (area > maxArea){maxArea = area;maxAreaIndex = i;}
}// 获取最大面积的轮廓
Point[] largestContour = contours[maxAreaIndex];
四、 获取最大面积轮廓的四个顶点。
Cv2.ApproxPolyDP() 获取4个顶点坐标
//4、获取最大面积轮廓的四个顶点。
Point[] approx = Cv2.ApproxPolyDP(contours[maxAreaIndex], 0.02 * Cv2.ArcLength(contours[maxAreaIndex], true), true);
标识四个顶点
//可以注释掉for (int i = 0; i < 4; i++){// 设置目标图像的四个顶点坐标Cv2.PutText(image, "H"+i, new Point(approx[i].X, approx[i].Y), HersheyFonts.HersheySimplex, 1, new Scalar(0, 0, 255), 2, LineTypes.Link4);}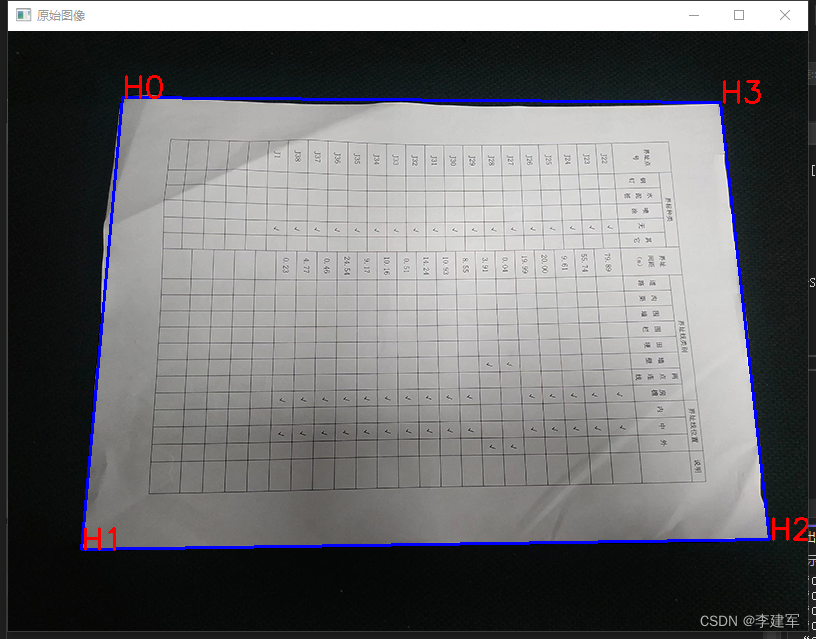
五、标识最小矩形坐标
获取顶点内最小矩形Cv2.MinAreaRect(srcPt);
//获取四个顶点坐标最小矩形顶点
RotatedRect rect = Cv2.MinAreaRect(srcPt);
Rect box = rect.BoundingRect();
OpenCvSharp.Point2f[] dstPt = new OpenCvSharp.Point2f[4];
stPt[0].X = box.X;dstPt[0].Y = box.Y;dstPt[1].X = box.X + box.Width;dstPt[1].Y = box.Y;dstPt[2].X = box.X + box.Width;dstPt[2].Y = box.Y + box.Height;dstPt[3].X = box.X;dstPt[3].Y = box.Y + box.Height;Mat final = new Mat();Mat warpmatrix = Cv2.GetPerspectiveTransform(srcPt, dstPt);//获得变换矩阵Cv2.WarpPerspective(image, final, warpmatrix, image.Size());//投射变换,将结果赋给finalRect roi = new Rect(box.X, box.Y, box.Width, box.Height);//坐标 x,y 尺寸 长宽Mat croppedImage = new Mat(final, roi);for (int i = 0; i < 4; i++){// 设置目标图像的四个顶点坐标Cv2.PutText(image, "A" + i, new Point(dstPt[i].X, dstPt[i].Y), HersheyFonts.HersheySimplex, 1, new Scalar(0, 0, 255), 2, LineTypes.Link4);}
两个坐标点顺序不一样,对齐坐标顺序,进行透视坐标转换
//5、透视转换OpenCvSharp.Point2f[] srcPt = new OpenCvSharp.Point2f[4];srcPt[0] = approx[0];srcPt[1] = approx[3];srcPt[2] = approx[2];srcPt[3] = approx[1];RotatedRect rect = Cv2.MinAreaRect(srcPt);Rect box = rect.BoundingRect();OpenCvSharp.Point2f[] dstPt = new OpenCvSharp.Point2f[4];dstPt[0].X = box.X;dstPt[0].Y = box.Y;dstPt[1].X = box.X + box.Width;dstPt[1].Y = box.Y;dstPt[2].X = box.X + box.Width;dstPt[2].Y = box.Y + box.Height;dstPt[3].X = box.X;dstPt[3].Y = box.Y + box.Height;Mat final = new Mat();六、透视变换显示
Mat warpmatrix = Cv2.GetPerspectiveTransform(srcPt, dstPt);//获得变换矩阵
Cv2.WarpPerspective(image, final, warpmatrix, final.Size());//投射变换,将结果赋给final
Cv2.ImShow("透视矫正图像", final);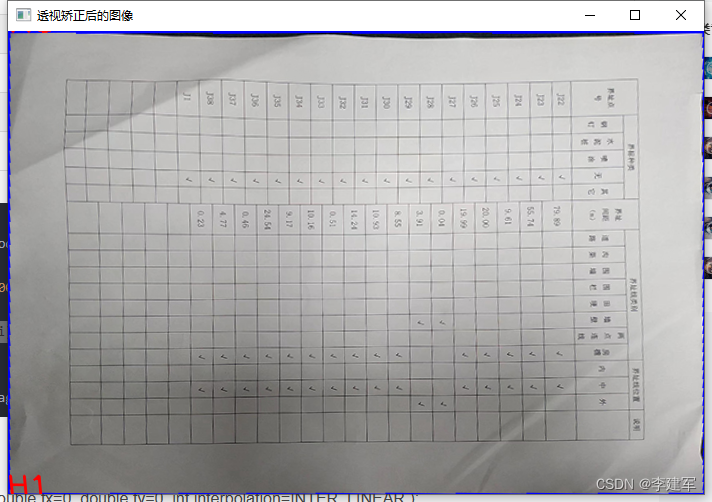
通过掌握这六个步骤,你可以在C#中使用OpenCvSharp实现透视矫正。祝你成功!
这篇关于c# OpenCvSharp透视矫正六步实现透视矫正(八)的文章就介绍到这儿,希望我们推荐的文章对编程师们有所帮助!


