本文主要是介绍Salesforce LWC学习(十) 前端处理之 list 处理,希望对大家解决编程问题提供一定的参考价值,需要的开发者们随着小编来一起学习吧!
本篇参看:https://developer.mozilla.org/zh-CN/docs/Web/JavaScript/Reference/Global_Objects/Array
list是我们经常要处理的内容,lwc前端针对list主要有几个函数处理,不同函数针对不同场景有不同的功能。下面就根据几个常用的处理list的方法进行简单的介绍。
一. forEach
我们针对list处理经常需要迭代去处理,通常可能用到for(var index = 0;index < sampleList.length; index++)这种方式,其实我们可以直接通过forEach函数去搞定,功能以及操作和上述方式相同。有几个参数可供选择。
/*
(method) Array<number>.forEach(callbackfn: (value: number, index: number, array: number[]) => void, thisArg?: any): void
Performs the specified action for each element in an array.
@param callbackfn — A function that accepts up to three arguments. forEach calls the callbackfn function one time for each element in the array.
@param thisArg — An object to which the this keyword can refer in the callbackfn function. If thisArg is omitted, undefined is used as the this value.
*/
下面通过一个demo来进行了解。
forEachSample.html:展示几个输入框,点击cancel以后会将所有的字段输入内容清空。
<template><lightning-record-edit-form record-id={recordId}object-api-name="Contact"><lightning-messages></lightning-messages><lightning-input-field field-name="FirstName"></lightning-input-field><lightning-input-field field-name="LastName"></lightning-input-field><lightning-input-field field-name="Email"></lightning-input-field> <lightning-input-field field-name="Phone"></lightning-input-field> <div class="slds-align_absolute-center slds-p-around_medium"><lightning-button class="slds-m-around_xx-small" label="Cancel" onclick={handleReset}></lightning-button><lightning-button class="slds-m-around_xx-small" label="Create Contact" type="submit" variant="brand" ></lightning-button></div></lightning-record-edit-form>
</template>
forEachSample.js:handleReset方法首先先获取到所有的lightning-inut-field然后使用forEach,这里只用了field,不需要用index,然后 =>方式 {}括起来去进行处理,reset是lightning-input-field的封装的方法,感兴趣的可以自行查看,lightning-input & lightning-input-field有很多好用的方法,后期有机会可以单独抽出来一篇博客讲解。
import { LightningElement,api } from 'lwc';export default class ForEachSample extends LightningElement {@api recordId;handleReset(event) {const inputFields = this.template.querySelectorAll('lightning-input-field');if (inputFields) {inputFields.forEach(field => {field.reset();});}}
}
二. find & findIndex
find和findIndex在lwc中针对list处理会经常用到,用于列表针对某一个条件去查找匹配的数据,匹配上则返回第一条匹配的数据然后终止遍历,如果没有匹配值则返回undefined, findIndex用于列表针对某一个条件去查找匹配的数据,匹配上返回第一条匹配的数据的下标然后终止遍历,下标从0开始,如果没有匹配则返回-1.我们可以根据find / findIndex来做那种选择列表中选择指定一条以后显示那条的数据信息或者获取那条数据详细信息,根据ID作为条件的遍历。demo找的是官方的一个功能,代码如下:
ContactController.cls:简单的获取list的列表数据
public with sharing class ContactController {@AuraEnabled(cacheable=true)public static List<Contact> getContactList() {return [SELECT Id, Name, Title, Phone, Email FROM Contact LIMIT 10];}
}
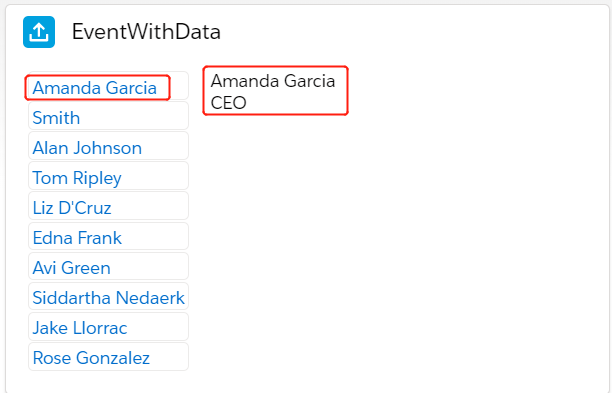
eventWithData.html:上面是一个list,点击以后触发事件获取到指定的那条数据然后展示在另一个区域
<template><lightning-card title="EventWithData" icon-name="standard:logging"><template if:true={contacts.data}><lightning-layout class="slds-m-around_medium"><lightning-layout-item><template for:each={contacts.data} for:item="contact"><c-contact-list-itemkey={contact.Id}contact={contact}onselect={handleSelect}></c-contact-list-item></template></lightning-layout-item><lightning-layout-item class="slds-m-left_medium"><template if:true={selectedContact}><p>{selectedContact.Name}</p><p>{selectedContact.Title}</p><p><lightning-formatted-phonevalue={selectedContact.Phone}></lightning-formatted-phone></p><p><lightning-formatted-emailvalue={selectedContact.Email}></lightning-formatted-email></p></template></lightning-layout-item></lightning-layout></template></lightning-card>
</template>
eventWithData.js: 在handleSelect中,使用find根据ID去进行匹配,匹配后便会获取到list中的指定的那条数据记录。下面的console中也弄了一个findIndex的写法。
/* eslint-disable no-console */
import { LightningElement, wire, track } from 'lwc';
import getContactList from '@salesforce/apex/ContactController.getContactList';export default class EventWithData extends LightningElement {@track selectedContact;@wire(getContactList) contacts;handleSelect(event) {const contactId = event.detail;/*** find方法定义如下: find(predicate: (this: void, value: number, index: number, obj: number[]) => value is number, thisArg?: any)* array.find方法用于通过某个指定的条件去获取满足条件的第一个的数据,找到满足条件的以后,后面的便不会在执行,如果遍历没有找到符合的则返回undefined.* 此函数不影响原有的array*/this.selectedContact = this.contacts.data.find(contact => contact.Id === contactId);let datalist = [10,1,13,14];let result1 = datalist.findIndex(data => data > 20);console.log(result1);}
}
结果展示:
三. some & every
我们有时候会有需求为判断当前的列表的内容是否满足某些条件,有一个满足内容则返回true,都不满足返回false;或者是全部满足返回true,有一个不满足就返回false。这个时候就要用到some & every了。 some用于列表的内容只要有一个item满足了条件则返回true,every为所有的都满足才返回true,这两个返回类型为布尔类型,不影响原有的list的值。在for循环中使用和在函数中使用写法可能多少有点区别,下面给一个demo用来展示写法。需求为我们将account表中的test__c(multi picklist)展示成列表样式来判断某个item是否选中,代码如下:
someEverySample.html:列表展示multi picklist的样式
<template><table class="slds-table slds-table_cell-buffer slds-table_bordered"><thead><tr class="slds-line-height_reset"><td>组件名称</td><template if:true={resultList}><template for:each={resultList} for:item="result"><th class="" scope="col" key={result.label}><div class="slds-truncate">{result.label}</div></th></template></template></tr></thead><tbody><tr><td>是否选中</td><template if:true={resultList}><template for:each={resultList} for:item="result"><td key={result.label}>{result.isSelected}</td></template></template></tr></tbody></table>
</template>
someEverySample.js: result list中有针对some / every的demo以及写法,在函数内写法和在for循环中写法多少有点区别,因为for循环里面写有一些限制。
/* eslint-disable no-console */
import { LightningElement,api,wire } from 'lwc';
import { getRecord,getFieldValue } from 'lightning/uiRecordApi';
import ACCOUNT_TEST_FIELD from '@salesforce/schema/Account.test__c';
import { getObjectInfo } from 'lightning/uiObjectInfoApi';
import ACCOUNT_OBJECT from '@salesforce/schema/Account';
import {getPicklistValues} from 'lightning/uiObjectInfoApi';export default class SomeEverySample extends LightningElement {@api recordId;@wire(getRecord,{recordId:'$recordId',fields:ACCOUNT_TEST_FIELD})wiredAccount;@wire(getObjectInfo, { objectApiName: ACCOUNT_OBJECT })accountInfo;@wire(getPicklistValues,{ recordTypeId: '$accountInfo.data.defaultRecordTypeId', fieldApiName: ACCOUNT_TEST_FIELD })testList;get resultList() {if(this.wiredAccount && this.wiredAccount.data && this.testList && this.testList.data && this.testList.data.values) {let testFieldValueStr = getFieldValue(this.wiredAccount.data,ACCOUNT_TEST_FIELD);let selectedTestValues = testFieldValueStr != null ? testFieldValueStr.split(';') : [];let testValues = this.testList.data.values;let results = [];let res = results.some((item,index) => item > 10 && index > 0);let resEvery = results.every((item,index) => item > 10 && index > 0);console.log(res);console.log(resEvery);for(let index in testValues) {if(selectedTestValues.some(function(item,itemIndex) {console.log(itemIndex);return item === testValues[index].value;}, this)) {results.push({'label':testValues[index].label,'isSelected':true});} else {results.push({'label':testValues[index].label,'isSelected':false});}}return results;}return [];}}
效果展示:123/1234等值为我们Test__c表里面的picklist values,true/false为我们在这条数据中是否选择了相关的item。

四. reduce
reduce用来接收一个函数作为累加器(accumulator),数组中的每个值(从左到右)开始合并,最终为一个值.所以我们使用reduce对列表处理最终会返回一个值,要么是布尔,要么是number等。reduce常用场景也可以查看篇中最上面的链接去详细查看。
/*
(method) Array<any>.reduce(callbackfn: (previousValue: any, currentValue: any, currentIndex: number, array: any[]) => any, initialValue: any): any (+2 overloads)Calls the specified callback function for all the elements in an array. The return value of the callback function is the accumulated result, and is provided as an argument in the next call to the callback function. Calls the specified callback function for all the elements in an array. The return value of the callback function is the accumulated result, and is provided as an argument in the next call to the callback function.@param callbackfn — A function that accepts up to four arguments. The reduce method calls the callbackfn function one time for each element in the array.@param initialValue — If initialValue is specified, it is used as the initial value to start the accumulation. The first call to the callbackfn function provides this value as an argument instead of an array value.*/
我们对reduce有一个了解以后弄一个常用的demo来更好的消化。
reduceSample.html:展示多个输入框,点击button去触发一个事件处理
<template><lightning-card title="LdsUpdateRecord" icon-name="standard:record"><div class="slds-m-around_medium"><template if:true={contact.data}><lightning-input label="Id" disabled value={contact.data.Id}></lightning-input><lightning-input label="First Name" value={contact.data.FirstName} data-field="FirstName" onchange={handleChange} class="slds-m-bottom_x-small"></lightning-input><lightning-input label="Last Name" value={contact.data.LastName} data-field="LastName" onchange={handleChange} class="slds-m-bottom_x-small" required></lightning-input><lightning-button label="Update Contact" variant="brand" onclick={updateContact} disabled={disabled}></lightning-button></template><template if:true={contact.error}><!-- handle Apex error --></template></div></lightning-card>
</template>
reduceSample.js:demo中是对lightning-input进行遍历,如果有没有满足check的,则报错,然后执行报错的提示信息,只有所有的都不报错了以后才执行validation 通过的逻辑。reportValidity以及checkValidity是lightning针对Input常用的很好的自带的方法,后期可能对Lightning input进行单独的博客讲解,感兴趣的可以自行查看这两个方法。我们通过reduce方法最后只返回一个true/false的值。
import { LightningElement, track, wire } from 'lwc';
import { ShowToastEvent } from 'lightning/platformShowToastEvent';import getSingleContact from '@salesforce/apex/ContactController.getSingleContact';export default class ReduceSample extends LightningElement {@track disabled = false;@track error;@wire(getSingleContact)contact;handleChange(event) {// Display field-level errors and disable button if a name field is empty.if (!event.target.value) {event.target.reportValidity();this.disabled = true;}else {this.disabled = false;}}updateContact() {let allInputList = Array.from(this.template.querySelectorAll('lightning-input'));/*方法声明如下:(method) Array<any>.reduce(callbackfn: (previousValue: any, currentValue: any, currentIndex: number, array: any[]) => any, initialValue: any): any (+2 overloads)Calls the specified callback function for all the elements in an array. The return value of the callback function is the accumulated result, and is provided as an argument in the next call to the callback function. Calls the specified callback function for all the elements in an array. The return value of the callback function is the accumulated result, and is provided as an argument in the next call to the callback function.@param callbackfn — A function that accepts up to four arguments. The reduce method calls the callbackfn function one time for each element in the array.@param initialValue — If initialValue is specified, it is used as the initial value to start the accumulation. The first call to the callbackfn function provides this value as an argument instead of an array value.*/const allValid = allInputList.reduce((validSoFar, inputFields) => {inputFields.reportValidity();return validSoFar && inputFields.checkValidity();}, true);if (allValid) {//TODO success related operation} else {// The form is not validthis.dispatchEvent(new ShowToastEvent({title: 'Something is wrong',message: 'Check your input and try again.',variant: 'error'}));}}
}
五. map & filter
map用来返回一个新数组,不影响原有的操作的list。这个新数组可以为这个list的每条数据针对某个条件处理以后的值,比如我们想要将一个list的里面的每一个值都乘以5然后返回一个新的数组,这个时候我们就可以使用map,只需要条件为对item * 5的操作即可。
filter用来使用指定的函数测试所有元素,并返回一个包含所有通过测试的元素的新数组,此方法不影响原有的list。
这两个基础的意思了解以后,来个demo更好的了解一下。
mapSample.html
<template><lightning-input label="Category 1" type="checkbox" onchange={handleCheckboxChange}></lightning-input><lightning-input label="Category 2" type="checkbox" onchange={handleCheckboxChange}></lightning-input>
</template>
mapSample.js: 点击checkbox以后获取选中的选项的label名称,通过filter获取到指定的想要数据,通过map获取到list的变形,及我们根据规则获取到的想要的数据。
/* eslint-disable no-console */
import { LightningElement } from 'lwc';export default class MapSample extends LightningElement {handleCheckboxChange() {const lightningInputList = Array.from(this.template.querySelectorAll('lightning-input'));console.log(JSON.stringify(lightningInputList));const filters =  lightningInputList.filter(element => element.checked).map(element => element.label);console.log(JSON.stringify(filters));}
}
总结:篇中都是lwc中针对list的常用的前端的使用方法,除了上述的方法以外还有其他的很多方法没有列出,小伙伴们自行查看。篇中有错误的地方欢迎指出,有不懂的欢迎留言。
这篇关于Salesforce LWC学习(十) 前端处理之 list 处理的文章就介绍到这儿,希望我们推荐的文章对编程师们有所帮助!


