本文主要是介绍CoordinatorLayout.Behavior,希望对大家解决编程问题提供一定的参考价值,需要的开发者们随着小编来一起学习吧!
CoordinatorLayout我们可以将它理解为一个超级Fragment,它的布局方式是一层一层叠上去,而且它可以组织子View之间的协作。组织协作的方式需要使用最重要的对象Behavior
Behavior是CoordinatorLayout实现子View之间交互的插件,它可以实现用户的一个或多个交互行为,它们可能包括拖拽、滑动、或者其他一些手势。
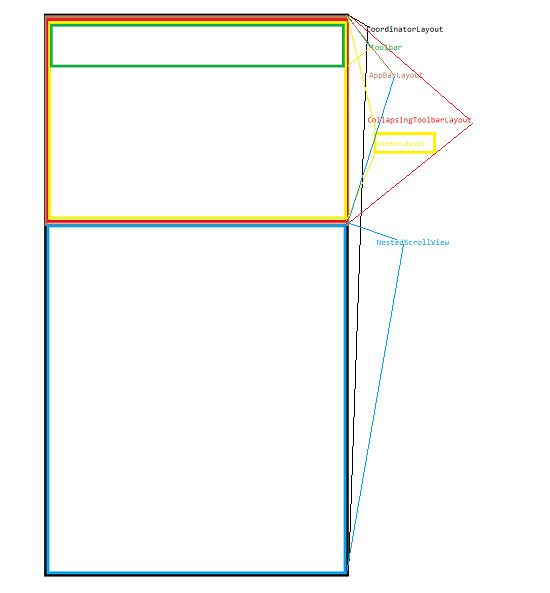
我们在使用CoordinatorLayout的时候,在NestedScrollView的xml属性中总是能看到app:layout_behavior="@string/appbar_scrolling_view_behavior"。NestedScrollView要想与AppBarLayout有联动,那么NestedScrollView作为直接的子View,就必须设置这个behavior,当然这个behavior谷歌已经给默认设置好了。
常用的方法(暂不介绍嵌套滑动)
1 . onLayoutChild可以用于子View视图布局的更改,修改behavior默认设置子View的行为。需要调用parent.onLayoutChild
/**** @param parent CoordinatorLayout* @param child 子View* @param layoutDirection ViewCompat.LAYOUT_DIRECTION_LTR(水平布局从左到右)* ViewCompat.LAYOUT_DIRECTION_RTL(水平布局从右到左)* @return false表示不改变,true改变View的视图*/@Overridepublic boolean onLayoutChild(CoordinatorLayout parent, ImageView child, int layoutDirection) {return super.onLayoutChild(parent, child, layoutDirection);}
2 . layoutDependsOn View的依赖关系在这里设置
/*** 表示是否给应用Behavior的View指定一个依赖的布局,一般当依赖的View布局发生变化时* 不管被被依赖View的顺序怎样,被依赖的View也会重新布局* @param parent CoordinatorLayout * @param child 绑定behavior 的View* @param dependency 依赖的view* @return 如果child是依赖的指定的View 返回true,否则返回false*/@Overridepublic boolean layoutDependsOn(CoordinatorLayout parent, View child, View dependency) {return super.layoutDependsOn(parent, child, dependency);}
3 . onDependentViewChanged
/*** 当依赖的视图状态位置、大小发生变化时,就会调用这个方法* @param parent* @param child* @param dependency* @return*/@Overridepublic boolean onDependentViewChanged(CoordinatorLayout parent, View child, View dependency) {return super.onDependentViewChanged(parent, child, dependency);}只是介绍这几个方法,可能我们还不太清楚,所以直接做几个练习,就能看到效果了。
我这里不准备做练习了,练习可以自己试,我这里要简单说一说源码里面这几个方法怎么调用的(我的水平只能简单说一说/(ㄒoㄒ)/~~)
我们一般会在XML中直接定义Behavior,我们在代码中来看看这个Behavior是怎么解析的。
LayoutParams(Context context, AttributeSet attrs) {super(context, attrs);...省略代码final TypedArray a = context.obtainStyledAttributes(attrs,R.styleable.CoordinatorLayout_LayoutParams);...省略代码//通过检测app:behavior="xxx",获取路径。所以在定义behavior的时候,一定要写有//两个参数的构造方法mBehaviorResolved = a.hasValue(R.styleable.CoordinatorLayout_LayoutParams_layout_behavior);if (mBehaviorResolved) {mBehavior = parseBehavior(context, attrs, a.getString(R.styleable.CoordinatorLayout_LayoutParams_layout_behavior));}a.recycle();
}static Behavior parseBehavior(Context context, AttributeSet attrs, String name) {if (TextUtils.isEmpty(name)) {return null;}final String fullName;if (name.startsWith(".")) {//相对路径fullName = context.getPackageName() + name;} else if (name.indexOf('.') >= 0) {//全限定名fullName = name;} else {// Assume stock behavior in this package (if we have one)fullName = !TextUtils.isEmpty(WIDGET_PACKAGE_NAME)? (WIDGET_PACKAGE_NAME + '.' + name): name;}try {Map<String, Constructor<Behavior>> constructors = sConstructors.get();if (constructors == null) {constructors = new HashMap<>();sConstructors.set(constructors);}Constructor<Behavior> c = constructors.get(fullName);//通过反射来新建实例if (c == null) {final Class<Behavior> clazz = (Class<Behavior>) Class.forName(fullName, true,context.getClassLoader());c = clazz.getConstructor(CONSTRUCTOR_PARAMS);c.setAccessible(true);constructors.put(fullName, c);}return c.newInstance(context, attrs);} catch (Exception e) {throw new RuntimeException("Could not inflate Behavior subclass " + fullName, e);}
}
在xml里面写的话,是在inflate的时候对Behavior赋值的
以注解方式写的话,是在onMeasure内赋值的。(后面会说为什么)
为View配置了Behavior,那么我们接着来看View之间是怎么依赖的。首先在LayoutParams中有关依赖的代码如下:
boolean dependsOn(CoordinatorLayout parent, View child, View dependency) {return dependency == mAnchorDirectChild|| (mBehavior != null && mBehavior.layoutDependsOn(parent, child, dependency));
}
返回两种结果,满足一种就是依赖的关系。一种是设置anchor ,另一种就是View的Behavior对另一个View有依赖。
如何处理这种依赖关系呢?既然Behavior能够监测另一个View的变化状况,那么肯定会有重新测量等操作。所以我们来看下面的代码
@Overrideprotected void onMeasure(int widthMeasureSpec, int heightMeasureSpec) {prepareChildren();ensurePreDrawListener();...省略代码}点进去prepareChildren();方法,看看里面写了什么…
private final List<View> mDependencySortedChildren = new ArrayList<View>();//根据依赖关系对child进行排序private void prepareChildren() {mDependencySortedChildren.clear();for (int i = 0, count = getChildCount(); i < count; i++) {final View child = getChildAt(i);final LayoutParams lp = getResolvedLayoutParams(child);lp.findAnchorView(this, child);mDependencySortedChildren.add(child);}//排序,按依赖关系排序,被依赖的View排在前面,保证被依赖的View先被测量绘制selectionSort(mDependencySortedChildren, mLayoutDependencyComparator);}
可以看到mDependencySortedChildren这个集合按照依赖关系将View存储了起来,至于为什么要排序,这个有性能上的考虑。getResolvedLayoutParams(child)这里有判断和解析注解的:
LayoutParams getResolvedLayoutParams(View child) {final LayoutParams result = (LayoutParams) child.getLayoutParams();//XML中如果定义了Behavior,那么result.mBehaviorResolved = true;if (!result.mBehaviorResolved) {Class<?> childClass = child.getClass();DefaultBehavior defaultBehavior = null;while (childClass != null &&(defaultBehavior = childClass.getAnnotation(DefaultBehavior.class)) == null) {childClass = childClass.getSuperclass();}if (defaultBehavior != null) {try {result.setBehavior(defaultBehavior.value().newInstance());} catch (Exception e) {Log.e(TAG, "Default behavior class " + defaultBehavior.value().getName() +" could not be instantiated. Did you forget a default constructor?", e);}}result.mBehaviorResolved = true;}return result;}依赖的集合也有了,那么接下来,就要添加各种监听了,监听绘制过程,监听View的层级变化了,所以在ensurePreDrawListener方法中先判断是否存在依赖关系,如果存在,直接注册相关的监听。
//添加或者删除绘制前的监听器 void ensurePreDrawListener() {boolean hasDependencies = false;final int childCount = getChildCount();//判断下CoordinatorLayout的子view是否存在依赖关系//如果存在的话就hasDependencies为truefor (int i = 0; i < childCount; i++) {final View child = getChildAt(i);if (hasDependencies(child)) {hasDependencies = true;break;}}if (hasDependencies != mNeedsPreDrawListener) {if (hasDependencies) {addPreDrawListener();} else {removePreDrawListener();}}}...省略代码void addPreDrawListener() {if (mIsAttachedToWindow) {// Add the listenerif (mOnPreDrawListener == null) {mOnPreDrawListener = new OnPreDrawListener();}final ViewTreeObserver vto = getViewTreeObserver();//在重绘之前,我们在onPreDraw里调用了dispatchOnDependentViewChanged方法vto.addOnPreDrawListener(mOnPreDrawListener);}// Record that we need the listener regardless of whether or not we're attached.// We'll add the real listener when we become attached.mNeedsPreDrawListener = true;}...省略代码class OnPreDrawListener implements ViewTreeObserver.OnPreDrawListener {@Overridepublic boolean onPreDraw() {dispatchOnDependentViewChanged(false);return true;}}ViewTreeObserver 是用来注册一个观察者来监听视图树,当视图树的布局、焦点、绘制、滚动等发生改变时,ViewTreeObserver都会收到通知。ViewTreeObserver不能被实例化,可以调用View.getViewTreeObserver()来获得。
dispatchOnDependentViewChanged方法是核心的方法,它会遍历根据依赖关系排序好的子View集合,找到位置改变了的View,或者有锚定目标的View,并回调依赖这个View的Behavior的onDependentViewChanged方法
void dispatchOnDependentViewChanged(final boolean fromNestedScroll) {final int layoutDirection = ViewCompat.getLayoutDirection(this);final int childCount = mDependencySortedChildren.size();for (int i = 0; i < childCount; i++) {final View child = mDependencySortedChildren.get(i);final LayoutParams lp = (LayoutParams) child.getLayoutParams();// 检查View设置了Anchor,然后处理for (int j = 0; j < i; j++) {final View checkChild = mDependencySortedChildren.get(j);if (lp.mAnchorDirectChild == checkChild) {//调整child,让孩子到正确的锚视图位置offsetChildToAnchor(child, layoutDirection);}}// Did it change? if not continuefinal Rect oldRect = mTempRect1;final Rect newRect = mTempRect2;getLastChildRect(child, oldRect);getChildRect(child, true, newRect);//比较前后两次的位置信息if (oldRect.equals(newRect)) {continue;}//记录newRect到LayoutParams里recordLastChildRect(child, newRect);// 找到依赖当前View的Behavior来进行回调for (int j = i + 1; j < childCount; j++) {final View checkChild = mDependencySortedChildren.get(j);final LayoutParams checkLp = (LayoutParams) checkChild.getLayoutParams();final Behavior b = checkLp.getBehavior();if (b != null && b.layoutDependsOn(this, checkChild, child)) {if (!fromNestedScroll && checkLp.getChangedAfterNestedScroll()) {// If this is not from a nested scroll and we have already been changed// from a nested scroll, skip the dispatch and reset the flagcheckLp.resetChangedAfterNestedScroll();continue;}final boolean handled = b.onDependentViewChanged(this, checkChild, child);if (fromNestedScroll) {// If this is from a nested scroll, set the flag so that we may skip// any resulting onPreDraw dispatch (if needed)checkLp.setChangedAfterNestedScroll(handled);}}}}}监听提供依赖的View的添加和移除,HierarchyChangeListener在View的添加和移除都会回调
private class HierarchyChangeListener implements OnHierarchyChangeListener {...@Overridepublic void onChildViewRemoved(View parent, View child) {dispatchDependentViewRemoved(child);...}
}
然后回调给Behavior#onDependentViewRemoved
void dispatchDependentViewRemoved(View view) {final int childCount = mDependencySortedChildren.size();boolean viewSeen = false;for (int i = 0; i < childCount; i++) {final View child = mDependencySortedChildren.get(i);if (child == view) {// 判断后续位置的View是否依赖当前View并回调viewSeen = true;continue;}if (viewSeen) {CoordinatorLayout.LayoutParams lp = (CoordinatorLayout.LayoutParams)child.getLayoutParams();CoordinatorLayout.Behavior b = lp.getBehavior();if (b != null && lp.dependsOn(this, child, view)) {b.onDependentViewRemoved(this, child, view);}}}
}
这样Behavior中关于依赖的关系就是这个样子了。
下面我们写一个简单的demo来测试一下,上面的方法。简单暴力,直接贴代码,也没有什么好讲的。
- XML
<android.support.design.widget.CoordinatorLayout xmlns:android="http://schemas.android.com/apk/res/android"xmlns:app="http://schemas.android.com/apk/res-auto"xmlns:tools="http://schemas.android.com/tools"android:layout_width="match_parent"android:layout_height="match_parent"tools:ignore="RtlHardcoded"><android.support.design.widget.AppBarLayout
        android:id="@+id/main.appbar"android:layout_width="match_parent"android:layout_height="wrap_content"android:theme="@style/ThemeOverlay.AppCompat.Dark.ActionBar"><android.support.design.widget.CollapsingToolbarLayout
            android:id="@+id/main.collapsing"android:layout_width="match_parent"android:layout_height="wrap_content"app:layout_scrollFlags="scroll|exitUntilCollapsed|snap"><ImageView
                android:id="@+id/main.imageview.placeholder"android:layout_width="match_parent"android:layout_height="300dp"android:scaleType="fitXY"android:src="@drawable/huo"android:tint="#11000000"app:layout_collapseMode="parallax"app:layout_collapseParallaxMultiplier="0.9"android:contentDescription=""tools:ignore="ContentDescription" /><FrameLayout
                android:id="@+id/main.framelayout.title"android:layout_width="match_parent"android:layout_height="100dp"android:layout_gravity="bottom|center_horizontal"android:background="@color/primary"android:orientation="vertical"app:layout_collapseMode="parallax"app:layout_collapseParallaxMultiplier="0.3"><LinearLayout
                    android:id="@+id/main.linearlayout.title"android:layout_width="wrap_content"android:layout_height="wrap_content"android:layout_gravity="center"android:orientation="vertical"tools:ignore="UselessParent"><TextView
                        android:layout_width="wrap_content"android:layout_height="wrap_content"android:layout_gravity="center_horizontal"android:gravity="bottom|center"android:text="@string/quila_name"android:textColor="@android:color/white"android:textSize="30sp" /><TextView
                        android:layout_width="wrap_content"android:layout_height="wrap_content"android:layout_gravity="center_horizontal"android:layout_marginTop="4dp"android:text="@string/quila_tagline"android:textColor="@android:color/white" /></LinearLayout></FrameLayout></android.support.design.widget.CollapsingToolbarLayout></android.support.design.widget.AppBarLayout><android.support.v4.widget.NestedScrollView
        android:layout_width="match_parent"android:layout_height="match_parent"android:scrollbars="none"app:layout_behavior="@string/appbar_scrolling_view_behavior"><android.support.v7.widget.CardView
            android:layout_width="wrap_content"android:layout_height="wrap_content"android:layout_margin="8dp"app:cardElevation="8dp"app:contentPadding="16dp"><TextView
                android:layout_width="match_parent"android:layout_height="wrap_content"android:lineSpacingExtra="8dp"android:text="@string/lorem"android:textSize="18sp" /></android.support.v7.widget.CardView></android.support.v4.widget.NestedScrollView><android.support.v7.widget.Toolbar
        android:id="@+id/main.toolbar"android:layout_width="match_parent"android:layout_height="?attr/actionBarSize"android:background="@color/primary"app:layout_anchor="@id/main.framelayout.title"app:theme="@style/ThemeOverlay.AppCompat.Dark"app:title=""><RelativeLayout
            android:layout_width="match_parent"android:layout_height="match_parent"><TextView
                android:id="@+id/main.textview.title"android:layout_width="wrap_content"android:layout_centerInParent="true"android:layout_height="wrap_content"android:text="@string/quila_name2"android:textColor="@android:color/white"android:textSize="20sp" /></RelativeLayout></android.support.v7.widget.Toolbar><ImageView
        android:layout_width="@dimen/image_width"android:layout_height="@dimen/image_width"android:layout_gravity="center"app:layout_behavior="myapplication.ImageCameraBehavior"android:src="@drawable/ic_perm_camera_mic_black_48dp"/><ImageView
        android:layout_width="@dimen/image_width"android:layout_height="@dimen/image_width"android:layout_gravity="center"app:layout_behavior="myapplication.ImageHomeBehavior"android:src="@drawable/ic_home_black_48dp"/></android.support.design.widget.CoordinatorLayout>
这里请注意ToolBar设置了锚定于上面的FrameLayout
主要是让两个ImageView有交互,所以我找了两张图片。然后先设置ImageCameraBehavior
@SuppressWarnings("unused")
public class ImageCameraBehavior extends CoordinatorLayout.Behavior<ImageView> {private final static String TAG = "kim";private Context mContext;private int toolBarYPosition;private int currentImageX;private int finalYPosition = 150;private float changeBehaviorPoint;private float childX;private int imageHeight;public ImageCameraBehavior(Context context, AttributeSet attrs) {mContext = context;}@Overridepublic boolean layoutDependsOn(CoordinatorLayout parent, ImageView child, View dependency) {return dependency instanceof Toolbar;}@Overridepublic boolean onDependentViewChanged(CoordinatorLayout parent, ImageView child, View dependency) {InitProperties(child, dependency);final int maxScrollDistance = toolBarYPosition;//展开的百分比,初始是1.float expandedPercentageFactor = dependency.getY() / maxScrollDistance;if (expandedPercentageFactor < changeBehaviorPoint) {//折叠的百分比float heightFactor = (changeBehaviorPoint - expandedPercentageFactor) / changeBehaviorPoint;//这里直接设置150硬编码,为了方便,实际开发请从dimens中获取float distanceXToSubtract = ((currentImageX - 150) * heightFactor) + (child.getWidth() / 2);float distanceYToSubtract = (toolBarYPosition)* (1f - expandedPercentageFactor);float iX = currentImageX - distanceXToSubtract;float iY = toolBarYPosition - distanceYToSubtract;Log.e(TAG, "ix=" + iX + "iy=" + iY);child.setX(iX);child.setY(iY);float heightToSubtract = ((imageHeight - 200) * heightFactor);CoordinatorLayout.LayoutParams lp = (CoordinatorLayout.LayoutParams) child.getLayoutParams();lp.width = (int) (imageHeight - heightToSubtract);lp.height = (int) (imageHeight - heightToSubtract);child.setLayoutParams(lp);} else {float distanceYToSubtract = ((toolBarYPosition)* (1f - expandedPercentageFactor));child.setX(currentImageX);child.setY(toolBarYPosition - distanceYToSubtract);CoordinatorLayout.LayoutParams lp = (CoordinatorLayout.LayoutParams) child.getLayoutParams();lp.width = imageHeight;lp.height = imageHeight;child.setLayoutParams(lp);}return true;}//初始化需要用到的参数private void InitProperties(ImageView child, View dependency) {if (toolBarYPosition == 0)toolBarYPosition = (int) dependency.getY();
//        Log.e(TAG, "toolBarYPosition=" + toolBarYPosition);if (currentImageX == 0)currentImageX = (int) (child.getX() + child.getWidth());
//        Log.e(TAG, "currentImageX=" + currentImageX);if (finalYPosition == 0)finalYPosition = dependency.getHeight();//ToolBar高度
//        Log.e(TAG, "mFinalYPosition=" + finalYPosition);if (imageHeight == 0) {imageHeight = child.getHeight();}//设定一个阈值,滑动到设定的阈值范围之后,开始移动变化if (changeBehaviorPoint == 0)changeBehaviorPoint = child.getHeight() / (2f * (toolBarYPosition - finalYPosition));}}
代码比较好理解,就是一些移动与计算。另一个ImageView的Behavior也和这个差不多,就不贴了。而且这里面在计算上还有一些问题,没有时间去搞了。
那么看一眼效果图吧:

最近看到项目组的大佬们在重构代码,马上就要上线的项目,还要大改架构,真是不明白这是在干啥。之前用了1年半的时间,解决了将近4k个问题了,这样一搞,可能要重来一遍了。。。。。
幸亏和我没啥关系,大爷的。O(∩_∩)O
这篇关于CoordinatorLayout.Behavior的文章就介绍到这儿,希望我们推荐的文章对编程师们有所帮助!


