本文主要是介绍【小沐学Python】Python实现Web服务器(aiohttp),希望对大家解决编程问题提供一定的参考价值,需要的开发者们随着小编来一起学习吧!
文章目录
- 1、简介
- 2、下载和安装
- 3、代码测试
- 3.1 客户端
- 3.2 服务端
- 4、更多测试
- 4.1 asyncio
- 4.2 aiohttp+HTTP服务器
- 4.3 aiohttp+爬虫实例
- 4.4 aiohttp+requests比较
- 结语
1、简介
https://github.com/aio-libs/aiohttp
https://docs.aiohttp.org/en/stable/index.html
Asynchronous HTTP client/server framework for asyncio and Python
异步 http 客户端/服务器框架


主要特点:
- 支持 HTTP 协议的客户端和服务器端。
- 支持开箱即用的客户端和服务器 Web 套接字,并避免 回调地狱。
- 为 Web 服务器提供中间件和可插拔路由。
2、下载和安装
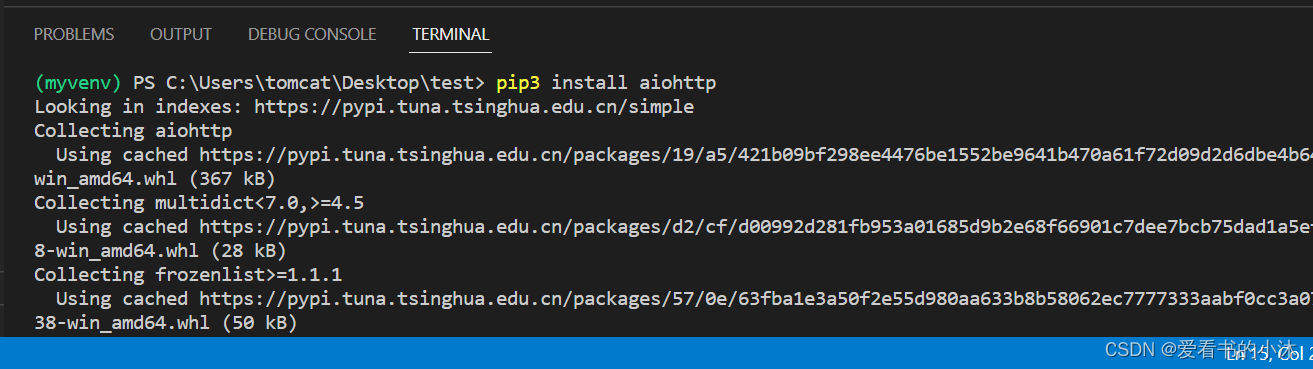
安装库:
pip3 install aiohttp
# pip install aiodns
# pip install aiohttp[speedups]
3、代码测试
3.1 客户端
- 客户端:要从网络上获取某些内容。
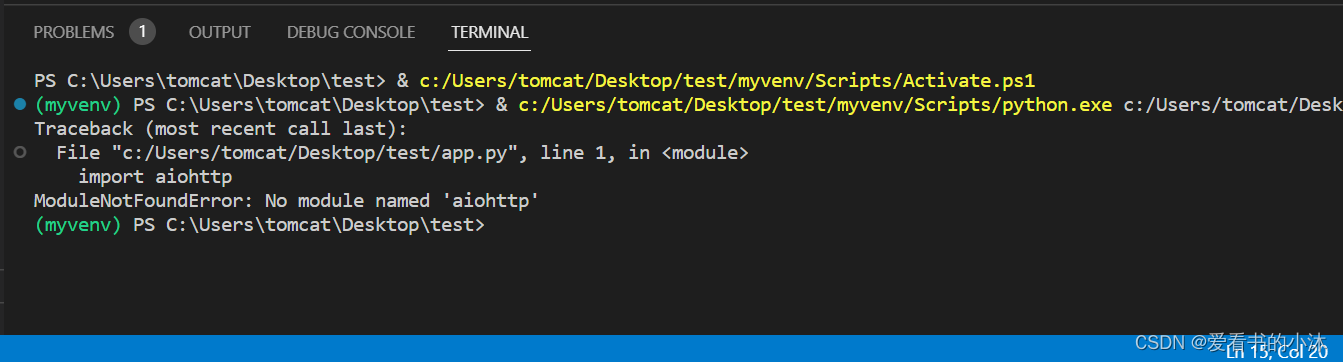
import aiohttp
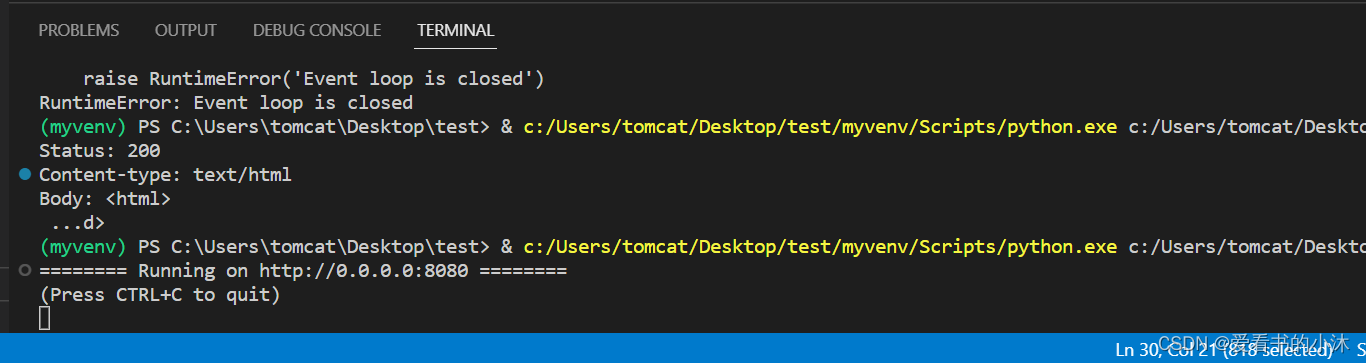
import asyncioasync def main():async with aiohttp.ClientSession() as session:async with session.get('https://www.baidu.com/') as response:print("Status:", response.status)print("Content-type:", response.headers['content-type'])html = await response.text()print("Body:", html[:15], "...")asyncio.run(main())
运行之后:
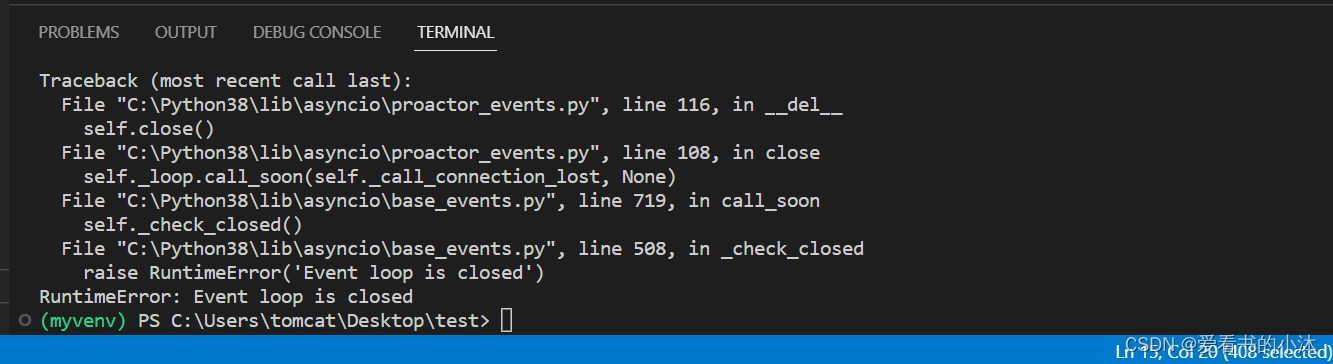
报错了。
修改代码如下:
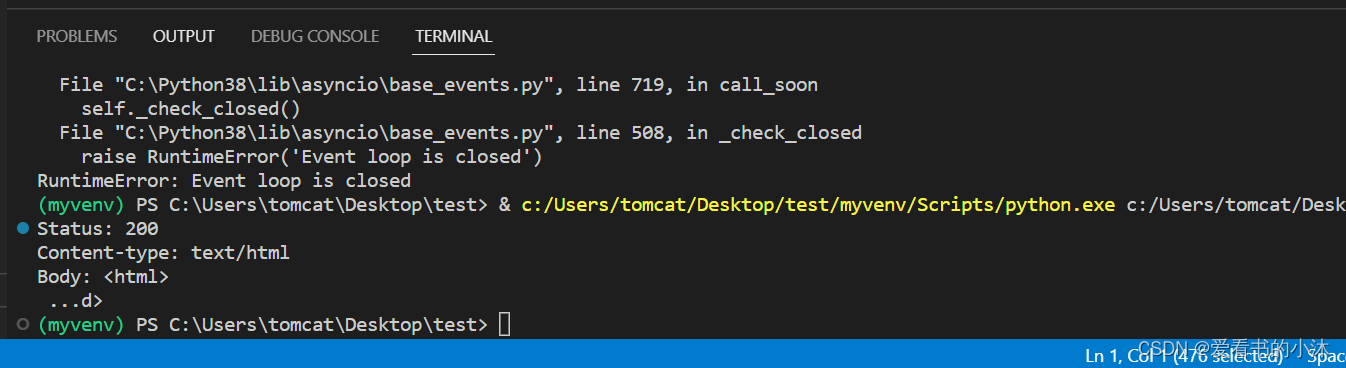
import aiohttp
import asyncioasync def main():async with aiohttp.ClientSession() as session:async with session.get('https://www.baidu.com/') as response:print("Status:", response.status)print("Content-type:", response.headers['content-type'])html = await response.text()print("Body:", html[:15], "...")# asyncio.run(main())
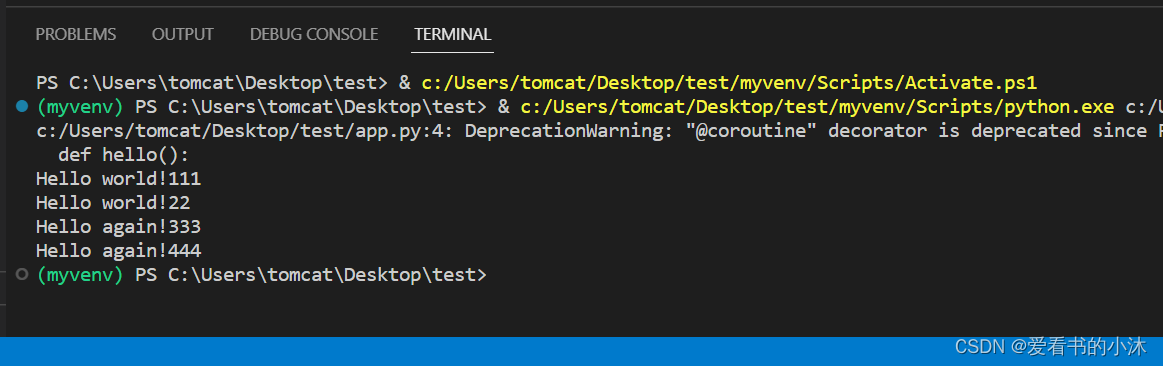
loop = asyncio.get_event_loop()
loop.run_until_complete(main())
再次运行之后,没有报错。
3.2 服务端
- 服务器:使用简单服务器的示例。
# examples/server_simple.py
from aiohttp import webasync def handle(request):name = request.match_info.get('name', "Anonymous")text = "Hello, " + namereturn web.Response(text=text)async def wshandle(request):ws = web.WebSocketResponse()await ws.prepare(request)async for msg in ws:if msg.type == web.WSMsgType.text:await ws.send_str("Hello, {}".format(msg.data))elif msg.type == web.WSMsgType.binary:await ws.send_bytes(msg.data)elif msg.type == web.WSMsgType.close:breakreturn wsapp = web.Application()
app.add_routes([web.get('/', handle),web.get('/echo', wshandle),web.get('/{name}', handle)])if __name__ == '__main__':web.run_app(app)
运行之后:
浏览器访问网址:
http://127.0.0.1:8080/


4、更多测试
4.1 asyncio
asyncio是Python 3.4版本引入的标准库,直接内置了对异步IO的支持。
asyncio的编程模型就是一个消息循环。我们从asyncio模块中直接获取一个EventLoop的引用,然后把需要执行的协程扔到EventLoop中执行,就实现了异步IO。
import asyncio@asyncio.coroutine
def hello():print("Hello world!111")print("Hello world!22")# 异步调用asyncio.sleep(1):r = yield from asyncio.sleep(1)print("Hello again!333")print("Hello again!444")# 获取EventLoop:
loop = asyncio.get_event_loop()
# 执行coroutine
loop.run_until_complete(hello())
loop.close()
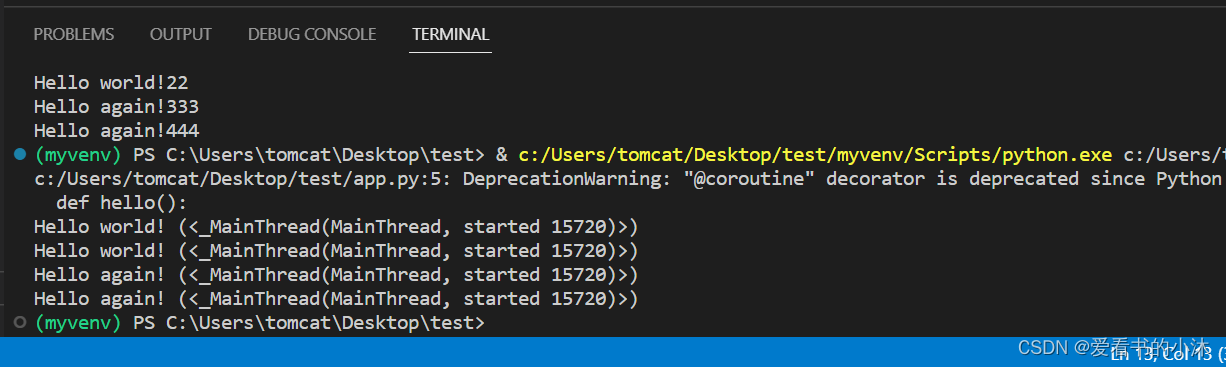
import threading
import asyncio@asyncio.coroutine
def hello():print('Hello world! (%s)' % threading.currentThread())yield from asyncio.sleep(1)print('Hello again! (%s)' % threading.currentThread())loop = asyncio.get_event_loop()
tasks = [hello(), hello()]
loop.run_until_complete(asyncio.wait(tasks))
loop.close()
import asyncio@asyncio.coroutine
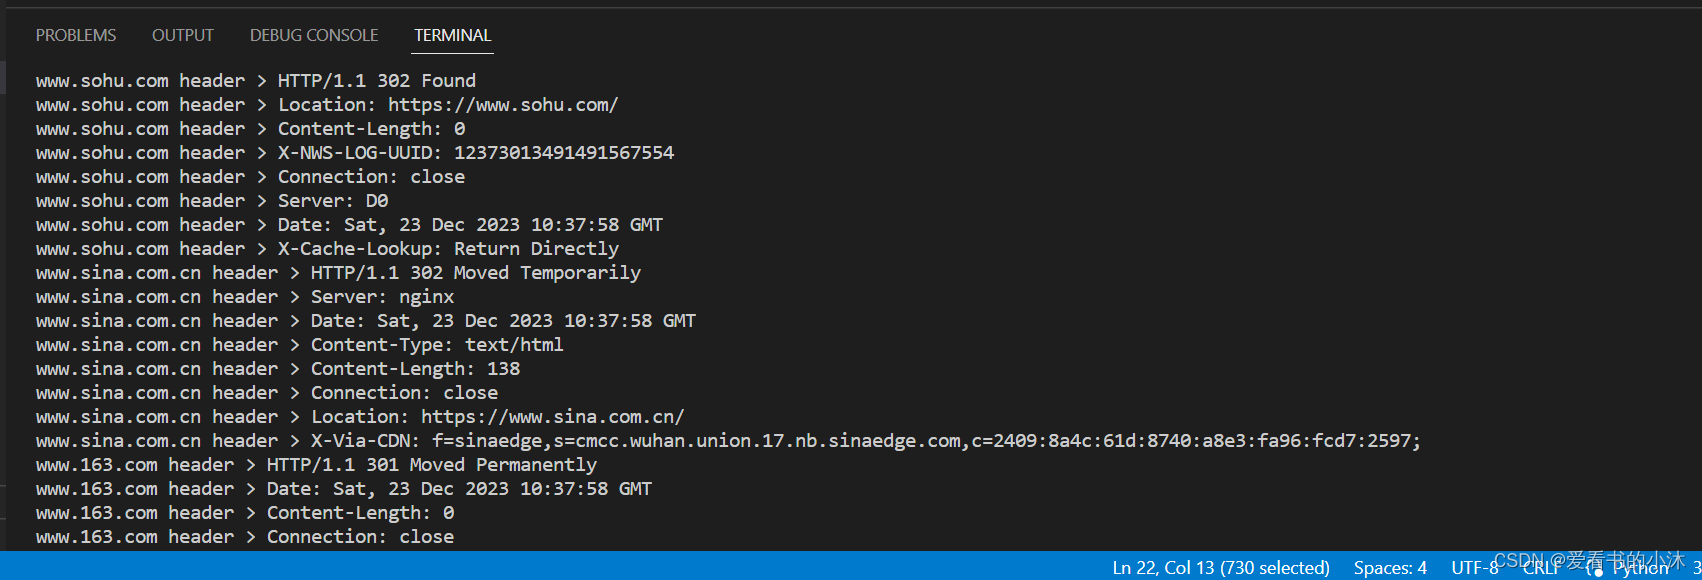
def wget(host):print('wget %s...' % host)connect = asyncio.open_connection(host, 80)reader, writer = yield from connectheader = 'GET / HTTP/1.0\r\nHost: %s\r\n\r\n' % hostwriter.write(header.encode('utf-8'))yield from writer.drain()while True:line = yield from reader.readline()if line == b'\r\n':breakprint('%s header > %s' % (host, line.decode('utf-8').rstrip()))# Ignore the body, close the socketwriter.close()loop = asyncio.get_event_loop()
tasks = [wget(host) for host in ['www.sina.com.cn', 'www.sohu.com', 'www.163.com']]
loop.run_until_complete(asyncio.wait(tasks))
loop.close()
asyncio提供了完善的异步IO支持;
异步操作需要在coroutine中通过yield from完成;
4.2 aiohttp+HTTP服务器
编写一个HTTP服务器:
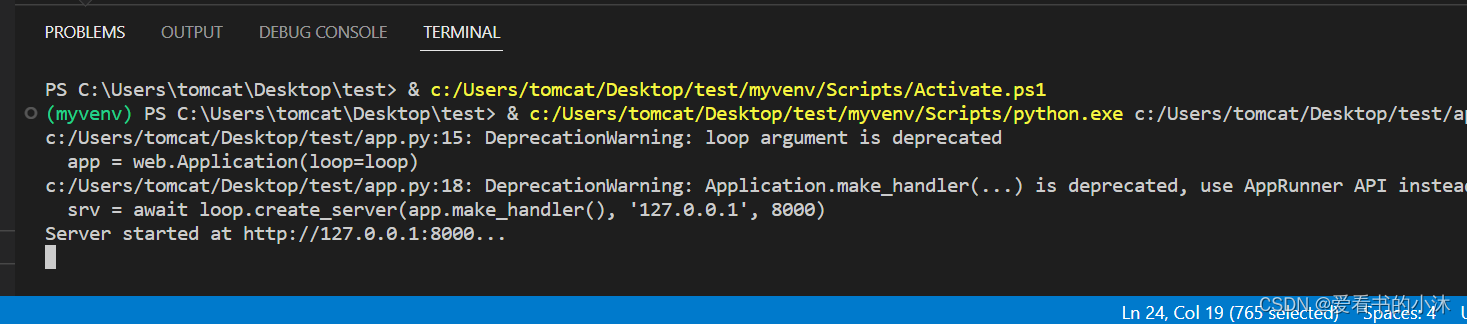
import asynciofrom aiohttp import webasync def index(request):await asyncio.sleep(0.5)return web.Response(text='<h1>Index</h1>', content_type= 'text/html')async def hello(request):await asyncio.sleep(0.5)text = '<h1>hello, %s!</h1>' % request.match_info['name']return web.Response(text=text, content_type= 'text/html')async def init(loop):app = web.Application(loop=loop)app.router.add_route('GET', '/', index)app.router.add_route('GET', '/hello/{name}', hello)srv = await loop.create_server(app.make_handler(), '127.0.0.1', 8000)print('Server started at http://127.0.0.1:8000...')return srvloop = asyncio.get_event_loop()
loop.run_until_complete(init(loop))
loop.run_forever()

4.3 aiohttp+爬虫实例
pip install bs4
编写一个爬虫实例:
import asyncio
import aiohttp
from bs4 import BeautifulSoup
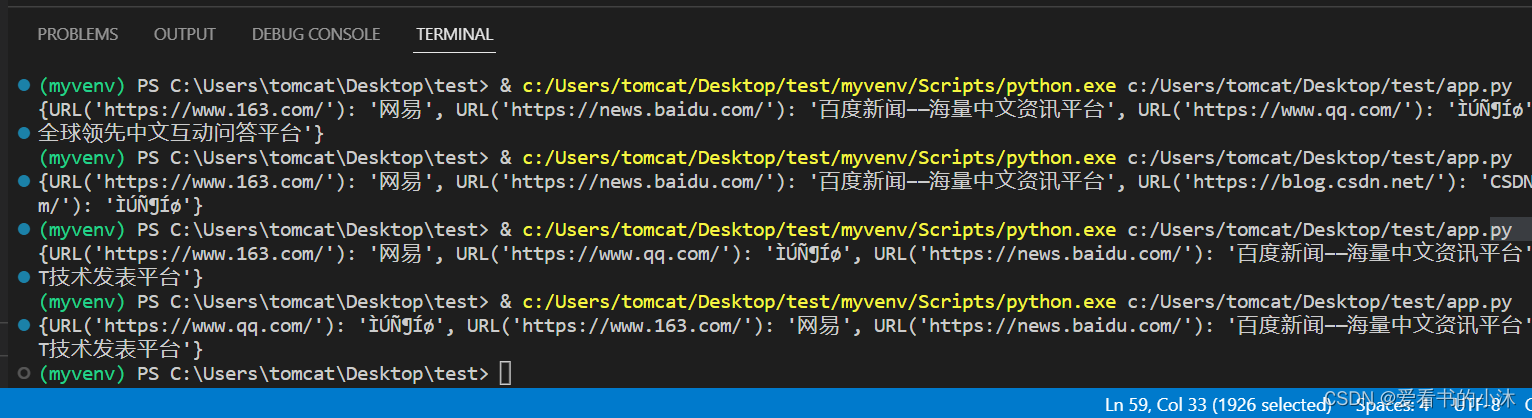
import loggingclass AsnycSpider(object):def __init__(self, url_list, max_threads):self.urls = url_listself.results = {}self.max_threads = max_threadsdef __parse_results(self, url, html):try:soup = BeautifulSoup(html, 'html.parser')title = soup.find('title').get_text()except Exception as e:raise eif title:self.results[url] = titleasync def get_body(self, url):async with aiohttp.ClientSession() as session:async with session.get(url, timeout=30) as response:assert response.status == 200html = await response.read()return response.url, htmlasync def get_results(self, url):url, html = await self.get_body(url)self.__parse_results(url, html)return 'Completed'async def handle_tasks(self, task_id, work_queue):while not work_queue.empty():current_url = await work_queue.get()try:task_status = await self.get_results(current_url)except Exception as e:logging.exception('Error for {}'.format(current_url), exc_info=True)def eventloop(self):q = asyncio.Queue()[q.put_nowait(url) for url in self.urls]loop = asyncio.get_event_loop()tasks = [self.handle_tasks(task_id, q, ) for task_id in range(self.max_threads)]loop.run_until_complete(asyncio.wait(tasks))# loop.close()if __name__ == '__main__':async_example = AsnycSpider(['https://www.qq.com/','https://www.163.com/','https://news.baidu.com/','https://blog.csdn.net/'], 5)async_example.eventloop()print(async_example.results)
4.4 aiohttp+requests比较
在 Python 众多的 HTTP 客户端中,有这几个:requests、aiohttp和httpx。在不借助其他第三方库的情况下,requests只能发送同步请求;aiohttp只能发送异步请求;httpx既能发送同步请求,又能发送异步请求。
pip install requests
- test_requests.py
import random
import time
import datetime
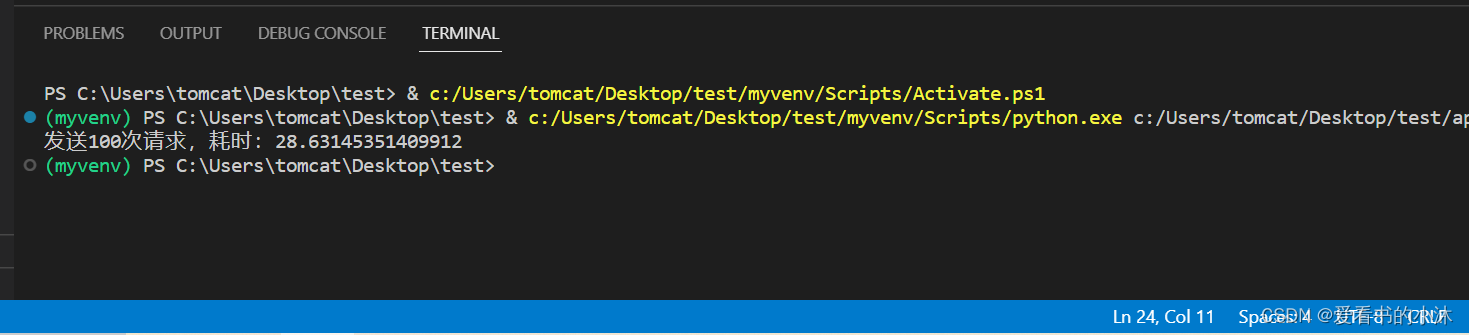
import requestsdef make_request(session):resp = session.get('http://httpbin.org/get')# result = resp.text# print(result)passdef main():session = requests.Session()start = time.time()for _ in range(100):make_request(session)end = time.time()print(f'发送100次请求,耗时:{end - start}')if __name__ == '__main__':main()
- test_aiohttp.py
import aiohttp
import random
import datetime
import asyncio
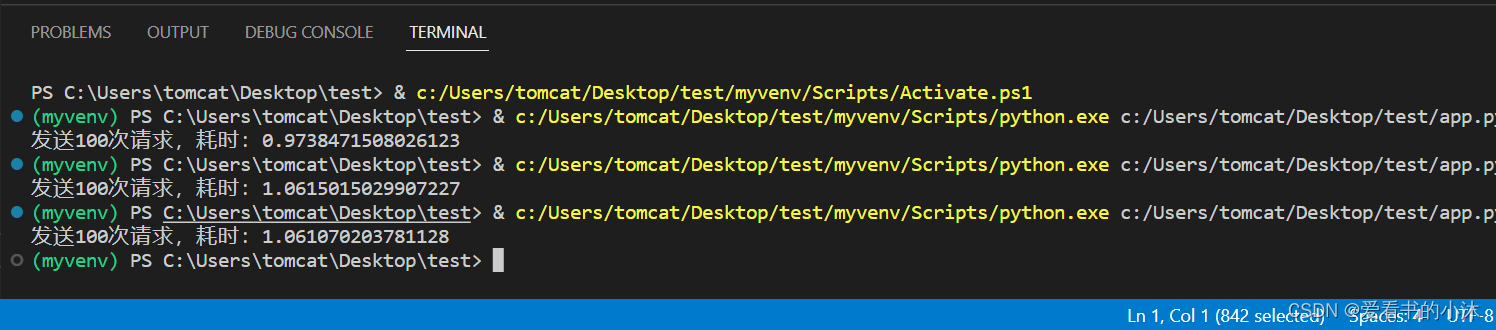
import timeasync def request(client):async with client.get('http://httpbin.org/get') as resp:# print(resp.status)# print(await resp.text())passasync def main():async with aiohttp.ClientSession() as client:start = time.time()task_list = []for _ in range(100):req = request(client)task = asyncio.create_task(req)task_list.append(task)await asyncio.gather(*task_list)end = time.time()print(f'发送100次请求,耗时:{end - start}')asyncio.run(main())
结语
如果您觉得该方法或代码有一点点用处,可以给作者点个赞,或打赏杯咖啡;╮( ̄▽ ̄)╭
如果您感觉方法或代码不咋地//(ㄒoㄒ)//,就在评论处留言,作者继续改进;o_O???
如果您需要相关功能的代码定制化开发,可以留言私信作者;(✿◡‿◡)
感谢各位大佬童鞋们的支持!( ´ ▽´ )ノ ( ´ ▽´)っ!!!
这篇关于【小沐学Python】Python实现Web服务器(aiohttp)的文章就介绍到这儿,希望我们推荐的文章对编程师们有所帮助!


