本文主要是介绍vue2使用 identify插件实现图片验证码,希望对大家解决编程问题提供一定的参考价值,需要的开发者们随着小编来一起学习吧!
identify是一款使用使用canvas来生成图形验证码的vue插件。
npm i identify --save
可以全局引入
import SIdentify from './components/page/identify'
Vue.use(SIdentify)
也可以局部引入,本文采用局部引入
下面是实现的代码:
子组件
<template><div class="s-canvas"><canvas id="s-canvas" :width="contentWidth" :height="contentHeight"></canvas></div>
</template>
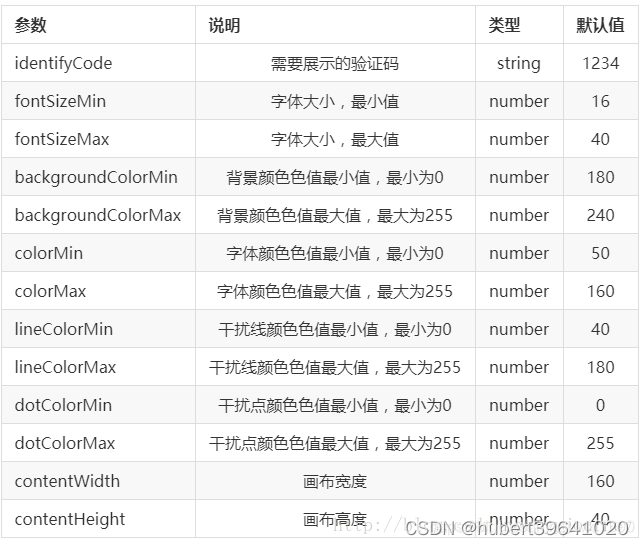
<script>export default {name: 'SIdentify',props: {identifyCode: {type: String,default: '1234'},fontSizeMin: {type: Number,default: 18},fontSizeMax: {type: Number,default: 40},backgroundColorMin: {type: Number,default: 180},backgroundColorMax: {type: Number,default: 240},colorMin: {type: Number,default: 50},colorMax: {type: Number,default: 160},lineColorMin: {type: Number,default: 40},lineColorMax: {type: Number,default: 180},dotColorMin: {type: Number,default: 0},dotColorMax: {type: Number,default: 255},contentWidth: {type: Number,default: 111},contentHeight: {type: Number,default: 38}},methods: {// 生成一个随机数randomNum(min, max) {return Math.floor(Math.random() * (max - min) + min)},// 生成一个随机的颜色randomColor(min, max) {let r = this.randomNum(min, max)let g = this.randomNum(min, max)let b = this.randomNum(min, max)return 'rgb(' + r + ',' + g + ',' + b + ')'},drawPic() {let canvas = document.getElementById('s-canvas')let ctx = canvas.getContext('2d')ctx.textBaseline = 'bottom'// 绘制背景ctx.fillStyle = this.randomColor(this.backgroundColorMin, this.backgroundColorMax)ctx.fillRect(0, 0, this.contentWidth, this.contentHeight)// 绘制文字for (let i = 0; i < this.identifyCode.length; i++) {this.drawText(ctx, this.identifyCode[i], i)}// this.drawLine(ctx) // 绘制干扰线// this.drawDot(ctx) // 绘制干扰点},// 绘制文本drawText(ctx, txt, i) {ctx.fillStyle = this.randomColor(this.colorMin, this.colorMax)ctx.font = this.randomNum(this.fontSizeMin, this.fontSizeMax) + 'px SimHei'let x = (i + 1) * (this.contentWidth / (this.identifyCode.length + 1))let y = this.randomNum(this.fontSizeMax, this.contentHeight - 5)var deg = this.randomNum(-30, 30) // 字符旋转角度(不超过45度比较好)// 修改坐标原点和旋转角度ctx.translate(x, y)ctx.rotate(deg * Math.PI / 180)ctx.fillText(txt, 0, 0)// 恢复坐标原点和旋转角度ctx.rotate(-deg * Math.PI / 180)ctx.translate(-x, -y)},drawLine(ctx) {// 绘制干扰线for (let i = 0; i < 8; i++) {ctx.strokeStyle = this.randomColor(this.lineColorMin, this.lineColorMax)ctx.beginPath()ctx.moveTo(this.randomNum(0, this.contentWidth), this.randomNum(0, this.contentHeight))ctx.lineTo(this.randomNum(0, this.contentWidth), this.randomNum(0, this.contentHeight))ctx.stroke()}},drawDot(ctx) {// 绘制干扰点for (let i = 0; i < 100; i++) {ctx.fillStyle = this.randomColor(0, 255)ctx.beginPath()ctx.arc(this.randomNum(0, this.contentWidth), this.randomNum(0, this.contentHeight), 1, 0, 2 * Math.PI)ctx.fill()}}},watch: {identifyCode() {this.drawPic()}},mounted() {this.drawPic()}}
</script>父组件
<template><div><div>验证码测试</div><div @click="refreshCode()" class="code" style="cursor:pointer;" title="点击切换验证码"><s-identify :identifyCode="identifyCode"></s-identify></div></div>
</template>
<script>
import { defineComponent } from 'vue';
import sIdentify from "../../src/components/Sidentify.vue";
// import axios from 'axios'
export default defineComponent({name: 'list',components: { sIdentify },data() {return {identifyCode: "",identifyCodes: ['0','1','2','3','4','5','6','7','8','9','a','b','c','d'], //根据实际需求加入自己想要的字符}},mounted() {this.refreshCode()},unmounted() {},methods: {// 生成随机数randomNum(min, max) {max = max + 1return Math.floor(Math.random() * (max - min) + min);},// 更新验证码refreshCode() {this.identifyCode = "";this.makeCode(this.identifyCodes, 4);console.log('当前验证码:',this.identifyCode);},// 随机生成验证码字符串makeCode(data, len) {console.log('data, len:', data, len)for (let i = 0; i < len; i++) {this.identifyCode += this.identifyCodes[this.randomNum(0, this.identifyCodes.length-1)]}},},
});
</script>
<style lang="less" scoped>.code{width: 500px;height: 31.25rem;border: 1px solid #ddd;}
</style>
效果图

这篇关于vue2使用 identify插件实现图片验证码的文章就介绍到这儿,希望我们推荐的文章对编程师们有所帮助!


