本文主要是介绍(七十一)Android O WiFi热点 开启流程梳理,希望对大家解决编程问题提供一定的参考价值,需要的开发者们随着小编来一起学习吧!
前言:之前主要梳理了WiFi开启扫描连接的流程,现在梳理下WiFi 热点 的开启流程。
时序图mdj样式:https://download.csdn.net/download/sinat_20059415/10542186
1. wifi热点简介
wifi热点是将手机接收的GPRS、3G或4G信号转化为wifi信号发出去的技术,手机必须有无线AP功能,才能当做热点。有些系统自带建热点这个功能比如 IOS(比如 iPhone 4s)。
如果你把你的iPhone当做热点,那么像TOUCH,PAD这样有WIFI功能的,都可以搜索到你手机建立的WIFI网络,连接上以后,TOUCH等使用WIFI产生的流量上网都是消耗的乐WIFI里的手机卡的GPRS或3G流量,所以iphone里最好放一张包大流量的上网卡。还有,把手机当做热点很费电,最好用的时候插上充电器。
2. WiFi热点开启流程梳理
2.1 Settings
Android O的Settings引入了PreferenceController这个包装类来实现对Preference的精细化控制,让代码结构更加地鲜明,很好地体现了单一职责原则,以前的Preference都是一大坨代码冗余在一起,看的都头疼。
TetherSettings->WifiTetherPreferenceController->WifiTetherSwitchBarController
TetherSettings是WiFi热点对应的界面,WifiTetherSwitchBarController是用来负责热点开关的相关逻辑处理的。
/packages/apps/Settings/src/com/android/settings/wifi/tether/WifiTetherSwitchBarController.java
public class WifiTetherSwitchBarController implements SwitchWidgetController.OnSwitchChangeListener,LifecycleObserver, OnStart, OnStop {
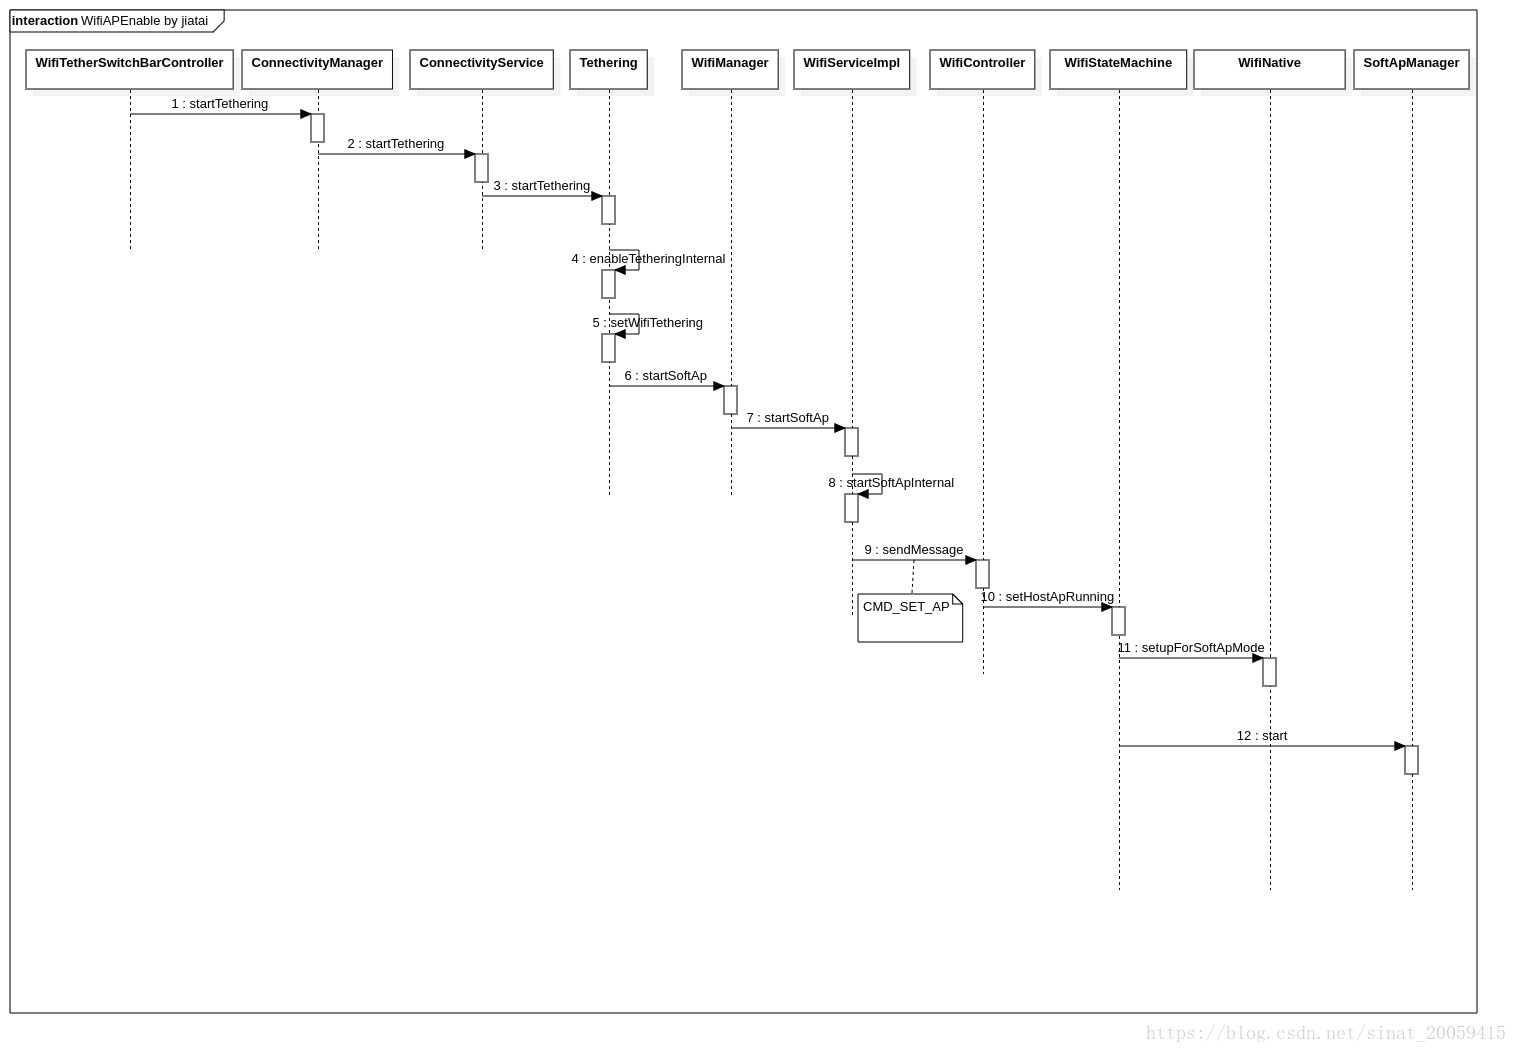
...@Overridepublic boolean onSwitchToggled(boolean isChecked) {if (isChecked) {startTether();} else {stopTether();}return true;}void stopTether() {mSwitchBar.setEnabled(false);mConnectivityManager.stopTethering(TETHERING_WIFI);}void startTether() {mSwitchBar.setEnabled(false);mConnectivityManager.startTethering(TETHERING_WIFI, true /* showProvisioningUi */,NoOpOnStartTetheringCallback.newInstance(), new Handler(Looper.getMainLooper()));}可以看到WiFi热点代开是通过ConnectivityManager的startTethering方法。
附
1) callback(抽象类直接new出来的,内部实现还没有。。。)
class NoOpOnStartTetheringCallback {public static ConnectivityManager.OnStartTetheringCallback newInstance() {return new ConnectivityManager.OnStartTetheringCallback() {};}
}
/*** Callback for use with {@link #startTethering} to find out whether tethering succeeded.* @hide*/@SystemApipublic static abstract class OnStartTetheringCallback {/*** Called when tethering has been successfully started.*/public void onTetheringStarted() {}/*** Called when starting tethering failed.*/public void onTetheringFailed() {}}
2)状态监听:
private final BroadcastReceiver mReceiver = new BroadcastReceiver() {@Overridepublic void onReceive(Context context, Intent intent) {String action = intent.getAction();if (WifiManager.WIFI_AP_STATE_CHANGED_ACTION.equals(action)) {final int state = intent.getIntExtra(WifiManager.EXTRA_WIFI_AP_STATE, WifiManager.WIFI_AP_STATE_FAILED);handleWifiApStateChanged(state);} else if (Intent.ACTION_AIRPLANE_MODE_CHANGED.equals(action)) {enableWifiSwitch();}}}; private void handleWifiApStateChanged(int state) {switch (state) {case WifiManager.WIFI_AP_STATE_ENABLING:mSwitchBar.setEnabled(false);break;case WifiManager.WIFI_AP_STATE_ENABLED:if (!mSwitchBar.isChecked()) {mSwitchBar.setChecked(true);}enableWifiSwitch();break;case WifiManager.WIFI_AP_STATE_DISABLING:if (mSwitchBar.isChecked()) {mSwitchBar.setChecked(false);}mSwitchBar.setEnabled(false);break;case WifiManager.WIFI_AP_STATE_DISABLED:mSwitchBar.setChecked(false);enableWifiSwitch();break;default:mSwitchBar.setChecked(false);enableWifiSwitch();break;}} private void enableWifiSwitch() {boolean isAirplaneMode = Settings.Global.getInt(mContext.getContentResolver(),Settings.Global.AIRPLANE_MODE_ON, 0) != 0;if (!isAirplaneMode) {mSwitchBar.setEnabled(!mDataSaverBackend.isDataSaverEnabled());} else {mSwitchBar.setEnabled(false);}}
2.2 ConnectivityManager
/*** Runs tether provisioning for the given type if needed and then starts tethering if* the check succeeds. If no carrier provisioning is required for tethering, tethering is* enabled immediately. If provisioning fails, tethering will not be enabled. It also* schedules tether provisioning re-checks if appropriate.** @param type The type of tethering to start. Must be one of* {@link ConnectivityManager.TETHERING_WIFI},* {@link ConnectivityManager.TETHERING_USB}, or* {@link ConnectivityManager.TETHERING_BLUETOOTH}.* @param showProvisioningUi a boolean indicating to show the provisioning app UI if there* is one. This should be true the first time this function is called and also any time* the user can see this UI. It gives users information from their carrier about the* check failing and how they can sign up for tethering if possible.* @param callback an {@link OnStartTetheringCallback} which will be called to notify the caller* of the result of trying to tether.* @param handler {@link Handler} to specify the thread upon which the callback will be invoked.* @hide*/@SystemApi@RequiresPermission(android.Manifest.permission.TETHER_PRIVILEGED)public void startTethering(int type, boolean showProvisioningUi,final OnStartTetheringCallback callback, Handler handler) {Preconditions.checkNotNull(callback, "OnStartTetheringCallback cannot be null.");ResultReceiver wrappedCallback = new ResultReceiver(handler) {@Overrideprotected void onReceiveResult(int resultCode, Bundle resultData) {if (resultCode == TETHER_ERROR_NO_ERROR) {callback.onTetheringStarted();} else {callback.onTetheringFailed();}}};try {String pkgName = mContext.getOpPackageName();Log.i(TAG, "startTethering caller:" + pkgName);mService.startTethering(type, wrappedCallback, showProvisioningUi, pkgName);} catch (RemoteException e) {Log.e(TAG, "Exception trying to start tethering.", e);wrappedCallback.send(TETHER_ERROR_SERVICE_UNAVAIL, null);}}至于mService:
mConnectivityManager =(ConnectivityManager) context.getSystemService(Context.CONNECTIVITY_SERVICE);SystemServiceRegistry:
registerService(Context.CONNECTIVITY_SERVICE, ConnectivityManager.class,new StaticApplicationContextServiceFetcher<ConnectivityManager>() {@Overridepublic ConnectivityManager createService(Context context) throws ServiceNotFoundException {IBinder b = ServiceManager.getServiceOrThrow(Context.CONNECTIVITY_SERVICE);IConnectivityManager service = IConnectivityManager.Stub.asInterface(b);return new ConnectivityManager(context, service);}}); /*** {@hide}*/public ConnectivityManager(Context context, IConnectivityManager service) {mContext = Preconditions.checkNotNull(context, "missing context");mService = Preconditions.checkNotNull(service, "missing IConnectivityManager");sInstance = this;}SystemServer:
traceBeginAndSlog("StartConnectivityService");try {connectivity = new ConnectivityService(context, networkManagement, networkStats, networkPolicy);ServiceManager.addService(Context.CONNECTIVITY_SERVICE, connectivity);networkStats.bindConnectivityManager(connectivity);networkPolicy.bindConnectivityManager(connectivity);} catch (Throwable e) {reportWtf("starting Connectivity Service", e);}traceEnd();
所以mService是ConnectivityService。
2.3 ConnectivityService
@Overridepublic void startTethering(int type, ResultReceiver receiver, boolean showProvisioningUi,String callerPkg) {ConnectivityManager.enforceTetherChangePermission(mContext, callerPkg);if (!isTetheringSupported()) {receiver.send(ConnectivityManager.TETHER_ERROR_UNSUPPORTED, null);return;}mTethering.startTethering(type, receiver, showProvisioningUi);}
2.4 Tethering
public void startTethering(int type, ResultReceiver receiver, boolean showProvisioningUi) {if (!isTetherProvisioningRequired()) {enableTetheringInternal(type, true, receiver);return;}if (showProvisioningUi) {runUiTetherProvisioningAndEnable(type, receiver);} else {runSilentTetherProvisioningAndEnable(type, receiver);}}暂时先认为打开tethering需要provision吧,继续往下看。
/*** Check if the device requires a provisioning check in order to enable tethering.** @return a boolean - {@code true} indicating tether provisioning is required by the carrier.*/@VisibleForTestingprotected boolean isTetherProvisioningRequired() {final TetheringConfiguration cfg = mConfig;if (mSystemProperties.getBoolean(DISABLE_PROVISIONING_SYSPROP_KEY, false)|| cfg.provisioningApp.length == 0) {return false;}if (carrierConfigAffirmsEntitlementCheckNotRequired()) {return false;}return (cfg.provisioningApp.length == 2);}shouProvisioningUi由设置传入,是true
private void runUiTetherProvisioningAndEnable(int type, ResultReceiver receiver) {ResultReceiver proxyReceiver = getProxyReceiver(type, receiver);sendUiTetherProvisionIntent(type, proxyReceiver);} /*** Creates a proxy {@link ResultReceiver} which enables tethering if the provisioning result* is successful before firing back up to the wrapped receiver.** @param type The type of tethering being enabled.* @param receiver A ResultReceiver which will be called back with an int resultCode.* @return The proxy receiver.*/private ResultReceiver getProxyReceiver(final int type, final ResultReceiver receiver) {ResultReceiver rr = new ResultReceiver(null) {@Overrideprotected void onReceiveResult(int resultCode, Bundle resultData) {// If provisioning is successful, enable tethering, otherwise just send the error.if (resultCode == TETHER_ERROR_NO_ERROR) {enableTetheringInternal(type, true, receiver);} else {sendTetherResult(receiver, resultCode);}}};// The following is necessary to avoid unmarshalling issues when sending the receiver// across processes.Parcel parcel = Parcel.obtain();rr.writeToParcel(parcel,0);parcel.setDataPosition(0);ResultReceiver receiverForSending = ResultReceiver.CREATOR.createFromParcel(parcel);parcel.recycle();return receiverForSending;} private void sendUiTetherProvisionIntent(int type, ResultReceiver receiver) {Intent intent = new Intent(Settings.ACTION_TETHER_PROVISIONING);intent.putExtra(EXTRA_ADD_TETHER_TYPE, type);intent.putExtra(EXTRA_PROVISION_CALLBACK, receiver);intent.addFlags(Intent.FLAG_ACTIVITY_NEW_TASK);final long ident = Binder.clearCallingIdentity();try {mContext.startActivityAsUser(intent, UserHandle.CURRENT);} finally {Binder.restoreCallingIdentity(ident);}}Settings有如下类会接收并处理消息
<activity android:name="TetherProvisioningActivity"android:exported="true"android:permission="android.permission.TETHER_PRIVILEGED"android:excludeFromRecents="true"android:theme="@style/Theme.ProvisioningActivity"><intent-filter android:priority="1"><action android:name="android.settings.TETHER_PROVISIONING_UI" /><category android:name="android.intent.category.DEFAULT" /></intent-filter></activity>/*** Activity which acts as a proxy to the tether provisioning app for sanity checks and permission* restrictions. Specifically, the provisioning apps require* {@link android.permission.CONNECTIVITY_INTERNAL}, while this activity can be started by a caller* with {@link android.permission.TETHER_PRIVILEGED}.*/
public class TetherProvisioningActivity extends Activity {private static final int PROVISION_REQUEST = 0;private static final String TAG = "TetherProvisioningAct";private static final String EXTRA_TETHER_TYPE = "TETHER_TYPE";private static final boolean DEBUG = Log.isLoggable(TAG, Log.DEBUG);private ResultReceiver mResultReceiver;@Overridepublic void onCreate(Bundle savedInstanceState) {super.onCreate(savedInstanceState);mResultReceiver = (ResultReceiver)getIntent().getParcelableExtra(ConnectivityManager.EXTRA_PROVISION_CALLBACK);int tetherType = getIntent().getIntExtra(ConnectivityManager.EXTRA_ADD_TETHER_TYPE,ConnectivityManager.TETHERING_INVALID);String[] provisionApp = getResources().getStringArray(com.android.internal.R.array.config_mobile_hotspot_provision_app);Intent intent = new Intent(Intent.ACTION_MAIN);intent.setClassName(provisionApp[0], provisionApp[1]);intent.putExtra(EXTRA_TETHER_TYPE, tetherType);if (DEBUG) {Log.d(TAG, "Starting provisioning app: " + provisionApp[0] + "." + provisionApp[1]);}if (getPackageManager().queryIntentActivities(intent,PackageManager.MATCH_DEFAULT_ONLY).isEmpty()) {Log.e(TAG, "Provisioning app is configured, but not available.");mResultReceiver.send(ConnectivityManager.TETHER_ERROR_PROVISION_FAILED, null);finish();return;}startActivityForResultAsUser(intent, PROVISION_REQUEST, UserHandle.CURRENT);} @Overridepublic void onActivityResult(int requestCode, int resultCode, Intent intent) {super.onActivityResult(requestCode, resultCode, intent);if (requestCode == PROVISION_REQUEST) {if (DEBUG) Log.d(TAG, "Got result from app: " + resultCode);int result = resultCode == Activity.RESULT_OK ?ConnectivityManager.TETHER_ERROR_NO_ERROR :ConnectivityManager.TETHER_ERROR_PROVISION_FAILED;mResultReceiver.send(result, null);finish();}}
}具体provision app需要vendor具体配置,看framework/base/core/res/res是空的
./values/config.xml:407:    <string-array translatable="false" name="config_mobile_hotspot_provision_app">
./values/config.xml-408-    <!--
./values/config.xml-409-        <item>com.example.provisioning</item>
./values/config.xml-410-        <item>com.example.provisioning.Activity</item>
./values/config.xml-411-    -->
./values/config.xml-412-    </string-array>
完成后回调onActivityResult,发送ConnectivityManager.TETHER_ERROR_NO_ERROR,继续调用enableTetheringInternal方法。
ResultReceiver rr = new ResultReceiver(null) {@Overrideprotected void onReceiveResult(int resultCode, Bundle resultData) {// If provisioning is successful, enable tethering, otherwise just send the error.if (resultCode == TETHER_ERROR_NO_ERROR) {enableTetheringInternal(type, true, receiver);} else {sendTetherResult(receiver, resultCode);}}};
/*** Enables or disables tethering for the given type. This should only be called once* provisioning has succeeded or is not necessary. It will also schedule provisioning rechecks* for the specified interface.*/private void enableTetheringInternal(int type, boolean enable, ResultReceiver receiver) {boolean isProvisioningRequired = enable && isTetherProvisioningRequired();int result;switch (type) {case TETHERING_WIFI:result = setWifiTethering(enable);if (isProvisioningRequired && result == TETHER_ERROR_NO_ERROR) {scheduleProvisioningRechecks(type);}sendTetherResult(receiver, result);break;case TETHERING_USB:result = setUsbTethering(enable);if (isProvisioningRequired && result == TETHER_ERROR_NO_ERROR) {scheduleProvisioningRechecks(type);}sendTetherResult(receiver, result);break;case TETHERING_BLUETOOTH:setBluetoothTethering(enable, receiver);break;default:Log.w(TAG, "Invalid tether type.");sendTetherResult(receiver, TETHER_ERROR_UNKNOWN_IFACE);}}可以看到tethering不特指WiFi热点,总体包含蓝牙WiFi热点和Usb。
我们还是走不需要provision的流程把。。。
private int setWifiTethering(final boolean enable) {int rval = TETHER_ERROR_MASTER_ERROR;final long ident = Binder.clearCallingIdentity();try {synchronized (mPublicSync) {mWifiTetherRequested = enable;final WifiManager mgr = getWifiManager();if ((enable && mgr.startSoftAp(null /* use existing wifi config */)) ||(!enable && mgr.stopSoftAp())) {rval = TETHER_ERROR_NO_ERROR;}}} finally {Binder.restoreCallingIdentity(ident);}return rval;}这边会走到WifiManager里去,wifi config为空表示使用已有的WiFi config。后面的senTetherResult就是回调之前的receiver通知执行结果。
2.5 WifiManager
/*** Start SoftAp mode with the specified configuration.* Note that starting in access point mode disables station* mode operation* @param wifiConfig SSID, security and channel details as* part of WifiConfiguration* @return {@code true} if the operation succeeds, {@code false} otherwise** @hide*/public boolean startSoftAp(@Nullable WifiConfiguration wifiConfig) {try {return mService.startSoftAp(wifiConfig);} catch (RemoteException e) {throw e.rethrowFromSystemServer();}}
2.6 WifiServiceImpl
/*** see {@link android.net.wifi.WifiManager#startSoftAp(WifiConfiguration)}* @param wifiConfig SSID, security and channel details as part of WifiConfiguration* @return {@code true} if softap start was triggered* @throws SecurityException if the caller does not have permission to start softap*/@Overridepublic boolean startSoftAp(WifiConfiguration wifiConfig) {// NETWORK_STACK is a signature only permission.enforceNetworkStackPermission();mLog.info("startSoftAp uid=%").c(Binder.getCallingUid()).flush();synchronized (mLocalOnlyHotspotRequests) {// If a tethering request comes in while we have LOHS running (or requested), call stop// for softap mode and restart softap with the tethering config.if (!mLocalOnlyHotspotRequests.isEmpty()) {stopSoftApInternal();}return startSoftApInternal(wifiConfig, WifiManager.IFACE_IP_MODE_TETHERED);}}
/*** Internal method to start softap mode. Callers of this method should have already checked* proper permissions beyond the NetworkStack permission.*/private boolean startSoftApInternal(WifiConfiguration wifiConfig, int mode) {mLog.trace("startSoftApInternal uid=% mode=%").c(Binder.getCallingUid()).c(mode).flush();// null wifiConfig is a meaningful input for CMD_SET_APif (wifiConfig == null || isValid(wifiConfig)) {SoftApModeConfiguration softApConfig = new SoftApModeConfiguration(mode, wifiConfig);mWifiController.sendMessage(CMD_SET_AP, 1, 0, softApConfig);return true;}Slog.e(TAG, "Invalid WifiConfiguration");return false;}这边对空的wificonfig包装成了SoftApModeConfiguration接由WifiController处理。
/*** Enqueue a message to this state machine.** Message is ignored if state machine has quit.*/public void sendMessage(int what, int arg1, int arg2, Object obj) {// mSmHandler can be null if the state machine has quit.SmHandler smh = mSmHandler;if (smh == null) return;smh.sendMessage(obtainMessage(what, arg1, arg2, obj));}
2.7 WifiController
ApStaDisabledState会对该消息进行对应的处理
case CMD_SET_AP:if (msg.arg1 == 1) {if (msg.arg2 == 0) { // previous wifi state has not been saved yetmSettingsStore.setWifiSavedState(WifiSettingsStore.WIFI_DISABLED);}mWifiStateMachine.setHostApRunning((SoftApModeConfiguration) msg.obj,true);transitionTo(mApEnabledState);}break;
2.8 WifiStateMachine
/*** TODO: doc*/public void setHostApRunning(SoftApModeConfiguration wifiConfig, boolean enable) {if (enable) {sendMessage(CMD_START_AP, wifiConfig);} else {sendMessage(CMD_STOP_AP);}}
看了一圈只有InitialState对该消息有正确响应
case CMD_START_AP:transitionTo(mSoftApState);break;InitialState exit()方法为空,看下SoftApState的enter方法
class SoftApState extends State {private SoftApManager mSoftApManager;private String mIfaceName;private int mMode;private class SoftApListener implements SoftApManager.Listener {@Overridepublic void onStateChanged(int state, int reason) {if (state == WIFI_AP_STATE_DISABLED) {sendMessage(CMD_AP_STOPPED);} else if (state == WIFI_AP_STATE_FAILED) {sendMessage(CMD_START_AP_FAILURE);}setWifiApState(state, reason, mIfaceName, mMode);}}@Overridepublic void enter() {final Message message = getCurrentMessage();if (message.what != CMD_START_AP) {throw new RuntimeException("Illegal transition to SoftApState: " + message);}SoftApModeConfiguration config = (SoftApModeConfiguration) message.obj;mMode = config.getTargetMode();IApInterface apInterface = null;Pair<Integer, IApInterface> statusAndInterface = mWifiNative.setupForSoftApMode();if (statusAndInterface.first == WifiNative.SETUP_SUCCESS) {apInterface = statusAndInterface.second;} else {incrementMetricsForSetupFailure(statusAndInterface.first);}if (apInterface == null) {setWifiApState(WIFI_AP_STATE_FAILED,WifiManager.SAP_START_FAILURE_GENERAL, null, mMode);/*** Transition to InitialState to reset the* driver/HAL back to the initial state.*/transitionTo(mInitialState);return;}try {mIfaceName = apInterface.getInterfaceName();} catch (RemoteException e) {// Failed to get the interface name. The name will not be available for// the enabled broadcast, but since we had an error getting the name, we most likely// won't be able to fully start softap mode.}checkAndSetConnectivityInstance();mSoftApManager = mWifiInjector.makeSoftApManager(mNwService,new SoftApListener(),apInterface,config.getWifiConfiguration());mSoftApManager.start();mWifiStateTracker.updateState(WifiStateTracker.SOFT_AP);}
这边的调用流程和WiFi的启动流程有点类似。先梳理到这,后面应该是硬菜。。。
3. 总结

这篇关于(七十一)Android O WiFi热点 开启流程梳理的文章就介绍到这儿,希望我们推荐的文章对编程师们有所帮助!


