本文主要是介绍将VOC2012格式的数据集转为YOLOV8格式,希望对大家解决编程问题提供一定的参考价值,需要的开发者们随着小编来一起学习吧!
文章目录
- 简介
- 1.数据集格式
- 1.1数据集目录格式对比
- 1.2标签格式对比
- 2.格式转换脚本
- 3.文件处理脚本
简介
- 将voc2012中xml格式的标签转为yolov8中txt格式
- 将转换后的图像和标签按照yolov8训练的要求整理为对应的目录结构
1.数据集格式
1.1数据集目录格式对比
(1)VOC2012的数据集文件目录如下:

(2)YOLOv8需要的文件目录
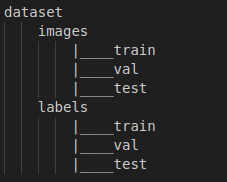
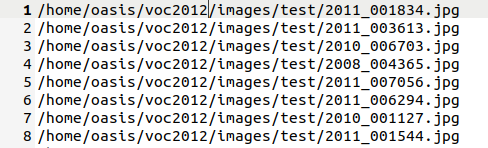
同时需要生成关于训练集、验证集和测试集图像目录的txt文件,最好是绝对路径

1.2标签格式对比
(1)voc数据集标签

(2)YOLO数据集标签
每一行代表一个目标框的信息:{class_index} {x_center} {y_center} {width} {height}

2.格式转换脚本
修改脚本中文件目录,然后运行:
python3 trans_voc_yolo.py
# -*- coding: utf-8 -*-
# 在脚本中,你需要将`voc_labels_folder`和`output_folder`两个变量设置为正确的路径
# 分别是VOC2012数据集的XML标签文件夹路径和转换后的YOLO格式标签文件夹路径。同时,你还需要根据VOC2012数据集的类别列表自定义`class_names`变量的内容。
# 执行脚本后,它会遍历VOC2012数据集的XML标签文件夹中的每个XML文件,解析其中的目标实例信息,并将它们转换为YOLO格式的txt标签文件。
# 转换后的txt文件将保存在指定的输出文件夹中,每个txt文件对应相应的XML文件。
# 请确保脚本中的文件路径正确,并提前创建好输出文件夹。运行脚本后,你会在输出文件夹中得到与VOC2012数据集中的每个XML标签文件对应的YOLO格式txt标签文件。import xml.etree.ElementTree as ET
import osvoc_labels_folder = 'Annotations/'  # VOC2012的XML标签文件夹路径
output_folder = 'yolo_labels/'  # 转换后的YOLO格式标签文件夹路径
class_names = ['aeroplane', 'bicycle', 'bird', 'boat', 'bottle', 'bus', 'car', 'cat', 'chair', 'cow', 'diningtable','dog', 'horse', 'motorbike', 'person', 'pottedplant', 'sheep', 'sofa', 'train', 'tvmonitor']  # 类别名称列表if not os.path.exists(output_folder):os.makedirs(output_folder)for xml_file in os.listdir(voc_labels_folder):tree = ET.parse(os.path.join(voc_labels_folder, xml_file))root = tree.getroot()image_width = int(root.find('size/width').text)image_height = int(root.find('size/height').text)txt_file = xml_file.replace('.xml', '.txt')txt_path = os.path.join(output_folder, txt_file)with open(txt_path, 'w') as f:for obj in root.findall('object'):class_name = obj.find('name').textclass_index = class_names.index(class_name)bbox = obj.find('bndbox')x_min = int(float(bbox.find('xmin').text))y_min = int(float(bbox.find('ymin').text))x_max = int(float(bbox.find('xmax').text))y_max = int(float(bbox.find('ymax').text))x_center = (x_min + x_max) / (2 * image_width)y_center = (y_min + y_max) / (2 * image_height)width = (x_max - x_min) / image_widthheight = (y_max - y_min) / image_heightf.write(f'{class_index} {x_center} {y_center} {width} {height}\n')
3.文件处理脚本
将数据集按照7:2:1的比例划分为训练集、验证集和测试集,并生成相应的目录
python3 split_train_val_test.py
# -*- coding: utf-8 -*-import os
import random
import shutil# 设置文件路径和划分比例
root_path = "/home/lusx/data/voc_yolo/"
image_dir = "JPEGImages/"
label_dir = "labels_sum/"
train_ratio = 0.7
val_ratio = 0.2
test_ratio = 0.1# 创建训练集、验证集和测试集目录
os.makedirs("images/train", exist_ok=True)
os.makedirs("images/val", exist_ok=True)
os.makedirs("images/test", exist_ok=True)
os.makedirs("labels/train", exist_ok=True)
os.makedirs("labels/val", exist_ok=True)
os.makedirs("labels/test", exist_ok=True)# 获取所有图像文件名
image_files = os.listdir(image_dir)
total_images = len(image_files)
random.shuffle(image_files)# 计算划分数量
train_count = int(total_images * train_ratio)
val_count = int(total_images * val_ratio)
test_count = total_images - train_count - val_count# 划分训练集
train_images = image_files[:train_count]
for image_file in train_images:label_file = image_file[:image_file.rfind(".")] + ".txt"shutil.copy(os.path.join(image_dir, image_file), "images/train/")shutil.copy(os.path.join(label_dir, label_file), "labels/train/")# 划分验证集
val_images = image_files[train_count:train_count+val_count]
for image_file in val_images:label_file = image_file[:image_file.rfind(".")] + ".txt"shutil.copy(os.path.join(image_dir, image_file), "images/val/")shutil.copy(os.path.join(label_dir, label_file), "labels/val/")# 划分测试集
test_images = image_files[train_count+val_count:]
for image_file in test_images:label_file = image_file[:image_file.rfind(".")] + ".txt"shutil.copy(os.path.join(image_dir, image_file), "images/test/")shutil.copy(os.path.join(label_dir, label_file), "labels/test/")# 生成训练集图片路径txt文件
with open("train.txt", "w") as file:file.write("\n".join([root_path + "images/train/" + image_file for image_file in train_images]))# 生成验证集图片路径txt文件
with open("val.txt", "w") as file:file.write("\n".join([root_path + "images/val/" + image_file for image_file in val_images]))# 生成测试集图片路径txt文件
with open("test.txt", "w") as file:file.write("\n".join([root_path + "images/test/" + image_file for image_file in test_images]))print("数据划分完成!")
这篇关于将VOC2012格式的数据集转为YOLOV8格式的文章就介绍到这儿,希望我们推荐的文章对编程师们有所帮助!


