本文主要是介绍【coco】掩膜mask影像转coco格式txt(含python代码),希望对大家解决编程问题提供一定的参考价值,需要的开发者们随着小编来一起学习吧!
最近在做实例分割,遇到二值掩膜影像——coco格式txt的实例分割转换问题,困扰很久,不知道怎么转换,转出来的txt没法用代码成功读取。一系列问题,索性记录下自己的结局路程,方便大家python代码自取。
目录
📞📞1.coco格式示例
📗 images模块
📘 categories模块
📙annotation模块
📷📷2.环境准备
📢📢3.maskToanno函数定义
⏰⏰4.images模块内容写入txt
📡📡5.categories模块内容写入txt
🛁🛁6.annotation模块内容写入txt
🔋🔋7.完整python代码
整理不易,欢迎一键三连!!!
送你们一条美丽的--分割线--
📞📞1.coco格式示例
coco格式txt文件示例:
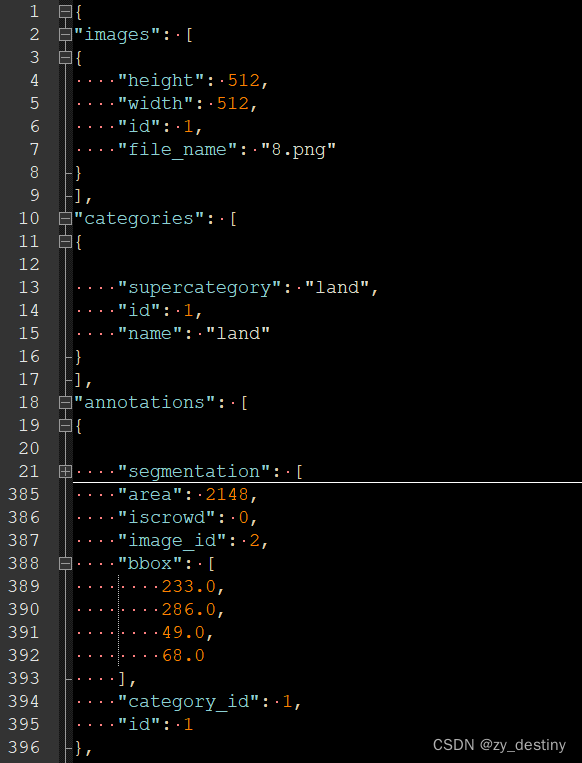
主要包含三个模块:
- images
- categories
- annotations
其中每个模块都由好多个分块组成,images和categories比较简单。
📗 images模块
images里主要记录的是每张image的长宽,id和文件名信息,注意此处的文件名必须是images文件名,labels也得是相同的文件名,不然索引不到。id从1开始,依次向下编号。
images[
{"height": 512,"width": 512,"id": 1,"file_name": "1.png"
}
...
...
...
{"height": 512,"width": 512,"id": 100,"file_name": "100.png"
}]
📘 categories模块
categories模块记录的是所有样本的类别信息,name为类别名称,id从1开始,依次向下编号,supercategory表示该类别的从属类别,理解起来比较简单,比如name为bus,supercategory就可以为car,name为cat,supercategory就可以为animal。如果没有多级类别,可以将name和supercategory写出相同的,像我下面写的。
"categories": [
{"supercategory": "land","id": 1,"name": "land"
}
{"supercategory": "land","id": 2,"name": "land2"
}
...
...
...
{"supercategory": "land","id": n,"name": "landn"
}
],
📙annotation模块
annotation模块主要记录的是label信息,也是最关键的内容,此处以实例分割为例进行讲解,因为coco格式可以做的任务太多,此处仅限实例分割或者语义分割。
annotation模块的一个完整内容包括:
- segmentation记录目标的边界坐标点位置信息,可以是很长但是要记得是双[[...]];
- area记录得是目标得面积信息,这个可以自动计算,后面会细讲;
- iscrowd代表一个目标是否被切分成多块,比如一个猫得身体和尾巴被一只狗头挡住,分开成2部分。0代表没有切分,1代表切分;
- image_id表示这个目标所对应得原始影像得id编号,与images模块里的id是一一对应的关系;
- bbox指这个目标的外界矩形框的位置信息;
- category_id表示这个目标的类别信息,与categories模块里的id是一一对应的关系;
- id代表目标的编号信息,可以与images个数不一致,因为一张图上很可能会有多个目标。
"annotations": [
{"segmentation": [[276,286,275,287,274,287,273,287,]],"area": 2148,"iscrowd": 0,"image_id": 2,"bbox": [233.0,286.0,49.0,68.0],"category_id": 1,"id": 1
},...{"segmentation": [[276,286,275,287,274,287,273,287,]],"area": 248,"iscrowd": 0,"image_id": 5,"bbox": [233.0,286.0,49.0,68.0],"category_id": 2,"id":100
},
📷📷2.环境准备
代码所需环境包有:json、numpy、pycocotools、OpenCV、os、sys。
包导入命令:
import jsonimport numpy as npfrom pycocotools import maskimport cv2import osimport sys📢📢3.maskToanno函数定义
输入:round_truth_binary_mask, ann_count, category_id
输出:annotations
python代码如下:
def maskToanno(ground_truth_binary_mask, ann_count, category_id):contours, _ = cv2.findContours(ground_truth_binary_mask, cv2.RETR_LIST, cv2.CHAIN_APPROX_NONE) # 根据二值图找轮廓annotations = [] #一幅图片所有的annotatonsglobal segmentation_id# print(ann_count)# 对每个实例进行处理for i in range(len(contours)):# print(i)# 生成二值的黑色图片x = np.zeros((512, 512))cv2.drawContours(x, contours, i, (1, 1, 1), -1) # 将单个mask表示为二值图的形式ground_truth_binary_mask_id = np.array(x, dtype=object).astype(np.uint8)fortran_ground_truth_binary_mask = np.asfortranarray(ground_truth_binary_mask_id)# 求每个mask的面积和框encoded_ground_truth = mask.encode(fortran_ground_truth_binary_mask)ground_truth_area = mask.area(encoded_ground_truth)ground_truth_bounding_box = mask.toBbox(encoded_ground_truth)contour, _ = cv2.findContours(ground_truth_binary_mask_id, cv2.RETR_LIST, cv2.CHAIN_APPROX_NONE)# contour = measure.find_contours(ground_truth_binary_mask_id, 0.5)# print(contour)annotation = {"segmentation": [],"area": ground_truth_area.tolist(),"iscrowd": 0,"image_id": ann_count,"bbox": ground_truth_bounding_box.tolist(),"category_id": category_id,"id": segmentation_id}#print(contour)# 求segmentation部分contour = np.flip(contour, axis=0)segmentation = contour.ravel().tolist()if len(segmentation)<=4:continueannotation["segmentation"].append(segmentation)annotations.append(annotation)segmentation_id = segmentation_id + 1return annotations⏰⏰4.images模块内容写入txt
输入:jsonpath
输出:jsonpath
将jsonpath路径下的txt文件打开,若image存在且对应文件名的label文件存在,就可以写image的images模块信息,python代码如下:
with io.open(jsonPath, 'w', encoding='utf8') as output:# 那就全部写在一个文件夹好了# 先写images的信息output.write(unicode('{\n'))output.write(unicode('"images": [\n'))for image in rgb_image_files:if os.path.exists(os.path.join(block_mask_path, image)):output.write(unicode('{'))annotation = {"height": 512,"width": 512,"id": imageCount,"file_name": image}str_ = json.dumps(annotation, indent=4)str_ = str_[1:-1]if len(str_) > 0:output.write(unicode(str_))imageCount = imageCount + 1if (image == rgb_image_files[-1]):output.write(unicode('}\n'))else:output.write(unicode('},\n'))📡📡5.categories模块内容写入txt
输入:jsonpath
输出:jsonpath
将jsonpath路径下的txt文件打开,将categories模块里的supercategory、id、name信息写入txt,此处的categories信息只是示例,可以根据自己的类别信息修改,python代码如下:
with io.open(jsonPath, 'w', encoding='utf8') as output:output.write(unicode('"categories": [\n'))output.write(unicode('{\n'))categories = {"supercategory": "land","id": 1,"name": "land"}str_ = json.dumps(categories, indent=4)str_ = str_[1:-1]if len(str_) > 0:output.write(unicode(str_))output.write(unicode('}\n'))output.write(unicode('],\n'))🛁🛁6.annotation模块内容写入txt
输入:jsonpath
输出:jsonpath
将jsonpath路径下的txt文件打开,若label存在且对应文件名的image文件存在,就可以把annotation模块里的信息写入txt,python代码如下:
with io.open(jsonPath, 'w', encoding='utf8') as output:output.write(unicode('"annotations": [\n'))for i in range(len(block_mask_image_files)):if os.path.exists(os.path.join(path, block_mask_image_files[i])):block_image = block_mask_image_files[i]# 读取二值图像block_im = cv2.imread(os.path.join(block_mask_path, block_image), 0)_, block_im = cv2.threshold(block_im, 100, 1, cv2.THRESH_BINARY)if not block_im is None:block_im = np.array(block_im, dtype=object).astype(np.uint8)block_anno = maskToanno(block_im, annCount, 1)for b in block_anno:str_block = json.dumps(b, indent=4)str_block = str_block[1:-1]if len(str_block) > 0:output.write(unicode('{\n'))output.write(unicode(str_block))if (block_image == rgb_image_files[-1] and b == block_anno[-1]):output.write(unicode('}\n'))else:output.write(unicode('},\n'))annCount = annCount + 1else:print(block_image)🔋🔋7.完整python代码
二值掩膜mask影像转coco格式的实例分割txt完整python代码如下:
import json
import numpy as np
from pycocotools import mask
import cv2
import os
import sysif sys.version_info[0] >= 3:unicode = strimport io
# 实例的id,每个图像有多个物体每个物体的唯一id
global segmentation_id
segmentation_id = 1
# annotations部分的实现
def maskToanno(ground_truth_binary_mask, ann_count, category_id):contours, _ = cv2.findContours(ground_truth_binary_mask, cv2.RETR_LIST, cv2.CHAIN_APPROX_NONE)  # 根据二值图找轮廓annotations = [] #一幅图片所有的annotatonsglobal segmentation_id# print(ann_count)# 对每个实例进行处理for i in range(len(contours)):# print(i)# 生成二值的黑色图片x = np.zeros((512, 512))cv2.drawContours(x, contours, i, (1, 1, 1), -1)  # 将单个mask表示为二值图的形式ground_truth_binary_mask_id = np.array(x, dtype=object).astype(np.uint8)fortran_ground_truth_binary_mask = np.asfortranarray(ground_truth_binary_mask_id)# 求每个mask的面积和框encoded_ground_truth = mask.encode(fortran_ground_truth_binary_mask)ground_truth_area = mask.area(encoded_ground_truth)ground_truth_bounding_box = mask.toBbox(encoded_ground_truth)contour, _ = cv2.findContours(ground_truth_binary_mask_id, cv2.RETR_LIST, cv2.CHAIN_APPROX_NONE)# contour = measure.find_contours(ground_truth_binary_mask_id, 0.5)# print(contour)annotation = {"segmentation": [],"area": ground_truth_area.tolist(),"iscrowd": 0,"image_id": ann_count,"bbox": ground_truth_bounding_box.tolist(),"category_id": category_id,"id": segmentation_id}#print(contour)# 求segmentation部分contour = np.flip(contour, axis=0)segmentation = contour.ravel().tolist()if len(segmentation)<=4:continueannotation["segmentation"].append(segmentation)annotations.append(annotation)segmentation_id = segmentation_id + 1return annotations# mask图像路径
block_mask_path = '/labels_512'
block_mask_image_files = sorted(os.listdir(block_mask_path))# coco json保存的位置
jsonPath = "/data/temp.json"
annCount = 1
imageCount = 1
# 原图像的路径, 原图像和mask图像的名称是一致的。
path = "/images_512"
rgb_image_files = sorted(os.listdir(path))with io.open(jsonPath, 'w', encoding='utf8') as output:# 那就全部写在一个文件夹好了# 先写images的信息output.write(unicode('{\n'))output.write(unicode('"images": [\n'))for image in rgb_image_files:if os.path.exists(os.path.join(block_mask_path, image)):output.write(unicode('{'))annotation = {"height": 512,"width": 512,"id": imageCount,"file_name": image}str_ = json.dumps(annotation, indent=4)str_ = str_[1:-1]if len(str_) > 0:output.write(unicode(str_))imageCount = imageCount + 1if (image == rgb_image_files[-1]):output.write(unicode('}\n'))else:output.write(unicode('},\n'))output.write(unicode('],\n'))# 接下来写cateoutput.write(unicode('"categories": [\n'))output.write(unicode('{\n'))categories = {"supercategory": "land","id": 1,"name": "land"}str_ = json.dumps(categories, indent=4)str_ = str_[1:-1]if len(str_) > 0:output.write(unicode(str_))output.write(unicode('}\n'))output.write(unicode('],\n'))# 写annotationsoutput.write(unicode('"annotations": [\n'))for i in range(len(block_mask_image_files)):if os.path.exists(os.path.join(path, block_mask_image_files[i])):block_image = block_mask_image_files[i]# 读取二值图像block_im = cv2.imread(os.path.join(block_mask_path, block_image), 0)_, block_im = cv2.threshold(block_im, 100, 1, cv2.THRESH_BINARY)if not block_im is None:block_im = np.array(block_im, dtype=object).astype(np.uint8)block_anno = maskToanno(block_im, annCount, 1)for b in block_anno:str_block = json.dumps(b, indent=4)str_block = str_block[1:-1]if len(str_block) > 0:output.write(unicode('{\n'))output.write(unicode(str_block))if (block_image == rgb_image_files[-1] and b == block_anno[-1]):output.write(unicode('}\n'))else:output.write(unicode('},\n'))annCount = annCount + 1else:print(block_image)output.write(unicode(']\n'))output.write(unicode('}\n'))
有问题,欢迎评论区交流~~~
整理不易,欢迎一键三连!!!
送你们一条美丽的--分割线--
🌷🌷🍀🍀🌾🌾🍓🍓🍂🍂🙋🙋🐸🐸🙋🙋💖💖🍌🍌🔔🔔🍉🍉🍭🍭🍋🍋🍇🍇🏆🏆📸📸⛵⛵⭐⭐🍎🍎👍👍🌷🌷
这篇关于【coco】掩膜mask影像转coco格式txt(含python代码)的文章就介绍到这儿,希望我们推荐的文章对编程师们有所帮助!


