本文主要是介绍Android折叠屏开发学习(二)---使用Jetpack WindowManager监听折叠屏开合状态,希望对大家解决编程问题提供一定的参考价值,需要的开发者们随着小编来一起学习吧!
学更好的别人,
做更好的自己。
——《微卡智享》

本文长度为4521字,预计阅读8分钟
前言
上一篇《Android折叠屏开发学习(一)---通过传感器获取铰链角度》使用了传感器获取折叠屏打开的角度。而在2021 Google I/O,发布了Jetpack WindowManager 用于进行折叠屏适配,今天这篇我们就来使用一下Jetpack WindowManager来做个折叠屏的Demo

实现效果


微卡智享
WindowManager
Jetpack WindowManager 是一个以Kotlin 优先的现代化库,它支持不同形态的新设备,并提供 “类 AppCompat” 的功能以构建具有响应式 UI 的应用。
通过WindowManager API中WindowInfoTracker来获取折叠屏的状态,其中WindowLayoutInfo获取的信息包含了窗口的显示特性,例如该窗口是否可折叠或包含铰链,在WindowLayoutInfo中可以得到FoldingFeature,让您能够监听可折叠设备的折叠状态得以判断设备的姿态。
FoldingFeature中几个关键的项:
-
state 折叠特征的角度(HALF_OPENED 或 FLAT)
-
orientation - 折叠特征的方向(HORIZONTAL 或 VERTICAL)
-
isSeparating - 如果折叠特征将显示区域分隔为两个不同的部分
其中isSeparating属性对于双屏设备,当应用跨铰链时,这始终为 true;对于其他可折叠设备,仅当状态是 HALF_OPENED 时(例如设备处于桌面状态时)这个为 true。所以我们可以定义同个函数在显示当前的状态。
fun isTableTopPosture(foldFeature: FoldingFeature?): Boolean {return foldFeature?.state == FoldingFeature.State.HALF_OPENED &&foldFeature.orientation == FoldingFeature.Orientation.HORIZONTAL}fun isBookPosture(foldFeature: FoldingFeature?): Boolean {return foldFeature?.state == FoldingFeature.State.HALF_OPENED &&foldFeature.orientation == FoldingFeature.Orientation.VERTICAL}fun isSeparating(foldFeature: FoldingFeature?): Boolean {return foldFeature?.state == FoldingFeature.State.FLAT && foldFeature.isSeparating}对应的状态图如下:

代码实现

微卡智享
01
build.gradle依赖
Demo还是接着我们的MVI的Demo,首先就是加入依赖项。
dependencies {implementation "androidx.window:window:1.0.0"implementation 'androidx.lifecycle:lifecycle-runtime-ktx:2.4.0'
}
这里windowmanager我用的是1.0稳定版,当前已经到了1.1.0-alpha02了,当然监听还是用到了lifecycle及协程,所以也加进来,我的项目依赖项如下图:

02
布局文件
创建了一个新的Activity,其中布局文件只有一个图片(ImageView)和一个文本(TextView)。
<?xml version="1.0" encoding="utf-8"?>
<androidx.constraintlayout.widget.ConstraintLayout xmlns:android="http://schemas.android.com/apk/res/android"xmlns:app="http://schemas.android.com/apk/res-auto"xmlns:tools="http://schemas.android.com/tools"android:layout_width="match_parent"android:layout_height="match_parent"android:padding="50dp"tools:context=".ui.view.WindowInfoTrackerActivity"><ImageViewandroid:layout_width="match_parent"android:layout_height="wrap_content"app:layout_constraintTop_toTopOf="parent"app:layout_constraintStart_toStartOf="parent"app:layout_constraintEnd_toEndOf="parent"app:layout_constraintBottom_toBottomOf="parent"android:id="@+id/imv_view" /><TextViewandroid:layout_width="wrap_content"android:layout_height="wrap_content"android:id="@+id/tv_imgstatus"app:layout_constraintTop_toBottomOf="@id/imv_view"app:layout_constraintStart_toStartOf="parent"app:layout_constraintEnd_toEndOf="parent"app:layout_constraintBottom_toBottomOf="parent"android:textSize="13pt"android:text="111" /></androidx.constraintlayout.widget.ConstraintLayout>
图片资源就是上图里面四个图片的状态,文件直接复制到drawable中了。

03
Activity代码
新建的Activity中,创建WindowInfoTracker和Flow<WindowLayoutInfo>的变量。

class WindowInfoTrackerActivity : AppCompatActivity() {private lateinit var windowInfoTracker : WindowInfoTrackerprivate lateinit var windowLayoutInfoFlow : Flow<WindowLayoutInfo>在OnCreate中初始化变量和监听

private fun observeFold() {lifecycleScope.launch(Dispatchers.Main) {lifecycle.repeatOnLifecycle(Lifecycle.State.STARTED) {windowLayoutInfoFlow.collect { layoutInfo ->Log.i(TAG, "size:${layoutInfo.displayFeatures.size}")val foldingFeature = layoutInfo.displayFeatures.filterIsInstance<FoldingFeature>().firstOrNull()foldingFeature?.let {Log.i(TAG, "state:${it.state}")}when {isTableTopPosture(foldingFeature) ->sendInfoMsg("横向半开")isBookPosture(foldingFeature) ->sendInfoMsg("竖向半开")isSeparating(foldingFeature) ->// Dual-screen devicefoldingFeature?.let {if (it.orientation == FoldingFeature.Orientation.HORIZONTAL) {sendInfoMsg("横向全展开")} else {sendInfoMsg("竖向全展开")}}else -> {sendInfoMsg("主屏")}}}}}}监听就是通过LifeCycle获取到windowLayoutInfo信息,然后提取FoldingFeature,通过判断FoldingFeature的当前状态.
代码中可以看到判断FoldingFeature的状态后使用sendInfoMsg发送消息,是用协程直接给VIewModel发送消息。

使用MVI架构更新UI
《Android MVI架构初探》文章中介绍了MVI的架构,本文的Demo也是在这个基础上做的,所以实现更新UI,下图中是当时我们MVI架构的示意图,我们重新看一下怎么处理的。

ActionIntent和ActionState增加Info项


ViewModel中的处理

ViewModel中接收到Intent的消息后,直接再往State中进行推送。
Activity中ViewModel的监听

在Activity的OnCreate中开启ViewModel的监听
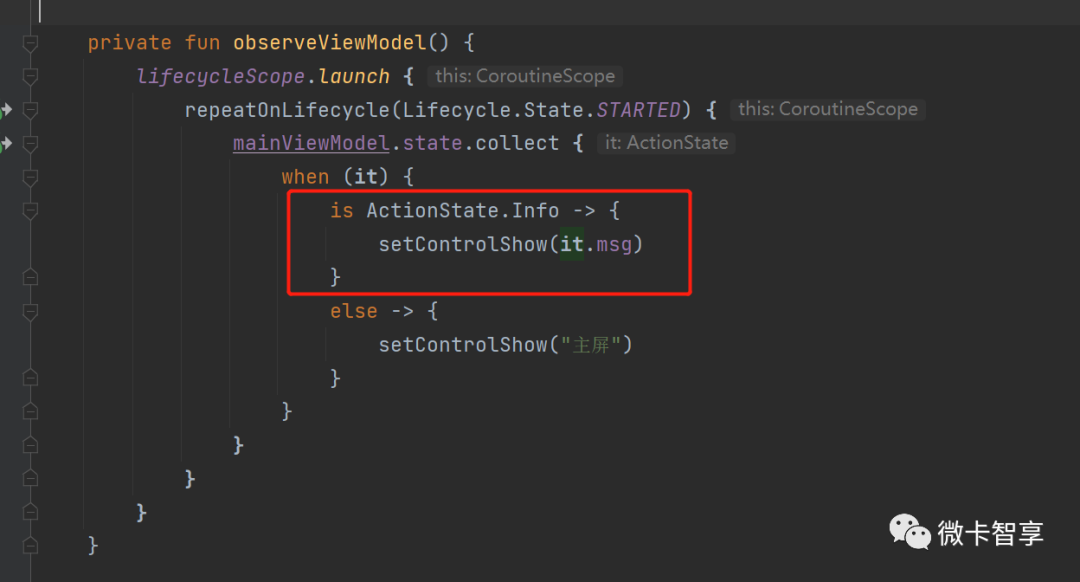
接收到ActionState.Info后直接调用setControlShow来更新UI显示

setControlShow中更新TextView显示当前的状态,并根据状态更换显示的图片。这样我们的Demo就完成了。

微卡智享
划重点
文章中可以看到,我用的虚拟机进行的测试,最主要的原因是使用WindowManager获取折叠屏当前状态,在Android 11下完全正常,但是在Android 12中就不好用了,我的真机是Android 12就完全没反应,后来创建了一个Android 12的虚拟机也是如此,代码其实挺简单,但是这个问题倒是卡了我好几天,后来又下的WindowManager的官方Demo也算比较旧的了,用了官方Demo试过,也是一样的,在Android 12下用不了。如果有知道怎么解决的朋友麻烦留言告之一下。
P2为当前程序运行的实现效果视频。下一篇将使用MotionLayout来实现折叠屏不同状态的不同布局效果,代码还是在这个项目中,会再增加一个Activity实现。
源码地址
https://github.com/Vaccae/AndroidMVIDemo.git
点击阅读原文可以看到“码云”的地址
完


往期精彩回顾

Android折叠屏开发学习(一)---通过传感器获取铰链角度

Android MVI架构初探
Android Kotlin协程间的通信Channel介绍
这篇关于Android折叠屏开发学习(二)---使用Jetpack WindowManager监听折叠屏开合状态的文章就介绍到这儿,希望我们推荐的文章对编程师们有所帮助!


