本文主要是介绍vue2中使用jsplumb完成流程图,希望对大家解决编程问题提供一定的参考价值,需要的开发者们随着小编来一起学习吧!
前言
之前的几个demo都是在vue3中写的,虽然可以直接拿去复用。
但是根据有些看客反馈,想用一个vue2版本的,毕竟很多人开发功能的时间都不是特别富裕。大多时候还是用现成的demo更好一些。
这里我就写一个简易版本的demo,可以实现绘制,并且删除连接线和节点等功能,篇幅也不大,适合应急的朋友,哈哈
代码
1.剥离公共的配置 config.js
export const readyConfig = {Container: 'plumbBox',anchor: ['Bottom', 'Top', 'Left', 'Right'],connector: 'Straight',endpoint: 'Blank',PaintStyle: { stroke: '#8b8c8d', strokeWidth: 2, outlineStroke: 'transparent', outlineWidth: 10 },Overlays: [['Arrow', { width: 10, length: 5, location: 0.5, direction: 1 }]],endpointStyle: { fill: 'lightgray', outlineStroke: 'darkgray', outlineWidth: 2 }
}
export const sourceConfig = {filter: '.pointNode',filterExclude: false,allowLoopback: true,maxConnections: -1,Container: 'plumbBox',anchor: ['Bottom', 'Top', 'Left', 'Right'],connector: 'Straight',endpoint: 'Blank',PaintStyle: { stroke: '#8b8c8d', strokeWidth: 2, outlineStroke: 'transparent', outlineWidth: 10 },Overlays: [['Arrow', { width: 10, length: 5, location: 0.5, direction: 1 }]],endpointStyle: { fill: 'lightgray', outlineStroke: 'darkgray', outlineWidth: 2 }
}
export const targetConfig = {filter: '.pointNode',filterExclude: false,allowLoopback: true,maxConnections: -1,Container: 'plumbBox',anchor: ['Bottom', 'Top', 'Left', 'Right'],connector: 'Straight',endpoint: 'Blank',PaintStyle: { stroke: '#8b8c8d', strokeWidth: 2, outlineStroke: 'transparent', outlineWidth: 10 },Overlays: [['Arrow', { width: 10, length: 5, location: 0.5, direction: 1 }]],endpointStyle: { fill: 'lightgray', outlineStroke: 'darkgray', outlineWidth: 2 }
}
其实这些配置都大差不差,之所以分别罗列,是让大家搞明白,画布层级的配置,起点节点的配置以及终点节点的配置都是可以单独去配置,具体配置项可以看我之前的文档。
2.使用简易数据 data.js
export const leftMenuList = [{name: "节点1",id: "app1",},{name: "节点2",id: "app2",},{name: "节点3",id: "app3",},{name: "节点4",id: "app4",},
]
这里的数据其实是左侧的数据
3.组件部分
<template><div class="flowBox"><div class="leftMenu"><h4 @click="checkInfo">左侧菜单</h4><draggable @start="start" @end="end" :sort="false"><divv-for="(item, index) in leftMenuList":key="item.id"@mousedown="(el) => downNode(el, item)"class="leftNode">{{ item.name }}</div><h4>操作提示</h4><hr /><p>左侧拖拽至右侧画布</p><p>右键节点是删除节点,左键线条是删除线条</p></draggable></div><div class="plumbBox" id="plumbBox"><divv-for="(item, index) in dataInfo":key="item.id":id="item.id":style="nodeStyle(item)"@click.right="deleteNode($event, item)">{{ item.name }}<div class="pointNode"></div></div></div></div>
</template>
<script>
import { jsPlumb } from "jsplumb";
import { readyConfig, sourceConfig, targetConfig } from "./config";
import { leftMenuList } from "./data";
import { cloneDeep } from "lodash";
import draggable from "vuedraggable";
export default {name: "flowChart",components: { draggable },data() {return {//节点列表leftMenuList: leftMenuList,dataInfo: [],//plumb实例PlumbInit: null,//关系列表renderList: [],//画布信息(大小和位置)canvasInfo: null,//鼠标位置精准判定nodePositionDiff: null,//选中的左侧列表节点ativeNodeItem: null,//线条的信息deleteLineInfo: null,};},mounted() {this.jsPlumbInit();this.readyPlumbDataFun("once");},methods: {//初始化jsPlumbInit() {this.PlumbInit = jsPlumb.getInstance();this.PlumbInit.importDefaults(readyConfig);},//组织渲染用的数据readyPlumbDataFun(flag) {this.renderList = [];this.PlumbInit.deleteEveryConnection();this.PlumbInit.deleteEveryEndpoint();this.$nextTick(() => {this.dataInfo = cloneDeep(this.dataInfo);//根据数据创建关联信息(连线关系)this.dataInfo.forEach((item) => {if (item.to && item.to.length > 0) {item.to.forEach((item1) => {let nodeConfig = Object.assign({source: item.id,target: item1,},readyConfig);this.renderList.push(nodeConfig);});}this.makeNodeConfig(item);});this.readyPlumbNodeFun(flag);});},//配置节点的具体信息makeNodeConfig(item) {this.PlumbInit.setSourceEnabled(item.id, true);this.PlumbInit.setTargetEnabled(item.id, true);this.PlumbInit.makeSource(item.id, sourceConfig);this.PlumbInit.makeTarget(item.id, targetConfig);this.PlumbInit.setDraggable(item.id, true);this.PlumbInit.draggable(item.id, {containment: "parent",stop: function (el) {item.left = el.pos[0];item.top = el.pos[1];},});},//渲染页面关系readyPlumbNodeFun(flag) {this.PlumbInit.ready(() => {this.renderList.forEach((item) => {this.PlumbInit.connect(item);});if (flag !== "once") {return;}//连线事件this.PlumbInit.bind("connection", (info) => {const sourceNode = this.dataInfo.find((item) => item.id === info.sourceId);if (sourceNode.to.includes(info.targetId)) {return false;}console.log("调用了几次");sourceNode.to.push(info.targetId);// this.$nextTick(() => {//   this.readyPlumbDataFun()// })return true;});//点击线条this.PlumbInit.bind("click", (con) => {this.deleteLineInfo = {source: con.sourceId,target: con.targetId,};this.deleteLine(this.deleteLineInfo);});});},//plumbNode的样式nodeStyle(item) {return {position: "absolute",left: item.left + "px",top: item.top + "px",width: "200px",height: "40px",lineHeight: "40px",textAlign: "center",borderLeft: "2px solid blue",borderRadius: "4%",cursor: "pointer",boxShadow: "#eee 3px 3px 3px 3px",};},//拖动开始start() {},//拖动结束end(e) {this.refreshCanvas();// 判断位置this.judgePosition(this.ativeNodeItem,this.canvasInfo,e.originalEvent.x,e.originalEvent.y);},//添加节点addNode(positionInfo, nodeInfo) {if (this.dataInfo.find((item) => item.id === nodeInfo.id)) {this.$message.error("该节点已经存在");return;}this.dataInfo.push({name: nodeInfo.name,id: nodeInfo.id,left: positionInfo.left,top: positionInfo.top,to: [],});this.$nextTick(() => {this.readyPlumbDataFun();});},//删除节点deleteNode($event, nodeInfo) {$event.returnValue = false;let index = this.dataInfo.findIndex((item) => item.id === nodeInfo.id);this.dataInfo.splice(index, 1);this.readyPlumbDataFun();},//删除线deleteLine(deleteLineInfo) {let dataInfo = cloneDeep(this.dataInfo);let node = dataInfo.find((val) => val.id === deleteLineInfo.source);let index = node.to.findIndex((val) => val === deleteLineInfo.target);node.to.splice(index, 1);this.dataInfo = null;this.dataInfo = dataInfo;this.readyPlumbDataFun();},checkInfo() {console.log(this.dataInfo, "dataInfo");console.log(this.renderList, "渲染关系");},//获取画布信息refreshCanvas() {this.canvasInfo = document.querySelector("#plumbBox").getBoundingClientRect();},//判断节点拖拽位置judgePosition(dragNodeInfo, plumbBoxPositionInfo, x, y) {if (x - this.nodePositionDiff.leftDiff < plumbBoxPositionInfo.left ||x + 200 - this.nodePositionDiff.leftDiff > plumbBoxPositionInfo.right ||y - this.nodePositionDiff.topDiff < plumbBoxPositionInfo.top ||y + 40 - this.nodePositionDiff.topDiff > plumbBoxPositionInfo.bottom) {this.$message.error("节点不能拖拽至画布之外");} else {const positionInfo = {top: y - plumbBoxPositionInfo.top - this.nodePositionDiff.topDiff,left: x - plumbBoxPositionInfo.left - this.nodePositionDiff.leftDiff,};this.addNode(positionInfo, dragNodeInfo);}},//鼠标抬起时,距离判定downNode(el, nodeItem) {this.ativeNodeItem = nodeItem;const mousedownPositionInfo = { x: el.clientX, y: el.clientY };// 被拖拽节点初始的位置信息const moveBoxBeforePosition = {x: el.target.getBoundingClientRect().x,y: el.target.getBoundingClientRect().y,};this.nodePositionDiff = {leftDiff: mousedownPositionInfo.x - moveBoxBeforePosition.x,topDiff: mousedownPositionInfo.y - moveBoxBeforePosition.y,};console.log(this.nodePositionDiff, "位置判定");},},
};
</script>
<style scoped>
.flowBox {display: flex;height: 100%;
}.leftMenu {width: 300px;/* height: 100%; */border: 1px solid #1a1919;
}h4 {margin-top: 10px;margin-left: 110px;
}.leftNode {width: 200px;height: 40px;line-height: 40px;text-align: center;margin: 30px;border: dashed 1px #362c2c;cursor: move;
}.plumbBox {flex: 1;/* height: 100%; */position: relative;
}
.pointNode {border-radius: 50%;width: 10px;height: 10px;background: royalblue;position: absolute;bottom: -5px;left: 95px;
}
</style>
各个函数的注释都写好了,操作方法也在其中,最主要的是根据插件暴露的api去领悟其中的每一个方法。
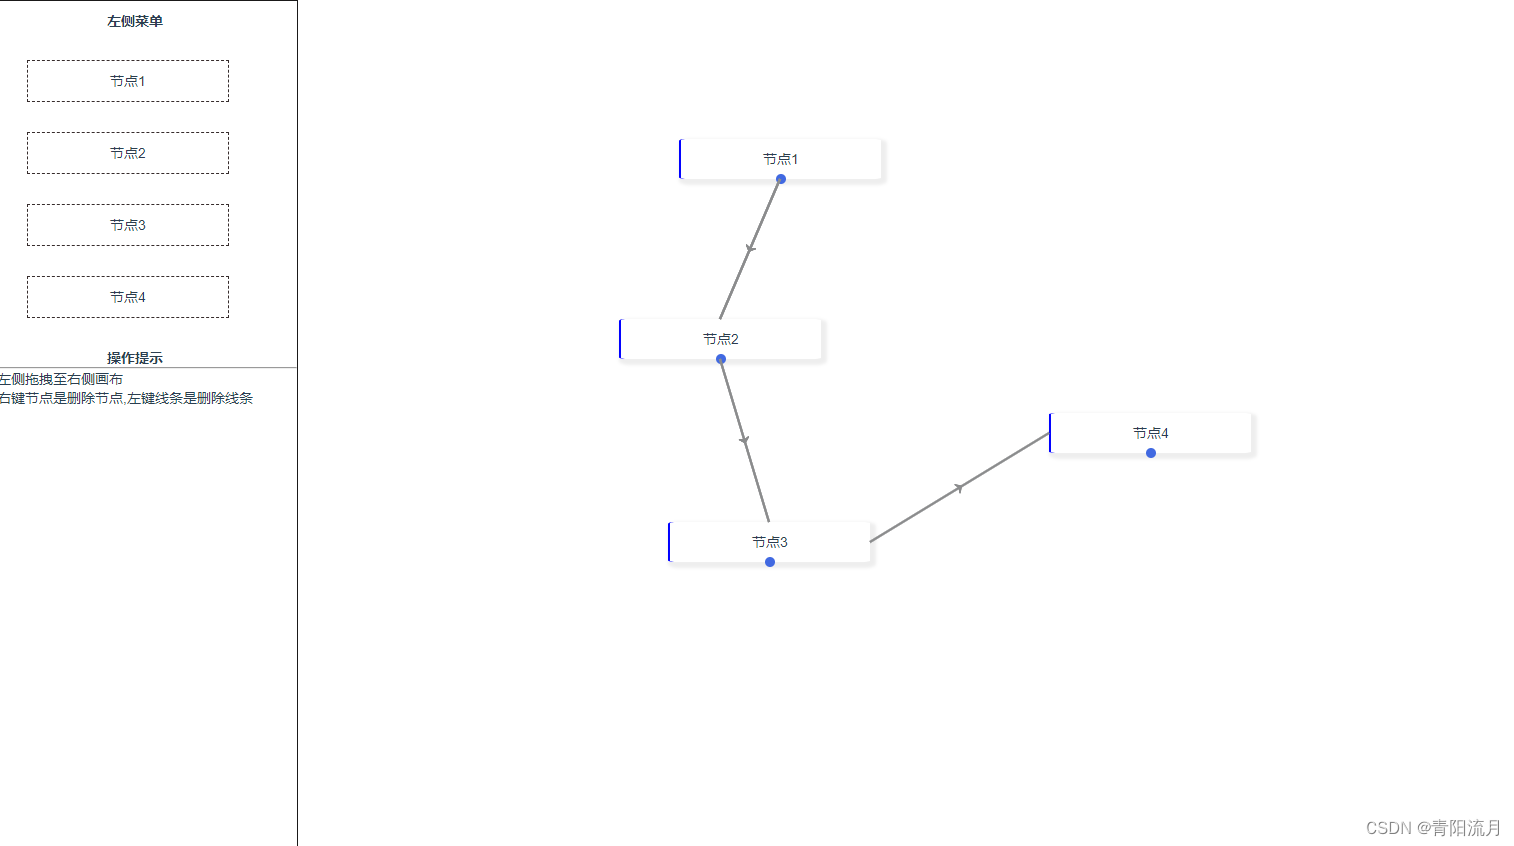
效果
这篇关于vue2中使用jsplumb完成流程图的文章就介绍到这儿,希望我们推荐的文章对编程师们有所帮助!


