本文主要是介绍用html+js+css3实现整屏滚动fullpage功能,希望对大家解决编程问题提供一定的参考价值,需要的开发者们随着小编来一起学习吧!
最近在jquery库中看到有人封装了整屏滚动(fullpage)的插件,感觉还挺有意思,然后想了一下怎么用原生js 实现。
本文的实例讲述了原生javascript实现的全屏滚动功能。分享供大家参考,具体如下:
1. 计算当前浏览器屏幕高度,每次翻页显示的内容高度即为屏幕高度
2. 对鼠标滚轮事件进行监听,注意滚轮事件的浏览器兼容问题。
效果图如下:

目录
一、先看看页面布局
html部分
css部分
js部分
二、代码总结
一、先看看页面布局
html部分
<div class="container"><div class="section section1"><h1>第1屏</h1></div><div class="section section2"><h1>第2屏</h1></div><div class="section section3"><h1>第3屏</h1></div><div class="section section4"><h1>第4屏</h1></div><div class="section section5"><h1>第5屏</h1></div></div><ul class="controls"><li class="active">1</li><li>2</li><li>3</li><li>4</li><li>5</li></ul>css部分
<style>* {padding: 0;margin: 0;}html,body {width: 100%;height: 100%;overflow: hidden;}.container {width: 100%;height: 500%;position: absolute;top: 0;transition: all 0.3s ease;}.section1 {background-color: rebeccapurple;background: url(./轮播图/img/01.jpg);}.section2 {background-color: skyblue;background: url(./轮播图/img/02.jpg);}.section3 {background-color: red;background: url(./轮播图/img/03.jpg);}.section4 {background-color: orange;background: url(./轮播图/img/04.jpg);}.section5 {background-color: lightgreen;background: url(./轮播图/img/05.jpg);}.section {width: 100%;height: 20%;display: flex;color: white;justify-content: center;align-items: center;background-size: cover;}.controls {position: absolute;top: 50%;right: 20px;transform: translateY(-50%);list-style: none;}.controls li {width: 50px;height: 50px;font: bold 22px/50px '宋体';text-align: center;background-color: #000;color: white;cursor: pointer;border-radius: 50%;}.controls li+li {margin-top: 5px;}.controls li.active {background-color: #fff;color: red;}</style>图片可以换成自己喜欢的图片。
js部分
主要核心部分
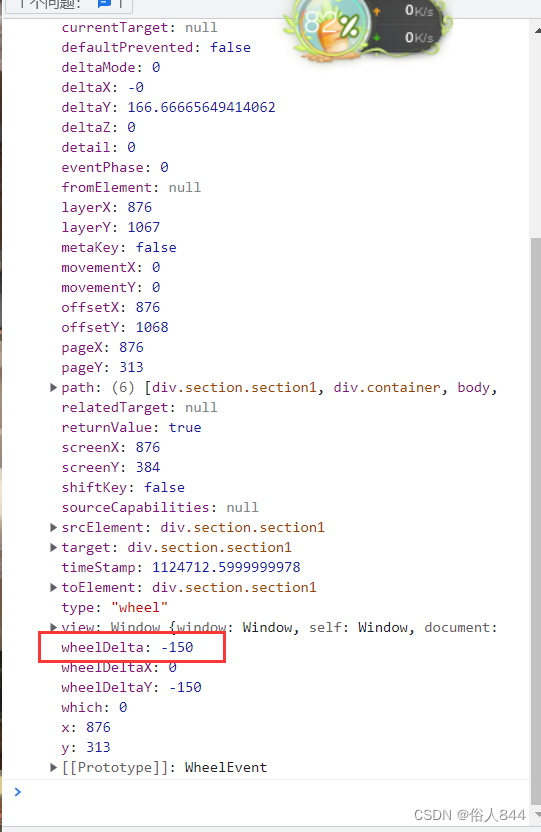
//实现滚动效果const container = document.querySelector('.container')const lis = document.querySelectorAll('.controls li') var viewHeight = null //声明页面高度var index = 0; //当前索引var flag = true; //节流开关document.addEventListener('mousewheel', function (e) {e = e || window.eventconsole.log(e);// 获取整屏的高度viewHeight = document.body.clientHeight;if (flag) { //节流阀flag = falseif (e.wheelDelta > 0) {index--if (index < 0) {index = 0}} else {index++;if (index > lis.length - 1) {index = lis.length - 1}}container.style.top = -index * viewHeight + 'px'changeColor(index)setTimeout(function () {flag = true}, 500)}})这里是本案例最核心的函数部分,1.给页面绑定鼠标滚轮事件,对鼠标滚轮事件进行监听,
通过事件对象event的wheelDelta属性值来判断鼠标滚动的方向:

wheelDelta的值为正的话说明鼠标向上滚动,值为负说明鼠标向下滚动。
2.这里使用了一个节流阀防止鼠标滚动过快导致屏幕滚动过快,用了一个开关思想,当鼠标触发滚动事件的时候将开关关闭,用延时定时器将开关打开。
小li颜色切换部分
//绑定点击事件for (let i = 0; i < lis.length; i++) {lis[i].onclick = function () {viewHeight = document.body.clientHeightindex = ichangeColor(index)container.style.top = -index * viewHeight + 'px'}}//改变小li颜色function changeColor(index) {for (var j = 0; j < lis.length; j++) {lis[j].className = ''}lis[index].className = 'active'}封装一个改变小li颜色的函数,通过传入索引,改变当前索引的小li类名,然后循环给小li绑定点击事件,这里使用let关键字的特点,具有块级作用域来保存每个小li的索引值,点击后将i值赋值给全局index保存索引。通过每次移动当前索引乘以整个屏幕的高度来实现滚动整个屏幕。
因为考虑兼容性问题,在点击小li或者滚动鼠标滚轮时重新获取一次整个屏幕的高度。防止因实时性出现问题。
二、代码总结
<!DOCTYPE html>
<html lang="en"><head><meta charset="UTF-8"><meta http-equiv="X-UA-Compatible" content="IE=edge"><meta name="viewport" content="width=device-width, initial-scale=1.0"><title>Document</title><style>* {padding: 0;margin: 0;}html,body {width: 100%;height: 100%;overflow: hidden;}.container {width: 100%;height: 500%;position: absolute;top: 0;transition: all 0.3s ease;}.section1 {background-color: rebeccapurple;background: url(./轮播图/img/01.jpg);}.section2 {background-color: skyblue;background: url(./轮播图/img/02.jpg);}.section3 {background-color: red;background: url(./轮播图/img/03.jpg);}.section4 {background-color: orange;background: url(./轮播图/img/04.jpg);}.section5 {background-color: lightgreen;background: url(./轮播图/img/05.jpg);}.section {width: 100%;height: 20%;display: flex;color: white;justify-content: center;align-items: center;background-size: cover;}.controls {position: absolute;top: 50%;right: 20px;transform: translateY(-50%);list-style: none;}.controls li {width: 50px;height: 50px;font: bold 22px/50px '宋体';text-align: center;background-color: #000;color: white;cursor: pointer;border-radius: 50%;}.controls li+li {margin-top: 5px;}.controls li.active {background-color: #fff;color: red;}</style>
</head><body><div class="container"><div class="section section1"><h1>第1屏</h1></div><div class="section section2"><h1>第2屏</h1></div><div class="section section3"><h1>第3屏</h1></div><div class="section section4"><h1>第4屏</h1></div><div class="section section5"><h1>第5屏</h1></div></div><ul class="controls"><li class="active">1</li><li>2</li><li>3</li><li>4</li><li>5</li></ul><script>//实现滚动效果const container = document.querySelector('.container')const lis = document.querySelectorAll('.controls li') var viewHeight = null //声明页面高度var index = 0; //当前索引var flag = true; //节流开关document.addEventListener('mousewheel', function (e) {e = e || window.eventconsole.log(e);// 获取整屏的高度viewHeight = document.body.clientHeight;if (flag) {  //节流阀flag = falseif (e.wheelDelta > 0) {index--if (index < 0) {index = 0}} else {index++;if (index > lis.length - 1) {index = lis.length - 1}}container.style.top = -index * viewHeight + 'px'changeColor(index)setTimeout(function () {flag = true}, 500)}})//绑定点击事件for (let i = 0; i < lis.length; i++) {lis[i].onclick = function () {viewHeight = document.body.clientHeightindex = ichangeColor(index)container.style.top = -index * viewHeight + 'px'}}//改变小li颜色function changeColor(index) {for (var j = 0; j < lis.length; j++) {lis[j].className = ''}lis[index].className = 'active'}</script>
</body></html>
感谢大家浏览!!!
这篇关于用html+js+css3实现整屏滚动fullpage功能的文章就介绍到这儿,希望我们推荐的文章对编程师们有所帮助!


