本文主要是介绍对称二叉树oblivious decision tree的简单实现python,希望对大家解决编程问题提供一定的参考价值,需要的开发者们随着小编来一起学习吧!
一、详情
可参见论文《BDT: Gradient Boosted Decision Tables for High Accuracy and Scoring Efficiency》
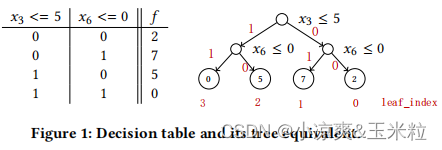
1.对称树也叫做决策表,每一层使用相同的分裂条件。
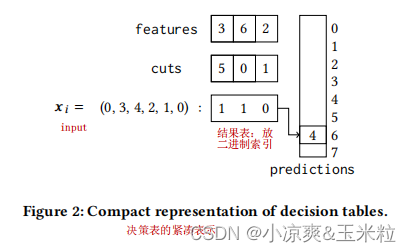
2.决策表的紧凑表示,这种表示会导致非常小的内存占用,并使其对缓存相当友好。
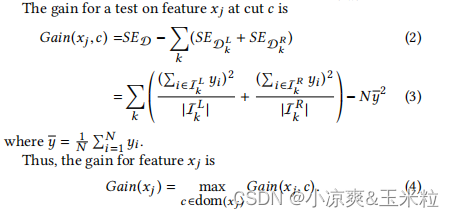
3.损失函数
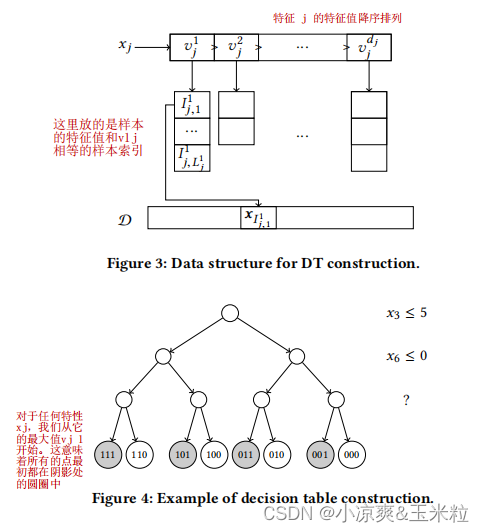
4.具体实现的时候,采样下面的结构表示决策表,可以加速计算Gain。
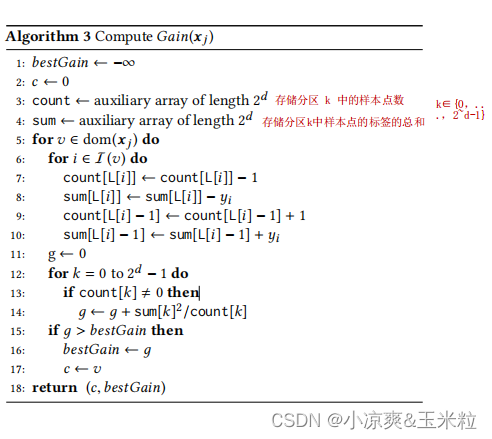
5.计算Gain
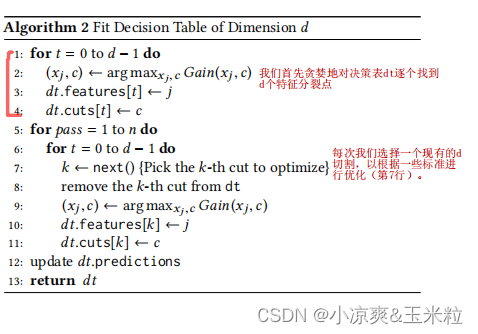
6.构建决策表
二、代码
本例子较为简单,只是实现了回归的Decision Tables,而且没有包括反拟合算法。
import pandas as pd
import numpy as np
import sklearn.datasets as datasets
from numpy import *
import copy as cp
import sklearn.metrics as metrics
from sklearn.model_selection import train_test_split#特征值和原本索引结构
class Sample_index(object):def __init__(self):self.featureIndex = []self.feature_values = []self.sample_index = []#决策表的类
class Decision_table(object):def __init__(self):self.features = []self.cuts = []self.predictions = []#为每个特征的特征值遍历样本索引
def visit_feature_value_sample_index(X_train):m, n = X_train.shapefeature_sample_index = Sample_index() #每个特征的特征值对应的样本索引for feaIndex in range(n):  # 遍历特征feature_sample_index.featureIndex.append(feaIndex)feature_values = np.sort(list(set(X_train[:, feaIndex])))[::-1].tolist() # 将特征值按照降序排列feature_sample_index.feature_values.append(feature_values)value_sample_index_list = []for value in feature_values:  # 遍历数据集,生成对于特征值的样本索引sample_index_list = []for j in np.where(X_train[:, feaIndex] == value):sample_index_list.append(j)value_sample_index_list.append(sample_index_list)feature_sample_index.sample_index.append(value_sample_index_list)return feature_sample_index#选择最好的分裂点
def choose_best_feature(y_train, depth, Sample_index, Partition_label, Count, Sum, bestGain):bestGain = bestGain #最大的熵增c = None #特征 x_j的最好划分特征值best_feature_index = None #最好划分的特征 x_j索引best_count = None #落入每个分区的样本数best_sum = None #落入每个分区的样本标签值之和best_partition_label = None #每个样本对应的分区索引sample_index = Sample_index#计算特征x_j在第d次划分时的收益for feature_index in sample_index.featureIndex:count = cp.deepcopy(Count)  # 存储分区 k 中的样本点数sum = cp.deepcopy(Sum)  # 存储分区k中样本点的标签的总和partition_label = cp.deepcopy(Partition_label)  # 记录每个样本对应的分区索引for value_index in range(len(sample_index.feature_values[feature_index])):  # 遍历特征if value_index != 0:for data_index in sample_index.sample_index[feature_index][value_index-1]:#遍历特征值下的样本集索引count[partition_label[data_index].astype(np.int32)] = count[partition_label[data_index].astype(np.int32)] -1sum[partition_label[data_index].astype(np.int32)] = sum[partition_label[data_index].astype(np.int32)] - y_train[data_index]count[partition_label[data_index].astype(np.int32) - 1] = count[partition_label[data_index].astype(np.int32) - 1] + 1sum[partition_label[data_index].astype(np.int32) - 1] = sum[partition_label[data_index].astype(np.int32) - 1] + y_train[data_index]partition_label[data_index] = partition_label[data_index] -1gain = 0for k in range(np.power(2, depth)):if count[k] != 0:gain = gain + (sum[k] * sum[k]) / count[k]if gain > bestGain:bestGain = gainc = list(sample_index.feature_values[feature_index])[value_index]best_feature_index = feature_indexbest_count = cp.deepcopy(count)best_sum = cp.deepcopy(sum)best_partition_label = cp.deepcopy(partition_label)return best_feature_index, c, bestGain, best_count, best_sum, best_partition_label#根据partition_label来统计count和sum的数量
def create_count_sum(partition_label, y_train, depth):partition_num = np.power(2, depth)count = np.zeros([partition_num])sum = np.zeros([partition_num])for i in range(partition_num):count[i] = np.sum(partition_label == i)for j in np.where(partition_label == i)[0]:sum[i] += y_train[j]return count, sum#计算分区的值=叶子节点的值
def get_leafs(count, sum):partition_num = len(sum)predictions = np.zeros([partition_num])for i in range(partition_num):if count[i] != 0:predictions[i] = sum[i] / count[i]return predictions.tolist()#建立决策表
def generate_decision_table(X_train, y_train, sample_index, depth = 2):m, n = X_train.shapecount = np.zeros([2])  # 存储分区 k 中的样本点数sum = np.zeros([2])  # 存储分区k中样本点的标签的总和sample_index = sample_indexGain = -inf  # 最大的熵增#对count,sum,partition_label进行初始化,对于第一次分裂,所有样本都在第1分区count[1] = msum[1] = y_train.sum()partition_label = np.ones([m])  # 记录每个样本对应的分区索引dt = Decision_table() #初始化决策表#贪婪的对决策表找到 其在拟合前 <= depth 个分裂点for t in range(depth):best_feature_index, best_value, bestGain, best_count, best_sum, best_partition_label = choose_best_feature(y_train, t+1, sample_index, partition_label, count, sum, Gain)if best_feature_index == None:breakfeature_index = cp.deepcopy(best_feature_index)value = cp.deepcopy(best_value)partition_label = cp.deepcopy(best_partition_label)count = cp.deepcopy(best_count)sum = cp.deepcopy(best_sum)Gain = bestGaindt.features.append(feature_index)dt.cuts.append(value)if t != depth-1:for i in range(len(partition_label)): #更新下一次分割的样本分区分布partition_label[i] = 2 * partition_label[i] + 1count, sum = create_count_sum(partition_label, y_train, t + 2)#backfiting 这部分的论文内容不太看得明白#叶子的值/每个分区的样本值dt.predictions = get_leafs(count, sum)return dt#用训练好的模型来预测测试集
def tree_table_predict(datasets, tree_table):m, n = datasets.shapedepth = len(tree_table.features)y_hat = np.zeros([m], dtype=int)j = 0for row in datasets:partition_label2 = np.zeros([depth], dtype=int)for i in range(depth):feature_index = int(tree_table.features[i])if float(row[feature_index]) <= tree_table.cuts[i]:partition_label2[i] = 1else:partition_label2[i] = 0#二进制转十进制partition_label2 = partition_label2.tolist()partition_label2 = ''.join(str(i) for i in partition_label2)partition_label10 = int(partition_label2, 2)y_hat[j] = tree_table.predictions[partition_label10]j += 1return y_hatif __name__ == '__main__':#准备数据boston = datasets.load_boston()x = boston['data']y = boston['target']feature_name = list(range(0, 13))#划分数据集X_train, X_test, y_train, y_test = train_test_split(x, y, test_size=0.2)#初始化每个特征值下的样本索引sample_index = visit_feature_value_sample_index(X_train)#建树tree_table = generate_decision_table(X_train, y_train, sample_index, depth=3)print("true_depth= ", len(tree_table.features))#预测y_hat = tree_table_predict(X_test, tree_table)# print("y_hat=", y_hat)#评估MAE = metrics.mean_absolute_error(y_test, y_hat)print("MAE= ", MAE)
这篇关于对称二叉树oblivious decision tree的简单实现python的文章就介绍到这儿,希望我们推荐的文章对编程师们有所帮助!


