本文主要是介绍高层API助你快速上手深度学习----【第二课作业】十二生肖分类详解,希望对大家解决编程问题提供一定的参考价值,需要的开发者们随着小编来一起学习吧!
① 问题定义
十二生肖分类的本质是图像分类任务,我们采用CNN网络结构进行相关实践。
② 数据准备
2.1 解压缩数据集
我们将网上获取的数据集以压缩包的方式上传到aistudio数据集中,并加载到我们的项目内。
在使用之前我们进行数据集压缩包的一个解压。
!unzip -q -o data/data68755/signs.zip
2.2 数据标注
我们先看一下解压缩后的数据集长成什么样子。
.
├── test
│   ├── dog
│   ├── dragon
│   ├── goat
│   ├── horse
│   ├── monkey
│   ├── ox
│   ├── pig
│   ├── rabbit
│   ├── ratt
│   ├── rooster
│   ├── snake
│   └── tiger
├── train
│   ├── dog
│   ├── dragon
│   ├── goat
│   ├── horse
│   ├── monkey
│   ├── ox
│   ├── pig
│   ├── rabbit
│   ├── ratt
│   ├── rooster
│   ├── snake
│   └── tiger
└── valid├── dog├── dragon├── goat├── horse├── monkey├── ox├── pig├── rabbit├── ratt├── rooster├── snake└── tiger
数据集分为train、valid、test三个文件夹,每个文件夹内包含12个分类文件夹,每个分类文件夹内是具体的样本图片。
我们对这些样本进行一个标注处理,最终生成train.txt/valid.txt/test.txt三个数据标注文件。
import io
import os
from PIL import Image
from config import get# 数据集根目录
DATA_ROOT = 'signs'# 标签List
LABEL_MAP = get('LABEL_MAP')# 标注生成函数
def generate_annotation(mode):# 建立标注文件with open('{}/{}.txt'.format(DATA_ROOT, mode), 'w') as f:# 对应每个用途的数据文件夹,train/valid/testtrain_dir = '{}/{}'.format(DATA_ROOT, mode)# 遍历文件夹,获取里面的分类文件夹for path in os.listdir(train_dir):# 标签对应的数字索引,实际标注的时候直接使用数字索引label_index = LABEL_MAP.index(path)# 图像样本所在的路径image_path = '{}/{}'.format(train_dir, path)# 遍历所有图像for image in os.listdir(image_path):# 图像完整路径和名称image_file = '{}/{}'.format(image_path, image)try:# 验证图片格式是否okwith open(image_file, 'rb') as f_img:image = Image.open(io.BytesIO(f_img.read()))image.load()if image.mode == 'RGB':f.write('{}\t{}\n'.format(image_file, label_index))except:continuegenerate_annotation('train')  # 生成训练集标注文件
generate_annotation('valid')  # 生成验证集标注文件
generate_annotation('test')   # 生成测试集标注文件
2.3 数据集定义
接下来我们使用标注好的文件进行数据集类的定义,方便后续模型训练使用。
2.3.1 导入相关库
import paddle
import numpy as np
from config import getpaddle.__version__
'2.0.0'
2.3.2 导入数据集的定义实现
我们数据集的代码实现是在dataset.py中。
from dataset import ZodiacDataset
2.3.3 实例化数据集类
根据所使用的数据集需求实例化数据集类,并查看总样本量。
train_dataset = ZodiacDataset(mode='train')
valid_dataset = ZodiacDataset(mode='valid')print('训练数据集:{}张;验证数据集:{}张'.format(len(train_dataset), len(valid_dataset)))
训练数据集:7096张;验证数据集:639张
③ 模型选择和开发
3.1 网络构建
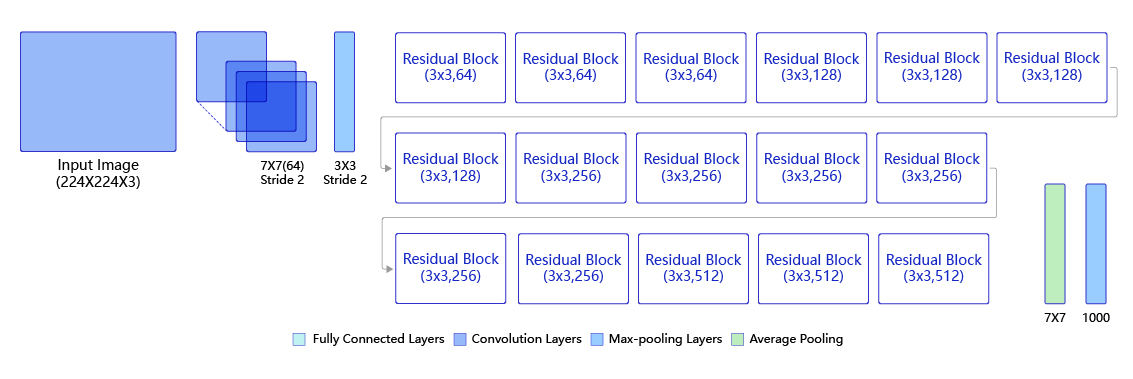
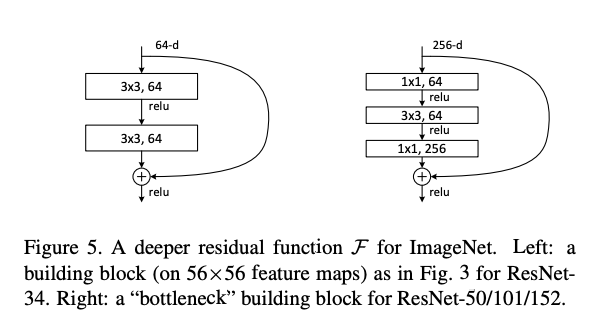
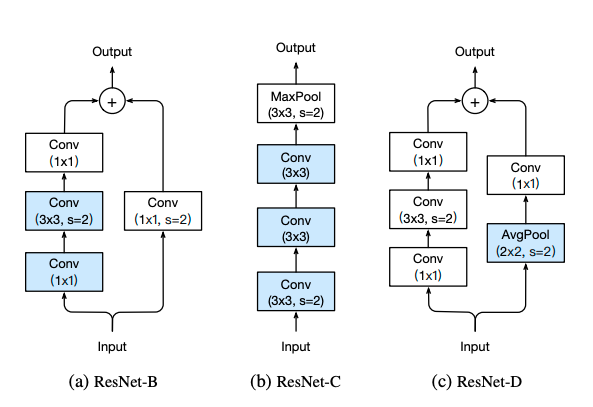
本次我们使用ResNet50网络来完成我们的案例实践。
1)ResNet系列网络

2)ResNet50结构

3)残差区块

4)ResNet其他版本


# 请补齐模型实例化代码network=paddle.vision.models.resnet101(num_classes=get('num_classes'), pretrained=True)
100%|██████████| 263160/263160 [00:03<00:00, 68870.66it/s]
/opt/conda/envs/python35-paddle120-env/lib/python3.7/site-packages/paddle/fluid/dygraph/layers.py:1263: UserWarning: Skip loading for fc.weight. fc.weight receives a shape [2048, 1000], but the expected shape is [2048, 12].warnings.warn(("Skip loading for {}. ".format(key) + str(err)))
/opt/conda/envs/python35-paddle120-env/lib/python3.7/site-packages/paddle/fluid/dygraph/layers.py:1263: UserWarning: Skip loading for fc.bias. fc.bias receives a shape [1000], but the expected shape is [12].warnings.warn(("Skip loading for {}. ".format(key) + str(err)))
模型可视化
model = paddle.Model(network)
model.summary((-1, ) + tuple(get('image_shape')))
④ 模型训练和优化
EPOCHS = get('epochs')
BATCH_SIZE = get('batch_size')# 请补齐模型训练过程代码
def create_optim(parameters):step_each_epoch = get('total_images') // get('batch_size')lr = paddle.optimizer.lr.CosineAnnealingDecay(learning_rate=get('LEARNING_RATE.params.lr'),T_max=step_each_epoch * EPOCHS)return paddle.optimizer.Momentum(learning_rate=lr,parameters=parameters,weight_decay=paddle.regularizer.L2Decay(get('OPTIMIZER.regularizer.factor')))# 模型训练配置
model.prepare(create_optim(network.parameters()),  # 优化器paddle.nn.CrossEntropyLoss(),        # 损失函数paddle.metric.Accuracy(topk=(1, 5))) # 评估指标# 训练可视化VisualDL工具的回调函数
visualdl = paddle.callbacks.VisualDL(log_dir='visualdl_log')# 启动模型全流程训练
model.fit(train_dataset,            # 训练数据集valid_dataset,            # 评估数据集epochs=EPOCHS,            # 总的训练轮次batch_size=BATCH_SIZE,    # 批次计算的样本量大小shuffle=True,             # 是否打乱样本集verbose=1,                # 日志展示格式save_dir='./chk_points/', # 分阶段的训练模型存储路径callbacks=[visualdl])     # 回调函数使用
The loss value printed in the log is the current step, and the metric is the average value of previous step.
Epoch 1/20/opt/conda/envs/python35-paddle120-env/lib/python3.7/site-packages/paddle/nn/layer/norm.py:636: UserWarning: When training, we now always track global mean and variance."When training, we now always track global mean and variance.")step 111/111 [==============================] - loss: 0.2994 - acc_top1: 0.8129 - acc_top5: 0.9569 - 2s/step
save checkpoint at /home/aistudio/chk_points/0
Eval begin...
The loss value printed in the log is the current batch, and the metric is the average value of previous step.
step 10/10 [==============================] - loss: 0.2774 - acc_top1: 0.9233 - acc_top5: 0.9953 - 2s/step
Eval samples: 639
Epoch 2/20
step 111/111 [==============================] - loss: 0.4724 - acc_top1: 0.9012 - acc_top5: 0.9873 - 2s/step
save checkpoint at /home/aistudio/chk_points/1
Eval begin...
The loss value printed in the log is the current batch, and the metric is the average value of previous step.
step 10/10 [==============================] - loss: 0.1623 - acc_top1: 0.9264 - acc_top5: 0.9953 - 2s/step
Eval samples: 639
Epoch 3/20
step 111/111 [==============================] - loss: 0.2196 - acc_top1: 0.9088 - acc_top5: 0.9893 - 2s/step
save checkpoint at /home/aistudio/chk_points/2
Eval begin...
The loss value printed in the log is the current batch, and the metric is the average value of previous step.
step 10/10 [==============================] - loss: 0.3726 - acc_top1: 0.9452 - acc_top5: 0.9953 - 2s/step
Eval samples: 639
Epoch 4/20
step 111/111 [==============================] - loss: 0.1125 - acc_top1: 0.9218 - acc_top5: 0.9897 - 2s/step
save checkpoint at /home/aistudio/chk_points/3
Eval begin...
The loss value printed in the log is the current batch, and the metric is the average value of previous step.
step 10/10 [==============================] - loss: 0.1343 - acc_top1: 0.9484 - acc_top5: 0.9922 - 2s/step
Eval samples: 639
Epoch 5/20
step 111/111 [==============================] - loss: 0.2677 - acc_top1: 0.9308 - acc_top5: 0.9903 - 2s/step
save checkpoint at /home/aistudio/chk_points/4
Eval begin...
The loss value printed in the log is the current batch, and the metric is the average value of previous step.
step 10/10 [==============================] - loss: 0.2783 - acc_top1: 0.9499 - acc_top5: 0.9937 - 2s/step
Eval samples: 639
Epoch 6/20
step 111/111 [==============================] - loss: 0.2177 - acc_top1: 0.9312 - acc_top5: 0.9927 - 2s/step
save checkpoint at /home/aistudio/chk_points/5
Eval begin...
The loss value printed in the log is the current batch, and the metric is the average value of previous step.
step 10/10 [==============================] - loss: 0.3158 - acc_top1: 0.9515 - acc_top5: 0.9969 - 2s/step
Eval samples: 639
Epoch 7/20
step 111/111 [==============================] - loss: 0.0833 - acc_top1: 0.9408 - acc_top5: 0.9938 - 2s/step
save checkpoint at /home/aistudio/chk_points/6
Eval begin...
The loss value printed in the log is the current batch, and the metric is the average value of previous step.
step 10/10 [==============================] - loss: 0.1721 - acc_top1: 0.9484 - acc_top5: 1.0000 - 2s/step
Eval samples: 639
Epoch 8/20
step 111/111 [==============================] - loss: 0.1454 - acc_top1: 0.9474 - acc_top5: 0.9937 - 2s/step
save checkpoint at /home/aistudio/chk_points/7
Eval begin...
The loss value printed in the log is the current batch, and the metric is the average value of previous step.
step 10/10 [==============================] - loss: 0.3457 - acc_top1: 0.9593 - acc_top5: 0.9953 - 2s/step
Eval samples: 639
Epoch 9/20
step 111/111 [==============================] - loss: 0.0632 - acc_top1: 0.9501 - acc_top5: 0.9938 - 2s/step
save checkpoint at /home/aistudio/chk_points/8
Eval begin...
The loss value printed in the log is the current batch, and the metric is the average value of previous step.
step 10/10 [==============================] - loss: 0.2145 - acc_top1: 0.9671 - acc_top5: 0.9953 - 2s/step
Eval samples: 639
Epoch 10/20
step 111/111 [==============================] - loss: 0.1419 - acc_top1: 0.9507 - acc_top5: 0.9948 - 2s/step
save checkpoint at /home/aistudio/chk_points/9
Eval begin...
The loss value printed in the log is the current batch, and the metric is the average value of previous step.
step 10/10 [==============================] - loss: 0.1284 - acc_top1: 0.9687 - acc_top5: 0.9984 - 2s/step
Eval samples: 639
Epoch 11/20
step 111/111 [==============================] - loss: 0.1837 - acc_top1: 0.9567 - acc_top5: 0.9962 - 2s/step
save checkpoint at /home/aistudio/chk_points/10
Eval begin...
The loss value printed in the log is the current batch, and the metric is the average value of previous step.
step 10/10 [==============================] - loss: 0.2203 - acc_top1: 0.9624 - acc_top5: 0.9984 - 2s/step
Eval samples: 639
Epoch 12/20
step 111/111 [==============================] - loss: 0.0954 - acc_top1: 0.9631 - acc_top5: 0.9961 - 2s/step
save checkpoint at /home/aistudio/chk_points/11
Eval begin...
The loss value printed in the log is the current batch, and the metric is the average value of previous step.
step 10/10 [==============================] - loss: 0.1996 - acc_top1: 0.9609 - acc_top5: 0.9969 - 2s/step
Eval samples: 639
Epoch 13/20
step 111/111 [==============================] - loss: 0.1991 - acc_top1: 0.9612 - acc_top5: 0.9946 - 2s/step
save checkpoint at /home/aistudio/chk_points/12
Eval begin...
The loss value printed in the log is the current batch, and the metric is the average value of previous step.
step 10/10 [==============================] - loss: 0.1538 - acc_top1: 0.9562 - acc_top5: 0.9969 - 2s/step
Eval samples: 639
Epoch 14/20
step 111/111 [==============================] - loss: 0.2008 - acc_top1: 0.9643 - acc_top5: 0.9966 - 2s/step
save checkpoint at /home/aistudio/chk_points/13
Eval begin...
The loss value printed in the log is the current batch, and the metric is the average value of previous step.
step 10/10 [==============================] - loss: 0.2580 - acc_top1: 0.9656 - acc_top5: 0.9984 - 2s/step
Eval samples: 639
Epoch 15/20
step 111/111 [==============================] - loss: 0.1571 - acc_top1: 0.9656 - acc_top5: 0.9965 - 2s/step
save checkpoint at /home/aistudio/chk_points/14
Eval begin...
The loss value printed in the log is the current batch, and the metric is the average value of previous step.
step 10/10 [==============================] - loss: 0.2078 - acc_top1: 0.9577 - acc_top5: 1.0000 - 2s/step
Eval samples: 639
Epoch 16/20
step 111/111 [==============================] - loss: 0.0766 - acc_top1: 0.9656 - acc_top5: 0.9972 - 2s/step
save checkpoint at /home/aistudio/chk_points/15
Eval begin...
The loss value printed in the log is the current batch, and the metric is the average value of previous step.
step 10/10 [==============================] - loss: 0.2247 - acc_top1: 0.9546 - acc_top5: 0.9969 - 2s/step
Eval samples: 639
Epoch 17/20
step 111/111 [==============================] - loss: 0.0959 - acc_top1: 0.9649 - acc_top5: 0.9969 - 2s/step
save checkpoint at /home/aistudio/chk_points/16
Eval begin...
The loss value printed in the log is the current batch, and the metric is the average value of previous step.
step 10/10 [==============================] - loss: 0.2885 - acc_top1: 0.9593 - acc_top5: 0.9953 - 2s/step
Eval samples: 639
Epoch 18/20
step 111/111 [==============================] - loss: 0.0430 - acc_top1: 0.9682 - acc_top5: 0.9968 - 2s/step
save checkpoint at /home/aistudio/chk_points/17
Eval begin...
The loss value printed in the log is the current batch, and the metric is the average value of previous step.
step 10/10 [==============================] - loss: 0.2386 - acc_top1: 0.9577 - acc_top5: 0.9969 - 2s/step
Eval samples: 639
Epoch 19/20
step 111/111 [==============================] - loss: 0.1366 - acc_top1: 0.9659 - acc_top5: 0.9968 - 2s/step
save checkpoint at /home/aistudio/chk_points/18
Eval begin...
The loss value printed in the log is the current batch, and the metric is the average value of previous step.
step 10/10 [==============================] - loss: 0.2560 - acc_top1: 0.9562 - acc_top5: 0.9969 - 2s/step
Eval samples: 639
Epoch 20/20
step 111/111 [==============================] - loss: 0.0891 - acc_top1: 0.9666 - acc_top5: 0.9970 - 2s/step
save checkpoint at /home/aistudio/chk_points/19
Eval begin...
The loss value printed in the log is the current batch, and the metric is the average value of previous step.
step 10/10 [==============================] - loss: 0.2363 - acc_top1: 0.9609 - acc_top5: 0.9953 - 2s/step
Eval samples: 639
save checkpoint at /home/aistudio/chk_points/final
模型存储
将我们训练得到的模型进行保存,以便后续评估和测试使用。
model.save(get('model_save_dir'))
⑤ 模型评估和测试
5.1 批量预测测试
5.1.1 测试数据集
predict_dataset = ZodiacDataset(mode='test')
print('测试数据集样本量:{}'.format(len(predict_dataset)))
测试数据集样本量:646
5.1.2 执行预测
from paddle.static import InputSpec# 请补充网络结构# 网络结构示例化
network = paddle.vision.models.resnet101(num_classes=get('num_classes'))# 模型封装
model_2 = paddle.Model(network, inputs=[InputSpec(shape=[-1] + get('image_shape'), dtype='float32', name='image')])# 训练好的模型加载
model_2.load(get('model_save_dir'))# 模型配置
model_2.prepare()# 执行预测
result = model_2.predict(predict_dataset)
Predict begin.../opt/conda/envs/python35-paddle120-env/lib/python3.7/site-packages/paddle/fluid/layers/utils.py:77: DeprecationWarning: Using or importing the ABCs from 'collections' instead of from 'collections.abc' is deprecated, and in 3.8 it will stop workingreturn (isinstance(seq, collections.Sequence) andstep 646/646 [==============================] - 278ms/step
Predict samples: 646
# 样本映射
LABEL_MAP = get('LABEL_MAP')# 随机取样本展示
indexs = [2, 38, 56, 92, 100, 303]for idx in indexs:predict_label = np.argmax(result[0][idx])real_label = predict_dataset[idx][1]print('样本ID:{}, 真实标签:{}, 预测值:{}'.format(idx, LABEL_MAP[real_label], LABEL_MAP[predict_label]))
样本ID:2, 真实标签:pig, 预测值:pig
样本ID:38, 真实标签:pig, 预测值:pig
样本ID:56, 真实标签:ratt, 预测值:ratt
样本ID:92, 真实标签:ratt, 预测值:ratt
样本ID:100, 真实标签:ratt, 预测值:ratt
样本ID:303, 真实标签:snake, 预测值:snake
⑥ 模型部署
model_2.save('infer/zodiac', training=False)
/opt/conda/envs/python35-paddle120-env/lib/python3.7/site-packages/paddle/fluid/layers/math_op_patch.py:298: UserWarning: /opt/conda/envs/python35-paddle120-env/lib/python3.7/site-packages/paddle/vision/models/resnet.py:145
The behavior of expression A + B has been unified with elementwise_add(X, Y, axis=-1) from Paddle 2.0. If your code works well in the older versions but crashes in this version, try to use elementwise_add(X, Y, axis=0) instead of A + B. This transitional warning will be dropped in the future.op_type, op_type, EXPRESSION_MAP[method_name]))
这篇关于高层API助你快速上手深度学习----【第二课作业】十二生肖分类详解的文章就介绍到这儿,希望我们推荐的文章对编程师们有所帮助!


