本文主要是介绍OpenCV 3 drawContours(),希望对大家解决编程问题提供一定的参考价值,需要的开发者们随着小编来一起学习吧!
OpenCV 3 drawContours()
OpenCV documentation index - OpenCV 文档索引
https://www.docs.opencv.org/
master (4.x)
https://www.docs.opencv.org/master/
3.4 (3.4.x)
https://www.docs.opencv.org/3.4/
2.4 (2.4.x)
https://www.docs.opencv.org/2.4/
Welcome to OpenCV-Python Tutorials’s documentation!
https://opencv-python-tutroals.readthedocs.io/en/latest/index.html
1. 3.4 (3.4.x) -> Modules -> Image Processing -> Drawing Functions -> drawContours()
1.1 Function Documentation - drawContours()
void cv::drawContours (InputOutputArray image,
InputArrayOfArrays contours,
int contourIdx,
const Scalar & color,
int thickness = 1,
int lineType = LINE_8,
InputArray hierarchy = noArray(),
int maxLevel = INT_MAX,
Point offset = Point()
)
Python
image = cv.drawContours(image, contours, contourIdx, color[, thickness[, lineType[, hierarchy[, maxLevel[, offset]]]]])
#include <opencv2/imgproc.hpp>
contour [ˈkɒntʊə(r)]:n. 轮廓,等高线,周线,电路,概要 vt. 画轮廓,画等高线
fill [fɪl]:vt. 装满,使充满,满足,堵塞,任职 vi. 被充满,膨胀 n. 满足,填满的量,装填物
outline [ˈaʊtlaɪn]:n. 轮廓,大纲,概要,略图 vt. 概述,略述,描画...轮廓
Draws contours outlines or filled contours.
The function draws contour outlines in the image if thickness ≥ \geq ≥ 0 or fills the area bounded by the contours if thickness < 0 . The example below shows how to retrieve connected components from the binary image and label them:
如果 thickness ≥ \geq ≥ 0,则该函数在图像中绘制 contour 轮廓。如果 thickness < 0,则该功能填充轮廓所包围的区域。下面的示例显示了如何从二进制映像中检索连接的组件并对其进行标记:
#include "opencv2/imgproc.hpp"
#include "opencv2/highgui.hpp"
using namespace cv;
using namespace std;
int main( int argc, char** argv )
{Mat src;// the first command-line parameter must be a filename of the binary// (black-n-white) imageif( argc != 2 || !(src=imread(argv[1], 0)).data)return -1;Mat dst = Mat::zeros(src.rows, src.cols, CV_8UC3);src = src > 1;namedWindow( "Source", 1 );imshow( "Source", src );vector<vector<Point> > contours;vector<Vec4i> hierarchy;findContours( src, contours, hierarchy,RETR_CCOMP, CHAIN_APPROX_SIMPLE );// iterate through all the top-level contours,// draw each connected component with its own random colorint idx = 0;for( ; idx >= 0; idx = hierarchy[idx][0] ){Scalar color( rand()&255, rand()&255, rand()&255 );drawContours( dst, contours, idx, color, FILLED, 8, hierarchy );}namedWindow( "Components", 1 );imshow( "Components", dst );waitKey(0);
}
Parameters
image - Destination image. (要绘制轮廓的图像。)
contours - All the input contours. Each contour is stored as a point vector. (所有输入的轮廓,每个轮廓被保存成一个 point vector。)
contourIdx - Parameter indicating a contour to draw. If it is negative, all the contours are drawn. (指定要绘制轮廓的编号,如果是负数,则绘制所有的轮廓。)
color - Color of the contours. (绘制轮廓所用的颜色。)
thickness - Thickness of lines the contours are drawn with. If it is negative (for example, thickness=FILLED ), the contour interiors are drawn. (绘制轮廓的线的粗细,如果是负数,则轮廓内部被填充。)
lineType - Line connectivity. See LineTypes (绘制轮廓的线的连通性。)
hierarchy - Optional information about hierarchy. It is only needed if you want to draw only some of the contours (see maxLevel ). (关于层级的可选参数,只有绘制部分轮廓时才会用到。)
maxLevel - Maximal level for drawn contours. If it is 0, only the specified contour is drawn. If it is 1, the function draws the contour(s) and all the nested contours. If it is 2, the function draws the contours, all the nested contours, all the nested-to-nested contours, and so on. This parameter is only taken into account when there is hierarchy available. (绘制轮廓的最高级别,这个参数只有hierarchy有效的时候才有效。maxLevel=0,绘制与输入轮廓属于同一等级的所有轮廓即输入轮廓和与其相邻的轮廓。maxLevel=1,绘制与输入轮廓同一等级的所有轮廓与其子节点。maxLevel=2,绘制与输入轮廓同一等级的所有轮廓与其子节点以及子节点的子节点。)
offset - Optional contour shift parameter. Shift all the drawn contours by the specified offset=(dx,dy).
interior [ɪnˈtɪəriə(r)]:n. 内部,里面,内景,内陆,腹地,内政,内务,本质 adj. 内部的,里面的,内位的,内陆的,腹地的,内务的,内政的,心灵的,精神的,本质的
When thickness=FILLED, the function is designed to handle connected components with holes correctly even when no hierarchy date is provided. This is done by analyzing all the outlines together using even-odd rule. This may give incorrect results if you have a joint collection of separately retrieved contours. In order to solve this problem, you need to call drawContours separately for each sub-group of contours, or iterate over the collection using contourIdx parameter.
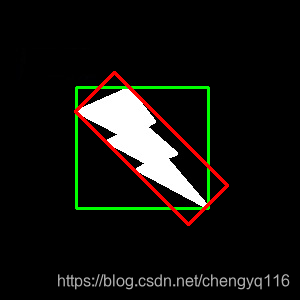
1.2 Rotated Rectangle
Here, bounding rectangle is drawn with minimum area, so it considers the rotation also. The function used is cv2.minAreaRect(). It returns a Box2D structure which contains following detals - (the center point (mass center) (x,y), (width, height), angle of rotation). But to draw this rectangle, we need 4 corners of the rectangle. It is obtained by the function cv2.boxPoints()
在这里,边界矩形是用最小面积绘制的,因此它也考虑了旋转。使用的函数是 cv2.minAreaRect()。它返回一个 Box2D 结构,其中包含以下细节- (the center point (mass center) (x,y), (width, height), angle of rotation)。但是要绘制此矩形,我们需要矩形的 4 个角。它是通过函数 cv2.boxPoints() 获得的。
center - The rectangle mass center. (矩形质心。)
size - Width and height of the rectangle.
angle - The rotation angle in a clockwise direction. When the angle is 0, 90, 180, 270 etc., the rectangle becomes an up-right rectangle. (顺时针方向的旋转角度。当角度为 0、90、180、270 等时,该矩形变为直立矩形。)
rect = cv2.minAreaRect(cnt)
box = cv2.boxPoints(rect)
box = np.int0(box)
im = cv2.drawContours(im,[box],0,(0,0,255),2)
Both the rectangles are shown in a single image. Green rectangle shows the normal bounding rect. Red rectangle is the rotated rect.
两个矩形都显示在单个图像中。绿色矩形显示正常的边界矩形。红色矩形是旋转的矩形。

2. Example
#!/usr/bin/env python
# -*- coding: utf-8 -*-
# Yongqiang Chengfrom __future__ import absolute_import
from __future__ import print_function
from __future__ import divisionimport os
import syssys.path.append(os.path.dirname(os.path.abspath(__file__)) + '/..')
current_directory = os.path.dirname(os.path.abspath(__file__))import numpy as np
# import tensorflow as tf
import cv2
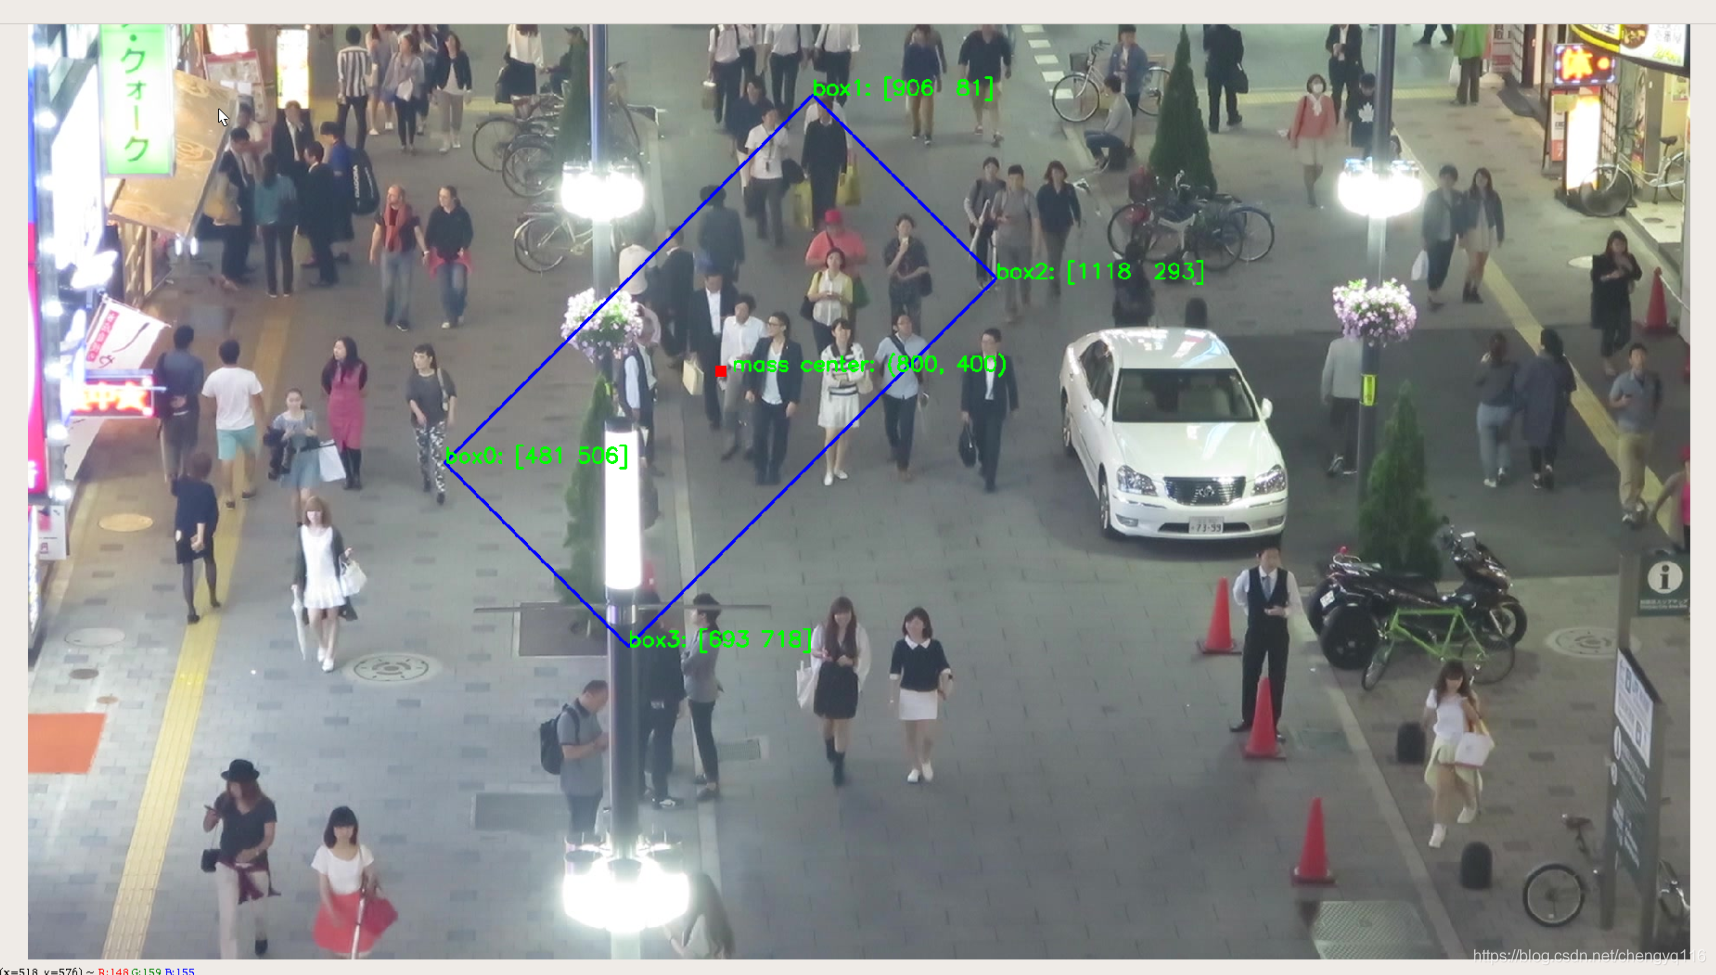
import timedef inference(image_file, current_directory):img = cv2.imread(image_file, cv2.IMREAD_COLOR)# get dimensions of imagedimensions = img.shape# height, width, number of channels in imageheight = img.shape[0]width = img.shape[1]channels = img.shape[2]print('Image Dimension : ', dimensions)print('Image Height : ', height)print('Image Width : ', width)print('Number of Channels : ', channels)# (the center point (mass center) (x,y), (width, height), angle of rotation)center = (800, 400)size = (300, 600)angle = 45rect = (center, size, angle)print("(the center point (mass center) (x,y), (width, height), angle of rotation):", rect)box = cv2.boxPoints(rect)print("box = cv2.boxPoints(rect):", box)box = np.int0(box)print("box = np.int0(box):", box)img = cv2.drawContours(img, [box], 0, (255, 0, 0), 2)box0 = box[0]box1 = box[1]box2 = box[2]box3 = box[3]cv2.rectangle(img, pt1=(center[0] - 6, center[1] - 6), pt2=(center[0] + 6, center[1] + 6), color=(0, 0, 255),thickness=-1)cv2.putText(img, text=" mass center: " + str(center), org=center, fontFace=0, fontScale=0.8, thickness=2,color=(0, 255, 0))cv2.putText(img, text="box0: " + str(box0), org=tuple(box0), fontFace=0, fontScale=0.8, thickness=2,color=(0, 255, 0))cv2.putText(img, text="box1: " + str(box1), org=tuple(box1), fontFace=0, fontScale=0.8, thickness=2,color=(0, 255, 0))cv2.putText(img, text="box2: " + str(box2), org=tuple(box2), fontFace=0, fontScale=0.8, thickness=2,color=(0, 255, 0))cv2.putText(img, text="box3: " + str(box3), org=tuple(box3), fontFace=0, fontScale=0.8, thickness=2,color=(0, 255, 0))tmp_directory = current_directory + "/tmp"if not os.path.exists(tmp_directory):os.makedirs(tmp_directory)cv2.namedWindow("Press ESC on keyboard to exit.", cv2.WINDOW_NORMAL)# Display the resulting framecv2.imshow("Press ESC on keyboard to exit.", img)k = cv2.waitKey(0)if k == 27: # wait for ESC key to exitpasselif k == ord('s'): # wait for 's' key to save and exitimage_name = "%s/%s.jpg" % (tmp_directory, "source_image")cv2.imwrite(image_name, img, [int(cv2.IMWRITE_JPEG_QUALITY), 100])# When everything done, release the capturecv2.destroyAllWindows()if __name__ == '__main__':image_file = "./tmp/000505.jpg"os.environ["CUDA_VISIBLE_DEVICES"] = '0'print("os.environ['CUDA_VISIBLE_DEVICES']:", os.environ['CUDA_VISIBLE_DEVICES'])inference(image_file, current_directory)
/usr/bin/python2.7 /home/strong/tensorflow_work/R2CNN_Faster-RCNN_Tensorflow/yongqiang.py --gpu=0
os.environ['CUDA_VISIBLE_DEVICES']: 0
Image Dimension    :  (1080, 1920, 3)
Image Height       :  1080
Image Width        :  1920
Number of Channels :  3
(the center point (mass center) (x,y), (width, height), angle of rotation): ((800, 400), (300, 600), 45)
box = cv2.boxPoints(rect): [[ 481.80197  506.066  ][ 906.066     81.80195][1118.198    293.934  ][ 693.934    718.19806]]
box = np.int0(box): [[ 481  506][ 906   81][1118  293][ 693  718]]Process finished with exit code 0
这篇关于OpenCV 3 drawContours()的文章就介绍到这儿,希望我们推荐的文章对编程师们有所帮助!


