本文主要是介绍varnish代理服务器_如何使用Varnish提升服务器性能,希望对大家解决编程问题提供一定的参考价值,需要的开发者们随着小编来一起学习吧!
varnish代理服务器
Varnish Cache is an HTTP accelerator and reverse proxy developed by Danish consultant and FreeBSD core developer Poul-Henning Kamp, along with other developers at Norwegian Linpro AS. It was released in 2006.
Varnish Cache是由丹麦顾问和FreeBSD核心开发人员Poul-Henning Kamp以及Norwegian Linpro AS的其他开发人员开发的HTTP加速器和反向代理 。 它于2006年发布 。
According to Pingdom.com, a company focused on web performance, in 2012 Varnish was already famous among the world’s top websites for its capacity to speed up web delivery, and it was being used by sites such as Wired, SlideShare, Zappos, SoundCloud, Weather.com, Business Insider, Answers.com, Urban Dictionary, MacRumors, DynDNS, OpenDNS, Lonely Planet, Technorati, ThinkGeek and Economist.com.
据专注于网络性能的公司Pingdom.com称 ,2012年,Varnish以其加速网络交付的能力而闻名于世界顶级网站,而Wired,SlideShare,Zappos,SoundCloud, Weather.com,Business Insider,Answers.com,Urban Dictionary,MacRumors,DynDNS,OpenDNS,Lonely Planet,Technorati,ThinkGeek和Economist.com。
It is licensed under a two-clause BSD license. Varnish has a premium tier, Varnish Plus, focused on enterprise customers, which offers some extra features, modules, and support.
它获得了两节BSD许可 。 Varnish具有面向企业客户的高级层Varnish Plus ,它提供了一些额外的功能,模块和支持 。
Although there are other solutions that also shine, Varnish is still a go-to solution that can dramatically improve website speed, reduce the strain on the web application server’s CPU, and even serve as a protection layer from DDoS attacks. KeyCDN recommends deploying it on the origin server stack.
尽管还有其他解决方案也很出色 ,但Varnish仍然是一种首选解决方案,可以极大地提高网站速度,减轻Web应用程序服务器CPU的负担,甚至可以充当DDoS攻击的保护层 。 KeyCDN建议将其部署在原始服务器堆栈上。
Varnish can sit on a dedicated machine in case of more demanding websites, and make sure that the origin servers aren’t affected by the flood of requests.
如果网站的要求更高,Varnish可以坐在专用计算机上,并确保原始服务器不受大量请求的影响。
At the time of this writing (November 2017), Varnish is at version 5.2.
在撰写本文时(2017年11月),Varnish的版本为5.2 。
这个怎么运作 (How it Works)
Caching in general works by keeping the pre-computed outputs of an application in memory, or on the disk, so that expensive computations don’t have to be computed over and over on every request. Web Cache can be on the client (browser cache), or on the server. Varnish falls into the second category. It is usually configured so that it listens for requests on the standard HTTP port (80), and then serves the requested resource to the website visitor.
一般而言, 缓存是通过将应用程序的预先计算的输出保存在内存或磁盘中来进行的,因此不必每次都重复计算昂贵的计算量。 Web缓存可以位于客户端(浏览器缓存)上,也可以位于服务器上。 清漆属于第二类。 通常将其配置为在标准HTTP端口(80)上侦听请求,然后将请求的资源提供给网站访问者。
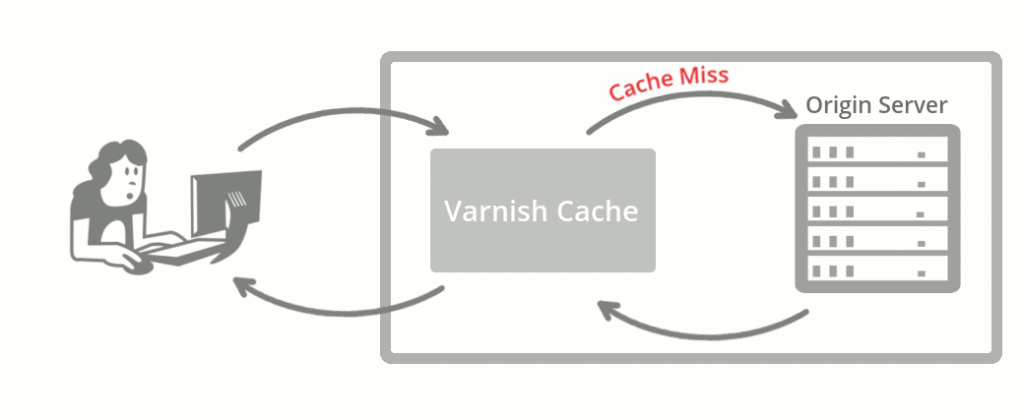
The first time a certain URL and path are requested, Varnish has to request it from the origin server in order to serve it to the visitor. This is called a CACHE MISS, which can be read in HTTP response headers, depending on the Varnish setup.
第一次请求某个URL和路径时,Varnish必须从原始服务器请求它,以便将其提供给访问者。 这称为CACHE MISS,根据Varnish设置,可以在HTTP响应标头中读取该信息。
According to the docs,
根据文档 ,
when an object, any kind of content i.e. an image or a page, is not stored in the cache, then we have what is commonly known as a cache miss, in which case Varnish will go and fetch the content from the web server, store it and deliver a copy to the user and retain it in cache to serve in response to future requests.
当某个对象(任何类型的内容,即图像或页面)未存储在缓存中时,我们将拥有通常称为缓存未命中的情况,在这种情况下,Varnish将从Web服务器中获取内容,并进行存储并将其交付给用户,然后将其保留在缓存中以响应将来的请求。
When a particular URL or a resource is cached by Varnish and stored in memory, it can be served directly from server RAM; it doesn’t need to be computed every time. Varnish will start delivering a CACHE HIT in a matter of microseconds.
当Varnish缓存特定的URL或资源并将其存储在内存中时,可以直接从服务器RAM提供服务。 它不需要每次都计算。 Varnish将在几微秒内开始提供CACHE HIT。

This means that neither our origin server or our web application, including its database, are touched by future requests. They won’t even be aware of the requests loaded on cached URLs.
这意味着将来的请求都不会影响我们的原始服务器或Web应用程序(包括其数据库)。 他们甚至不会意识到缓存URL上加载的请求。
The origin server — or servers, in case we use Varnish as a load balancer — are configured to listen on some non-standard port, like 8888, and Varnish is made aware of their address and port.
原始服务器(或在我们使用Varnish作为负载平衡器的情况下的服务器)被配置为侦听某些非标准端口(例如8888),并且Varnish 知道了它们的地址和端口 。
清漆特性 (Varnish Features)
Varnish is threaded. It’s been reported that Varnish was able to handle over 200,000 requests per second on a single instance. If properly configured, the only bottlenecks of your web app will be network throughput and the amount of RAM. (This shouldn’t be an unreasonable requirement, because it just needs to keep computed web pages in memory, so for most websites, a couple of gigabytes should be sufficient.)
清漆是螺纹的 。 据报道 ,Varnish能够在单个实例上每秒处理超过200,000个请求。 如果配置正确,则Web应用程序的唯一瓶颈将是网络吞吐量和RAM量。 (这不是一个不合理的要求,因为它只需要将计算出的网页保留在内存中,因此对于大多数网站来说,几个千兆字节就足够了。)
Varnish is extendable via VMODS. These are modules that can use standard C libraries and extend Varnish functionality. There are community-contributed VMODS listed here. They range from header manipulation to Lua scripting, throttling of requests, authentication, and so on.
清漆可通过VMODS扩展 。 这些模块可以使用标准C库并扩展Varnish功能。 有上市的社区贡献VMODS 这里 。 它们的范围从头操作到Lua脚本,节制请求,身份验证等等。
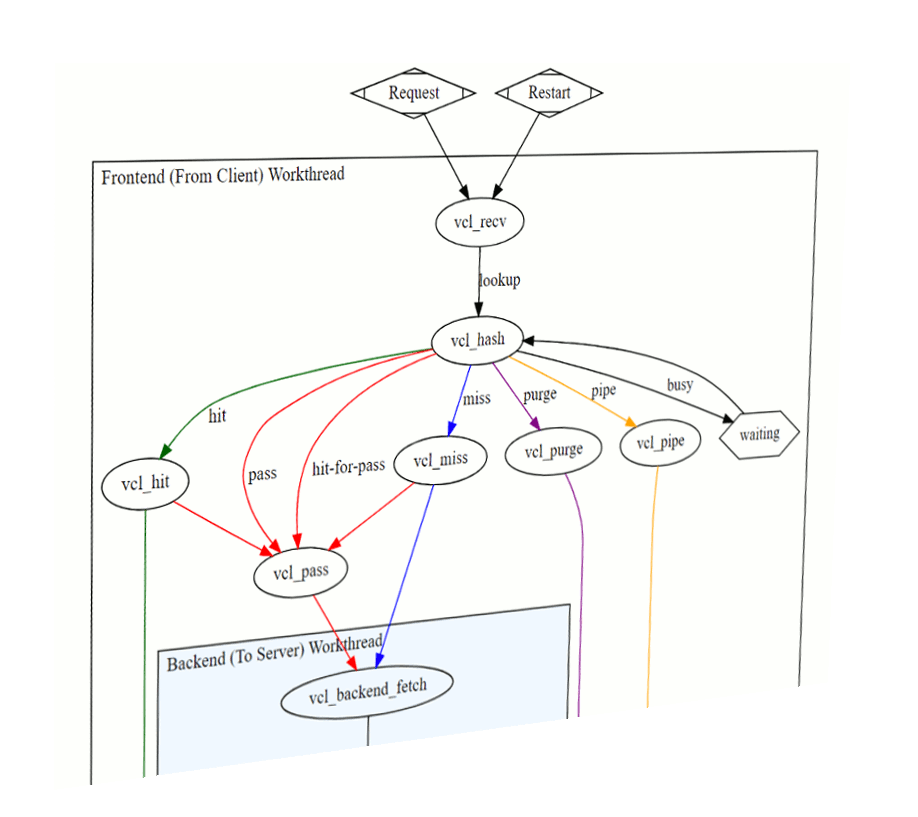
Varnish has its own domain-specific language, VCL. VCL provides comprehensive configurability. With a full-page caching server like Varnish, there are a lot of intricacies that need to be solved.
Varnish有其自己的特定于域的语言VCL 。 VCL提供全面的可配置性。 对于像Varnish这样的全页缓存服务器,需要解决许多复杂问题。
When we cache a dynamic website with dozens or hundreds of pages and paths, with GET query parameters, we’ll want to exclude some of them from cache, or set different cache-expiration rules. Sometimes we’ll want to cache certain Ajax requests, or exclude them from the cache. This varies from project to project, and can’t be tailored in advance.
当我们使用GET查询参数缓存具有数十个或数百个页面和路径的动态网站时,我们将希望从缓存中排除其中的一些,或设置不同的缓存过期规则。 有时我们想要缓存某些Ajax请求,或者将它们从缓存中排除。 这因项目而异,因此无法事先定制。
Sometimes we’ll want Varnish to decide what to do with the request depending on request headers. Sometimes we’ll want to pass requests directly to the back end with a certain cookie set.
有时,我们希望Varnish根据请求标头决定如何处理请求。 有时我们会希望将带有特定Cookie的请求直接传递到后端。
To quote the Varnish book,
引用清漆书 ,
VCL provides subroutines that allow you to affect the handling of any single request almost anywhere in the execution chain.
VCL提供了子例程,使您可以影响执行链中几乎任何地方的任何单个请求的处理。
Purging the cache often needs to be done dynamically — triggered by publishing articles or updating the website. Purging also needs to be done as atomically as possible — meaning it should target the smallest possible scope, like a single resource or path.
清除缓存通常需要动态完成-由发布文章或更新网站触发。 清除也需要尽可能原子地进行-这意味着它应该针对尽可能小的范围,例如单个资源或路径。
This means that specific rules need to be defined, with their order of priority in mind. Some examples can be found in the Varnish book (which is available to read online or as a downloadable PDF).
这意味着需要定义特定规则,并牢记其优先顺序。 可以在Varnish书籍中找到一些示例(可在线阅读或下载PDF )。
Varnish has a set of tools for monitoring and administering the server:
Varnish有一组用于监视和管理服务器的工具 :
There’s
varnishtop, which lets us monitor requested URLs and their frequency.有
varnishtop,它使我们可以监视请求的URL及其频率。varnishncsacan be used to print the Varnish Shared memory Log (VSL): it dumps everything pointing to a certain domain and subdomains.varnishncsa可用于打印Varnish共享内存日志 (VSL):它转储指向某个域和子域的所有内容。varnishhistreads the VSL and presents a live histogram showing the distribution of the last number of requests, giving an overview of server and back-end performance.varnishhist读取VSL并显示实时直方图,以显示最近请求数量的分布,从而概述服务器和后端性能。varnishtestis used to test VCL configuration files and develop VMODS.varnishtest用于测试VCL配置文件和开发VMODS。varnishstatdisplays statistics about our varnishd instance:varnishstat显示有关我们的清漆实例的统计信息: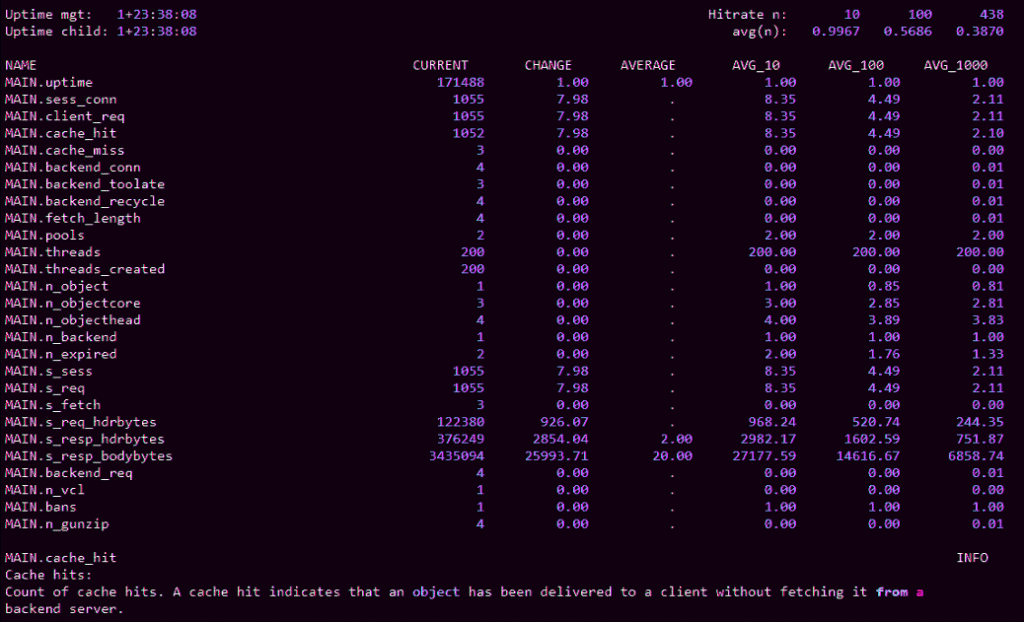
varnishlogis used to get data about specific clients and requests.varnishlog用于获取有关特定客户端和请求的数据。
Varnish Software offers a set of commercial, paid solutions either built on top of Varnish cache, or extending its usage and helping with monitoring and management: Varnish Api Engine, Varnish Extend, Akamai Connector for Varnish, Varnish Administration Console (VAC), and Varnish Custom Statistics (VCS).
Varnish软件提供了一套商业的,付费的解决方案,这些解决方案建立在Varnish缓存的基础上,或者扩展了其用法并有助于监视和管理: Varnish Api Engine , Varnish Extend , 用于Varnish的Akamai连接器 , Varnish管理控制台(VAC)和Varnish自定义统计信息(VCS) 。
安装清漆 (Installing Varnish)
The Varnish docs cover installation on various systems. We’ll go with Ubuntu 16.04 LTS in this post.
Varnish文档涵盖了在各种系统上的安装 。 在本文中,我们将使用Ubuntu 16.04 LTS。
Packagecloud.io has instructions for updating the Ubuntu repositories and installing Varnish version 5:
Packagecloud.io包含有关更新Ubuntu存储库和安装Varnish版本5的说明:
curl -L https://packagecloud.io/varnishcache/varnish5/gpgkey | sudo apt-key add -
sudo apt-get update
sudo apt-get install -y apt-transport-https
Then we add the following lines to the newly created file /etc/apt/sources.list.d/varnishcache_varnish5.list:
然后, /etc/apt/sources.list.d/varnishcache_varnish5.list添加到新创建的文件/etc/apt/sources.list.d/varnishcache_varnish5.list :
deb https://packagecloud.io/varnishcache/varnish5/ubuntu/ xenial main
deb-src https://packagecloud.io/varnishcache/varnish5/ubuntu/ xenial main
Then we run:
然后我们运行:
sudo apt-get update
sudo apt-get install varnish
We can test a brand-new WordPress installation running on Nginx. First, we change Nginx’s default listening port from 80 to 8080 — which is the port Varnish expects the back end to be running on — by adding the following lines to the Nginx virtual host, inside the server clause:
我们可以测试在Nginx上运行的全新WordPress安装。 首先,我们通过将以下行添加到Nginx虚拟主机的server子句中,将Nginx的默认侦听端口从80更改为8080(这是Varnish期望后端在其上运行的端口):
server {
listen 127.0.0.1:8080 default_server;
listen [::]:8080 default_server;
Then we configure Varnish: we edit /etc/default/varnish, replacing port 6081 with 80 (the default web port):
然后配置Varnish:编辑/etc/default/varnish ,将端口6081替换为80(默认Web端口):
DAEMON_OPTS="-a :80 \
-T localhost:6082 \
-f /etc/varnish/default.vcl \
-S /etc/varnish/secret \
-s malloc,256m"
We also need to change /lib/systemd/system/varnish.service, making the same replacement:
我们还需要更改/lib/systemd/system/varnish.service ,进行相同的替换:
[Service]
Type=simple
LimitNOFILE=131072
LimitMEMLOCK=82000
ExecStart=/usr/sbin/varnishd -j unix,user=vcache -F -a :80 -T localhost:6082 -f /etc/varnish/default.vcl -S /etc/varnish/secret -s malloc,256m
ExecReload=/usr/share/varnish/reload-vcl
ProtectSystem=full
ProtectHome=true
PrivateTmp=true
PrivateDevices=true
Then we restart Nginx and Varnish:
然后,我们重新启动Nginx和Varnish:
sudo service nginx restart
sudo /etc/init.d/varnish restart
Warning: due to some peculiarities, Varnish usually must be restarted — or started this way, not with service varnish start — in order to read all the config files we edited.
警告:由于某些特殊性,通常必须重新启动Varnish或以这种方式启动,而不是使用service varnish start才能service varnish start ,以便读取我们编辑的所有配置文件。
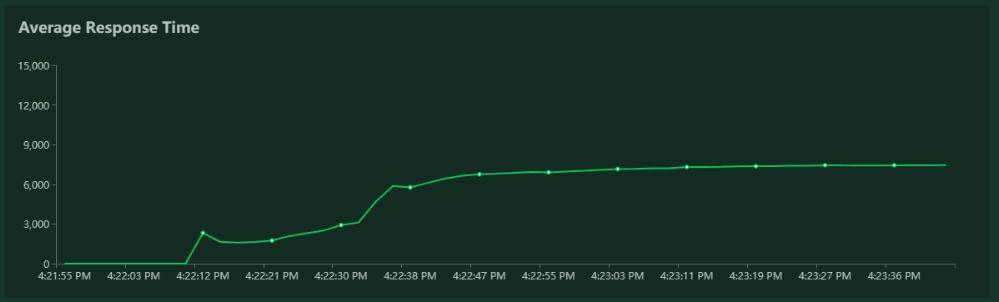
We tested the website speed and responsiveness with Locust and Pingdom Tools.
我们使用Locust和Pingdom工具测试了网站的速度和响应速度。
Once the cache was warmed up, the difference was impressive, despite Nginx being well known for its speed: the average number of requests per second was multiplied by three to four times, and response time were greatly reduced. Load times were a bit higher due to network latency, since we tested the website hosted in California from a workstation in Europe.
一旦对缓存进行了预热,尽管Nginx以其速度而闻名,但两者之间的差异却令人印象深刻: 每秒平均请求数乘以三到四倍 ,并且响应时间大大缩短。 由于网络延迟,加载时间有所增加,因为我们从欧洲的工作站测试了位于加利福尼亚州的网站。
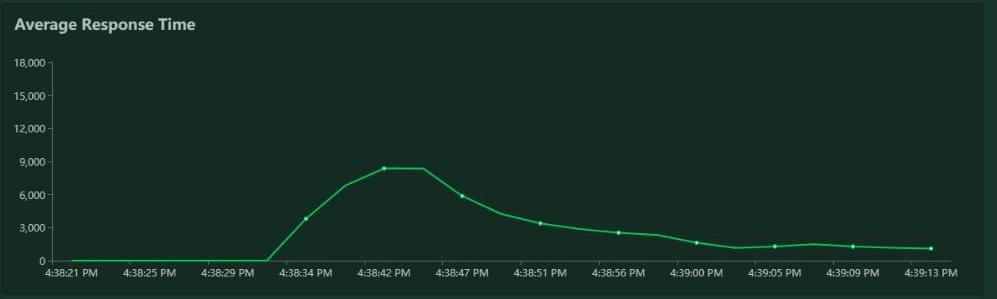
Locust results for Nginx:
Nginx的蝗虫结果:
Locust results for Nginx + Varnish:
Nginx +清漆的蝗虫结果:
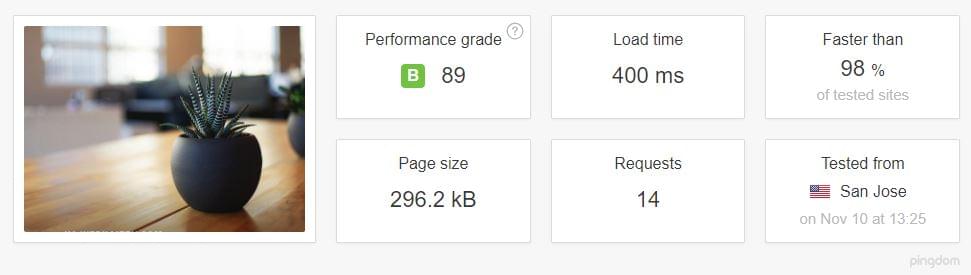
Pingdom results were also good.
Pingdom结果也不错。
Pingdom results for Nginx stack, tested from California:
Nginx堆栈的Pingdom结果,从加利福尼亚进行了测试:
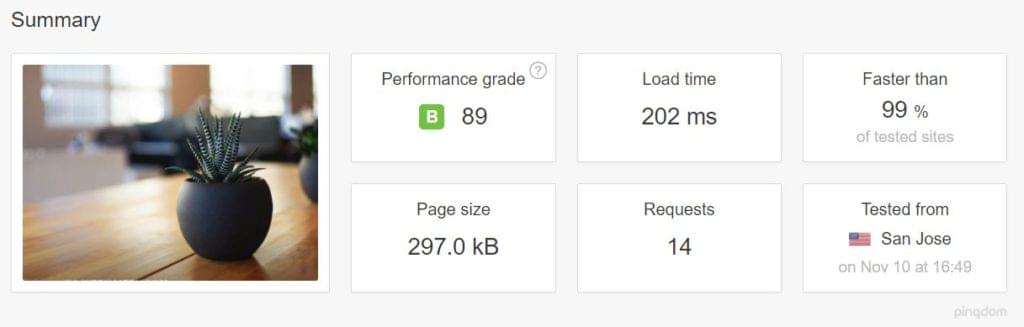
Pingdom results for Nginx + Varnish, California:
Nginx + Varnish,加利福尼亚的Pingdom结果:
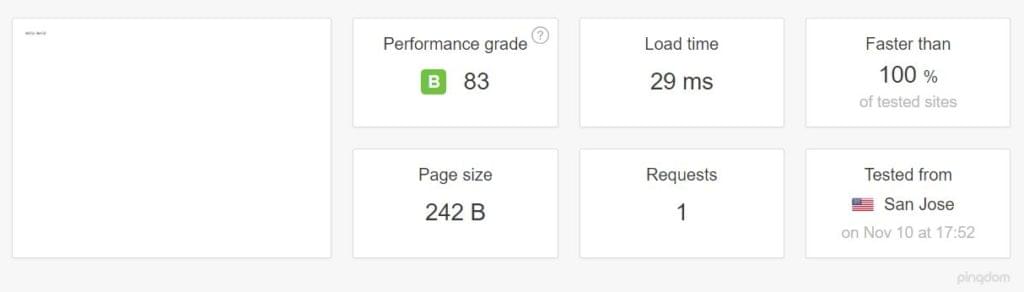
Notice also the TTFB for each case.
还要注意每种情况的TTFB 。
Nginx alone:
仅Nginx:

Nginx + Varnish:
Nginx +清漆:

Even if we neglect the pink part, which is the DNS lookup, there is still an obvious difference.
即使我们忽略了粉红色部分(即DNS查找),仍然存在明显的差异。
设置简单 (Simplicity of Setup)
Varnish doesn’t care what’s listening on port 8080 (we can change this default port as well, if required). This means that setting up Apache, or some other application server, should be just as straightforward: all we need to do is to configure them to listen on port 8080 instead of 80.
Varnish并不关心端口8080上正在监听什么(如果需要,我们也可以更改此默认端口)。 这意味着设置Apache或其他应用程序服务器应该同样简单:我们需要做的就是将它们配置为侦听8080端口而不是80端口。
使用NodeJS设置Varnish (Setting up Varnish with NodeJS)
On our existing server, where we had already installed Varnish, setting up a hello-world Node app was just as simple. We installed the nodejs and npm packages and linked NodeJS to Node:
在我们已经安装了Varnish的现有服务器上,设置hello-world Node应用程序非常简单。 我们安装了nodejs和npm软件包,并将nodejs链接到Node:
ln -s /usr/bin/nodejs /usr/bin/nodeThen we created a simple node hello-world program listening on port 8080:
然后,我们创建了一个侦听端口8080的简单节点hello-world程序:
#!/usr/bin/env nodejs
var http = require('http');
http.createServer(function (req, res) {
res.writeHead(200, {'Content-Type': 'text/plain'});
res.end('Hello World\n');
}).listen(8080, 'localhost');
console.log('Server running at http://localhost:8080/');
Then we installed Node’s package manager, PM2, to be able to daemonize our app:
然后,我们安装了Node的包管理器PM2 ,以便能够守护我们的应用程序:
sudo npm install -g pm2
pm2 start index.js
aAnd voila — our Node app was being served by Varnish:
aAnd瞧-我们的Node应用程序由Varnish提供:
其他技巧 (Other Tips)
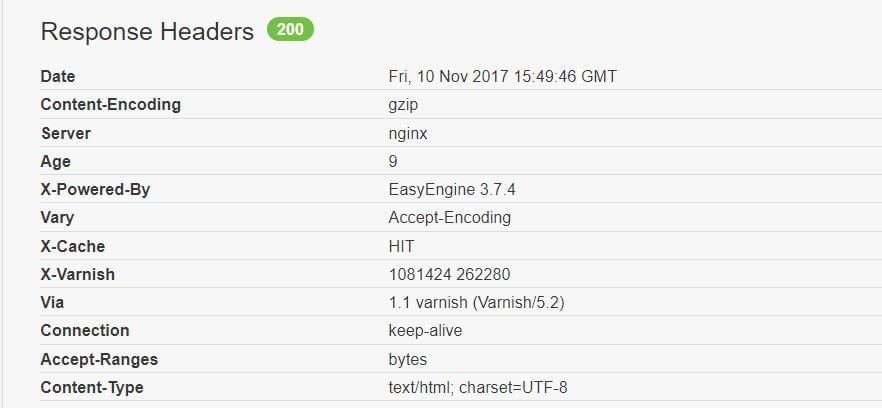
To be able to control whether or not our request is being cached in our browser inspector, we ought to add the following snippet to our Varnish config file, into the sub vcl_deliver block:
为了能够控制是否在浏览器检查器中缓存了我们的请求,我们应该将以下代码段添加到Varnish配置文件中的sub vcl_deliver块中:
sub vcl_deliver {
if (obj.hits > 0) {
set resp.http.X-Cache = "HIT";
} else {
set resp.http.X-Cache = "MISS";
}
}
Then we can see the feedback in our response headers as HIT or MISS:
然后,我们可以在响应标题中看到HIT或MISS的反馈:
One more warning: Varnish (or at least the open-source version) doesn’t support SSL, reiterated again by its creator Poul-Henning Kamp (who is not shy to voice his opinions). So when you need to use Varnish and HTTPS, consider using another proxy in front of it for SSL termination — such as haproxy, or Varnish’s own hitch.
另一个警告:Varnish(至少是开放源代码版本) 不支持SSL ,其创建者Poul-Henning Kamp(不愿意发表自己的见解 ) 再次重申。 因此,当您需要使用Varnish和HTTPS时,请考虑在其前面使用另一个代理进行SSL终止 -例如haproxy或Varnish自己的挂钩 。
Or, if that’s getting too involved, just use Nginx and FastCGI Cache.
或者,如果涉及的内容过多,只需使用Nginx和FastCGI Cache即可 。
结论 (Conclusion)
In this article we tried to give a brief introduction to Varnish Cache without going too deeply into its setup, monitoring and administration.
在本文中,我们尝试对Varnish Cache进行了简要介绍,而没有对其设置,监视和管理进行过深入的介绍。
Tuning server performance is a science of its own, and presenting the full scope of use cases and setups requires another article. I’ll be diving a bit deeper into this subject in another article, so stay tuned for a future installment, where I’ll add Varnish in front of a real app.
调优服务器性能本身就是一门科学,要介绍用例和设置的全部范围,还需要另一篇文章。 在另一篇文章中,我将对该主题进行更深入的探讨,因此请继续关注以后的文章,在此我将在真正的应用程序之前添加Varnish。
翻译自: https://www.sitepoint.com/how-to-boost-your-server-performance-with-varnish/
varnish代理服务器
这篇关于varnish代理服务器_如何使用Varnish提升服务器性能的文章就介绍到这儿,希望我们推荐的文章对编程师们有所帮助!


