本文主要是介绍MySQL高可用探索之orchestrator,希望对大家解决编程问题提供一定的参考价值,需要的开发者们随着小编来一起学习吧!
摘要:使用orchestrator实现mysql主从自动切换、故障转移、拓扑管理。
部署MySQL环境(一主两从)
| IP:端口 | 角色 | 版本 |
|---|---|---|
| 192.168.30.113:4406 | master | Percona 5.7.24-27-log CentOS Linux release 7.4.1708 (Core) 3.10.0-693.el7.x86_64 |
| 192.168.30.118:4406 | slave | Percona 5.7.24-27-log CentOS Linux release 7.4.1708 (Core) 3.10.0-693.el7.x86_64 |
| 192.168.30.119:4406 | slave | Percona 5.7.24-27-log CentOS Linux release 7.4.1708 (Core) 3.10.0-693.el7.x86_64 |
安装MySQL(略)
创建复制用户(三台mysql上面都创建)
GRANT REPLICATION SLAVE ON . TO repluser@’192.168.30.%’ IDENTIFIED BY ‘rep_2019’;
set global slave_net_timeout=8; 缩短从库感知主库宕机的等待时间
创建复制关系
在118和119上执行:
| change master to master_host='192.168.30.113',master_port=4406,master_user='repluser',master_password='rep_2019',master_auto_position=1,MASTER_HEARTBEAT_PERIOD=2,MASTER_CONNECT_RETRY=1, MASTER_RETRY_COUNT=86400; start slave; |
以119为例,实操:
| mysql> change master to master_host='192.168.30.113',master_port=4406,master_user='repluser',master_password='rep_2019',master_auto_position=1,MASTER_HEARTBEAT_PERIOD=2,MASTER_CONNECT_RETRY=1, MASTER_RETRY_COUNT=86400; Query OK, 0 rows affected, 2 warnings (0.01 sec) mysql> show warnings \G; *************************** 1. row *************************** Level: Note Code: 1759 Message: Sending passwords in plain text without SSL/TLS is extremely insecure. *************************** 2. row *************************** Level: Note Code: 1760 Message: Storing MySQL user name or password information in the master info repository is not secure and is therefore not recommended. Please consider using the USER and PASSWORD connection options for START SLAVE; see the 'START SLAVE Syntax' in the MySQL Manual for more information. 2 rows in set (0.00 sec) ERROR: No query specified mysql> start slave; Query OK, 0 rows affected (0.00 sec) mysql> show slave status \G; *************************** 1. row *************************** Slave_IO_State: Waiting for master to send event Master_Host: 192.168.30.113 Master_User: repluser Master_Port: 4406 Connect_Retry: 1 Master_Log_File: mysql-bin.000024 Read_Master_Log_Pos: 588 Relay_Log_File: mysqld-relay-bin.000002 Relay_Log_Pos: 665 Relay_Master_Log_File: mysql-bin.000024 Slave_IO_Running: Yes Slave_SQL_Running: Yes Replicate_Do_DB: Replicate_Ignore_DB: Replicate_Do_Table: Replicate_Ignore_Table: Replicate_Wild_Do_Table: Replicate_Wild_Ignore_Table: Last_Errno: 0 Last_Error: Skip_Counter: 0 Exec_Master_Log_Pos: 588 Relay_Log_Space: 873 Until_Condition: None Until_Log_File: Until_Log_Pos: 0 Master_SSL_Allowed: No Master_SSL_CA_File: Master_SSL_CA_Path: Master_SSL_Cert: Master_SSL_Cipher: Master_SSL_Key: Seconds_Behind_Master: 0 Master_SSL_Verify_Server_Cert: No Last_IO_Errno: 0 Last_IO_Error: Last_SQL_Errno: 0 Last_SQL_Error: Replicate_Ignore_Server_Ids: Master_Server_Id: 1134406 Master_UUID: 9b8d01ee-081d-11e9-94a1-005056a99b7f Master_Info_File: mysql.slave_master_info SQL_Delay: 0 SQL_Remaining_Delay: NULL Slave_SQL_Running_State: Slave has read all relay log; waiting for more updates Master_Retry_Count: 86400 Master_Bind: Last_IO_Error_Timestamp: Last_SQL_Error_Timestamp: Master_SSL_Crl: Master_SSL_Crlpath: Retrieved_Gtid_Set: 9b8d01ee-081d-11e9-94a1-005056a99b7f:1 Executed_Gtid_Set: 3db33b36-0e51-409f-a61d-c99756e90155:1-31:1000007, 7b8d01ee-081d-11e9-94a1-005056a99b7f:1-3, 8b8d01ee-081d-11e9-94a1-005056a99b7f:1-2, 9b8d01ee-081d-11e9-94a1-005056a99b7f:1 Auto_Position: 1 Replicate_Rewrite_DB: Channel_Name: Master_TLS_Version: 1 row in set (0.00 sec) ERROR: No query specified |
在113上查看slave信息:
| mysql> show slave hosts; +-----------+----------------+------+-----------+--------------------------------------+ | Server_id | Host | Port | Master_id | Slave_UUID | +-----------+----------------+------+-----------+--------------------------------------+ | 1194406 | 192.168.30.119 | 4406 | 1134406 | 8b8d01ee-081d-11e9-94a1-005056a99b7f | | 1184406 | 192.168.30.118 | 4406 | 1134406 | 7b8d01ee-081d-11e9-94a1-005056a99b7f | +-----------+----------------+------+-----------+--------------------------------------+ 2 rows in set (0.00 sec) |
一主两从搭建完毕。
安装orchestrator
下载并解压
下载地址:https://github.com/github/orchestrator/releases/download/v3.0.14/orchestrator-3.0.14-linux-amd64.tar.gz
将解压出来的orchestrator目录拷贝到/usr/local/,将/usr/local/orchestrator加入环境变量(3台都装)
[root@mysql2 src]# tar xvf orchestrator-3.0.14-linux-amd64.tar.gz
[root@mysql2 src]# cp -r ./usr/local/orchestrator/ /usr/local/
配置
首先在orchestrator管理数据库的实例上创建账号:orch自用
| root@(none) 04:11:09>create database orchestrator; Query OK, 1 row affected (0.02 sec) root@(none) 04:13:49>CREATE USER 'orchestrator'@'192.168.1.3' IDENTIFIED BY '123456'; Query OK, 0 rows affected (0.00 sec) root@(none) 04:13:58>GRANT ALL ON orchestrator.* TO 'orchestrator'@'192.168.1.3'; Query OK, 0 rows affected (0.00 sec) |
然后再在被管理的MySQL实例上创建账号(只在主库113执行即可,从库会复制过去):
| mysql> GRANT SELECT, RELOAD, PROCESS, SUPER, REPLICATION SLAVE, REPLICATION CLIENT ON *.* TO 'orchestrator'@'192.168.30.%' identified by 'abc123'; Query OK, 0 rows affected, 1 warning (0.00 sec) mysql> show warnings; +---------+------+------------------------------------------------------------------------------------------------------------------------------------------------------------------------------------+ | Level | Code | Message | +---------+------+------------------------------------------------------------------------------------------------------------------------------------------------------------------------------------+ | Warning | 1287 | Using GRANT statement to modify existing user's properties other than privileges is deprecated and will be removed in future release. Use ALTER USER statement for this operation. | +---------+------+------------------------------------------------------------------------------------------------------------------------------------------------------------------------------------+ 1 row in set (0.00 sec) |
编辑配置文件
https://github.com/github/orchestrator/blob/master/docs/configuration-sample.md
使用官网的配置文件模板,修改一下数据源即可:
| [root@mysql-113 ~]# cat /usr/local/orchestrator/orchestrator.conf.json { "Debug": true, "EnableSyslog": false, "ListenAddress": ":3000", "MySQLTopologyUser": "orchestrator", "MySQLTopologyPassword": "abc123", "MySQLTopologyCredentialsConfigFile": "", "MySQLTopologySSLPrivateKeyFile": "", "MySQLTopologySSLCertFile": "", "MySQLTopologySSLCAFile": "", "MySQLTopologySSLSkipVerify": true, "MySQLTopologyUseMutualTLS": false, "MySQLOrchestratorHost": "192.168.1.3", "MySQLOrchestratorPort": 3306, "MySQLOrchestratorDatabase": "orchestrator", "MySQLOrchestratorUser": "orchestrator", "MySQLOrchestratorPassword": "123456", ... ... "RaftEnabled": true, "BackendDB": "mysql", "RaftBind": "192.168.30.113", "RaftDataDir": "/var/lib/orchestrator", "DefaultRaftPort": 10008, "RaftNodes": [ "192.168.30.113", "192.168.30.118", "192.168.30.119" ], "ConsulAddress": "", "ConsulAclToken": "" } |
启动
| root@:mysql-113:/usr/local/orchestrator$./orchestrator --config=./orchestrator.conf.json http 2019-02-26 16:21:50 INFO starting orchestrator 2019-02-26 16:21:50 INFO Read config: ./orchestrator.conf.json 2019-02-26 16:21:50 DEBUG Initializing orchestrator 2019-02-26 16:21:50 DEBUG Migrating database schema 2019-02-26 16:22:25 DEBUG Migrated database schema to version [1.5.7] 2019-02-26 16:22:25 DEBUG Connected to orchestrator backend: orchestrator:?@tcp(127.0.0.1:3306)/orchestrator?timeout=1s 2019-02-26 16:22:25 DEBUG Orchestrator pool SetMaxOpenConns: 128 2019-02-26 16:22:25 INFO Starting Discovery 2019-02-26 16:22:25 INFO Registering endpoints 2019-02-26 16:22:25 INFO Starting continuous discovery 2019-02-26 16:22:25 INFO Starting HTTP listener on :3000 2019-02-26 16:22:26 DEBUG outdated keys: [] 2019-02-26 16:22:27 DEBUG outdated keys: [] 2019-02-26 16:22:28 DEBUG outdated keys: [] 2019-02-26 16:22:29 DEBUG outdated keys: [] 2019-02-26 16:22:30 DEBUG outdated keys: [] 2019-02-26 16:22:31 DEBUG outdated keys: [] |
访问WEB
http://192.168.30.113:3000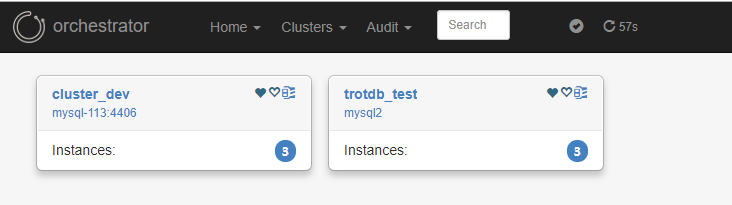
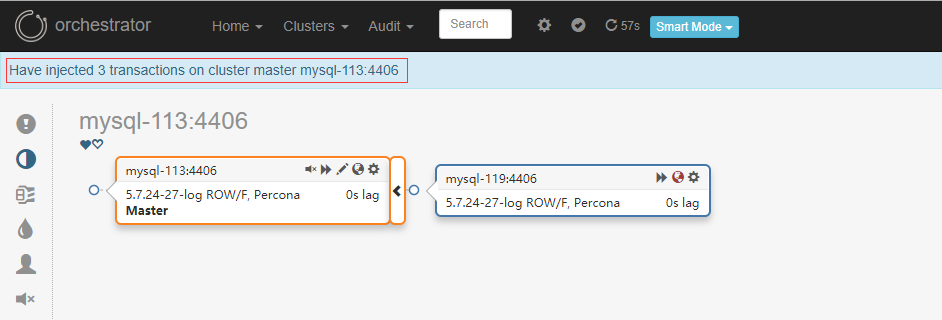
查看主从拓扑: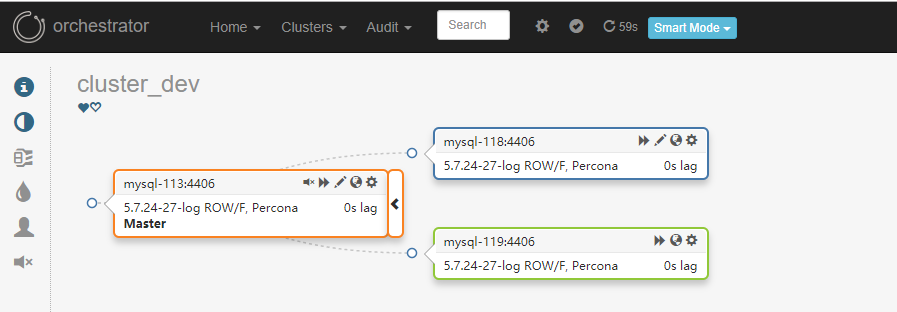
查看orchestrator状态: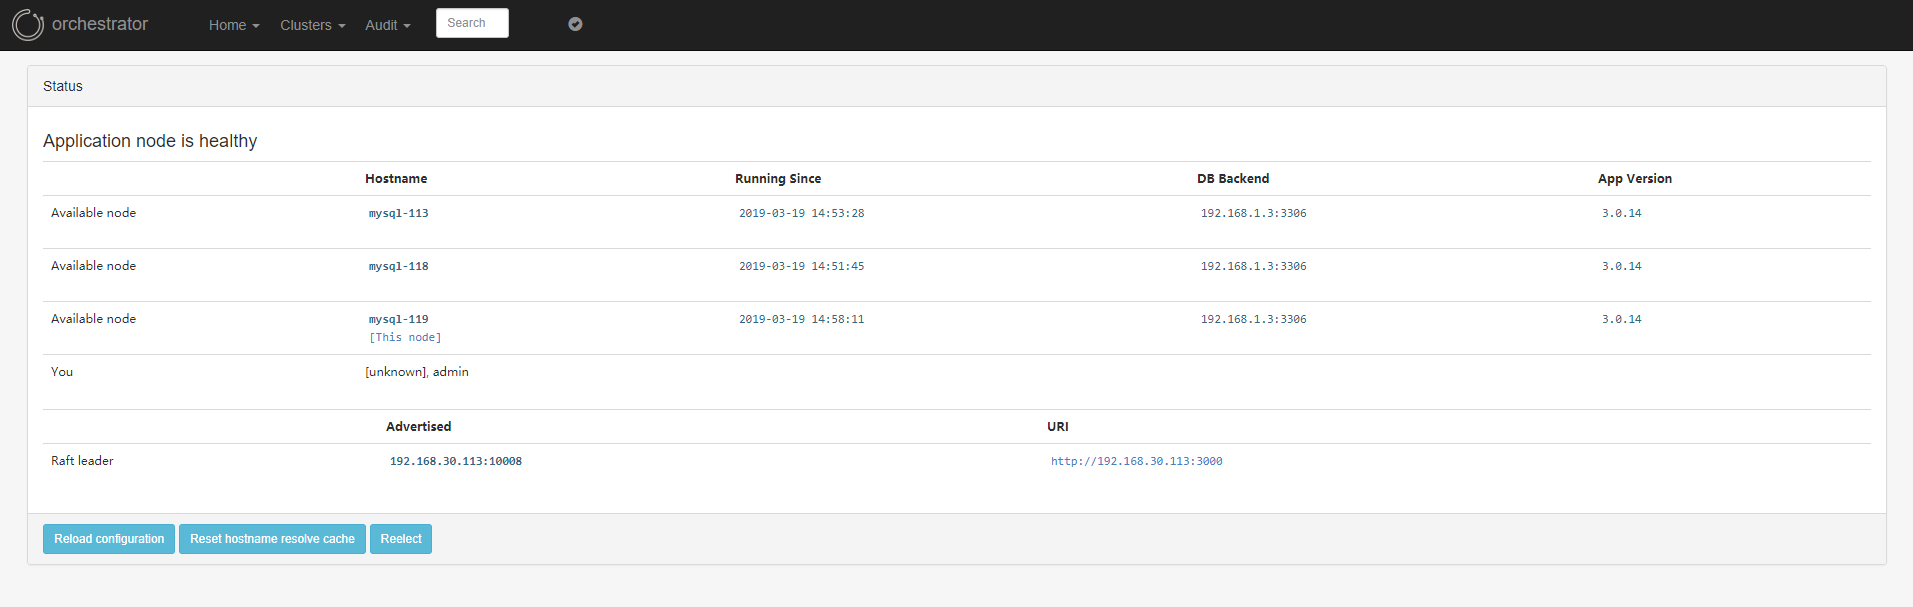
命令行操作
将/usr/local/orchestrator/resources/bin目录加入path环境变量
列出集群(含别名)
| [root@mysql-119 ~]# orchestrator-client -c clusters-alias mysql-113:4406,cluster_dev mysql2:3306,trotdb_test |
发现实例
| [root@mysql-119]# orchestrator -c discover -i mysql1:3306 2019-03-11 07:12:45 FATAL Orchestrator configured to run raft ("RaftEnabled": true). All access must go through the web API of the active raft node. You may use the orchestrator-client script which has a similar interface to the command line invocation. You may override this with --ignore-raft-setup 报错说在启用raft模式上禁止使用orchestrator客户端,建议使用orchestrator-client,orchestrator-client可以安装在没有orchestrator上的服务器。 要使用orchestrator-client需要先安装jq,否则会报错:orchestrator-client[18537]: cannot find jq [root@mysql-119]# yum install jq -y [root@mysql-119]# orchestrator-client -c discover -i mysql1:3306 mysql1:3306 |
查看拓扑
| [root@mysql-119 ~]# orchestrator-client -c topology -i mysql-113:4406 mysql-113:4406 [0s,ok,5.7.24-27-log,rw,ROW,>>,GTID,P-GTID] + mysql-119:4406 [0s,ok,5.7.24-27-log,rw,ROW,>>,GTID,P-GTID] + mysql-118:4406 [0s,ok,5.7.24-27-log,rw,ROW,>>,GTID] [root@mysql-119 ~]# 返回列表格式: [root@mysql-119 ~]# orchestrator-client -c topology-tabulated -i mysql-113:4406 mysql-113:4406 |0s|ok|5.7.24-27-log|rw|ROW|>>,GTID,P-GTID + mysql-119:4406 |0s|ok|5.7.24-27-log|rw|ROW|>>,GTID,P-GTID + mysql-118:4406|0s|ok|5.7.24-27-log|rw|ROW|>>,GTID |
忘记实例
| [root@mysql-119 ~]# orchestrator-client -c forget -i mysql-118:4406 查看拓扑可以发现没有了mysql-118: [root@mysql-119 ~]# orchestrator-client -c topology-tabulated -i mysql-113:4406 mysql-113:4406 |0s|ok|5.7.24-27-log|rw|ROW|>>,GTID,P-GTID + mysql-119:4406|0s|ok|5.7.24-27-log|rw|ROW|>>,GTID,P-GTID 重新发现mysql-118: [root@mysql-119 ~]# orchestrator-client -c discover -i mysql-118:4406 mysql-118:4406 [root@mysql-119 ~]# orchestrator-client -c topology-tabulated -i mysql-113:4406 mysql-113:4406 |0s|ok|5.7.24-27-log|rw|ROW|>>,GTID,P-GTID + mysql-119:4406 |0s|ok|5.7.24-27-log|rw|ROW|>>,GTID,P-GTID + mysql-118:4406|0s|ok|5.7.24-27-log|rw|ROW|>>,GTID |
查看API接口
| [root@mysql-119 ~]# orchestrator-client -c which-api http://localhost:3000/api |
调用API
| [root@mysql-119 ~]# orchestrator-client -c api -path clusters [ "mysql-113:4406", "mysql2:3306" ] [root@mysql-119 ~]# orchestrator-client -c api -path leader-check "Not leader" [root@mysql-119 ~]# orchestrator-client -c api -path status { "Code": "OK", "Message": "Application node is healthy", "Details": { "Healthy": true, "Hostname": "mysql-119", "Token": "3bfe4deae671a528477bb3caa281b4d50b7aae33b052dd421d2b8655c8220864", "IsActiveNode": false, "ActiveNode": { "Hostname": "192.168.30.118:10008", "Token": "", "AppVersion": "", "FirstSeenActive": "", "LastSeenActive": "", "ExtraInfo": "", "Command": "", "DBBackend": "", "LastReported": "0001-01-01T00:00:00Z" }, "Error": null, "AvailableNodes": [ { "Hostname": "mysql-113", "Token": "30a4dc2ab18b3fce1f66b518a3c87f5f8c9351bcf43e09e10718390392bb64aa", "AppVersion": "3.0.14", "FirstSeenActive": "2019-03-05 14:04:02", "LastSeenActive": "2019-03-11 19:36:14", "ExtraInfo": "", "Command": "", "DBBackend": "192.168.1.3:3306", "LastReported": "0001-01-01T00:00:00Z" }, { "Hostname": "mysql-118", "Token": "b8e7dea2b6bf2a7117f0ba6258633f7ad677675530d499462d51473bffd6e54b", "AppVersion": "3.0.14", "FirstSeenActive": "2019-03-05 13:58:53", "LastSeenActive": "2019-03-11 19:36:13", "ExtraInfo": "", "Command": "", "DBBackend": "192.168.1.3:3306", "LastReported": "0001-01-01T00:00:00Z" }, { "Hostname": "mysql-119", "Token": "3bfe4deae671a528477bb3caa281b4d50b7aae33b052dd421d2b8655c8220864", "AppVersion": "3.0.14", "FirstSeenActive": "2019-03-05 14:01:55", "LastSeenActive": "2019-03-11 19:36:14", "ExtraInfo": "", "Command": "", "DBBackend": "192.168.1.3:3306", "LastReported": "0001-01-01T00:00:00Z" } ], "RaftLeader": "192.168.30.118:10008", "IsRaftLeader": false, "RaftLeaderURI": "http://192.168.30.118:3000", "RaftAdvertise": "192.168.30.119", "RaftHealthyMembers": null } } [root@mysql-118 ~]# orchestrator-client -c api -path leader-check "OK" [root@mysql-113 ~]# orchestrator-client -c api -path leader-check "Not leader" |
搜索实例
| [root@mysql-119 ~]# orchestrator-client -c search -i mysql-118 mysql-118:4406 [root@mysql-119 ~]# orchestrator-client -c search -i mysql3 mysql3:3307 |
查看指定实例的主库
| [root@mysql-119 ~]# orchestrator-client -c which-master -i mysql-119:4406 mysql-113:4406 |
查看指定实例的从库
| [root@mysql-119 ~]# orchestrator-client -c which-replicas -i mysql-113:4406 mysql-119:4406 [root@mysql-119 ~]# orchestrator-client -c which-replicas -i mysql2 mysql1:3306 mysql3:3307 |
查看指定实例名
| [root@mysql-119 ~]# orchestrator-client -c instance -i mysql2 mysql2:3306 |
打印指定主实例从库异常的列表:which-broken-replicas,模拟test3的复制异常:
| # orchestrator-client -c which-broken-replicas -i test2:3307 test3:3307 |
给定一个实例,列出所在集群下所有实例
| [root@mysql-119 ~]# orchestrator-client -c which-cluster-instances -i mysql-119:4406 mysql-113:4406 mysql-118:4406 mysql-119:4406 [root@mysql-119 ~]# orchestrator-client -c which-cluster-instances -i mysql1 mysql1:3306 mysql2:3306 mysql3:3307 |
查看所有实例
| [root@mysql-119 ~]# orchestrator-client -c all-clusters-masters mysql-113:4406 mysql2:3306 [root@mysql-119 ~]# orchestrator-client -c all-instances mysql2:3306 mysql-113:4406 mysql-119:4406 mysql1:3306 mysql3:3307 mysql-118:4406 |
查看可作为pt-online-schema-change操作的副本列表
| [root@mysql-119 ~]# orchestrator-client -c which-cluster-osc-replicas -i mysql2 mysql1:3306 mysql3:3307 [root@mysql-119 ~]# orchestrator-client -c which-cluster-osc-running-replicas -i mysql2 mysql1:3306 mysql3:3307 |
查看集群中主实例的数据中心
| [root@mysql-119 ~]# orchestrator-client -c dominant-dc mysql2 |
将集群的主提交到KV存储
| [root@mysql-119 ~]# orchestrator-client -c submit-masters-to-kv-stores mysql/master/cluster_dev:mysql-113:4406 mysql/master/cluster_dev/hostname:mysql-113 mysql/master/cluster_dev/port:4406 mysql/master/cluster_dev/ipv4:192.168.30.113 mysql/master/cluster_dev/ipv6: mysql/master/trotdb_test:mysql2:3306 mysql/master/trotdb_test/hostname:mysql2 mysql/master/trotdb_test/port:3306 mysql/master/trotdb_test/ipv4:192.168.1.173 mysql/master/trotdb_test/ipv6: |
修改拓扑(迁移从库到另一个实例上)
| [root@mysql-119 ~]# orchestrator-client -c topology -i mysql-118:4406 mysql-113:4406 [0s,ok,5.7.24-27-log,rw,ROW,>>,GTID,P-GTID] + mysql-119:4406 [0s,ok,5.7.24-27-log,rw,ROW,>>,GTID,P-GTID] + mysql-118:4406 [0s,ok,5.7.24-27-log,rw,ROW,>>,GTID] 将mysql-118:4406改为mysql-113:4406的从库 [root@mysql-119 ~]# orchestrator-client -c relocate -i mysql-118:4406 -d mysql-113:4406 mysql-118:4406<mysql-113:4406 [root@mysql-119 ~]# orchestrator-client -c topology -i mysql-118:4406 mysql-113:4406 [0s,ok,5.7.24-27-log,rw,ROW,>>,GTID,P-GTID] + mysql-118:4406 [0s,ok,5.7.24-27-log,rw,ROW,>>,GTID] + mysql-119:4406 [0s,ok,5.7.24-27-log,rw,ROW,>>,GTID,P-GTID] |
如果发生过了failover,旧主修复后只能通过手动方式将其加入复制。
如果使用orchestrator加入会报错:
| [root@mysql-113 ~]# orchestrator-client -c relocate -i mysql-118:4406 -d mysql-113:4406 2019-03-19 08:37:10 ERROR Relocating mysql-118:4406 below mysql-113:4406 turns to be too complex; please do it manually |
故障切换
主库宕机,自动Failover
② Detected UnreachableMaster on mysql-113:4406. Affected replicas: 2
② Detected DeadMaster on mysql-113:4406. Affected replicas: 1
③ Will recover from DeadMaster on mysql-113:4406
④ Recovered from DeadMaster on mysql-113:4406. Failed: mysql-113:4406; Promoted: mysql-118:4406
⑤ (for all types) Recovered from DeadMaster on mysql-113:4406. Failed: mysql-113:4406; Successor: mysql-118:4406
遇到问题及解决
访问WEB报:html/template: “templates/layout” is undefined
访问http://192.168.30.113:3000时报错:html/template: “templates/layout” is undefined
由于启动orchstrator时没有cd到go的项目路径,而是直接使用绝对路径启动:
/usr/local/orchestrator/orchestrator –config=/usr/local/orchestrator/orchestrator.conf.json http &
正确启动方式:
cd /usr/local/orchestrator && ./orchestrator –config=./orchestrator.conf.json http &
glibc版本太低问题
如果系统版本是centos6,运行时可能遇到如下报错:
| [root@mysql2 ~]# orchestrator orchestrator: /lib64/libc.so.6: version `GLIBC_2.14' not found (required by orchestrator) [root@mysql2 ~]# strings /lib64/libc.so.6 |grep GLIBC GLIBC_2.2.5 GLIBC_2.2.6 GLIBC_2.3 GLIBC_2.3.2 GLIBC_2.3.3 GLIBC_2.3.4 GLIBC_2.4 GLIBC_2.5 GLIBC_2.6 GLIBC_2.7 GLIBC_2.8 GLIBC_2.9 GLIBC_2.10 GLIBC_2.11 GLIBC_2.12 GLIBC_PRIVATE [root@mysql2 ~]# 升级glibc要非常小心,一般不建议升级。 root@:mysql_dev:~$strings /lib64/libc.so.6 |grep GLIBC GLIBC_2.2.5 GLIBC_2.2.6 GLIBC_2.3 GLIBC_2.3.2 GLIBC_2.3.3 GLIBC_2.3.4 GLIBC_2.4 GLIBC_2.5 GLIBC_2.6 GLIBC_2.7 GLIBC_2.8 GLIBC_2.9 GLIBC_2.10 GLIBC_2.11 GLIBC_2.12 GLIBC_2.13 GLIBC_2.14 GLIBC_2.15 GLIBC_2.16 GLIBC_2.17 GLIBC_PRIVATE root@:mysql_dev:~$orchestrator --help Usage of orchestrator: -alias string cluster alias -binlog string Binary log file name -c string command, required. See full list of commands via 'orchestrator -c help' -config string config file name -d string destination instance, host_fqdn[:port] (synonym to -s) -databaseless EXPERIMENTAL! Work without backend database -debug debug mode (very verbose) -discovery auto discovery mode (default true) -duration string maintenance duration (format: 59s, 59m, 23h, 6d, 4w) -grab-election Grab leadership (only applies to continuous mode) -hostname string Hostname/fqdn/CNAME/VIP (applies for hostname/resolve related commands) -i string instance, host_fqdn[:port] (e.g. db.company.com:3306, db.company.com) -noop Dry run; do not perform destructing operations -owner string operation owner -pattern string regular expression pattern -pool string Pool logical name (applies for pool-related commands) -promotion-rule string Promotion rule for register-andidate (prefer|neutral|must_not) (default "prefer") -quiet quiet -reason string operation reason -s string sibling instance, host_fqdn[:port] -skip-unresolve Do not unresolve a host name -skip-unresolve-check Skip/ignore checking an unresolve mapping (via hostname_unresolve table) resolves back to same hostname -stack add stack trace upon error -statement string Statement/hint -strict strict mode (more checks, slower) -verbose verbose -version Print version and exit |
虚GTID问题
报错:2019-03-05 10:31:52 ERROR ReadTopologyInstance(mysql-113:4406) DetectPseudoGTIDQuery: Error 1146: Table ‘meta.pseudo_gtid_status’ doesn’t exist
在被管理的MySQL实例上创建Pseudo-GTID的meta库(只在主库执行即可,从库会复制过去)
| mysql> create database meta; Query OK, 1 row affected (0.01 sec) mysql> source /usr/local/orchestrator/resources/pseudo-gtid/pseudo-gtid.sql; Query OK, 1 row affected, 1 warning (0.00 sec) Database changed Query OK, 0 rows affected (0.01 sec) Query OK, 0 rows affected, 1 warning (0.00 sec) Query OK, 0 rows affected (0.01 sec) Query OK, 0 rows affected (0.00 sec) mysql> CREATE TABLE IF NOT EXISTS cluster ( -> anchor TINYINT NOT NULL, -> cluster_name VARCHAR(128) CHARSET ascii NOT NULL DEFAULT '', -> cluster_domain VARCHAR(128) CHARSET ascii NOT NULL DEFAULT '', -> PRIMARY KEY (anchor) -> ) ENGINE=InnoDB DEFAULT CHARSET=utf8; Query OK, 0 rows affected (0.01 sec) mysql> show tables; +--------------------+ | Tables_in_meta | +--------------------+ | cluster | | pseudo_gtid_status | +--------------------+ 2 rows in set (0.00 sec) mysql> INSERT INTO cluster (anchor, cluster_name, cluster_domain) -> VALUES (1, CONCAT('cls_',@@hostname), @@hostname) -> ON DUPLICATE KEY UPDATE cluster_name=VALUES(cluster_name), cluster_domain=VALUES(cluster_domain); Query OK, 1 row affected (0.00 sec) mysql> select * from cluster; +--------+---------------+----------------+ | anchor | cluster_name | cluster_domain | +--------+---------------+----------------+ | 1 | cls_mysql-113 | mysql-113 | +--------+---------------+----------------+ 1 row in set (0.00 sec) |
hosts没配置报错
| 2019-02-27 11:28:43 DEBUG outdated keys: [] 2019-02-27 11:28:44 DEBUG outdated keys: [mysql1:3306 mysql2:3306 mysql3:3307] 2019-02-27 11:28:44 ERROR dial tcp: lookup mysql3 on [::1]:53: read udp [::1]:32462->[::1]:53: read: connection refused 2019-02-27 11:28:44 ERROR ReadTopologyInstance(mysql3:3307) show variables like 'maxscale%': dial tcp: lookup mysql3 on [::1]:53: read udp [::1]:32462->[::1]:53: read: connection refused 2019-02-27 11:28:44 ERROR ReadTopologyInstance(mysql3:3307) Cleanup: dial tcp: lookup mysql3 on [::1]:53: read udp [::1]:19871->[::1]:53: read: connection refused 2019-02-27 11:28:44 WARNING discoverInstance(mysql3:3307) instance is nil in 0.009s, error=Failed ReadTopologyInstance 2019-02-27 11:28:44 DEBUG Discovered host: mysql2:3306, master: mysql1:3306, version: 5.7.20-19-log in 0.018s 2019-02-27 11:28:44 DEBUG Discovered host: mysql1:3306, master: mysql2:3306, version: 5.7.20-19-log in 0.020s 2019-02-27 11:28:45 DEBUG outdated keys: [] 报错: 2019-03-05 13:31:04 DEBUG raft leader is 192.168.30.113:10008; state: Follower 2019-03-05 13:31:07 ERROR ReadTopologyInstance(mysql1:3306) show global status like 'Uptime': dial tcp: lookup mysql1 on 127.0.0.1:53: no such host 2019-03-05 13:31:07 ERROR ReadTopologyInstance(mysql3:3307) show global status like 'Uptime': dial tcp: lookup mysql3 on 127.0.0.1:53: no such host 原因:域名解析问题,配置/etc/hosts解决 解决:在orchestrator运行的机器上添加mysql的ip及对应主机名 #orchestrator 192.168.1.172 mysql1 192.168.1.173 mysql2 192.168.1.123 mysql3 |
report-host没设置报错
| 2019-02-26 17:15:03 DEBUG outdated keys: [mysql1:3306 mysql2:3306] 2019-02-26 17:15:03 ERROR ReadTopologyInstance(mysql2:3306) show slave hosts: ReadTopologyInstance(mysql2:3306) 'show slave hosts' returned row with <host,port>: <,3306> 2019-02-26 17:15:03 ERROR ReadTopologyInstance(mysql1:3306) show slave hosts: ReadTopologyInstance(mysql1:3306) 'show slave hosts' returned row with <host,port>: <,3306> 2019-02-26 17:15:03 DEBUG Discovered host: mysql2:3306, master: mysql1:3306, version: 5.7.20-19-log in 0.018s 2019-02-26 17:15:03 DEBUG Discovered host: mysql1:3306, master: mysql2:3306, version: 5.7.20-19-log in 0.025s 2019-02-26 17:15:04 DEBUG outdated keys: [] 2019-02-26 17:15:05 DEBUG outdated keys: [] 解决: Mysql主从复制,在master上查看从的信息:show slave hosts http://dinglin.iteye.com/blog/1255160 默认不记录从的host信息,只记录端口和Server_id信息,需要设置my.cnf 中的[mysqld] report-host=IP 正常输出: 2019-02-27 11:31:43 DEBUG outdated keys: [] 2019-02-27 11:31:44 DEBUG outdated keys: [mysql1:3306 mysql2:3306 mysql3:3307] 2019-02-27 11:31:44 DEBUG Discovered host: mysql2:3306, master: mysql1:3306, version: 5.7.20-19-log in 0.019s 2019-02-27 11:31:44 DEBUG Discovered host: mysql1:3306, master: mysql2:3306, version: 5.7.20-19-log in 0.023s 2019-02-27 11:31:44 DEBUG Discovered host: mysql3:3307, master: mysql2:3306, version: 5.7.20-19-log in 0.042s 2019-02-27 11:31:45 DEBUG outdated keys: [] |
mysql用户权限问题
| 2019-03-05 13:58:55 ERROR ReadTopologyInstance(mysql2:3306) show global status like 'Uptime': Error 1045: Access denied for user 'orchestrator'@'192.168.30.118' (using password: YES) 2019-03-05 14:08:34 ERROR ReadTopologyInstance(mysql3:3307) show global status like 'Uptime': Error 1045: Access denied for user 'orchestrator'@'192.168.30.118' (using password: YES) 2019-03-05 14:08:34 WARNING DiscoverInstance(mysql3:3307) instance is nil in 0.017s (Backend: 0.004s, Instance: 0.013s), error=Error 1045: Access denied for user 'orchestrator'@'192.168.30.118' (using password: YES) 2019-03-05 14:08:34 ERROR ReadTopologyInstance(mysql1:3306) show global status like 'Uptime': Error 1045: Access denied for user 'orchestrator'@'192.168.30.118' (using password: YES) 2019-03-05 14:08:34 WARNING DiscoverInstance(mysql1:3306) instance is nil in 0.023s (Backend: 0.004s, Instance: 0.019s), error=Error 1045: Access denied for user 'orchestrator'@'192.168.30.118' (using password: YES) 2019-03-05 14:08:35 ERROR ReadTopologyInstance(mysql2:3306) show global status like 'Uptime': Error 1045: Access denied for user 'orchestrator'@'192.168.30.118' (using password: YES) 2019-03-05 14:08:35 WARNING DiscoverInstance(mysql2:3306) instance is nil in 0.016s (Backend: 0.008s, Instance: 0.009s), error=Error 1045: Access denied for user 'orchestrator'@'192.168.30.118' (using password: YES) 解决:由于orchestrator部署到了新的网段,需重新赋权 mysql> GRANT SELECT, RELOAD, PROCESS, SUPER, REPLICATION SLAVE, REPLICATION CLIENT ON *.* TO 'orchestrator'@'192.168.30.%' identified by 'abc123'; Query OK, 0 rows affected, 1 warning (0.00 sec) mysql> show warnings; +---------+------+------------------------------------------------------------------------------------------------------------------------------------------------------------------------------------+ | Level | Code | Message | +---------+------+------------------------------------------------------------------------------------------------------------------------------------------------------------------------------------+ | Warning | 1287 | Using GRANT statement to modify existing user's properties other than privileges is deprecated and will be removed in future release. Use ALTER USER statement for this operation. | +---------+------+------------------------------------------------------------------------------------------------------------------------------------------------------------------------------------+ 1 row in set (0.00 sec) |
GTID错误跳过
Problem:Errant GTID
replica has gtid entries not found on its master
可以在页面上处理GTID错误:
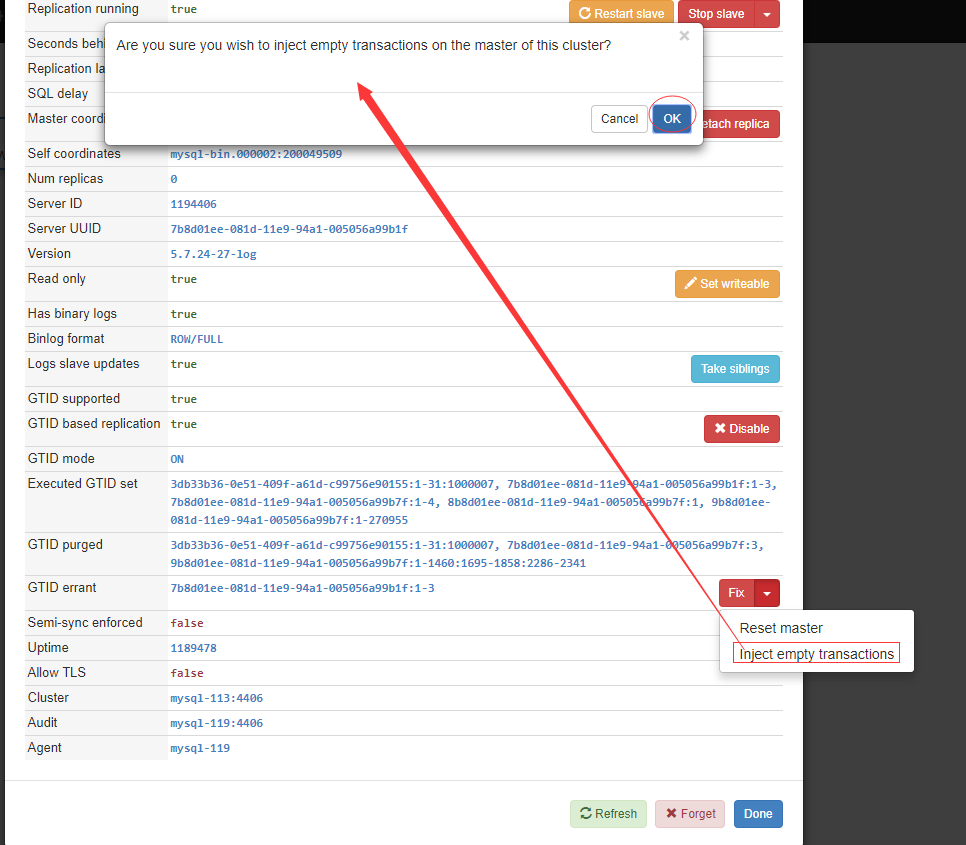
然后刷新下页面就没有GTID的报错了。
这篇关于MySQL高可用探索之orchestrator的文章就介绍到这儿,希望我们推荐的文章对编程师们有所帮助!


