本文主要是介绍基于seata1.0和spring cloud的Greenwich.SR2版本的分布式事务demo例子的实现全过程,希望对大家解决编程问题提供一定的参考价值,需要的开发者们随着小编来一起学习吧!
基于seata1.0和spring cloud的Greenwich.SR2版本的分布式事务demo例子的实现全过程
- 源码下载
- 前期注意事项
- JDK版本必须是64位
- mysql数据库版本必须是5.x
- maven仓库配置
- demo实现
- 下载官方demo例子
- 下载seata-server的release版本
- 完善demo例子
- 配置数据库
- seata数据库脚本
- seat-account数据库脚本
- seat-order数据库脚本
- seat-storage数据库脚本
- 启动seata-server
- 修改file.conf配置文件
- 修改registry.conf配置文件
- 启动seata-server
- 问题一:无法启动我们的seata-server会报堆对象内存空间不足如下:
- 问题二:启动好seata-server但是报以下的错误:
- 启动order-server模块
- 删除DataSourceConfiguration无用配置文件
- 修改我们的工程的starter
- 验证order-server的启动
- 启动剩余模块
- 验证分布式事务
- 验证正常事务流程
- 验证异常事务回滚流程
源码下载

大家可以直接微信扫描上面的二维码关注我的公众号,然后回复seata1.0里面就会给到源代码的下载地址同时会附上相应的视频教程,并定期的与大家分享相关的技术文章。
前期注意事项
JDK版本必须是64位
首先要确保你的JDK的版本是64位的,若是32位的将会导致启动seata的服务的时候内存溢出或者无法正常启动,至于如何查看JDK是否为64位大家自行百度。
mysql数据库版本必须是5.x
接着我们需要保证我们的mysql数据库版本是5.x的版本,若是高版本的则需要改动一些数据库中的配置是无法正常运行官方给到的例子的,因此为了确保我们可以正常的运行官方的例子,我们必须确保我们的数据库版本是5.x,至于如何查看自己的mysql数据库的版本不懂就百度吧。
maven仓库配置
记得maven仓库一定要设置成阿里的中央仓库,如何设置自行百度。
demo实现
下载官方demo例子
首先我们直接到seata的官方的例子仓库,地址是:https://github.com/seata/seata-samples,大家直接到这个官方的例子仓库,将这些例子直接clone下来,然后我们使用我们的编译器打开里面的springcloud-eureka-feign-mybatis-seata这个demo例子,如下图所示:

下载seata-server的release版本
接着下载seata-server 0.9的编译好的版本,地址是:https://github.com/seata/seata/releases,大家按着下图直接下载即可:

下载完成以后将我们的seata-server解压到我们的springcloud-eureka-feign-mybatis-seata工程底下,解压完成以后效果如下所示:

完善demo例子
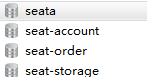
配置数据库
使用我们的navicate打开我们的mysql数据库,依次创建seata、seat-order、seat-account、seat-storage这四个数据库:
接着分写执行以下的脚本:
seata数据库脚本
-- the table to store GlobalSession data
drop table if exists `global_table`;
create table `global_table` (`xid` varchar(128)  not null,`transaction_id` bigint,`status` tinyint not null,`application_id` varchar(32),`transaction_service_group` varchar(32),`transaction_name` varchar(128),`timeout` int,`begin_time` bigint,`application_data` varchar(2000),`gmt_create` datetime,`gmt_modified` datetime,primary key (`xid`),key `idx_gmt_modified_status` (`gmt_modified`, `status`),key `idx_transaction_id` (`transaction_id`)
);-- the table to store BranchSession data
drop table if exists `branch_table`;
create table `branch_table` (`branch_id` bigint not null,`xid` varchar(128) not null,`transaction_id` bigint ,`resource_group_id` varchar(32),`resource_id` varchar(256) ,`lock_key` varchar(128) ,`branch_type` varchar(8) ,`status` tinyint,`client_id` varchar(64),`application_data` varchar(2000),`gmt_create` datetime,`gmt_modified` datetime,primary key (`branch_id`),key `idx_xid` (`xid`)
);-- the table to store lock data
drop table if exists `lock_table`;
create table `lock_table` (`row_key` varchar(128) not null,`xid` varchar(96),`transaction_id` long ,`branch_id` long,`resource_id` varchar(256) ,`table_name` varchar(32) ,`pk` varchar(36) ,`gmt_create` datetime ,`gmt_modified` datetime,primary key(`row_key`)
);
seat-account数据库脚本
CREATE TABLE `account` (`id` bigint(11) NOT NULL AUTO_INCREMENT COMMENT 'id',`user_id` bigint(11) DEFAULT NULL COMMENT '用户id',`total` decimal(10,0) DEFAULT NULL COMMENT '总额度',`used` decimal(10,0) DEFAULT NULL COMMENT '已用余额',`residue` decimal(10,0) DEFAULT '0' COMMENT '剩余可用额度',PRIMARY KEY (`id`)
) ENGINE=InnoDB AUTO_INCREMENT=2 DEFAULT CHARSET=utf8;INSERT INTO `seat-account`.`account` (`id`, `user_id`, `total`, `used`, `residue`) VALUES ('1', '1', '1000', '0', '100');CREATE TABLE `undo_log` (`id` bigint(20) NOT NULL AUTO_INCREMENT,`branch_id` bigint(20) NOT NULL,`xid` varchar(100) NOT NULL,`context` varchar(128) NOT NULL,`rollback_info` longblob NOT NULL,`log_status` int(11) NOT NULL,`log_created` datetime NOT NULL,`log_modified` datetime NOT NULL,`ext` varchar(100) DEFAULT NULL,PRIMARY KEY (`id`),UNIQUE KEY `ux_undo_log` (`xid`,`branch_id`)
) ENGINE=InnoDB AUTO_INCREMENT=1 DEFAULT CHARSET=utf8;
seat-order数据库脚本
CREATE TABLE `order` (`id` bigint(11) NOT NULL AUTO_INCREMENT,`user_id` bigint(11) DEFAULT NULL COMMENT '用户id',`product_id` bigint(11) DEFAULT NULL COMMENT '产品id',`count` int(11) DEFAULT NULL COMMENT '数量',`money` decimal(11,0) DEFAULT NULL COMMENT '金额',PRIMARY KEY (`id`)
) ENGINE=InnoDB AUTO_INCREMENT=7 DEFAULT CHARSET=utf8;ALTER TABLE `order` ADD COLUMN `status` int(1) DEFAULT NULL COMMENT '订单状态:0:创建中;1:已完结' AFTER `money` ;CREATE TABLE `undo_log` (`id` bigint(20) NOT NULL AUTO_INCREMENT,`branch_id` bigint(20) NOT NULL,`xid` varchar(100) NOT NULL,`context` varchar(128) NOT NULL,`rollback_info` longblob NOT NULL,`log_status` int(11) NOT NULL,`log_created` datetime NOT NULL,`log_modified` datetime NOT NULL,`ext` varchar(100) DEFAULT NULL,PRIMARY KEY (`id`),UNIQUE KEY `ux_undo_log` (`xid`,`branch_id`)
) ENGINE=InnoDB AUTO_INCREMENT=1 DEFAULT CHARSET=utf8;
seat-storage数据库脚本
CREATE TABLE `storage` (`id` bigint(11) NOT NULL AUTO_INCREMENT,`product_id` bigint(11) DEFAULT NULL COMMENT '产品id',`total` int(11) DEFAULT NULL COMMENT '总库存',`used` int(11) DEFAULT NULL COMMENT '已用库存',`residue` int(11) DEFAULT NULL COMMENT '剩余库存',PRIMARY KEY (`id`)
) ENGINE=InnoDB AUTO_INCREMENT=2 DEFAULT CHARSET=utf8;INSERT INTO `seat-storage`.`storage` (`id`, `product_id`, `total`, `used`, `residue`) VALUES ('1', '1', '100', '0', '100');CREATE TABLE `undo_log` (`id` bigint(20) NOT NULL AUTO_INCREMENT,`branch_id` bigint(20) NOT NULL,`xid` varchar(100) NOT NULL,`context` varchar(128) NOT NULL,`rollback_info` longblob NOT NULL,`log_status` int(11) NOT NULL,`log_created` datetime NOT NULL,`log_modified` datetime NOT NULL,`ext` varchar(100) DEFAULT NULL,PRIMARY KEY (`id`),UNIQUE KEY `ux_undo_log` (`xid`,`branch_id`)
) ENGINE=InnoDB AUTO_INCREMENT=1 DEFAULT CHARSET=utf8;
启动seata-server
在启动我们的seata-server之前我们需要先启动我们的注册中心,注册中心直接启动即可,无需修改任何的配置,注册中心启动完成以后我们需要修改seata目录底下的file.conf和registry.conf配置文件:
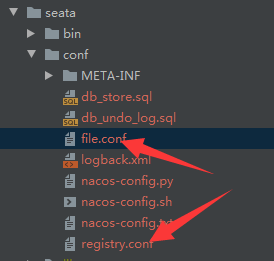
修改file.conf配置文件
首先修改以下部分:
service {#vgroup->rgroupvgroup_mapping.my_test_tx_group = "default" ##修改这里将【vgroup_mapping.my_test_tx_group】修改为【vgroup_mapping.fsp_tx_group】#only support single nodedefault.grouplist = "127.0.0.1:8091"#degrade current not supportenableDegrade = false#disabledisable = false#unit ms,s,m,h,d represents milliseconds, seconds, minutes, hours, days, default permanentmax.commit.retry.timeout = "-1"max.rollback.retry.timeout = "-1"
}
接着修改以下部分
store {## store mode: file、dbmode = "db"   ##修改这里,表明事务信息用db存储## file store 当mode=db时,此部分配置就不生效了,这是mode=file的配置file {dir = "sessionStore"# branch session size , if exceeded first try compress lockkey, still exceeded throws exceptionsmax-branch-session-size = 16384# globe session size , if exceeded throws exceptionsmax-global-session-size = 512# file buffer size , if exceeded allocate new bufferfile-write-buffer-cache-size = 16384# when recover batch read sizesession.reload.read_size = 100# async, syncflush-disk-mode = async}## database store  mode=db时,事务日志存储会存储在这个配置的数据库里db {## the implement of javax.sql.DataSource, such as DruidDataSource(druid)/BasicDataSource(dbcp) etc.datasource = "dbcp"## mysql/oracle/h2/oceanbase etc.db-type = "mysql"driver-class-name = "com.mysql.jdbc.Driver"url = "jdbc:mysql://你的数据库的地址/seat"  ##修改这里user = "root"  ##修改这里password = "root"  ##修改这里min-conn = 1max-conn = 3global.table = "global_table"branch.table = "branch_table"lock-table = "lock_table"query-limit = 100}
}
修改registry.conf配置文件
registry {# file 、nacos 、eureka、redis、zk、consul、etcd3、sofatype = "eureka" ## 修改这里将注册中心设置为eureka## 若注册中心有修改则直接修改此处的配置eureka {serviceUrl = "http://localhost:8761/eureka"application = "default"weight = "1"}}
启动seata-server
直接进入以下的路径启动我们的seata-server:

启动完成以后我们可以在我们直接打开我们的注册中心http://127.0.0.1:8761/,看到我们的seata-server已经注册到我们的注册中心了,如果这里大家在启动的时候没有事先安装好64位的JDK以及5.x版本的mysql那么这边会出现以下的两个问题:
问题一:无法启动我们的seata-server会报堆对象内存空间不足如下:
Could not reserve enough space for 2097152KB object heap
解决此问题的方法就是安装64位的JDK。
问题二:启动好seata-server但是报以下的错误:
Could not retrieve transation read-only status server
解决此问题的方法就是安装的数据库版本需要是5.x的版本。
启动order-server模块
首先修改我们的springcloud-eureka-feign-mybatis-seata底下的pom.xml,修改以后如下所示:
<?xml version="1.0" encoding="UTF-8"?>
<project xmlns="http://maven.apache.org/POM/4.0.0" xmlns:xsi="http://www.w3.org/2001/XMLSchema-instance"xsi:schemaLocation="http://maven.apache.org/POM/4.0.0 https://maven.apache.org/xsd/maven-4.0.0.xsd"><modelVersion>4.0.0</modelVersion><parent><groupId>org.springframework.boot</groupId><artifactId>spring-boot-starter-parent</artifactId><version>2.1.8.RELEASE</version><relativePath/></parent><groupId>io.seata.sample</groupId><artifactId>springcloud-eureka-feign-mybatis-seata</artifactId><version>0.0.1-SNAPSHOT</version><name>springcloud-eureka-feign-mybatis-seata</name><description>Demo project for Spring Boot</description><modules><module>order-server</module><module>account-server</module><module>storage-server</module></modules><properties><java.version>1.8</java.version><mysql-connector-java.version>5.1.37</mysql-connector-java.version><mybatis-spring-boot-starter.version>2.0.0</mybatis-spring-boot-starter.version><druid-spring-boot-starter.version>1.1.10</druid-spring-boot-starter.version><lombok.version>1.18.8</lombok.version><seata.version>1.0.0</seata.version></properties><dependencies><dependency><groupId>org.springframework.boot</groupId><artifactId>spring-boot-starter</artifactId></dependency><dependency><groupId>org.springframework.boot</groupId><artifactId>spring-boot-starter-test</artifactId><scope>test</scope></dependency><!--mybatis--><dependency><groupId>org.mybatis.spring.boot</groupId><artifactId>mybatis-spring-boot-starter</artifactId><version>${mybatis-spring-boot-starter.version}</version></dependency><!--mysql--><dependency><groupId>mysql</groupId><artifactId>mysql-connector-java</artifactId><version>${mysql-connector-java.version}</version></dependency><!--druid--><dependency><groupId>com.alibaba</groupId><artifactId>druid-spring-boot-starter</artifactId><version>${druid-spring-boot-starter.version}</version></dependency><!--lombok--><dependency><groupId>org.projectlombok</groupId><artifactId>lombok</artifactId><version>${lombok.version}</version></dependency><!--seata 设置spring-cloud-alibaba-seata版本为2.1.1--><dependency><groupId>com.alibaba.cloud</groupId><artifactId>spring-cloud-alibaba-seata</artifactId><version>2.1.1.RELEASE</version><exclusions><exclusion><artifactId>seata-all</artifactId><groupId>io.seata</groupId></exclusion></exclusions></dependency><!-- 将原先的seata-all替换成seata-spring-boot-starter --><dependency><groupId>io.seata</groupId><artifactId>seata-spring-boot-starter</artifactId><version>1.0.0</version></dependency></dependencies><build><plugins><plugin><groupId>org.springframework.boot</groupId><artifactId>spring-boot-maven-plugin</artifactId></plugin></plugins></build></project>
到了1.0版本以后我们就不需要file.conf和registry.conf配置文件了,我们可以直接删除我们order-server工程底下的file.conf和registry.conf配置文件,直接将配置写到我们的application.yml配置中即可,因此改造以后的application.yml如下:
eureka:instance:hostname: localhostprefer-ip-address: trueclient:serviceUrl:defaultZone: http://${eureka.instance.hostname}:8761/eureka/
feign:hystrix:enabled: false
logging:level:io:seata: info
mybatis:mapperLocations: classpath:mapper/*.xmltypeAliasesPackage: io.seata.sample.entity
server:port: 8180
spring:application:name: order-server
#    需要删除的配置
#    cloud:
#        alibaba:
#            seata:
#                tx-service-group: fsp_tx_groupdatasource:driver-class-name: com.mysql.jdbc.Driverpassword: 123456url: jdbc:mysql://127.0.0.1:3306/seat-orderusername: root# 需要新增的配置
seata:tx-service-group: fsp_tx_groupregistry:type: eurekaeureka:service-url: http://localhost:8761/eureka# 增加ribbon和hystrix的配置将他们的超时时间设置的长一点,可能是我电脑比较垃圾,因此执行一次完整的链路时间需要好几秒,因此在默认不配置以下参数的时候会导致我的链路请求超时导致失败而回滚,因此我增加了以下的配置。
ribbon:eureka:enabled: trueReadTimeout: 120000ConnectTimeout: 120000MaxAutoRetries: 0MaxAutoRetriesNextServer: 0OkToRetryOnAllOperations: falseNFLoadBalancerRuleClassName: com.netflix.loadbalancer.RandomRule# 设置断路器超时时间
hystrix:threadpool:default:coreSize: 1000maxQueueSize: 1000queueSizeRejectionThreshold: 500command:default:execution:isolation:thread:timeoutInMilliseconds: 490000strategy: SEMAPHORE
删除DataSourceConfiguration无用配置文件
接着删除我们的DataSourceConfiguration配置文件,因为到了1.0版本已经不需要我们再去手动配置了
修改我们的工程的starter
修改完成以后代码如下:
/*** 订单服务* @author wangzhongxiang*/
@SpringBootApplication(exclude = GlobalTransactionAutoConfiguration.class)
@MapperScan("io.seata.sample.dao")
@EnableDiscoveryClient
@EnableFeignClients
public class OrderServerApplication {public static void main(String[] args) {SpringApplication.run(OrderServerApplication.class, args);}}
验证order-server的启动
启动完成以后我们可以在seata-server的控制台看到我们的order-server已经注册进去了,同时在注册中心也会看到我们的order-server已经注册完成了,结果如下所示:

启动剩余模块
同理按着上面的order-server的修改剩下的account-server和storage-server,然后启动剩下的两个工程,如果在seata-server你们看到以下的页面就说明我们的剩余的模块已经正常启动了。

验证分布式事务
验证正常事务流程
直接打开我们的浏览器然后输入以下的地址:http://localhost:8180/order/create?userId=1&productId=1&count=10&money=100,这时候我们可以看我们的启动的服务的控制台,大家会发现我们已经正常完成了整个事务的闭环。

验证异常事务回滚流程
直接修改我们的order-account的service中的代码如下所示:
/*** 扣减账户余额* @param userId 用户id* @param money 金额*/@Overridepublic void decrease(Long userId, BigDecimal money) {LOGGER.info("------->扣减账户开始account中");accountDao.decrease(userId,money);LOGGER.info("------->扣减账户结束account中");//修改订单状态,此调用会导致调用成环LOGGER.info("修改订单状态开始");String mes = orderApi.update(userId, money.multiply(new BigDecimal("0.09")),0);LOGGER.info("修改订单状态结束:{}",mes);// 模拟异常错误throw new RuntimeException("账户操作异常!");}
然后重启我们的工程,然后再次访问我们刚刚的地址,这时候大家就会看到控制台报错,且我们在数据库会看到我们的数据都被回滚了。
这篇关于基于seata1.0和spring cloud的Greenwich.SR2版本的分布式事务demo例子的实现全过程的文章就介绍到这儿,希望我们推荐的文章对编程师们有所帮助!


