本文主要是介绍使用Streamlit创建AutoGen用户界面,希望对大家解决编程问题提供一定的参考价值,需要的开发者们随着小编来一起学习吧!
AutoGen作为一个最大化LLM(如GPT-4)能力的框架而脱颖而出。由微软研究院开发的AutoGen通过提供一种自动化、优化和编排工作流的方法,简化了复杂的、基于多代理llm的应用程序的创建。我们在以前的文章中也有过介绍,你可以与许多GPT交谈,并且GPT和GPT之间也可以互相交谈。每个GPT都是它自己的“代理”,并在总体业务流程中扮演特殊角色。但是AutoGen是用命令行模式进行交互的,这对我们的输入来说非常不方便,所以这次我们来对其进行改造,使用Streamlit创建一个web界面,这样可以让我们更好的与其交互。
这个项目略微粗糙,但它应该为为AutoGen代理创建简单的ui提供了一个很好的起点。
这里需要注意的是:
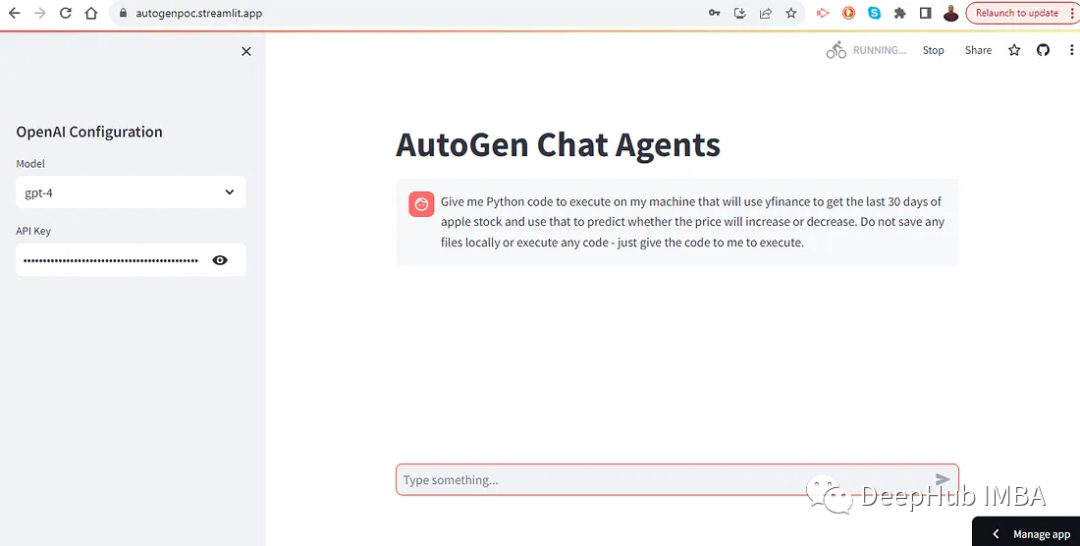
明确要求不要运行代码或将文件存储在本地,因为这是Streamlit限制—而不是AutoGen限制。
简单介绍AutoGen
我们之前已经介绍过AutoGen,所以这里再做个简单的回顾:
AutoGen自动化了LLM工作流,这在开发人员制作越来越复杂的基于LLM的应用程序时至关重要。
它提供了可定制的代理,这些代理不仅可以与用户进行自动对话,还可以在代理之间进行自动对话。
AutoGen代理可以合并llm、人工输入和其他工具的组合,克服每个组件单独的局限性。无论是代码生成、执行、调试还是复杂任务解决,AutoGen代理都可以处理各种高级操作。
创建Streamlit应用
我们的目标是这样的:

我们先安装如下包:
aiohttp==3.8.6aiosignal==1.3.1altair==5.1.2async-timeout==4.0.3attrs==23.1.0blinker==1.6.3cachetools==5.3.2certifi==2023.7.22charset-normalizer==3.3.1click==8.1.7diskcache==5.6.3docker==6.1.3FLAML==2.1.1frozenlist==1.4.0gitdb==4.0.11GitPython==3.1.40idna==3.4importlib-metadata==6.8.0Jinja2==3.1.2jsonschema==4.19.1jsonschema-specifications==2023.7.1markdown-it-py==3.0.0MarkupSafe==2.1.3mdurl==0.1.2multidict==6.0.4numpy==1.26.1openai==0.28.1packaging==23.2pandas==2.1.2Pillow==10.1.0protobuf==4.24.4pyarrow==13.0.0pyautogen==0.1.13pydeck==0.8.1b0Pygments==2.16.1python-dateutil==2.8.2python-dotenv==1.0.0pytz==2023.3.post1referencing==0.30.2requests==2.31.0rich==13.6.0rpds-py==0.10.6six==1.16.0smmap==5.0.1streamlit==1.28.0tenacity==8.2.3termcolor==2.3.0toml==0.10.2toolz==0.12.0tornado==6.3.3tqdm==4.66.1typing_extensions==4.8.0tzdata==2023.3tzlocal==5.2urllib3==2.0.7validators==0.22.0websocket-client==1.6.4yarl==1.9.2zipp==3.17.0
然后创建
app.py
首先是导入包:
import streamlit as stimport asynciofrom autogen import AssistantAgent, UserProxyAgent
streamlit用于创建UI。Asyncio对于异步控制流是必需的,它允许聊天响应。Autogen为聊天代理提供了类。
然后使用Streamlit的write函数设置应用的标题:
st.write("# AutoGen Chat Agents")
这一行将在UI的顶部显示标题“AutoGen Chat Agents”。
然后就是创建自定义代理类,需要扩展AutoGen的AssistantAgent和UserProxyAgent:
class TrackableAssistantAgent(AssistantAgent):def _process_received_message(self, message, sender, silent):with st.chat_message(sender.name):st.markdown(message)return super()._process_received_message(message, sender, silent)class TrackableUserProxyAgent(UserProxyAgent):def _process_received_message(self, message, sender, silent):with st.chat_message(sender.name):st.markdown(message)return super()._process_received_message(message, sender, silent)
这些类覆盖一个_process_received_message方法,在Streamlit聊天小部件中显示接收到的消息,为用户提供实时更新。
然后就是使用Streamlit的侧边栏功能进行配置:
selected_model = Noneselected_key = Nonewith st.sidebar:st.header("OpenAI Configuration")selected_model = st.selectbox("Model", ['gpt-3.5-turbo', 'gpt-4'], index=1)selected_key = st.text_input("API Key", type="password")
这里可以使用我们上次文章的本地 LLM 方案,这样就不用使用openai的付费API了
AutoGen完整教程和加载本地LLM示例
然后就是创建主聊天界面并处理输入:
with st.container():# for message in st.session_state["messages"]:# st.markdown(message)user_input = st.chat_input("Type something...")if user_input:if not selected_key or not selected_model:st.warning('You must provide valid OpenAI API key and choose preferred model', icon="⚠️")st.stop()llm_config = {"request_timeout": 600,"config_list": [{"model": selected_model,"api_key": selected_key}]}
上面代码创建一个聊天输入字段,如果用户没有完成配置,将显示一个警告。
自定义我们的代理,并为异步聊天设置事件循环:
# create an AssistantAgent instance named "assistant"assistant = TrackableAssistantAgent(name="assistant", llm_config=llm_config)# create a UserProxyAgent instance named "user"user_proxy = TrackableUserProxyAgent(name="user", human_input_mode="NEVER", llm_config=llm_config)# Create an event looploop = asyncio.new_event_loop()asyncio.set_event_loop(loop)
代理的配置需要根据我们的需求自行定义,我们这里只给一个演示。除此以外还要使用asyncio为应用程序处理异步操作做好准备。
最后定义并运行异步函数来启动聊天:
async def initiate_chat():await user_proxy.a_initiate_chat(assistant,message=user_input,)# Run the asynchronous function within the event looploop.run_until_complete(initiate_chat())
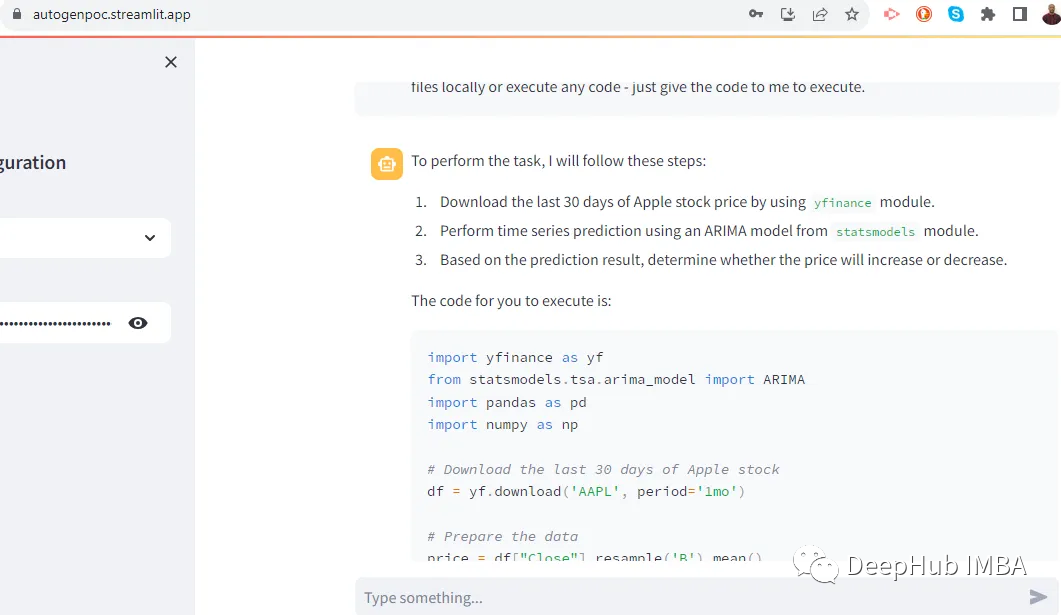
当发送消息时,就可以在用户代理和助理代理之间发起聊天,结果如下:

总结
将AutoGen代理集成到Streamlit应用程序中,为创建由大型语言模型驱动的交互式智能ui提供了无数可能性。通过我们的以上代码可以建立一个响应式聊天界面,利用AutoGen的高级功能。AutoGen和Streamlit的结合为实现我们的需求提供了一个强大且对开发人员友好的途径。
本文完整代码:
https://avoid.overfit.cn/post/5b403f65a3084a9faf966b8bba0de2c7
作者:Dr. Ernesto Lee
这篇关于使用Streamlit创建AutoGen用户界面的文章就介绍到这儿,希望我们推荐的文章对编程师们有所帮助!


