本文主要是介绍Azure 机器学习 - 使用 ONNX 对来自 AutoML 的计算机视觉模型进行预测,希望对大家解决编程问题提供一定的参考价值,需要的开发者们随着小编来一起学习吧!
目录
- 一、环境准备
- 二、下载 ONNX 模型文件
- 2.1 Azure 机器学习工作室
- 2.2 Azure 机器学习 Python SDK
- 2.3 生成模型进行批量评分
- 多类图像分类
- 三、加载标签和 ONNX 模型文件
- 四、获取 ONNX 模型的预期输入和输出详细信息
- ONNX 模型的预期输入和输出格式
- 多类图像分类
- 多类图像分类输入格式
- 多类图像分类输出格式
- 五、预处理
- 多类图像分类
- 多类图像分类 无 PyTorch
- 多类图像分类 有 PyTorch
- 使用 ONNX 运行时进行推理
- 多类图像分类
- 后期处理
- 多类图像分类无 PyTorch
- 多类图像分类有 PyTorch
- 将预测结果可视化
- 多类图像分类
本文介绍如何使用 Open Neural Network Exchange (ONNX) 对从 Azure 机器学习中的自动机器学习 (AutoML) 生成的计算机视觉模型进行预测。
关注TechLead,分享AI全维度知识。作者拥有10+年互联网服务架构、AI产品研发经验、团队管理经验,同济本复旦硕,复旦机器人智能实验室成员,阿里云认证的资深架构师,项目管理专业人士,上亿营收AI产品研发负责人。

一、环境准备
-
对任何受支持的图像任务(分类、对象检测或实例分段)获取经 AutoML 训练的计算机视觉模型。 详细了解 AutoML 对计算机视觉任务的支持。
-
安装 onnxruntime 包。 本文中的方法已使用 1.3.0-1.8.0 版本进行了测试。
二、下载 ONNX 模型文件
可以使用 Azure 机器学习工作室 UI 或 Azure 机器学习 Python SDK 从 AutoML 运行下载 ONNX 模型文件。 建议使用具有实验名称和父运行 ID 的 SDK 进行下载。
2.1 Azure 机器学习工作室
在 Azure 机器学习工作室中,通过训练笔记本中生成的指向实验的超链接进入实验,或选择“资产”下的“实验”选项卡中实验名称进入实验 。 然后,选择最佳子运行。
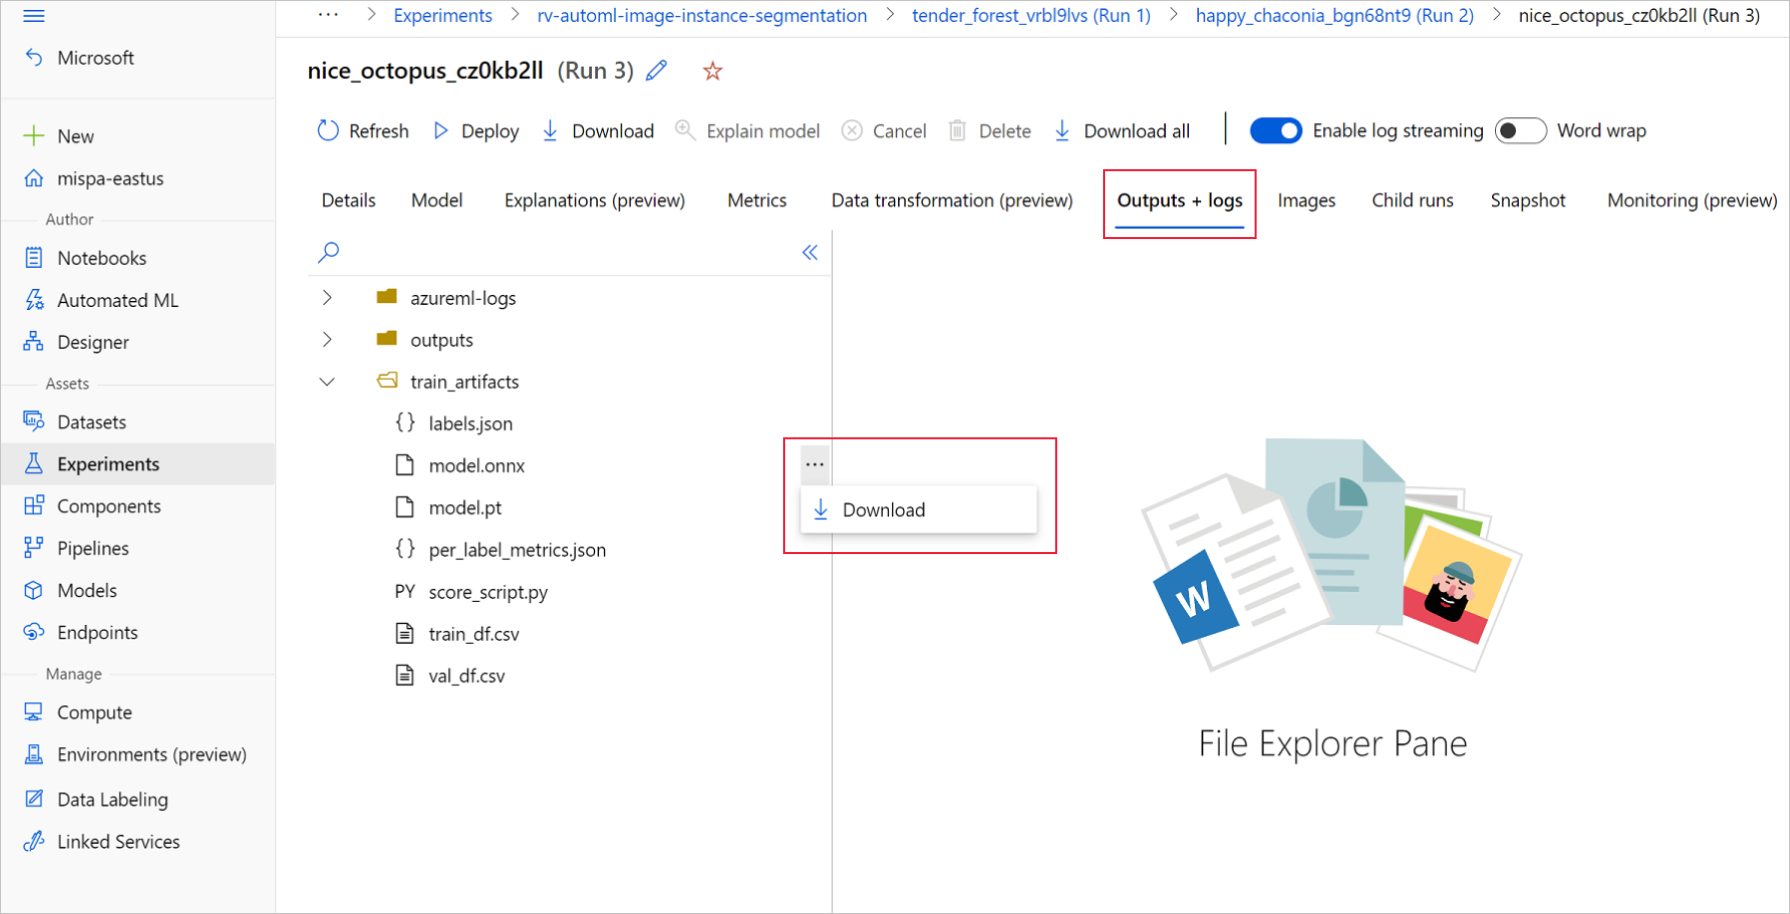
在最佳子运行中,转到“输出+日志”>“train_artifacts” 。 使用“下载”按钮手动下载以下文件:
- labels.json:包含训练数据集中所有类或标签的文件。
- model.onnx:ONNX 格式的模型。
将下载的模型文件保存到目录。 本文中的示例使用 ./automl_models 目录。
2.2 Azure 机器学习 Python SDK
在 SDK 中,可以使用实验名称和父运行 ID 选择最佳子运行(按主要指标)。 然后,可以下载 labels.json 和 model.onnx 文件 。
以下代码根据相关的主要指标返回最佳子运行。
from azureml.train.automl.run import AutoMLRun# Select the best child run
run_id = '' # Specify the run ID
automl_image_run = AutoMLRun(experiment=experiment, run_id=run_id)
best_child_run = automl_image_run.get_best_child()
下载 labels.json 文件,其中包含训练数据集中的所有类和标签。
labels_file = 'automl_models/labels.json'
best_child_run.download_file(name='train_artifacts/labels.json', output_file_path=labels_file)
下载 model.onnx 文件。
onnx_model_path = 'automl_models/model.onnx'
best_child_run.download_file(name='train_artifacts/model.onnx', output_file_path=onnx_model_path)
2.3 生成模型进行批量评分
默认情况下,AutoML for Images 支持分类的批量评分。 但是对象检测和实例分段模型不支持批量推理。 若要对于对象检测和实例分段进行批量推断,请使用以下过程为所需的批大小生成 ONNX 模型。 为特定批大小生成的模型不能用于其他批大小。
from azureml.core.script_run_config import ScriptRunConfig
from azureml.train.automl.run import AutoMLRun
from azureml.core.workspace import Workspace
from azureml.core import Experiment# specify experiment name
experiment_name = ''
# specify workspace parameters
subscription_id = ''
resource_group = ''
workspace_name = ''
# load the workspace and compute target
ws = ''
compute_target = ''
experiment = Experiment(ws, name=experiment_name)# specify the run id of the automl run
run_id = ''
automl_image_run = AutoMLRun(experiment=experiment, run_id=run_id)
best_child_run = automl_image_run.get_best_child()
使用以下模型特定参数提交脚本。 有关参数的更多详细信息,请参阅模型特定超参数;有关支持的对象检测模型名称,请参阅支持的模型算法部分。
若要获取创建批处理评分模型所需的参数值,请参阅 AutoML 训练运行 outputs 文件夹下生成的评分脚本。 使用最佳子运行评分文件内模型设置变量中提供的超参数值。
多类图像分类
对于多类图像分类,为最佳子运行生成的 ONNX 模型默认支持批量评分。 因此,此任务类型不需要模型特定的参数。
三、加载标签和 ONNX 模型文件
以下代码片段加载 labels.json,其中类名已排序。 也就是说,如果 ONNX 模型预测标签 ID 为 2,则它对应于 labels.json 文件中的第三个索引给出的标签名称。
import json
import onnxruntimelabels_file = "automl_models/labels.json"
with open(labels_file) as f:classes = json.load(f)
print(classes)
try:session = onnxruntime.InferenceSession(onnx_model_path)print("ONNX model loaded...")
except Exception as e: print("Error loading ONNX file: ",str(e))
四、获取 ONNX 模型的预期输入和输出详细信息
使用模型时,务必了解一些特定于模型和特定于任务的详细信息。 这些详细信息包括输入数量和输出数量、用于预处理图像的预期输入形状或格式,以及输出形状,确保你了解特定于模型或特定于任务的输出。
sess_input = session.get_inputs()
sess_output = session.get_outputs()
print(f"No. of inputs : {len(sess_input)}, No. of outputs : {len(sess_output)}")for idx, input_ in enumerate(range(len(sess_input))):input_name = sess_input[input_].nameinput_shape = sess_input[input_].shapeinput_type = sess_input[input_].typeprint(f"{idx} Input name : { input_name }, Input shape : {input_shape}, \Input type  : {input_type}")  for idx, output in enumerate(range(len(sess_output))):output_name = sess_output[output].nameoutput_shape = sess_output[output].shapeoutput_type = sess_output[output].typeprint(f" {idx} Output name : {output_name}, Output shape : {output_shape}, \Output type  : {output_type}")
ONNX 模型的预期输入和输出格式
每个 ONNX 模型都有一组预定义的输入和输出格式。
多类图像分类
此示例应用具有 134 个图像和 4 个类/标签的 fridgeObjects 数据集上训练的模型,以说明 ONNX 模型推理。 有关训练图像分类任务的详细信息,请参阅多类图像分类笔记本。
多类图像分类输入格式
输入是经过预处理的图像。
| 输入名称 | 输入形状 | 输入类型 | 描述 |
|---|---|---|---|
| input1 | (batch_size, num_channels, height, width) | ndarray(float) | 输入是经过预处理的图像,形状为 (1, 3, 224, 224),批大小为 1,高度和宽度为 224。 这些数字对应于训练示例中 crop_size 所用的值。 |
多类图像分类输出格式
输出是所有类/标签的 logit 数组。
| 输出名称 | 输出形状 | 输出类型 | 描述 |
|---|---|---|---|
| output1 | (batch_size, num_classes) | ndarray(float) | 模型返回 logit(没有 softmax)。 例如,对于批大小为 1 和 4 的类,它返回 (1, 4)。 |
此示例使用具有 128 个图像和 4 个类/标签的多标签 fridgeObjects 数据集上训练的模型,以说明 ONNX 模型推理。 有关多标签图像分类的模型训练的详细信息,请参阅多标签图像分类笔记本。
五、预处理
多类图像分类
执行以下预处理步骤,以实现 ONNX 模型推理:
- 将图像转换为 RGB。
- 将图像大小调整为
valid_resize_size和valid_resize_size值,这些值对应于训练期间验证数据集转换时使用的值。valid_resize_size的默认值为 256。 - 将图像中心裁剪为
height_onnx_crop_size和width_onnx_crop_size。 它与valid_crop_size对应,默认值为 224。 - 将
HxWxC更改为CxHxW。 - 转换为 float 型。
- 使用 ImageNet 的
mean=[0.485, 0.456, 0.406]和std=[0.229, 0.224, 0.225]进行规范化。
如果在训练期间为超参数valid_resize_size 和 valid_crop_size 选择了不同的值,则应使用这些值。
获取 ONNX 模型所需的输入形状。
batch, channel, height_onnx_crop_size, width_onnx_crop_size = session.get_inputs()[0].shape
batch, channel, height_onnx_crop_size, width_onnx_crop_size
多类图像分类 无 PyTorch
import glob
import numpy as np
from PIL import Imagedef preprocess(image, resize_size, crop_size_onnx):"""Perform pre-processing on raw input image:param image: raw input image:type image: PIL image:param resize_size: value to resize the image:type image: Int:param crop_size_onnx: expected height of an input image in onnx model:type crop_size_onnx: Int:return: pre-processed image in numpy format:rtype: ndarray 1xCxHxW"""image = image.convert('RGB')# resizeimage = image.resize((resize_size, resize_size))#  center  cropleft = (resize_size - crop_size_onnx)/2top = (resize_size - crop_size_onnx)/2right = (resize_size + crop_size_onnx)/2bottom = (resize_size + crop_size_onnx)/2image = image.crop((left, top, right, bottom))np_image = np.array(image)# HWC -> CHWnp_image = np_image.transpose(2, 0, 1) # CxHxW# normalize the imagemean_vec = np.array([0.485, 0.456, 0.406])std_vec = np.array([0.229, 0.224, 0.225])norm_img_data = np.zeros(np_image.shape).astype('float32')for i in range(np_image.shape[0]):norm_img_data[i,:,:] = (np_image[i,:,:]/255 - mean_vec[i])/std_vec[i]np_image = np.expand_dims(norm_img_data, axis=0) # 1xCxHxWreturn np_image# following code loads only batch_size number of images for demonstrating ONNX inference
# make sure that the data directory has at least batch_size number of imagestest_images_path = "automl_models_multi_cls/test_images_dir/*" # replace with path to images
# Select batch size needed
batch_size = 8
# you can modify resize_size based on your trained model
resize_size = 256
# height and width will be the same for classification
crop_size_onnx = height_onnx_crop_size image_files = glob.glob(test_images_path)
img_processed_list = []
for i in range(batch_size):img = Image.open(image_files[i])img_processed_list.append(preprocess(img, resize_size, crop_size_onnx))if len(img_processed_list) > 1:img_data = np.concatenate(img_processed_list)
elif len(img_processed_list) == 1:img_data = img_processed_list[0]
else:img_data = Noneassert batch_size == img_data.shape[0]
多类图像分类 有 PyTorch
import glob
import torch
import numpy as np
from PIL import Image
from torchvision import transformsdef _make_3d_tensor(x) -> torch.Tensor:"""This function is for images that have less channels.:param x: input tensor:type x: torch.Tensor:return: return a tensor with the correct number of channels:rtype: torch.Tensor"""return x if x.shape[0] == 3 else x.expand((3, x.shape[1], x.shape[2]))def preprocess(image, resize_size, crop_size_onnx):transform = transforms.Compose([transforms.Resize(resize_size),transforms.CenterCrop(crop_size_onnx),transforms.ToTensor(),transforms.Lambda(_make_3d_tensor),transforms.Normalize([0.485, 0.456, 0.406], [0.229, 0.224, 0.225])])img_data = transform(image)img_data = img_data.numpy()img_data = np.expand_dims(img_data, axis=0)return img_data# following code loads only batch_size number of images for demonstrating ONNX inference
# make sure that the data directory has at least batch_size number of imagestest_images_path = "automl_models_multi_cls/test_images_dir/*" # replace with path to images
# Select batch size needed
batch_size = 8
# you can modify resize_size based on your trained model
resize_size = 256
# height and width will be the same for classification
crop_size_onnx = height_onnx_crop_size image_files = glob.glob(test_images_path)
img_processed_list = []
for i in range(batch_size):img = Image.open(image_files[i])img_processed_list.append(preprocess(img, resize_size, crop_size_onnx))if len(img_processed_list) > 1:img_data = np.concatenate(img_processed_list)
elif len(img_processed_list) == 1:img_data = img_processed_list[0]
else:img_data = Noneassert batch_size == img_data.shape[0]
使用 ONNX 运行时进行推理
使用 ONNX 运行时进行推理因各个计算机视觉任务而异。
多类图像分类
def get_predictions_from_ONNX(onnx_session, img_data):"""Perform predictions with ONNX runtime:param onnx_session: onnx model session:type onnx_session: class InferenceSession:param img_data: pre-processed numpy image:type img_data: ndarray with shape 1xCxHxW:return: scores with shapes(1, No. of classes in training dataset) :rtype: numpy array"""sess_input = onnx_session.get_inputs()sess_output = onnx_session.get_outputs()print(f"No. of inputs : {len(sess_input)}, No. of outputs : {len(sess_output)}") # predict with ONNX Runtimeoutput_names = [ output.name for output in sess_output]scores = onnx_session.run(output_names=output_names,\input_feed={sess_input[0].name: img_data})return scores[0]scores = get_predictions_from_ONNX(session, img_data)
后期处理
多类图像分类无 PyTorch
对 softmax() 应用预测值,以获取每个类的分类置信度分数(概率)。 然后,将预测出概率最高的类。
def softmax(x):e_x = np.exp(x - np.max(x, axis=1, keepdims=True))return e_x / np.sum(e_x, axis=1, keepdims=True)conf_scores = softmax(scores)
class_preds = np.argmax(conf_scores, axis=1)
print("predicted classes:", ([(class_idx, classes[class_idx]) for class_idx in class_preds]))
多类图像分类有 PyTorch
conf_scores = torch.nn.functional.softmax(torch.from_numpy(scores), dim=1)
class_preds = torch.argmax(conf_scores, dim=1)
print("predicted classes:", ([(class_idx.item(), classes[class_idx]) for class_idx in class_preds]))
该步骤不同于多类分类。 需要将 sigmoid 应用于 logit(ONNX 输出),以获取多标签图像分类的置信度分数。
将预测结果可视化
多类图像分类
使用标签将输入图像可视化
import matplotlib.image as mpimg
import matplotlib.pyplot as plt
%matplotlib inlinesample_image_index = 0 # change this for an image of interest from image_files list
IMAGE_SIZE = (18, 12)
plt.figure(figsize=IMAGE_SIZE)
img_np = mpimg.imread(image_files[sample_image_index])img = Image.fromarray(img_np.astype('uint8'), 'RGB')
x, y = img.sizefig,ax = plt.subplots(1, figsize=(15, 15))
# Display the image
ax.imshow(img_np)label = class_preds[sample_image_index]
if torch.is_tensor(label):label = label.item()conf_score = conf_scores[sample_image_index]
if torch.is_tensor(conf_score):conf_score = np.max(conf_score.tolist())
else:conf_score = np.max(conf_score)display_text = '{} ({})'.format(label, round(conf_score, 3))
print(display_text)color = 'red'
plt.text(30, 30, display_text, color=color, fontsize=30)plt.show()
关注TechLead,分享AI全维度知识。作者拥有10+年互联网服务架构、AI产品研发经验、团队管理经验,同济本复旦硕,复旦机器人智能实验室成员,阿里云认证的资深架构师,项目管理专业人士,上亿营收AI产品研发负责人。
这篇关于Azure 机器学习 - 使用 ONNX 对来自 AutoML 的计算机视觉模型进行预测的文章就介绍到这儿,希望我们推荐的文章对编程师们有所帮助!


