本文主要是介绍Flutter 仿知乎广告Banner的切换动画,希望对大家解决编程问题提供一定的参考价值,需要的开发者们随着小编来一起学习吧!
前言
继【闲来无事】仿知乎广告Banner的切换功能,后再用flutter撸一遍,这样对同一功能双方的实现也可以有个对比,顺便在开工前热身一哈。
功能
Banner 中两层图片重叠,上层图片根据滚动方向和距离,进行扇形裁剪并展示。
最终使上层图片如水波状进行展开或收起。
主要代码
flutter 是没有xml布局的,全部由代码实现。
SingleChildScrollView(controller: _scrollController,child: Column(children: <Widget>[//up contentSizedBox(height: 500,width: screenWidth,child: Container(color: Colors.red,),),//switch bannerStack(children: <Widget>[Image.asset("assets/below.png",width: screenWidth,fit: BoxFit.fill,),ClipPath(clipper: _myOvalClipper,child: Image.asset("assets/above.png",width: screenWidth,fit: BoxFit.fill,),),],),//bottom contentSizedBox(height: 500,width: screenWidth,child: Container(color: Colors.yellowAccent,),),],),)
以上大致是布局代码,分为上中下三层,广告banner在中间位置,即:switch banner(随意取的代号)。
switch banner: 外层是stack,类似原生的FrameLayout,内部为两层图片widget,我们对第二个图片进行裁剪(也就是显示在上层的)。
实现方式
我们要达到根据滚动来实现裁剪,就需要用到ScrollController(当然,布局最外层要有一个SingleChildScrollView,类似原生的ScrollView)
@overridevoid initState() {// TODO: implement initStatesuper.initState();_myOvalClipper = MyOvalClipper(0);_scrollController = ScrollController();_scrollController.addListener((){print("scroll offset : ${_scrollController.offset}");if(_scrollController.offset > currentPosition){//scroll downscrollUp = false;currentPosition = _scrollController.offset;}else{scrollUp = true;currentPosition = _scrollController.offset;}if(currentPosition > 300){ratio = 1;}else{ratio = currentPosition / 300;}setState(() {print("ratio : $ratio");_myOvalClipper = MyOvalClipper(ratio);});});}
我们在initState 方法中(flutter的一个生命周期,一般用作初始化一些数据,具体可以百度)初始化scrollController,并添加监听函数。
_scrollController.offset 为当前滚动的位置,一般是0 到 你内容高度之和。
threshold 是一个临界值(这里设置为300),并没有具体含义,可以根据实际业务需要进行更改。
ratio 用于裁剪的系数 0-1.
setState()方法中,我们对_myOvalClipper进行刷新,已达到重新裁剪的效果(myOvalClipper 下面会讲到)。
这样我们就可以对single child scroll view 进行监听并实时得到滚动值了。
ClipPath
这个widget可以按照Path对Widget进行裁剪(它有一些封装好的如:clipOval,clipRRect等)。
ClipPath(clipper: _myOvalClipper,child: Image.asset("assets/above.png",width: screenWidth,fit: BoxFit.fill,),),
child 是要裁剪的子widget,clipper 是我们的裁剪器,这里我们传入一个自定义的myOvalClipper
class MyOvalClipper extends CustomClipper<Path>{final double ratio;MyOvalClipper(this.ratio);@overridePath getClip(Size size) {// TODO: implement getClipprint("size info : ${size.width}     ${size.height}");double width = size.width;double height = size.height;double radius = width * ratio;Path path = Path();path.moveTo(0, 0);path.lineTo(0, radius);path.arcToPoint(Offset(radius,0),clockwise: false,radius: Radius.circular(radius));path.close();//    path.lineTo(width, 0);
//    path.lineTo(width, height);
//    path.close();return path;}@overridebool shouldReclip(CustomClipper<Path> oldClipper) {// TODO: implement shouldReclipreturn ratio != (oldClipper as MyOvalClipper).ratio;}}
shouldReclip()方法 // 是否需要重新裁剪。
具体的裁剪路径,在getClip() 进行设置,这个方法有一个参数 size, 这个是当前子widget的大小。
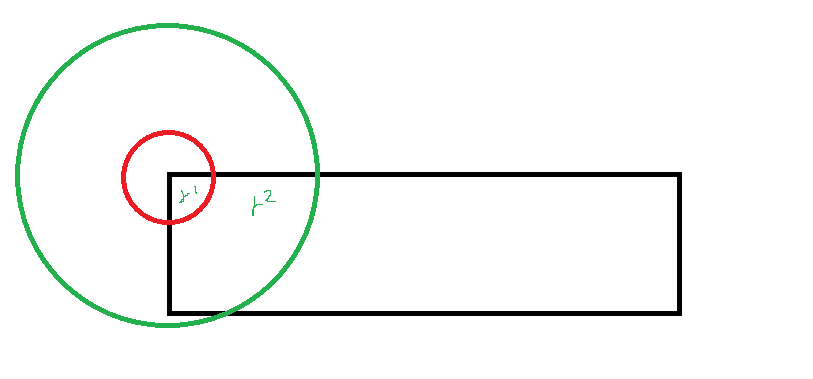
因为要保证扇形最终可以将整个图片显示出来,所以我们在计算radius时要使用宽度。
参考图如下:r1,r2 就是不断变化的半径

path其他的方法都比较简单,这里介绍一下
path.arcToPoint(Offset(radius,0),clockwise: false,radius: Radius.circular(radius));
第一个参数 offset: 终点
第二个参数 顺/逆时针
第三个参数 半径
path.arcToPoint 会在上一个起点开始,以offset为终点,参照半径 radius 计算出一个path。
之后我们将path.close 并返回,clipper 会按照我们的path对child widget 进行裁剪了。
DEMO地址
地址: flutter_zhihu_banner
PS:DEMO中可能有一些无用代码,那个是我写DEMO时试验了一些其他功能的残留,个人觉得可能有用暂时保留的。
如有其他方法,请留言,大家一起交流一哈
这篇关于Flutter 仿知乎广告Banner的切换动画的文章就介绍到这儿,希望我们推荐的文章对编程师们有所帮助!


