本文主要是介绍Docker-mmdetection3d,希望对大家解决编程问题提供一定的参考价值,需要的开发者们随着小编来一起学习吧!
Docker-mmdetection3d
ubuntu18.04 3090Ti
文章目录
- Docker-mmdetection3d
- docker安装
- 部署cuda
- 报错
- 安装mmdetection3d
- 测试
- 使用现成的镜像
docker安装
https://blog.csdn.net/b1134977524/article/details/120442417
常用命令:
- https://blog.csdn.net/u013378306/article/details/86668313
- https://blog.csdn.net/awodwde/article/details/122047721(wsl)
部署cuda
https://blog.csdn.net/weixin_50008473/article/details/119464898
报错
- 用docker命令时报错,提示:Cannot connect to the Docker daemon at unix:///var/run/docker.sock.
- 出现问题原因:
可能是上一次没有正常退出docker,所以docker没有正常启动,在相应的/var/run/路径下找不到docker进程。[root@node02 ~]# systemctl stop docker.socket [root@node02 ~]# sudo systemctl restart docker [root@node02 ~]# docker ps CONTAINER ID IMAGE COMMAND CREATED STATUS PORTS NAMES - 参考:https://blog.csdn.net/weixin_42449832/article/details/114994451
安装mmdetection3d
参考:https://blog.csdn.net/weixin_41010198/article/details/116133545
可以按需修改docker/下的DockerFile
docker build -t mmdetection3d docker/
生成or启动mmdetection3容器
sudo docker run --gpus all --shm-size=8g -it -v /home/wtw/workspace/:/mmdetection3d/data mmdetection3d
/home/wtw/workspace/映射一个本地的路径到容器中,用于存放数据,这样不会导致你容器删除的时候出现数据丢失!!!
暂时安装镜像没有报错,但是测试demo时,报错mmcv1.3.8冲突
修改mmcv,从https://download.openmmlab.com/mmcv/dist/cu101/torch1.6.0/index.html查询版本
pip uninstall mmcv-full
pip install mmcv-full -f https://download.openmmlab.com/mmcv/dist/cu101/torch1.6.0/mmcv_full-1.3.14-cp37-cp37m-manylinux1_x86_64.whl
如果有问题,参考https://blog.csdn.net/weixin_36670529/article/details/116664344 不同方法
安装报错
ERROR: After October 2020 you may experience errors when installing or updating packages. This is because pip will change the way that it resolves dependency conflicts.We recommend you use --use-feature=2020-resolver to test your packages with the new resolver before it becomes the default.imageio 2.10.3 requires pillow>=8.3.2, but you'll have pillow 8.1.1 which is incompatible.
没有A4B469963BF863CC key,添加
RUN apt-key adv --keyserver hkp://keyserver.ubuntu.com:80 --recv A4B469963BF863CC
Certificate verification failed
将https改成http
Dockerfile中修改pip镜像
RUN pip3 config set global.index-url http://mirrors.aliyun.com/pypi/simple
RUN pip3 config set install.trusted-host mirrors.aliyun.com
还是存在pillow问题,不过容器生成了
手动将pillow升级后,保存新镜像
sudo docker ps
sudo docker commit relaxed_gauss mmdet3d_modify
移除多余镜像
测试
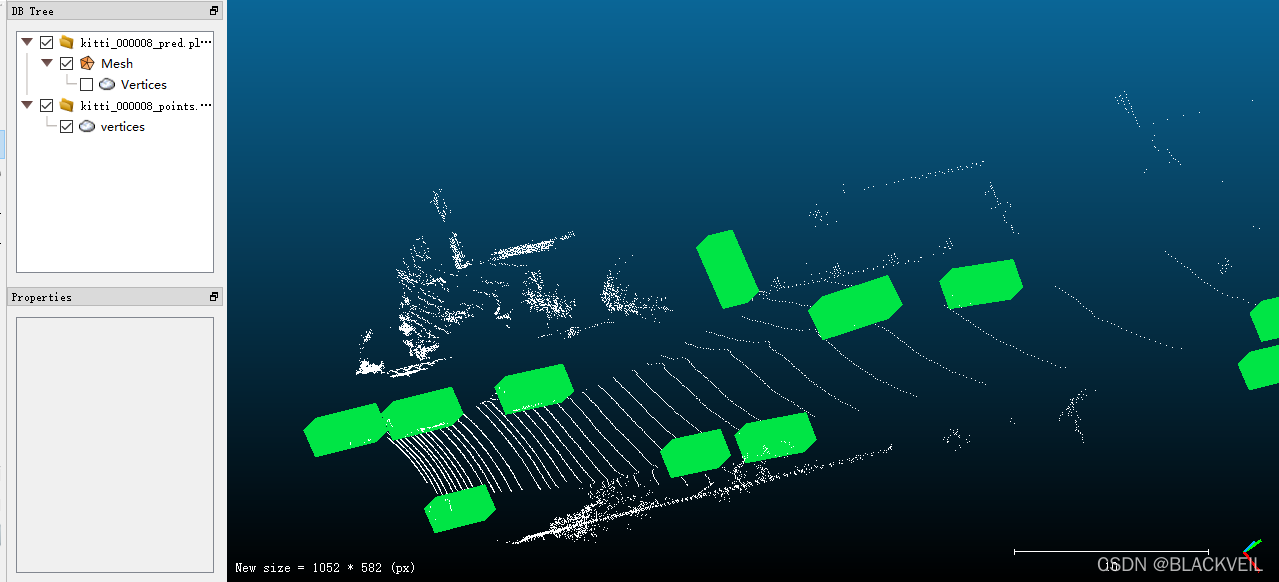
python demo/pcd_demo.py demo/data/kitti/kitti_000008.bin configs/second/hv_second_secfpn_6x8_80e_kitti-3d-car.py data/testmm3d/hv_second_secfpn_6x8_80e_kitti-3d-car_20200620_230238-393f000c.pth --out-dir data/output_result/
- 显示测试结果
https://mmdetection3d.readthedocs.io/en/latest/useful_tools.html#visualization
修改的Dockerfile
ARG PYTORCH="1.8.0"
ARG CUDA="11.1"
ARG CUDNN="8"FROM pytorch/pytorch:${PYTORCH}-cuda${CUDA}-cudnn${CUDNN}-develENV TORCH_CUDA_ARCH_LIST="5.0 7.0 8.0 8.6+PTX"
ENV TORCH_NVCC_FLAGS="-Xfatbin -compress-all"
ENV CMAKE_PREFIX_PATH="$(dirname $(which conda))/../"RUN cp /etc/apt/sources.list /etc/apt/sources.list.bak  \&& echo  "# 默认注释了源码镜像以提高 apt update 速度,如有需要可自行取消注释\ndeb http://mirrors.tuna.tsinghua.edu.cn/ubuntu/ bionic main restricted universe multiverse\n# deb-src http://mirrors.tuna.tsinghua.edu.cn/ubuntu/ bionic main restricted universe multiverse\ndeb http://mirrors.tuna.tsinghua.edu.cn/ubuntu/ bionic-updates main restricted universe multiverse\n# deb-src http://mirrors.tuna.tsinghua.edu.cn/ubuntu/ bionic-updates main restricted universe multiverse\ndeb http://mirrors.tuna.tsinghua.edu.cn/ubuntu/ bionic-backports main restricted universe multiverse\n# deb-src http://mirrors.tuna.tsinghua.edu.cn/ubuntu/ bionic-backports main restricted universe multiverse\ndeb http://mirrors.tuna.tsinghua.edu.cn/ubuntu/ bionic-security main restricted universe multiverse\n# deb-src http://mirrors.tuna.tsinghua.edu.cn/ubuntu/ bionic-security main restricted universe multiverse" >  /etc/apt/sources.list && cat  /etc/apt/sources.list\&& apt-key adv --keyserver hkp://keyserver.ubuntu.com:80 --recv A4B469963BF863CCRUN apt-get update && apt-get install -y ffmpeg libsm6 libxext6 git ninja-build libglib2.0-0 libsm6 libxrender-dev libxext6 \&& apt-get clean \&& rm -rf /var/lib/apt/lists/*
# set pip channel
RUN pip3 config set global.index-url http://mirrors.aliyun.com/pypi/simple
RUN pip3 config set install.trusted-host mirrors.aliyun.com
# Install MMCV, MMDetection and MMSegmentation
RUN pip install openmim
RUN mim install mmdet
RUN pip install mmsegmentation
#RUN pip install mmcv-full==1.3.16 -f https://download.openmmlab.com/mmcv/dist/cu111/torch1.8.0/index.html
#RUN pip install mmdet==2.17.0
#RUN pip install mmsegmentation==0.18.0# Install MMDetection3D
RUN conda clean --all
RUN git clone https://github.com/open-mmlab/mmdetection3d.git /mmdetection3d
WORKDIR /mmdetection3d
ENV FORCE_CUDA="1"
RUN pip install -r requirements/build.txt
#RUN pip uninstall mmcv-ful -y && pip install mmcv-full -f https://download.openmmlab.com/mmcv/dist/cu101/torch1.6.0/mmcv_full-1.6.0-cp38-cp38-manylinux1_x86_64.whl
RUN pip uninstall mmcv-ful -y && pip install mmcv-full==1.6.0   pillow==8.3.2   ipython==7.23.1   traitlets==5.2.2
RUN pip install --no-cache-dir -e .
cuda支持的算力要高于实际的显卡算力——软件支持算力高于硬件
修改setup.py文件里的TORCH_CUDA_ARCH_LIST,将这个值改成你当前使用的GPU对应算力,可以使cuda(软件算力)降到硬件范围
使用现成的镜像
docker search mmdetection

挑选了这个朋友的镜像,pulling…
docker pull hquan7395/mmdetection3d-lab
run起来,/home/{共享路径}/(本地):/mmdetection3d/data(docker容器)
sudo docker run --gpus all --shm-size=8g -it -v /home/{共享路径}/:/mmdetection3d/data hquan7395/mmdetection3d-lab
测试mm3d(需要下载模型权重文件)
python demo/pcd_demo.py demo/data/kitti_000008.bin configs/second/hv_second_secfpn_6x8_80e_kitti-3d-car.py checkpoints/hv_second_secfpn_6x8_80e_kitti-3d-car_20200620_230238-393f000c.pth
通过共享路径将结果文件夹传出来
show
ps:这是在自己的1050ti笔记本上测试的
这篇关于Docker-mmdetection3d的文章就介绍到这儿,希望我们推荐的文章对编程师们有所帮助!


