本文主要是介绍【Android Camera1】Android Camera1综述,希望对大家解决编程问题提供一定的参考价值,需要的开发者们随着小编来一起学习吧!
Camera1综述
- 简介:
- Camera1简介
- Camera1衡量维度
- Camera.java
- Camera HAL1
- 宏观流程
- 基本配置
- AndroidManifest.xml
- 使用
- 自定义相机开发
简介:
本篇文章是Camera1概览。
- Camera1的源码细节可参看Camera系列文章之Camera1源码。
- 具体可运行的代码可参看Camera系列文章之Camera1开源项目分析
- 具体完善的开发细节和问题处理可参看Camera系列文章之Camera1初始化,AF,AE,常见问题等文章。
Camera1简介
目前Android提供3个Camera框架,Camera1、Camera2、CameraX;Camera1作为最早期框架再API level1就已经存在,随着Android SDK的升级,在Level21推荐使用Camera2代替Camera1; 但在实际的应用开发中,考虑到诸多兼容性问题,仍然会把Camera1作为兜底的一种Camera功能实现方式。
相比较Camera2、CameraX。Camera1更像是一个黑盒,提供基本的相机功能:如
- 预览
- 视频录制
- 静态拍摄
Camera1衡量维度
要想使用Camera1开发一个健壮性比较高的应用,还需要多多实践,以结果说话。具体可从如下维度衡量
- 相机初始化的稳定性
- 相机拍照的稳定性
- 相机录制视频的稳定性
- 相机的初始化和拍照性能
- 相机拍出照片的质量等等
Camera系列文章也会始终以这些衡量维度去阐述具体的细节处理。
Camera.java
相比较Camera2和CameraX来说,Camera1的Java层源码十分简单,一个类Camera.java 囊括了App开发中使用的所有相关代码。当然具体的实现功能还是Native层面。
Camera HAL1
相机的功能实现在Native层,向上提供应用接口,Camera框架之间的差异也代表了HAL之间的差异。
HAL 位于相机驱动程序和更高级别的 Android 框架之间,它定义您必须实现的接口,以便应用可以正确地操作相机硬件。
HAL 可定义一个标准接口以供硬件供应商实现,可让Android忽略较低级别的驱动程序实现。HAL实现通常会内置在共享库模块(.so)中。

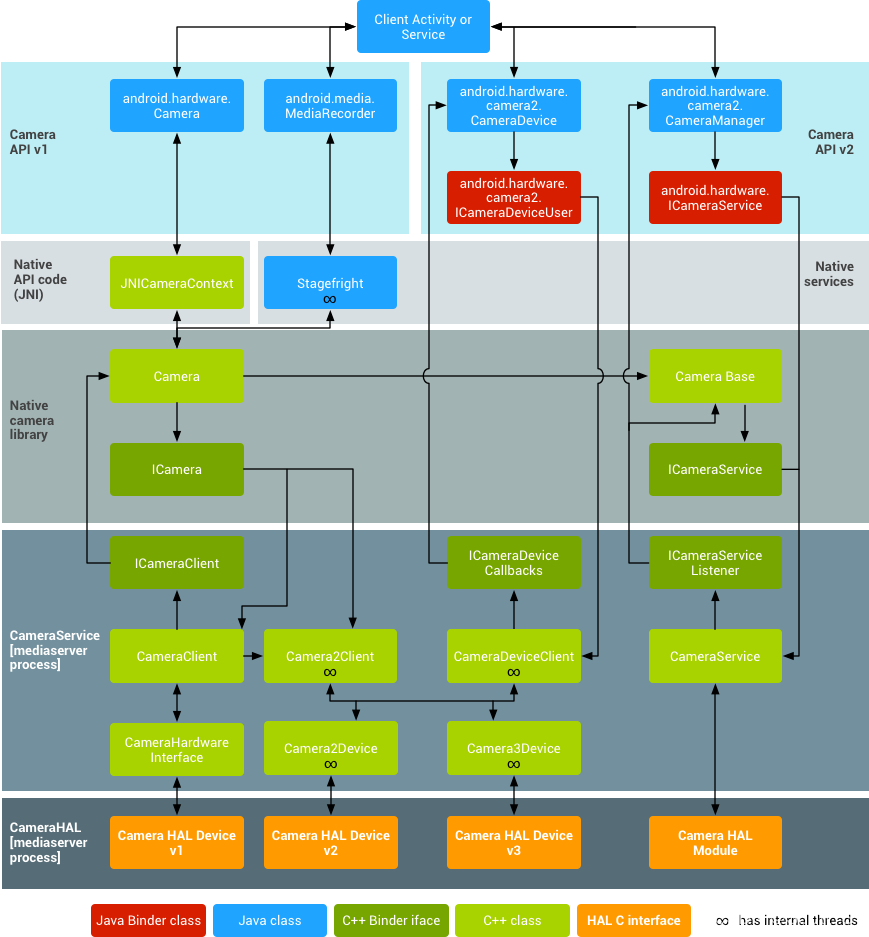
Camera1的HAL架构图可以参考左侧部分。可以看到从上到下涉及到的类不是很复杂。
简单可抽象为如下流程,由于Camera1是向后兼容的,所以之后的Android SDK都可以使用Camera1来实现自己App相关的相机Feature。

宏观流程
Camera1整体的理论知识可参考如下网站和资料
- 官方文档说明
- 官方API文档
接下来分为如下几个部分来介绍,详细的细节可参考Camera系列文章里Camera1源码文章:
- 基本配置
- 使用相机功能流程
- 自定义开发相机功能流程
基本配置
AndroidManifest.xml
uses-permission
android.permission.CAMERAandroid.permission.WRITE_EXTERNAL_STORAGEandroid.permission.RECORD_AUDIO
基本上涉及到相机,存储和录音3个权限,在App启动时需要向用户申请通过相关权限,否则将无法执行后续流程。
uses-feature
android:name="android.hardware.camera" android:required="true"android.hardware.camera.autofocusandroid.hardware.camera.anyandroid.hardware.camera.flash
对应App的相关能力特征
使用
通过发送相应的intent可使用相应的三方相机能力,具体的模版代码可参考官方文档。这里简单列一下关键的intent 和其说明。需要特别注意的是代码里面列出来的异常,在使用之前一定要保证最基本的前提条件:权限申请,Android SDK版本兼容等。
android.media.action.IMAGE_CAPTURE
/*** Standard Intent action that can be sent to have the camera application* capture an image and return it.* <p>* The caller may pass an extra EXTRA_OUTPUT to control where this image will be written.* If the EXTRA_OUTPUT is not present, then a small sized image is returned as a Bitmap* object in the extra field. This is useful for applications that only need a small image.* If the EXTRA_OUTPUT is present, then the full-sized image will be written to the Uri* value of EXTRA_OUTPUT.* As of {@link android.os.Build.VERSION_CODES#LOLLIPOP}, this uri can also be supplied through* {@link android.content.Intent#setClipData(ClipData)}. If using this approach, you still must* supply the uri through the EXTRA_OUTPUT field for compatibility with old applications.* If you don't set a ClipData, it will be copied there for you when calling* {@link Context#startActivity(Intent)}.** <p>Note: if you app targets {@link android.os.Build.VERSION_CODES#M M} and above* and declares as using the {@link android.Manifest.permission#CAMERA} permission which* is not granted, then attempting to use this action will result in a {@link* java.lang.SecurityException}.** @see #EXTRA_OUTPUT*/@SdkConstant(SdkConstantType.ACTIVITY_INTENT_ACTION)public final static String ACTION_IMAGE_CAPTURE = "android.media.action.IMAGE_CAPTURE";
android.media.action.VIDEO_CAMERA
/*** The name of the Intent action used to launch a camera in video mode.*/@SdkConstant(SdkConstantType.ACTIVITY_INTENT_ACTION)public static final String INTENT_ACTION_VIDEO_CAMERA = "android.media.action.VIDEO_CAMERA";
自定义相机开发
详细的流程和模版代码可参看:控制相机文档
这里简要介绍下源码中给出的流程
1. client for camera service 管理Camera硬件资源
2. 包含:a.image capture settingsb.start/stop previewc.snap picturesd.retrieve frames for encoding for video
****************************
/**The Camera class is used to set image capture settings, start/stop preview,
snap pictures, and retrieve frames for encoding for video. This class is a
client for the Camera service, which manages the actual camera hardware.
**/1. 需要申请权限2. 描述相机使用的features****************************
/*** To access the device camera, you must declare the* {@link android.Manifest.permission#CAMERA} permission in your Android* Manifest. Also be sure to include the manifest element to declare camera features used by * * your application.* For example, if you use the camera and auto-focus feature, your Manifest* should include the following:</p>* <pre> <uses-permission android:name="android.permission.CAMERA" />* <uses-feature android:name="android.hardware.camera" />* <uses-feature android:name="android.hardware.camera.autofocus" /></pre>**/拍照流程1. open(int)2. getParameters() and modify3. setDisplayOrientation(int)4. setPreviewDisplay(SurfaceHolder)5. startPreview()6. takePicture(Camera.ShutterCallback,* Camera.PictureCallback, Camera.PictureCallback, Camera.PictureCallback)****************************
/*** <p>To take pictures with this class, use the following steps:</p>** <ol>* <li>Obtain an instance of Camera from {@link #open(int)}.** <li>Get existing (default) settings with {@link #getParameters()}.** <li>If necessary, modify the returned {@link Camera.Parameters} object and call* {@link #setParameters(Camera.Parameters)}.** <li>Call {@link #setDisplayOrientation(int)} to ensure correct orientation of preview.** <li><b>Important</b>: Pass a fully initialized {@link SurfaceHolder} to* {@link #setPreviewDisplay(SurfaceHolder)}. Without a surface, the camera* will be unable to start the preview.** <li><b>Important</b>: Call {@link #startPreview()} to start updating the* preview surface. Preview must be started before you can take a picture.** <li>When you want, call {@link #takePicture(Camera.ShutterCallback,* Camera.PictureCallback, Camera.PictureCallback, Camera.PictureCallback)} to* capture a photo. Wait for the callbacks to provide the actual image data.** <li>After taking a picture, preview display will have stopped. To take more* photos, call {@link #startPreview()} again first.**/销毁1. stopPreview()2. release()****************************/** <li>Call {@link #stopPreview()} to stop updating the preview surface.** <li><b>Important:</b> Call {@link #release()} to release the camera for* use by other applications. Applications should release the camera* immediately in {@link android.app.Activity#onPause()} (and re-{@link #open()}* it in {@link android.app.Activity#onResume()}).* </ol>**/切换视频模式1. Obtain and initialize a Camera and start preview2. unlock()3. android.media.MediaRecorder#setCamera(Camera)****************************
/** <p>To quickly switch to video recording mode, use these steps:</p>** <ol>* <li>Obtain and initialize a Camera and start preview as described above.** <li>Call {@link #unlock()} to allow the media process to access the camera.** <li>Pass the camera to {@link android.media.MediaRecorder#setCamera(Camera)}.* See {@link android.media.MediaRecorder} information about video recording.** <li>When finished recording, call {@link #reconnect()} to re-acquire* and re-lock the camera.** <li>If desired, restart preview and take more photos or videos.** <li>Call {@link #stopPreview()} and {@link #release()} as described above.* </ol>**/1. 非线程安全,一定要做好线程调度控制****************************/** <p>This class is not thread-safe, and is meant for use from one event thread.* Most long-running operations (preview, focus, photo capture, etc) happen* asynchronously and invoke callbacks as necessary. Callbacks will be invoked* on the event thread {@link #open(int)} was called from. This class's methods* must never be called from multiple threads at once.</p>**/1. 注意兼容性****************************/** <p class="caution"><strong>Caution:</strong> Different Android-powered devices* may have different hardware specifications, such as megapixel ratings and* auto-focus capabilities. In order for your application to be compatible with* more devices, you should not make assumptions about the device camera* specifications.</p>** <div class="special reference">* <h3>Developer Guides</h3>* <p>For more information about using cameras, read the* <a href="{@docRoot}guide/topics/media/camera.html">Camera</a> developer guide.</p>* </div>**/1. 高版本Android SDK推荐使用Camera2****************************/** @deprecated We recommend using the new {@link android.hardware.camera2} API for new* applications.*/
更多细节请参看其他Camera1系列文章~~
这篇关于【Android Camera1】Android Camera1综述的文章就介绍到这儿,希望我们推荐的文章对编程师们有所帮助!


