本文主要是介绍浅谈OSG的默认视点方向,希望对大家解决编程问题提供一定的参考价值,需要的开发者们随着小编来一起学习吧!
目录
1. 前言
2. OPenGL坐标系和OSG坐标系
3. 默认视点有关的几个案例
4. 视点操作
4.1. 视点调整
4.2. 左右转动
4.3. 向前走
5. 总结
6. 参考资料
1. 前言
在OSG开发中,对视点的理解透彻是必须可少的,特别是在进行自定义操控器类的开发中,对视点的深刻理解,更是重要,否则自定义的操控器功能可能会不正常、不会按预想的那样。关于怎么编写自定义操控器,可参考:自定义一个简单的操控器类。
默认视点方向为何如此重要?因为旋绕、移动操作最开始是建立在默认视点基础上,即以默认视点为基础进行旋转、移动,从而在视觉上让人觉得场景在变化。如果默认视点方向理解错了,则后续的旋绕、移动操作都是错的,从而导致场景的旋转、移动不是预想的。
2. OPenGL坐标系和OSG坐标系
OPenGL坐标系和OSG坐标系都是右手坐标系。OPenGL坐标系如下:
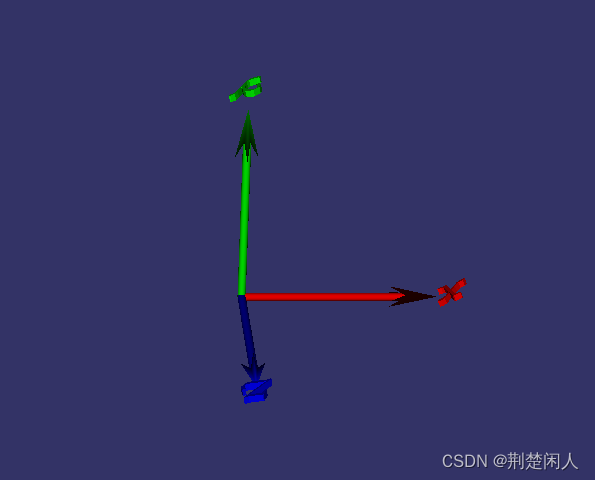
图1
- 红色表示X轴正半轴,朝向右边。
- 绿色表示Y轴正半轴,方向从底部垂直指向顶部。
- 蓝色表示Z轴正半轴,方向垂直屏幕,由屏幕内部指向屏幕外部。
OSG的坐标系如下:
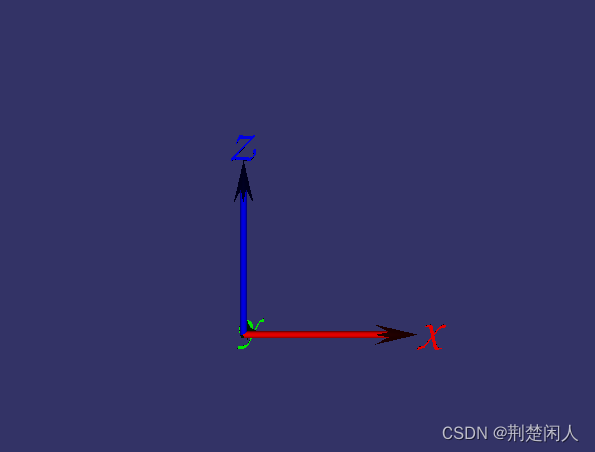
图2
- 红色表示X轴正半轴,朝向右边。
- 绿色表示Y轴正半轴,方向指向屏幕内部。
- 蓝色表示Z轴正半轴,方向由屏幕底部指向顶部。
可以看到OSG坐标系其实是OSG在其内核中将OPenGL坐标系绕X轴正半轴顺时针旋转了90°。
3. 默认视点有关的几个案例
案例1:
如下代码:
#include <osgDB/readFile>
#include<osgViewer/Viewer>
int main()
{osg::ref_ptr<osgViewer::Viewer> viewer = new osgViewer::Viewer;osg::ref_ptr<osg::Group> root = new osg::Group;osg::ref_ptr<osg::Node> node = osgDB::readNodeFile("cow.osg");root->addChild(node);viewer->setSceneData(root.get());viewer->run();
}
代码段1
加载了一个奶牛模型到视景器中:
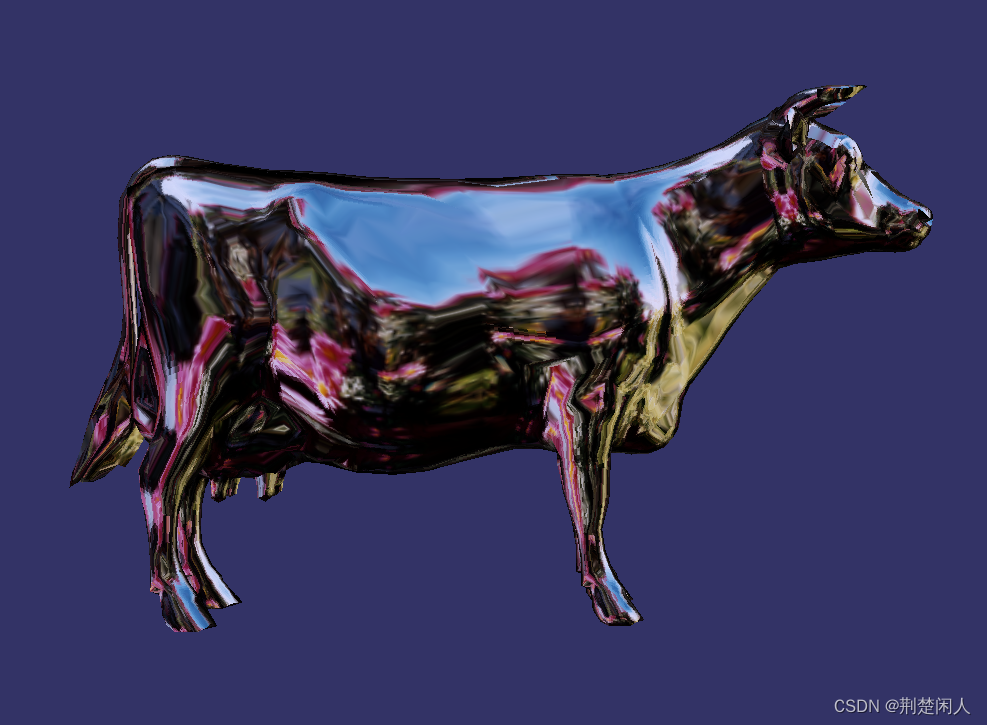
图3
注意:在用osg进行场景显示时,必须至少存在一个操控器类对象,即必须至少存在一个从osgGA::CameraManipulator派生的子类对象,且必须通过如下函数
viewer->setCameraManipulator(操控器类对象);代码段2
将该操控器类子对象设置到视景器中,否则osg程序就会因为没有操控器类对象而崩溃终止。读者可能会问了:上面代码没见设置操控器到视景器中啊!通过跟踪
viewer->run();代码段3
这句代码后到Viewer::run函数:
int Viewer::run()
{if (!getCameraManipulator() && getCamera()->getAllowEventFocus()){setCameraManipulator(new osgGA::TrackballManipulator());}setReleaseContextAtEndOfFrameHint(false);return ViewerBase::run();
}
代码段4
才明白osg检测到外层如果没有设置操控器,则就为我们设置一个osgGA::TrackballManipulator即跟踪球操控器。正是在因为设置了跟踪球操控器,才导致程序一起来,我们就能看到奶牛位于视景器中心,视点由Y轴负半轴看向正半轴。即跟踪球操控器将默认视点方向改变为由Y轴负半轴看向正半轴。那么最开始的默认视点方向是朝向哪里?即如果不用跟踪球操控器或不人为调整默认视点方向,默认视点朝向哪个方向呢?
附:关于跟踪球操控器是如何将场景调整到视景器中心、如何调整默认视点方向的,请参考:
osgGA::CameraManipulator类computeHomePosition函数分析博文。
案例2:
#include <osgDB/readFile>
#include<osgViewer/Viewer>
#include<osgGA/AnimationPathManipulator>
osg::Node* createBase(const osg::Vec3 center, float radius)
{osg::Group* root = new osg::Group;int numTilesX = 10;int numTilesY = 10;float width = 2 * radius;float height = 2 * radius;osg::Vec3 v000(center - osg::Vec3(width * 0.5f, height * 0.5f, 0.0f));osg::Vec3 dx(osg::Vec3(width / ((float)numTilesX), 0.0, 0.0f));osg::Vec3 dy(osg::Vec3(0.0f, height / ((float)numTilesY), 0.0f));// fill in vertices for grid, note numTilesX+1 * numTilesY+1...osg::Vec3Array* coords = new osg::Vec3Array;int iy;for (iy = 0; iy <= numTilesY; ++iy){for (int ix = 0; ix <= numTilesX; ++ix){coords->push_back(v000 + dx * (float)ix + dy * (float)iy);}}//Just two colours - black and white.osg::Vec4Array* colors = new osg::Vec4Array;colors->push_back(osg::Vec4(1.0f, 1.0f, 1.0f, 1.0f)); // whitecolors->push_back(osg::Vec4(0.0f, 0.0f, 0.0f, 1.0f)); // blackosg::ref_ptr<osg::DrawElementsUShort> whitePrimitives = new osg::DrawElementsUShort(GL_QUADS);osg::ref_ptr<osg::DrawElementsUShort> blackPrimitives = new osg::DrawElementsUShort(GL_QUADS);int numIndicesPerRow = numTilesX + 1;for (iy = 0; iy < numTilesY; ++iy){for (int ix = 0; ix < numTilesX; ++ix){osg::DrawElementsUShort* primitives = ((iy + ix) % 2 == 0) ? whitePrimitives.get() : blackPrimitives.get();primitives->push_back(ix + (iy + 1) * numIndicesPerRow);primitives->push_back(ix + iy * numIndicesPerRow);primitives->push_back((ix + 1) + iy * numIndicesPerRow);primitives->push_back((ix + 1) + (iy + 1) * numIndicesPerRow);}}// set up a single normalosg::Vec3Array* normals = new osg::Vec3Array;normals->push_back(osg::Vec3(0.0f, 0.0f, 1.0f));osg::Geometry* geom = new osg::Geometry;geom->setVertexArray(coords);geom->setColorArray(colors, osg::Array::BIND_PER_PRIMITIVE_SET);geom->setNormalArray(normals, osg::Array::BIND_OVERALL);geom->addPrimitiveSet(whitePrimitives.get());geom->addPrimitiveSet(blackPrimitives.get());osg::Geode* geode = new osg::Geode;geode->addDrawable(geom);geode->getOrCreateStateSet()->setMode(GL_LIGHTING, osg::StateAttribute::OFF);root->addChild(geode);root->addChild(osgDB::readNodeFile("axes.osgt"));return root;
}int main()
{osgViewer::Viewer viewer;auto pAnimationPath = new osg::AnimationPath;osgGA::AnimationPathManipulator* apm = new osgGA::AnimationPathManipulator(pAnimationPath )osg::Vec3d eye, center, up;apm->getHomePosition(eye, center, up);std::cout << "eye pos:" << "x: " << eye.x() << "y: " << eye.y() << "z: " << eye.z() << std::endl;viewer.setCameraManipulator(apm);viewer.setSceneData(createBase(osg::Vec3(0.0, 0.0, 0.0), 20.0));viewer.run();
}
代码段5
上面的代码,以坐标原点为中心,分别在X、Y正负轴绘制了一个10 * 10的黑白嵌套的类似棋盘的地砖,并安装了动画路径操控器(关于动画路径操控器的详细描述,请参考:osg操控器之动画路径操控器osgGA::AnimationPathManipulator分析博文),本想得到如下结果:
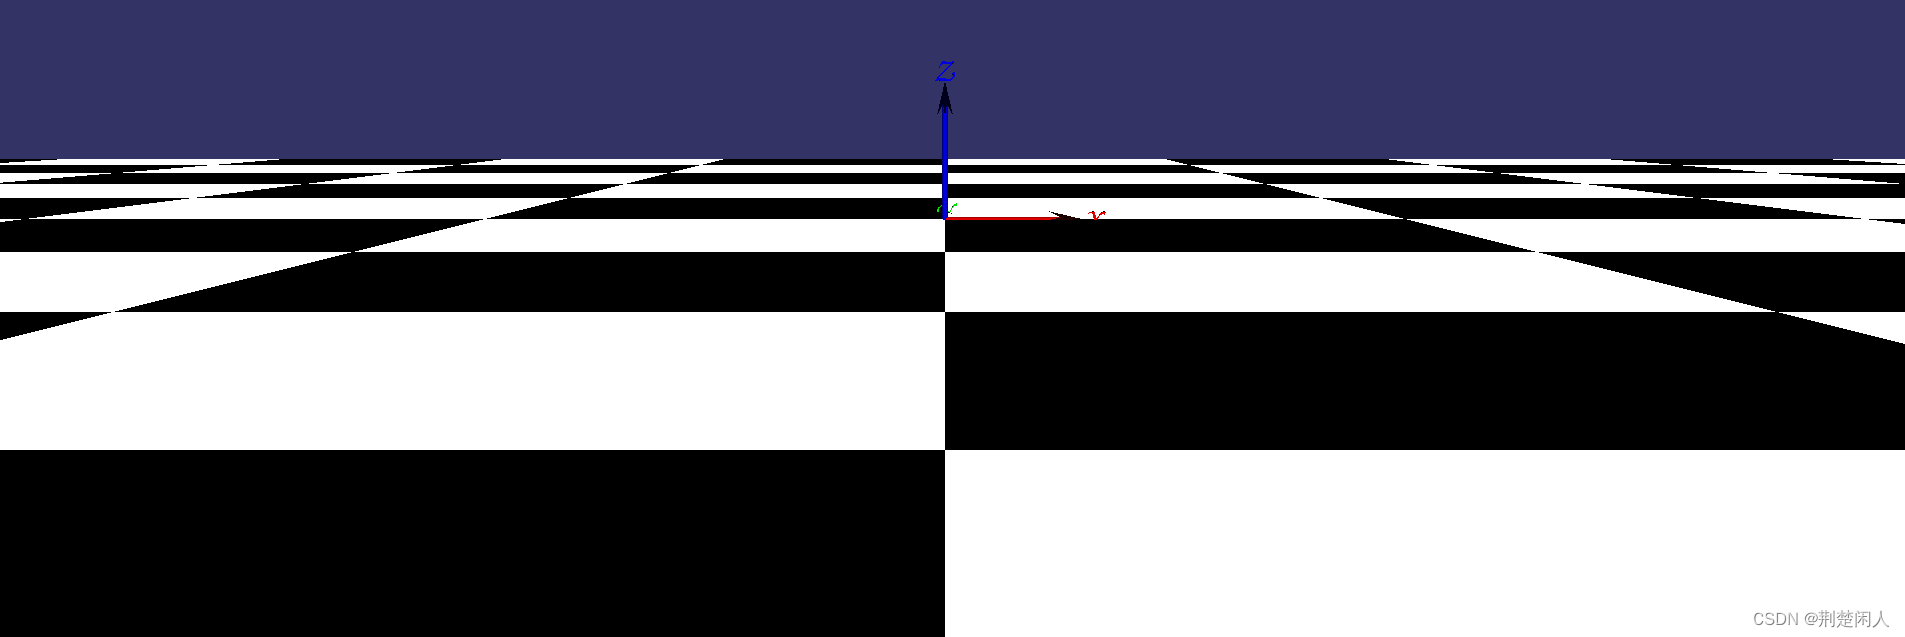
图4
然而得到的却是如下结果:

图5
这显然不是我们想要的结果。造成这种现象的原因是:没有调整视点位置和方向,程序采用的是默认视点位置和方向,即默认观察点看向的方向没有看到场景,即没看到地砖。那么最开始的默认视点方向是朝向哪里,默认视点位置位于何处?我们应该怎样调整视点位置和方向,才能看到场景地砖?
4. 视点操作
4.1. 视点调整
从上面的打印可以看出:默认视点即_eye,其位置位于(0.0, -1.0, 0.0)处。现在首先要弄明白的是当_rotation = 0,0,0的时候,它朝哪?这是个默认朝向,然后我们根据它朝哪,我们才能做自己的操作。还是结合前面的黑白地砖例子来讲,视点默认朝向如下图:
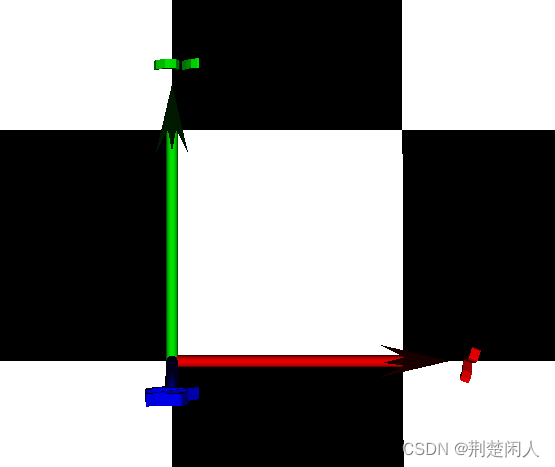
图6
其中红色是x轴,绿色是y轴,蓝色是z轴。可以看到_rotation = 0,0,0的时候,默认视点朝向z轴负方向,且头顶是y轴,右手是x轴。 现在要把它移向正常的朝向,期望像图4那样。对比默认朝向,只需要沿x轴正半轴顺时针旋转90度就可以了(关于顺、逆时针的旋转的具体介绍,请参考:左/右手坐标系绕不同轴顺时针旋转动不同的理解与总结)。因此我们在_rotation的时候这样定义了:
_rotation = osg::Vec3(osg::inDegrees(90.0), 0.0, 0.0);代码段6
理解了上面所讲的,更改代码段5中的main函数如下:
int main()
{osgViewer::Viewer viewer;osg::Quat rotate(osg::inDegrees(90.0), osg::X_AXIS);auto pAnimationPath = new osg::AnimationPath;pAnimationPath->insert(0.0, osg::AnimationPath::ControlPoint(osg::Vec3d(0.0, -18.0, 1.0), rotate));osgGA::AnimationPathManipulator* apm = new osgGA::AnimationPathManipulator(pAnimationPath);osg::Vec3d eye, center, up;apm->getHomePosition(eye, center, up);std::cout << "eye pos:" << "x: " << eye.x() << "y: " << eye.y() << "z: " << eye.z() << std::endl;viewer.setCameraManipulator(apm);viewer.setSceneData(createBase(osg::Vec3(0.0, 0.0, 0.0), 20.0));viewer.run();
}
代码段7
即
- 先将默认视点方向绕x轴正半轴顺时针转动90°。
- 再将其在0s时刻即立马移动到(0.0, -18.0, 1.0)位置。
经过上述调整视点朝向和位置后,就可以看到图4的场景效果了。
4.2. 左右转动
以下摘自杨石兴博客:
没有什么特别的原因,旋转我们就不需要操作xy轴的旋转了,向左向右旋转在上图的基本上其实就是绕z轴旋转。这里要注意方向,比如绕z轴旋转45度,是看向这里:
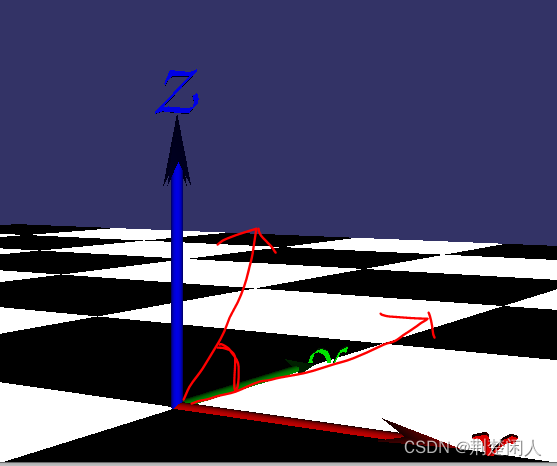
图7
图中示意的角度是45度,靠近z轴的红色箭头就是当前的朝向。注意旋转10度,是顺时针旋转10度,-10度是逆时针旋转10度。在事件处理中点q我们就加2度(顺时针),点e我们就减两度(逆时针)。代码如下:
if ((ea.getKey() == 'q') || (ea.getKey() == 'Q')) //右转{_rotation.z() += osg::inDegrees(2.0);if (_rotation.z() > osg::inDegrees(180.0)){_rotation.z() -= osg::inDegrees(360.0);}}if ((ea.getKey() == 'E') || (ea.getKey() == 'e')) // 左转{_rotation.z() -= osg::inDegrees(2.0);if (_rotation.z() < osg::inDegrees(-180.0)){_rotation.z() += osg::inDegrees(360.0);}}
代码段8
4.3. 向前走
以下摘自杨石兴博客:
向前走是点w,也是个大难题,容易把人绕晕乎。向前走不涉及z的值,只涉及xy的值。而具体往哪个方向走,将步长固定下来,则xy方向上的变化量就是与朝向有关系了,如下图所示:
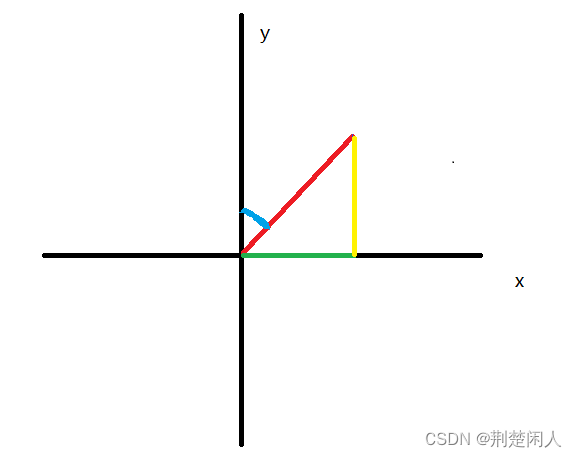
图8
上图看仔细了啊,现在我们站在原点,要走向红线的另一头,红线的长度是步长,_eye的z值怎么走都不变,则如图走到红线另一头则x方向上的变化是绿线,y方向上的变化是黄线,图中蓝线的角度就是_rotation.z(),图上这个角度肯定是负的,因为是顺时针转了一点点。默认朝向是朝y轴正方向的,顺时针转了一点点就是负值,是蓝色的角度。已知蓝色的角度,和红色的步长,那求出来黄色和绿色就是分分钟的事情了。
这里面在第一四象限可以用一个公式,在二三象限可以用一个公式。角度有正负、xy有正负、正逆时针旋转有正负,这三个正负搅和在一起,让你没有本文辅佐实难理清呀。拿第一象限来说,蓝色角度_rotation.z()在[0, 90]之间,stepSize * std::sin(_rotation.z()) 就是绿线。stepSize * std::cos(_rotation.z());就是黄线。慢慢理吧,以下是代码:
if ((ea.getKey() == 'w') || (ea.getKey() == 'W'))//前进{float stepSize = 0.5;float zRot = _rotation.z();//[-180, 180]//判断朝向以xy为平面的哪个象限,注意默认是朝各Y轴正方向的,时不时就得提一下//第一象限||第四象限if (((zRot >= osg::inDegrees(0.0)) && (zRot <= osg::inDegrees(90.0)))|| ((zRot <= osg::inDegrees(180.0)) && (zRot >= osg::inDegrees(90.0)))){_eye.x() += stepSize * std::sin(zRot);_eye.y() += stepSize * std::cos(zRot);}else //二三象限{_eye.x() += stepSize * std::sin(-zRot);_eye.y() += stepSize * std::cos(-zRot);} }
代码段9
以下是所有的代码,在一个cpp文件中,直接拷走可用:
#include <osgViewer/viewer>
#include <osgDB/ReadFile>
#include <osg/Geode>
#include <osg/Geometry>
#include <osgGA/CameraManipulator>class TravelCameraManipulator : public osgGA::CameraManipulator
{
public:TravelCameraManipulator(){//初始的场景是个20x20的棋盘,中心点在[0,0],xy的坐标范围是从[-10,10],z=0//设置_eye的出生点_eye = osg::Vec3(0.0, -8, 1.0);//这里很关键,_rotation=(0,0,0)的情况下视点会朝向哪里呢,这是个基准参考量,后面的旋转都是从//这里来,所以务必要弄清楚,000时的朝向是Z轴负方向,头顶向Y轴正方向,自然右手边就是X轴正方向//在简书的文章里有图,简书搜杨石兴,《osg3.6.5最短的一帧》等找找//我们要想让视角转着朝向前方,也即站在(0.0, -8, 1.0)看向(0,0,0),则只需要看向Y轴//正方向就可以,则只需要x轴方向逆时针转90度,则出生就是朝向这里了//用户可以自己修改这个值感受一下_rotation = osg::Vec3(osg::inDegrees(90.0), 0.0, 0.0);}//这三个纯虚函数本例不会使用virtual void setByMatrix(const osg::Matrixd& matrix) {};virtual void setByInverseMatrix(const osg::Matrixd& matrix) {};virtual osg::Matrixd getMatrix() const { return osg::Matrix::identity(); };//最关键的是这个,这个返回的就是ViewMatrixvirtual osg::Matrixd getInverseMatrix() const{return osg::Matrix::inverse(osg::Matrix::rotate(_rotation.x(), osg::X_AXIS, _rotation.y(), osg::Y_AXIS,_rotation.z(), osg::Z_AXIS) * osg::Matrix::translate(_eye));};//事件处理,我们要点击A就围着Z轴顺时针转动,点D就逆时针转动,转的时候始终朝0 0 0 点看着virtual bool handle(const osgGA::GUIEventAdapter& ea, osgGA::GUIActionAdapter& us){if (ea.getEventType() == osgGA::GUIEventAdapter::KEYDOWN){//若是A键if ((ea.getKey() == 'q') || (ea.getKey() == 'Q')) // 右转{_rotation.z() += osg::inDegrees(2.0);if (_rotation.z() > osg::inDegrees(180.0)){_rotation.z() -= osg::inDegrees(360.0);}}if ((ea.getKey() == 'E') || (ea.getKey() == 'e')) // 左转{_rotation.z() -= osg::inDegrees(2.0);if (_rotation.z() < osg::inDegrees(-180.0)){_rotation.z() += osg::inDegrees(360.0);}}if ((ea.getKey() == 'w') || (ea.getKey() == 'W'))//前进{float stepSize = 0.5;float zRot = _rotation.z();//[-180, 180]//判断朝向以xy为平面的哪个象限,注意默认是朝各Y轴正方向的,时不时就得提一下//第一象限||第四象限if (((zRot >= osg::inDegrees(0.0)) && (zRot <= osg::inDegrees(90.0)))|| ((zRot <= osg::inDegrees(180.0)) && (zRot >= osg::inDegrees(90.0)))){_eye.x() += stepSize * std::sin(zRot);_eye.y() += stepSize * std::cos(zRot);}else //二三象限{_eye.x() += stepSize * std::sin(-zRot);_eye.y() += stepSize * std::cos(-zRot);}           }}return false;}//视点位置osg::Vec3d              _eye;//视点朝向osg::Vec3d              _rotation;
};osg::Node* createBase(const osg::Vec3 center, float radius)
{osg::Group* root = new osg::Group;int numTilesX = 10;int numTilesY = 10;float width = 2 * radius;float height = 2 * radius;osg::Vec3 v000(center - osg::Vec3(width * 0.5f, height * 0.5f, 0.0f));osg::Vec3 dx(osg::Vec3(width / ((float)numTilesX), 0.0, 0.0f));osg::Vec3 dy(osg::Vec3(0.0f, height / ((float)numTilesY), 0.0f));// fill in vertices for grid, note numTilesX+1 * numTilesY+1...osg::Vec3Array* coords = new osg::Vec3Array;int iy;for (iy = 0; iy <= numTilesY; ++iy){for (int ix = 0; ix <= numTilesX; ++ix){coords->push_back(v000 + dx * (float)ix + dy * (float)iy);}}//Just two colours - black and white.osg::Vec4Array* colors = new osg::Vec4Array;colors->push_back(osg::Vec4(1.0f, 1.0f, 1.0f, 1.0f)); // whitecolors->push_back(osg::Vec4(0.0f, 0.0f, 0.0f, 1.0f)); // blackosg::ref_ptr<osg::DrawElementsUShort> whitePrimitives = new osg::DrawElementsUShort(GL_QUADS);osg::ref_ptr<osg::DrawElementsUShort> blackPrimitives = new osg::DrawElementsUShort(GL_QUADS);int numIndicesPerRow = numTilesX + 1;for (iy = 0; iy < numTilesY; ++iy){for (int ix = 0; ix < numTilesX; ++ix){osg::DrawElementsUShort* primitives = ((iy + ix) % 2 == 0) ? whitePrimitives.get() : blackPrimitives.get();primitives->push_back(ix + (iy + 1) * numIndicesPerRow);primitives->push_back(ix + iy * numIndicesPerRow);primitives->push_back((ix + 1) + iy * numIndicesPerRow);primitives->push_back((ix + 1) + (iy + 1) * numIndicesPerRow);}}// set up a single normalosg::Vec3Array* normals = new osg::Vec3Array;normals->push_back(osg::Vec3(0.0f, 0.0f, 1.0f));osg::Geometry* geom = new osg::Geometry;geom->setVertexArray(coords);geom->setColorArray(colors, osg::Array::BIND_PER_PRIMITIVE_SET);geom->setNormalArray(normals, osg::Array::BIND_OVERALL);geom->addPrimitiveSet(whitePrimitives.get());geom->addPrimitiveSet(blackPrimitives.get());osg::Geode* geode = new osg::Geode;geode->addDrawable(geom);geode->getOrCreateStateSet()->setMode(GL_LIGHTING, osg::StateAttribute::OFF);root->addChild(geode);root->addChild(osgDB::readNodeFile("axes.osgt"));return root;
}int main()
{osgViewer::Viewer viewer;viewer.setCameraManipulator(new TravelCameraManipulator);viewer.setSceneData(createBase(osg::Vec3(0.0, 0.0, 0.0), 10.0));return viewer.run();
}
代码段10
注意:上面转动时,发现z轴也跟踪转动跑掉了,这是因为没固定视点和被观察物体中心点的距离导致的,如果想保持z轴固定不动,请参见:自定义一个简单的操控器类博文。
5. 总结
结合上面的分析,我们得出结论:
- OSG在内部已经将OPenGL的坐标系绕X轴正半轴顺时针旋转了90°。
- OSG并没对视点进行旋转或平移,仅仅只是某些自带的操控器(如:跟踪球操控器)实现了对视点进行调整,以使其朝向场景,但大部分是没有调整默认视点方向的,大多数情况下,调整默认视点方向是程序员的责任。
- 默认视点位置位于(0.0, -1.0, 0.0),朝向z轴负方向(屏幕向里),且头顶是y轴,右手是x轴,如果场景不可见,则需调整视点位置和朝向。
6. 参考资料
【1】:第9节 实例-最简单的第一人称漫游操作器
这篇关于浅谈OSG的默认视点方向的文章就介绍到这儿,希望我们推荐的文章对编程师们有所帮助!


