本文主要是介绍Python 编写 Flink 应用程序经验记录(Flink1.17.1),希望对大家解决编程问题提供一定的参考价值,需要的开发者们随着小编来一起学习吧!
目录
官方API文档
提交作业到集群运行
官方示例
环境
编写一个 Flink Python Table API 程序
执行一个 Flink Python Table API 程序
实例处理Kafka后入库到Mysql
下载依赖
flink-kafka jar
读取kafka数据
写入mysql数据
flink-mysql jar
官方API文档
https://nightlies.apache.org/flink/flink-docs-release-1.17/zh/docs/dev/python/overview/
https://nightlies.apache.org/flink/flink-docs-release-1.17/zh/docs/connectors/datastream/kafka/
提交作业到集群运行
#! /usr/bin/env python
# -*- coding: utf-8 -*-# /opt/test_flink.py
if __name__ == "__main__":print("这是一个简单的测试用例")
flink 安装目录下的 examples 目录里面已经提供了一些测试案例,我们也可以直接拿它来做实验。
提交至集群
./bin/flink run -py 代码文件通过 flink run 即可运行应用程序,由于 flink 既可运行 Java 程序、也可以运行 Python 程序,所以这里我们需要指定 -py 参数,表示运行的是 py 文件。但默认情况下解释器使用的 python2,当然如果你终端输入 python 进入的就是 python3 的话则当我没说,要是我们想指定 flink 使用 python3 解释器的话,则需要配置一个环境变量。
export PYFLINK_CLIENT_EXECUTABLE=/usr/bin/python3下面来测试一下:
./bin/flink run -py /opt/test_flink.py
很明显结果是成功的,当然这里面没有涉及到任何与 Flink 有关的内容,只是演示如何提交一个 Python 应用程序。当然 flink run 是同时支持 Java、Python 等语言的。
不管使用哪种 API 进行编程,最终客户端都会生成 JobGraph 提交到 JM 上。但毕竟 Flink 的内核是采用 Java 语言编写的,如果 Python 应用程序变成 JobGraph 对象被提交到 Flink 集群上运行的话,那么 Python 虚拟机和 Java 虚拟机之间一定有某种方式,使得 Python 可以直接动态访问 Java 中的对象、Java 也可以回调 Python 中的对象。没错,实现这一点的便是 py4j。
提交单个 py 文件知道怎么做了,但如果该文件还导入了其它文件该怎么办呢?一个项目中还会涉及到包的存在。其实不管项目里的文件有多少,启动文件只有一个,只需要把这个启动文件提交上去即可。举例说明,当然这里仍不涉及具体和 Flink 相关的内容,先把如何提交程序这一步给走通。因为不管编写的程序多复杂,提交这一步骤是不会变的。
先来看看编写的程序:
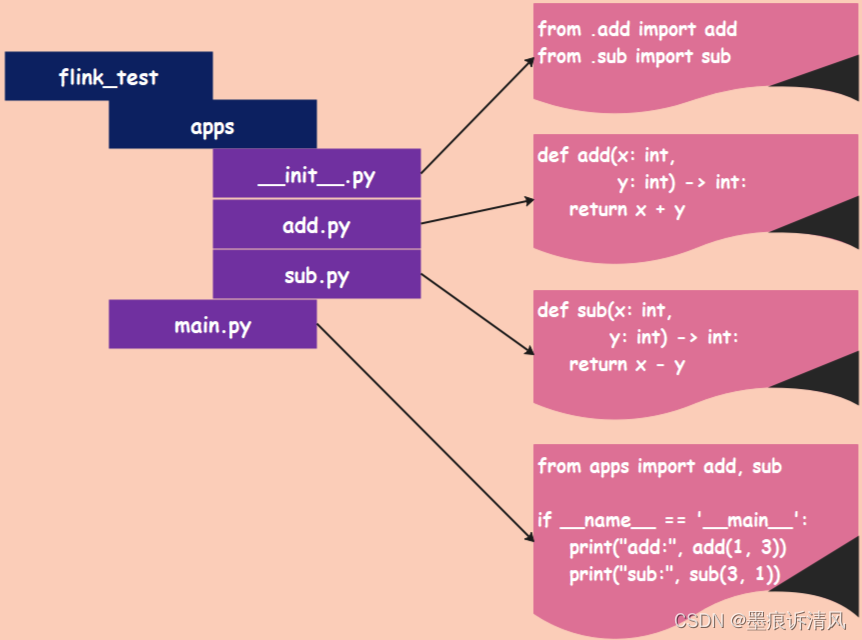
flink_test 就是主目录,里面有一个 apps 子目录和一个 main.py 文件,apps 目录里面有三个 py 文件,对应的内容分别如图所示。然后将其提交到 Flink Standalone 集群上运行,命令和提交单个文件是一样的:

即使是多文件,提交方式也是相似的,输出结果表明提交成功了。
官方示例
环境
- Java 11
- Python 3.7, 3.8, 3.9 or 3.10
python -m pip install apache-flink==1.17.1编写一个 Flink Python Table API 程序
编写 Flink Python Table API 程序的第一步是创建 TableEnvironment。这是 Python Table API 作业的入口类。
t_env = TableEnvironment.create(EnvironmentSettings.in_streaming_mode())
t_env.get_config().set("parallelism.default", "1")
接下来,我们将介绍如何创建源表和结果表。
t_env.create_temporary_table('source',TableDescriptor.for_connector('filesystem').schema(Schema.new_builder().column('word', DataTypes.STRING()).build()).option('path', input_path).format('csv').build())
tab = t_env.from_path('source')t_env.create_temporary_table('sink',TableDescriptor.for_connector('filesystem').schema(Schema.new_builder().column('word', DataTypes.STRING()).column('count', DataTypes.BIGINT()).build()).option('path', output_path).format(FormatDescriptor.for_format('canal-json').build()).build())
你也可以使用 TableEnvironment.execute_sql() 方法,通过 DDL 语句来注册源表和结果表:
my_source_ddl = """create table source (word STRING) with ('connector' = 'filesystem','format' = 'csv','path' = '{}')
""".format(input_path)my_sink_ddl = """create table sink (word STRING,`count` BIGINT) with ('connector' = 'filesystem','format' = 'canal-json','path' = '{}')
""".format(output_path)t_env.execute_sql(my_source_ddl)
t_env.execute_sql(my_sink_ddl)
上面的程序展示了如何创建及注册表名分别为 source 和 sink 的表。 其中,源表 source 有一列: word,该表代表了从 input_path 所指定的输入文件中读取的单词; 结果表 sink 有两列: word 和 count,该表的结果会输出到 output_path 所指定的输出文件中。
接下来,我们介绍如何创建一个作业:该作业读取表 source 中的数据,进行一些变换,然后将结果写入表 sink。
最后,需要做的就是启动 Flink Python Table API 作业。上面所有的操作,比如创建源表 进行变换以及写入结果表的操作都只是构建作业逻辑图,只有当 execute_insert(sink_name) 被调用的时候, 作业才会被真正提交到集群或者本地进行执行。
@udtf(result_types=[DataTypes.STRING()])
def split(line: Row):for s in line[0].split():yield Row(s)# 计算 word count
tab.flat_map(split).alias('word') \.group_by(col('word')) \.select(col('word'), lit(1).count) \.execute_insert('sink') \.wait()
该教程的完整代码如下:
import argparse
import logging
import sysfrom pyflink.common import Row
from pyflink.table import (EnvironmentSettings, TableEnvironment, TableDescriptor, Schema,DataTypes, FormatDescriptor)
from pyflink.table.expressions import lit, col
from pyflink.table.udf import udtfword_count_data = ["To be, or not to be,--that is the question:--","Whether 'tis nobler in the mind to suffer","The slings and arrows of outrageous fortune","Or to take arms against a sea of troubles,","And by opposing end them?--To die,--to sleep,--","No more; and by a sleep to say we end","The heartache, and the thousand natural shocks","That flesh is heir to,--'tis a consummation","Devoutly to be wish'd. To die,--to sleep;--","To sleep! perchance to dream:--ay, there's the rub;","For in that sleep of death what dreams may come,","When we have shuffled off this mortal coil,","Must give us pause: there's the respect","That makes calamity of so long life;","For who would bear the whips and scorns of time,","The oppressor's wrong, the proud man's contumely,","The pangs of despis'd love, the law's delay,","The insolence of office, and the spurns","That patient merit of the unworthy takes,","When he himself might his quietus make","With a bare bodkin? who would these fardels bear,","To grunt and sweat under a weary life,","But that the dread of something after death,--","The undiscover'd country, from whose bourn","No traveller returns,--puzzles the will,","And makes us rather bear those ills we have","Than fly to others that we know not of?","Thus conscience does make cowards of us all;","And thus the native hue of resolution","Is sicklied o'er with the pale cast of thought;","And enterprises of great pith and moment,","With this regard, their currents turn awry,","And lose the name of action.--Soft you now!","The fair Ophelia!--Nymph, in thy orisons","Be all my sins remember'd."]def word_count(input_path, output_path):t_env = TableEnvironment.create(EnvironmentSettings.in_streaming_mode())# write all the data to one filet_env.get_config().set("parallelism.default", "1")# define the sourceif input_path is not None:t_env.create_temporary_table('source',TableDescriptor.for_connector('filesystem').schema(Schema.new_builder().column('word', DataTypes.STRING()).build()).option('path', input_path).format('csv').build())tab = t_env.from_path('source')else:print("Executing word_count example with default input data set.")print("Use --input to specify file input.")tab = t_env.from_elements(map(lambda i: (i,), word_count_data),DataTypes.ROW([DataTypes.FIELD('line', DataTypes.STRING())]))# define the sinkif output_path is not None:t_env.create_temporary_table('sink',TableDescriptor.for_connector('filesystem').schema(Schema.new_builder().column('word', DataTypes.STRING()).column('count', DataTypes.BIGINT()).build()).option('path', output_path).format(FormatDescriptor.for_format('canal-json').build()).build())else:print("Printing result to stdout. Use --output to specify output path.")t_env.create_temporary_table('sink',TableDescriptor.for_connector('print').schema(Schema.new_builder().column('word', DataTypes.STRING()).column('count', DataTypes.BIGINT()).build()).build())@udtf(result_types=[DataTypes.STRING()])def split(line: Row):for s in line[0].split():yield Row(s)# compute word counttab.flat_map(split).alias('word') \.group_by(col('word')) \.select(col('word'), lit(1).count) \.execute_insert('sink') \.wait()# remove .wait if submitting to a remote cluster, refer to# https://nightlies.apache.org/flink/flink-docs-stable/docs/dev/python/faq/#wait-for-jobs-to-finish-when-executing-jobs-in-mini-cluster# for more detailsif __name__ == '__main__':logging.basicConfig(stream=sys.stdout, level=logging.INFO, format="%(message)s")parser = argparse.ArgumentParser()parser.add_argument('--input',dest='input',required=False,help='Input file to process.')parser.add_argument('--output',dest='output',required=False,help='Output file to write results to.')argv = sys.argv[1:]known_args, _ = parser.parse_known_args(argv)word_count(known_args.input, known_args.output)
执行一个 Flink Python Table API 程序
接下来,可以在命令行中运行作业(假设作业名为 word_count.py):
python word_count.py上述命令会构建 Python Table API 程序,并在本地 mini cluster 中运行。如果想将作业提交到远端集群执行, 可以参考作业提交示例。
最后,你可以得到如下运行结果:

实例处理Kafka后入库到Mysql
下载依赖
flink-kafka jar
wget https://repo.maven.apache.org/maven2/org/apache/flink/flink-sql-connector-kafka/1.17.1/flink-sql-connector-kafka-1.17.1.jar
读取kafka数据
#! /usr/bin/env python
# -*- coding: utf-8 -*-import sys
import loggingfrom pyflink.datastream import StreamExecutionEnvironment
from pyflink.common import WatermarkStrategy, Types
from pyflink.common.serialization import SimpleStringSchema
from pyflink.datastream.connectors.kafka import KafkaSource, KafkaOffsetsInitializerfrom pyflink.common import Row
from pyflink.datastream import FlatMapFunctiondef read_kafka():env = StreamExecutionEnvironment.get_execution_environment()env.add_jars("file:///D:/安技汇/运营平台/DataManage/flink-sql-connector-kafka-1.17.1.jar")source = KafkaSource.builder() \.set_bootstrap_servers("172.16.12.128:9092") \.set_topics("test") \.set_group_id("my-group") \.set_starting_offsets(KafkaOffsetsInitializer.earliest()) \.set_value_only_deserializer(SimpleStringSchema()) \.build()# 从消费组提交的位点开始消费,不指定位点重置策略#.set_starting_offsets(KafkaOffsetsInitializer.committed_offsets()) \# 从消费组提交的位点开始消费,如果提交位点不存在,使用最早位点#.set_starting_offsets(KafkaOffsetsInitializer.committed_offsets(KafkaOffsetResetStrategy.EARLIEST)) \# 从时间戳大于等于指定时间戳(毫秒)的数据开始消费#.set_starting_offsets(KafkaOffsetsInitializer.timestamp(1657256176000)) \# 从最早位点开始消费#.set_starting_offsets(KafkaOffsetsInitializer.earliest()) \# 从最末尾位点开始消费#.set_starting_offsets(KafkaOffsetsInitializer.latest()) \#.set_property("partition.discovery.interval.ms", "10000")  # 每 10 秒检查一次新分区#.set_property("security.protocol", "SASL_PLAINTEXT") \#.set_property("sasl.mechanism", "PLAIN") \#.set_property("sasl.jaas.config", "org.apache.kafka.common.security.plain.PlainLoginModule required username=\"username\" password=\"password\";")kafka_stream = env.from_source(source, WatermarkStrategy.no_watermarks(), "Kafka Source")kafka_stream.print()env.execute("Source")if __name__ == "__main__":logging.basicConfig(stream=sys.stdout, level=logging.INFO, format="%(message)s")read_kafka()
写入mysql数据
flink-mysql jar
没通,待补充。。
这篇关于Python 编写 Flink 应用程序经验记录(Flink1.17.1)的文章就介绍到这儿,希望我们推荐的文章对编程师们有所帮助!


