本文主要是介绍语义分割模块PointRend,希望对大家解决编程问题提供一定的参考价值,需要的开发者们随着小编来一起学习吧!
文章目录
- 1.概述
- 2.源码分析
- 2.1 sampling_points
- 2.2 point_sample
- 2.3 PointHead
- 2.4 loss
- 2.5 模块组合
- 3 实验结果
- 参考
paper: http://arxiv.org/abs/1912.08193
code: https://github.com/facebookresearch/detectron2/tree/master/projects/PointRend
1.概述
论文要解决的是图像分割质量问题,往往图像分割在物体边界处的分割质量很差,不能细致的分割出每个细节。因此作者提出了针对目标轮廓进行细化预测的一个模型:PointRend,其思想是以迭代的方式细化从目标轮廓区域选择的点的分割预测,从而提升目标轮廓分割质量。提出的模型适用于实例分割和语义分割,能预测清晰的目标轮廓,同时也提升了相应的分割精度。如下图,每一步对平滑区域进行双线性上采样,对那些有可能是物体边界的少量点进行高分辨率预测。
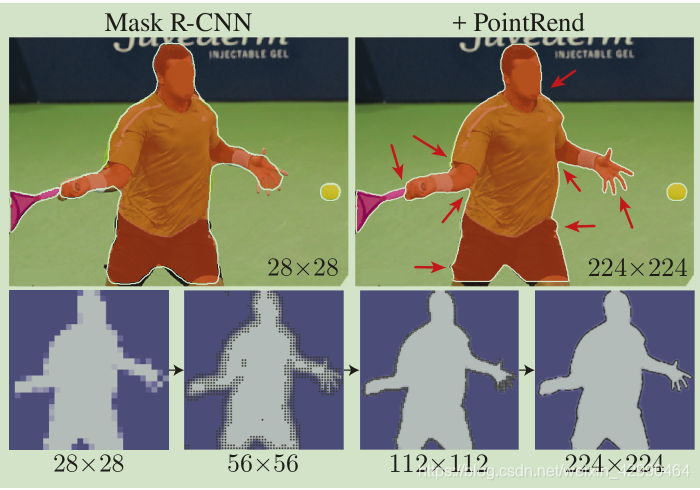
作者认为图像或者特征这种规则的像素网格在进行预测时,不可避免的在平滑区域过采样,在物体轮廓欠采样。
2.源码分析
PointRend模块包含3个部分:(1)sampling_points:点选择策略(预测和训练时的策略不同),对少量选择的点预测其在高分辨率图中的类别;(2)point_sample:对选择的每个点的特征表示。(3)PointHead:根据每个点的特征表示预测类别标签
2.1 sampling_points
点选择策略,在训练阶段和预测阶段有所不同。
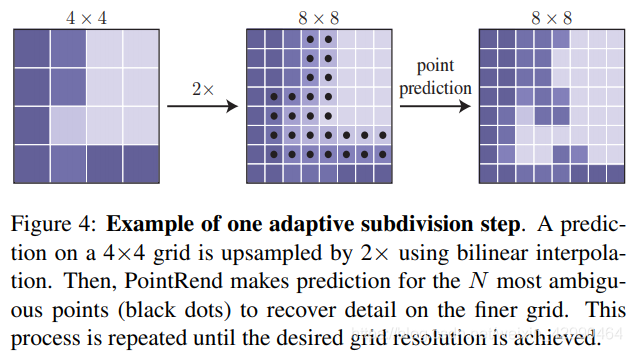
预测阶段每一次迭代选择N个最不确定的点(比如置信度接近0.5的点)计算特征表示,然后预测标签。
具体为先根据粗糙预测出来的mask,将mask按类别预测分数排序,选出分数高的前2
类别的mask,计算出在2个类别mask上均有较高得分的Top K个像素点作为K
个不确定点【1个像素点只能对应1个类别,如果它对应2个类别的分数都很高,说明它很可能是边界点,也是不确定的】
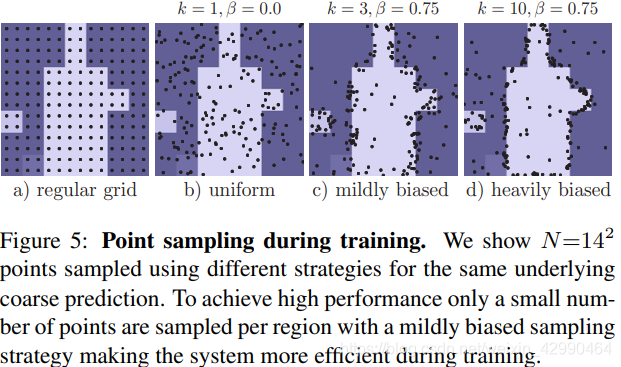
训练阶段的策略与预测阶段不同,如下图所示。有三个原则:(1)生成更多的点:以均匀分布取kN个点(k>1)。(2)关注于那些不确定的粗预测点,通过对kN个点进行插值并计算了一个针对特定任务的不确定性估计,然后选择最不确定的βN个点(3)剩下的1−β个点从均匀分布中选取。这种策略更偏重于那些不确定的区域,也就是物体轮廓。
def sampling_points(mask, N, k=3, beta=0.75, training=True):"""Follows 3.1. Point Selection for Inference and TrainingIn Train:, `The sampling strategy selects N points on a feature map to train on.`In Inference, `then selects the N most uncertain points`Args:mask(Tensor): [B, C, H, W]N(int): `During training we sample as many points as there are on a stride 16 feature map of the input`k(int): Over generation multiplierbeta(float): ratio of importance pointstraining(bool): flagReturn:selected_point(Tensor) : flattened indexing points [B, num_points, 2]"""assert mask.dim() == 4, "Dim must be N(Batch)CHW"device = mask.deviceB, _, H, W = mask.shapemask, _ = mask.sort(1, descending=True)if not training:H_step, W_step = 1 / H, 1 / WN = min(H * W, N)uncertainty_map = -1 * (mask[:, 0] - mask[:, 1])_, idx = uncertainty_map.view(B, -1).topk(N, dim=1)points = torch.zeros(B, N, 2, dtype=torch.float, device=device)points[:, :, 0] = W_step / 2.0 + (idx % W).to(torch.float) * W_steppoints[:, :, 1] = H_step / 2.0 + (idx // W).to(torch.float) * H_stepreturn idx, points# Official Comment : point_features.py#92# It is crucial to calculate uncertanty based on the sampled prediction value for the points.# Calculating uncertainties of the coarse predictions first and sampling them for points leads# to worse results. To illustrate the difference: a sampled point between two coarse predictions# with -1 and 1 logits has 0 logit prediction and therefore 0 uncertainty value, however, if one# calculates uncertainties for the coarse predictions first (-1 and -1) and sampe it for the# center point, they will get -1 unceratinty.over_generation = torch.rand(B, k * N, 2, device=device)over_generation_map = point_sample(mask, over_generation, align_corners=False)uncertainty_map = -1 * (over_generation_map[:, 0] - over_generation_map[:, 1])_, idx = uncertainty_map.topk(int(beta * N), -1)shift = (k * N) * torch.arange(B, dtype=torch.long, device=device)idx += shift[:, None]importance = over_generation.view(-1, 2)[idx.view(-1), :].view(B, int(beta * N), 2)coverage = torch.rand(B, N - int(beta * N), 2, device=device)return torch.cat([importance, coverage], 1).to(device)2.2 point_sample
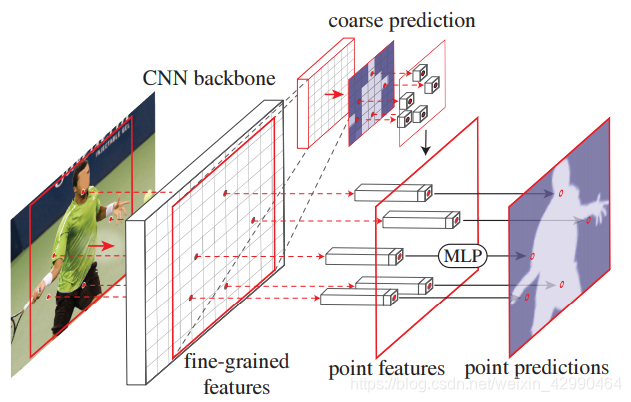
根据第一步所得出不确定点的位置,来获取每个点的特征。
def point_sample(input, point_coords, **kwargs):"""From Detectron2, point_features.py#19A wrapper around :function:`torch.nn.functional.grid_sample` to support 3D point_coords tensors.Unlike :function:`torch.nn.functional.grid_sample` it assumes `point_coords` to lie inside[0, 1] x [0, 1] square.Args:input (Tensor): A tensor of shape (N, C, H, W) that contains features map on a H x W grid.point_coords (Tensor): A tensor of shape (N, P, 2) or (N, Hgrid, Wgrid, 2) that contains[0, 1] x [0, 1] normalized point coordinates.Returns:output (Tensor): A tensor of shape (N, C, P) or (N, C, Hgrid, Wgrid) that containsfeatures for points in `point_coords`. The features are obtained via bilinearinterplation from `input` the same way as :function:`torch.nn.functional.grid_sample`."""add_dim = Falseif point_coords.dim() == 3:add_dim = Truepoint_coords = point_coords.unsqueeze(2)output = F.grid_sample(input, 2.0 * point_coords - 1.0, **kwargs)if add_dim:output = output.squeeze(3)return output
2.3 PointHead
得到每个点的特征以后,对每个不确定点的使用一个MLP来进行单独进行细分预测【训练与预测有所区别】。
具体为:通过刚刚得到的不确定点所在图片的相对位置坐标来找到对应的特征点,将此点对应的特征向量与此点的粗糙预测结果合并,然后通过一个MLP进行细分预测。
##训练阶段
def forward(self, x, res2, out):"""主要思路:通过 out(粗糙预测)计算出top N 个不稳定的像素点,针对每个不稳定像素点得到在res2(fine)和out(coarse)中对应的特征,组合N个不稳定像素点对应的fine和coarse得到rend,再通过mlp得到更准确的预测:param x: 表示输入图片的特征     eg.[2, 3, 768, 768]:param res2: 表示xception的第一层特征输出     eg.[2, 256, 192, 192]:param out: 表示经过级联空洞卷积提取的特征的粗糙预测    eg.[2, 19, 48, 48]:return: rend:更准确的预测,points:不确定像素点的位置""""""1. Fine-grained features are interpolated from res2 for DeeplabV32. During training we sample as many points as there are on a stride 16 feature map of the input3. To measure prediction uncertaintywe use the same strategy during training and inference: the difference between the mostconfident and second most confident class probabilities."""if not self.training:return self.inference(x, res2, out)#获得不确定点的坐标points = sampling_points(out, x.shape[-1] // 16, self.k, self.beta) #out:[2, 19, 48, 48] || x:[2, 3, 768, 768] || points:[2, 48, 2]#根据不确定点的坐标,得到对应的粗糙预测coarse = point_sample(out, points, align_corners=False) #[2, 19, 48]#根据不确定点的坐标,得到对应的特征向量fine = point_sample(res2, points, align_corners=False)  #[2, 256, 48]#将粗糙预测与对应的特征向量合并feature_representation = torch.cat([coarse, fine], dim=1)   #[2, 275, 48]#使用MLP进行细分预测rend = self.mlp(feature_representation) #[2, 19, 48]return {"rend": rend, "points": points}##推理阶段
@torch.no_grad()def inference(self, x, res2, out):"""输入:x:[1, 3, 768, 768],表示输入图片的特征res2:[1, 256, 192, 192],表示xception的第一层特征输出out:[1, 19, 48, 48],表示经过级联空洞卷积提取的特征的粗糙预测输出:out:[1,19,768,768],表示最终图片的预测主要思路:通过 out计算出top N = 8096 个不稳定的像素点,针对每个不稳定像素点得到在res2(fine)和out(coarse)中对应的特征,组合8096个不稳定像素点对应的fine和coarse得到rend,再通过mlp得到更准确的预测,迭代至rend的尺寸大小等于输入图片的尺寸大小""""""During inference, subdivision uses N=8096(i.e., the number of points in the stride 16 map of a 1024×2048 image)"""num_points = 8096while out.shape[-1] != x.shape[-1]: #out:[1, 19, 48, 48], x:[1, 3, 768, 768]#每一次预测均会扩大2倍像素,直至与原图像素大小一致out = F.interpolate(out, scale_factor=2, mode="bilinear", align_corners=True)   #out[1, 19, 48, 48]points_idx, points = sampling_points(out, num_points, training=self.training)   #points_idx:8096 || points:[1, 8096, 2]coarse = point_sample(out, points, align_corners=False) #coarse:[1, 19, 8096]   表示8096个不稳定像素点根据高级特征得出的对应的类别fine = point_sample(res2, points, align_corners=False)  #fine:[1, 256, 8096]    表示8096个不稳定像素点根据低级特征得出的对应类别feature_representation = torch.cat([coarse, fine], dim=1)   #[1, 275, 8096] 表示8096个不稳定像素点合并fine和coarse的特征rend = self.mlp(feature_representation) #[1, 19, 8096]B, C, H, W = out.shape  #first:[1, 19, 128, 256]points_idx = points_idx.unsqueeze(1).expand(-1, C, -1)  #[1, 19, 8096]out = (out.reshape(B, C, -1).scatter_(2, points_idx, rend)    #[1, 19, 32768].view(B, C, H, W))    #[1, 19, 128, 256]return {"fine": out}
2.4 loss
由整体预测及细分点预测两部分组成
class PointRendLoss(nn.CrossEntropyLoss):def __init__(self, aux=True, aux_weight=0.2, ignore_index=-1, **kwargs):super(PointRendLoss, self).__init__(ignore_index=ignore_index)self.aux = auxself.aux_weight = aux_weightself.ignore_index = ignore_indexdef forward(self, *inputs, **kwargs):result, gt = tuple(inputs)#result['res2']: [2, 256, 192, 192], 即xception的c1层提取到的特征#result['coarse']: [2, 19, 48, 48]#result['rend']: [2, 19, 48]#result['points']:[2, 48, 2]#gt:[2, 768, 768], 即图片对应的label#pred:[2, 19, 768, 768],将粗糙预测的插值到label大小pred = F.interpolate(result["coarse"], gt.shape[-2:], mode="bilinear", align_corners=True)#整体像素点的交叉熵lossseg_loss = F.cross_entropy(pred, gt, ignore_index=self.ignore_index)#根据不确定点坐标获得不确定点对应的gtgt_points = point_sample(gt.float().unsqueeze(1),result["points"],mode="nearest",align_corners=False).squeeze_(1).long()#不确定点的交叉熵losspoints_loss = F.cross_entropy(result["rend"], gt_points, ignore_index=self.ignore_index)#整体+不确定点loss = seg_loss + points_lossreturn dict(loss=loss)2.5 模块组合
class PointRend(nn.Module):def __init__(self, backbone, head):super().__init__()self.backbone = backboneself.head = headdef forward(self, x):result = self.backbone(x)result.update(self.head(x, result["res2"], result["coarse"]))result["coarse"] = F.interpolate(result["coarse"], x.shape[-2:], mode="bilinear", align_corners=True)return resultif __name__ == "__main__":x = torch.randn(2, 3, 256, 256).cuda()from Unet import UNetV6net = PointRend(SVBFUNetV6(), PointHead()).cuda()net.eval()out = net(x)for k, v in out.items():print(k, v.shape)3 实验结果

参考
https://www.cnblogs.com/QuintinLiu/p/12084699.html
https://blog.csdn.net/weixin_42028608/article/details/105379233
这篇关于语义分割模块PointRend的文章就介绍到这儿,希望我们推荐的文章对编程师们有所帮助!


