本文主要是介绍C#的DataGridView数据控件(直接访问SQL vs 通过EF实体模型访问SQL),希望对大家解决编程问题提供一定的参考价值,需要的开发者们随着小编来一起学习吧!
使用DataGridView控件可以快速地将数据库中的数据显示给用户,并且可以通过DataGridView控件直接对数据进行操作,大大增强了操作数据库的效率。DataGridView控件提供一种强大而灵活的以表格形式显示数据的方式。
既可以通过编程直接访问SQL ,也可以通过建立EF实体模型间接访问SQL,哪个方法更方便呢?请读者给出答案吧?
如何建立数据库的实体模型,在作者的其他文章里有所涉及,本文中不再论述。
一、在DataGridView控件中显示数据
1.直接编程访问SQL
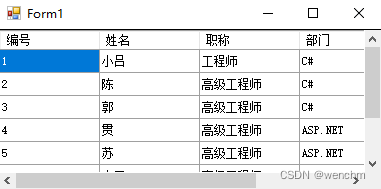
通过DataGridView控件显示数据表中的数据,首先需要使用DataAdapter对象查询指定的数据,然后通过该对象的Fill()方法填充DataSet,最后设置DataGridView控件的DataSource属性为DataSet的表格数据。DataSource属性用于获取或设置DataGridView控件所显示数据的数据源。
语法如下:public Object DataSource{get;set;}
属性值:包含DataGridView控件要显示的数据的对象。
(1)、源码
//Form1.cs
//在DataGridView控件中显示数据
using System;
using System.Collections.Generic;
using System.ComponentModel;
using System.Data;
using System.Data.SqlClient;
using System.Drawing;
using System.Linq;
using System.Text;
using System.Threading.Tasks;
using System.Windows.Forms;namespace _01
{public partial class Form1 : Form{public Form1(){InitializeComponent();}/// <summary>/// 实例化SqlConnection变量conn,连接数据库db_CSharp/// 创建一个SqlDataAdapter对象/// 创建一个DataSet对象/// 使用SqlDataAdapter对象的Fil()方法填充DataSet/// 设置dataGridView1控件数据源/// </summary>private void Form1_Load(object sender, EventArgs e){dataGridView1.Dock = DockStyle.Fill;dataGridView1.AllowUserToAddRows = false;dataGridView1.AllowUserToDeleteRows = false;dataGridView1.AllowUserToResizeColumns = false;dataGridView1.AllowUserToResizeRows = false;dataGridView1.ReadOnly = true;dataGridView1.RowHeadersVisible = false;SqlConnection conn = new SqlConnection("Server=DESKTOP-QFENBNJ\\SQL_WEN;integrated security=SSPI;Initial Catalog=db_CSharp");//conn = new SqlConnection("Server=DESKTOP-GFMO83R;integrated security=SSPI;Initial Catalog=db_CSharp");SqlDataAdapter sda = new SqlDataAdapter("select*from tb_emp", conn);DataSet ds = new DataSet();sda.Fill(ds, "emp");dataGridView1.DataSource = ds.Tables[0];}}
}
(2)、生成效果
2.通过EF实体模型访问SQL
(1)、源码
//Form1.cs
//在DataGridView控件中显示数据
using System;
using System.Collections.Generic;
using System.ComponentModel;
using System.Data;
using System.Drawing;
using System.Linq;
using System.Text;
using System.Threading.Tasks;
using System.Windows.Forms;namespace _01_1
{public partial class Form1 : Form{public Form1(){InitializeComponent();}private void Form1_Load(object sender, EventArgs e){dataGridView1.Dock = DockStyle.Fill;dataGridView1.AllowUserToAddRows = false;dataGridView1.AllowUserToDeleteRows = false;dataGridView1.AllowUserToResizeColumns = false;dataGridView1.AllowUserToResizeRows = false;dataGridView1.ReadOnly = true;dataGridView1.RowHeadersVisible = false;using (db_CSharpEntities db_ = new db_CSharpEntities()){dataGridView1.DataSource = db_.tb_emp.ToList();};}}
}
(2)生成效果
生成效果与上述方法相同。但通过EF实体模型访问数据库更简单。
二、获取DataGridView控件中的当前单元格
1.直接编程访问SQL
若要与DataGridView进行交互,通常要求通过编程方式发现哪个单元格处于活动状态。如果需要更改当前单元格,可通过DataGridView控件的CurrentCell属性来获取当前单元格信息。CurrentCell属性用于获取当前处于活动状态的单元格。语法如下:
public DataGridViewCell CurrentCell {get;set;}
属性值:表示当前单元格的DataGridViewCell,如果没有当前单元格,则为空引用。默认值是第一列中的第一个单元格,如果控件中没有单元格,则为空引用。
(1)、源码
//Form1.cs
//获取控件单元格信息
using System;
using System.Collections.Generic;
using System.ComponentModel;
using System.Data;
using System.Data.SqlClient;
using System.Drawing;
using System.Linq;
using System.Reflection.Emit;
using System.Text;
using System.Threading.Tasks;
using System.Windows.Forms;namespace _02
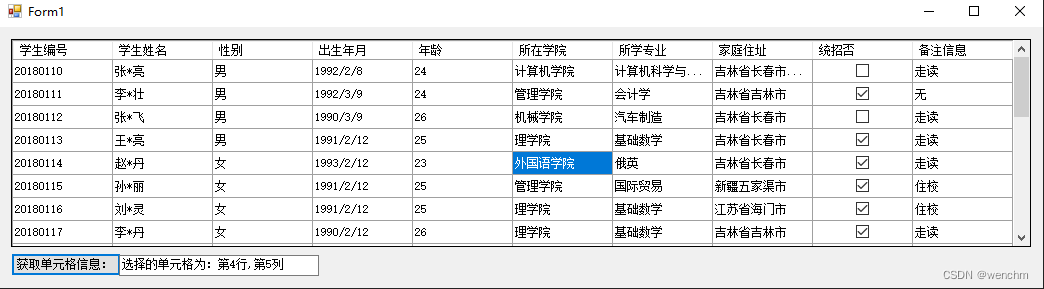
{public partial class Form1 : Form{public Form1(){InitializeComponent();}/// <summary>/// 初始化Form1 /// 实例化SqlConnection变量conn,连接数据库db_CSharp/// 创建一个SqlDataAdapter对象/// 创建一个DataSet对象/// 使用SqlDataAdapter对象的Fil()方法填充DataSet/// 设置dataGridView1控件数据源/// </summary>private void Form1_Load(object sender, EventArgs e){button1.Text = "获取单元格信息:";button1.Size = new Size(110,23);textBox1.Size = new Size(200,21);dataGridView1.AllowUserToAddRows = false;dataGridView1.AllowUserToDeleteRows = false;dataGridView1.AllowUserToResizeColumns = false;dataGridView1.AllowUserToResizeRows = false;dataGridView1.ReadOnly = true;dataGridView1.RowHeadersVisible = false;//SqlConnection conn = new SqlConnection("Server=DESKTOP-QFENBNJ\\SQL_WEN;integrated security=SSPI;Initial Catalog=db_CSharp");SqlConnection conn_ = new SqlConnection("Server=DESKTOP-GFMO83R;integrated security=SSPI;Initial Catalog=db_EMS");SqlDataAdapter sda_ = new SqlDataAdapter("select*from tb_CNStudent", conn_);DataSet ds_ = new DataSet();sda_.Fill(ds_, "emp");dataGridView1.DataSource = ds_.Tables[0];}/// <summary>/// 获取控件中单元格的信息/// 鼠标选中想要获取的单元格,点击获取信息按钮,文本框就会显示单元格信息/// </summary>private void Button1_Click(object sender, EventArgs e){string msg_ = String.Format("第{0}行,第{1}列", dataGridView1.CurrentCell.RowIndex,dataGridView1.CurrentCell.ColumnIndex);textBox1.Text = "选择的单元格为:" + msg_;}}
}
(2)、生成效果
2.通过EF实体模型访问SQL
(1)、源码
//Form1.cs
//EF获取控件单元格信息
using _02_1;
using System;
using System.Collections.Generic;
using System.ComponentModel;
using System.Data;
using System.Drawing;
using System.Linq;
using System.Text;
using System.Threading.Tasks;
using System.Windows.Forms;
using static System.Windows.Forms.VisualStyles.VisualStyleElement;namespace _02_1
{public partial class Form1 : Form{public Form1(){InitializeComponent();}/// <summary>/// 初始化Form1    /// </summary>private void Form1_Load(object sender, EventArgs e){button1.Text = "获取单元格信息:";button1.Size = new Size(110, 23);textBox1.Size = new Size(200, 21);dataGridView1.AllowUserToAddRows = false;dataGridView1.AllowUserToDeleteRows = false;dataGridView1.AllowUserToResizeColumns = false;dataGridView1.AllowUserToResizeRows = false;dataGridView1.ReadOnly = true;dataGridView1.RowHeadersVisible = false;using (db_EMSEntities db_ = new db_EMSEntities()){dataGridView1.DataSource = db_.tb_CNStudent.ToList();};}/// <summary>/// 获取单元格信息/// Format{}中“”是格式字符串,逗号前=当前行,逗号后=当前列/// </summary>private void Button1_Click(object sender, EventArgs e){string msg_ = String.Format("第{0}行,第{1}列", dataGridView1.CurrentCell.RowIndex, dataGridView1.CurrentCell.ColumnIndex);textBox1.Text = "选择的单元格为:" + msg_;}}
}
(2)生成效果
生成效果与上述方法相同。但通过EF实体模型访问数据库更简单。
三、在DataGridView控件中修改数据
1.直接编程访问SQL
在DataGridView控件中修改数据,主要用到DataTable的ImportRow()方法和DataAdapter对象的Update()方法。实现的过程是通过DataTable的ImportRow()方法将更改后的数据复制到一个DataTable中,然后通过DataAdapter对象的Update()方法,将DataTable中的数据更新到数据库中。ImportRow()方法用于将DataRow复制到DataTable中,保留任何属性设置以及初始值和当前值。
语法如下:
public void ImportRow(DataRow row)
row:要导入的DataRow。
或
void DataTable.ImportRow(DataRow row);
将DataRow复制到DataTable中,保留任何属性设置、初始值和当前值。
(1)源码
//Form1.cs
//在DataGridView控件中修改数据,然后进行批量更新
using System;
using System.Data;
using System.Data.SqlClient;
using System.Drawing;
using System.Windows.Forms;namespace _03
{public partial class Form1 : Form{public Form1(){InitializeComponent();}SqlConnection _Conn;SqlDataAdapter _Adapter;int _CurIndex;/// <summary>/// 初始化Form1并加载SQL数据表/// </summary>private void Form1_Load(object sender, EventArgs e){button1.Text = "提交修改";button1.Size = new Size(70, 23);dataGridView1.AllowUserToAddRows = true;dataGridView1.AllowUserToDeleteRows = true;dataGridView1.AllowUserToResizeColumns = false;dataGridView1.AllowUserToResizeRows = false;dataGridView1.ReadOnly = false;dataGridView1.RowHeadersVisible = false;dataGridView1.ColumnHeadersVisible = true;dataGridView1.SelectionMode = DataGridViewSelectionMode.FullRowSelect;  //全行选中dataGridView1.DefaultCellStyle.SelectionBackColor = Color.Red;          //选中行红色背景//_Conn = new SqlConnection("Server=DESKTOP-GFMO83R;integrated security=SSPI;Initial Catalog=db_EMS");_Conn = new SqlConnection("Server=DESKTOP-QFENBNJ\\SQL_WEN;integrated security=SSPI;Initial Catalog=db_EMS");SqlDataAdapter sda = new SqlDataAdapter("select*from tb_CNStudent", _Conn);DataSet ds = new DataSet();sda.Fill(ds);dataGridView1.DataSource = ds.Tables[0];     }/// <summary>/// 按下按钮,调用dbUpdate(),为真则消息提示=成功/// </summary>private void Button1_Click(object sender, EventArgs e){if (DbUpdate()){MessageBox.Show("修改成功!");}}/// <summary>/// 功能:自定义更新数据库函数DbUpdate(),更新成功返回true否则返回false/// 功能:只能对同一行内的单元格进行修改。多行修改,只有最后一行修改的内容会复制到SQL/// 功能:其前面的行的修改都是虚假修改,不会复制到SQL。退出重启后修改不见。/// 虽然VS提示CommandBuiler没有用,但实际不可或缺/// 提交自上次调用DataTable.AcceptChanges()以来对该表进行的所有更改,更改到数据表/// </summary>/// <returns>/// 调用Dbconn()的结果=dtSelect,是Fill()方法填充的数据表DataTable/// </returns>private Boolean DbUpdate(){string strSQL = "select * from tb_CNStudent";DataTable dtUpdate = Dbconn(strSQL);                    //创建数据表dtUpdate,其内容为dtSelectDataTable dtShow = (DataTable)dataGridView1.DataSource; //获取DataGridView所显示数据复制为数据表dtShowdtUpdate.ImportRow(dtShow.Rows[_CurIndex]);             //把dtShow当前行属性、值复制到dtUpdate中SqlCommandBuilder CommandBuiler = new SqlCommandBuilder(_Adapter);//适配器沟通SQL的变量_Adapter.Update(dtUpdate);  //对dtUpdate的已修改,Update到数据库dtUpdate.AcceptChanges();   //所有修改更新到数据表dtUpdatereturn true;}/// <summary>/// 功能:返回一个已填充的数据表对象DataTable dtSelect/// 建立DataTable的方法 Dbconn():/// 打开SQL连接/// 带入实参新建适配器对象dtSelect/// Fill()方法填充dtSelect/// 关闭SQL连接/// </summary>/// <param name="strSQL">///  Dbconn()形参由DbUpdate()函数的实参带入/// </param>/// <returns>/// 返回dtSelect,是Fill()方法填充的数据表DataTable/// </returns>private DataTable Dbconn(string strSQL){_Conn.Open ();_Adapter = new SqlDataAdapter(strSQL, _Conn);DataTable dtSelect = new DataTable();_Adapter.Fill(dtSelect);_Conn.Close();return dtSelect;}/// <summary>/// 鼠标的cellclick事件/// 鼠标点击cell单元时,触发当前行的索引号_CurIndex/// 没有行索引号_CurIndex,提交虚假的修改成功,SSMS更新后发现实际没有修改成功/// </summary>private void DataGridView1_CellClick(object sender, DataGridViewCellEventArgs e){_CurIndex = e.RowIndex;}}
}
(2)生成效果
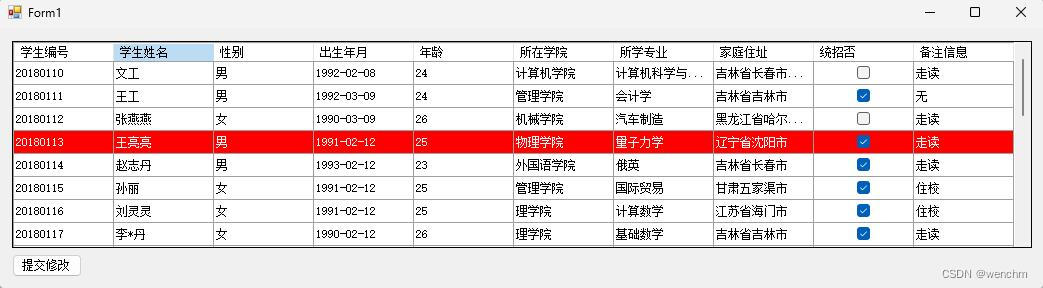
 以上数据表中单元格内容为null的都应该修改为空或者添加文字,否则生成后当点击含有null的行时就会报警,导致修改失败。取消行中所有的null后,警告消失。
2.通过EF实体模型访问SQL
(1)源码
以上面的工程为例,通过EF实体模型访问数据库的,修改数据表中选中行的单元格内容。为了让读者更好地理解EF实体模型访问数据库与SQL编程访问数据库在应用方面的差别,在窗体设计上增加了一些控件,程序段里也增加了测试语句(均有注释)。
//Form1.cs测试用
//通过EF实体模型访问数据库的,修改数据表
using System;
using System.Collections.Generic;
using System.ComponentModel;
using System.Data;
using System.Data.Entity;
using System.Drawing;
using System.Linq;
using System.Net.NetworkInformation;
using System.Runtime.Serialization.Json;
using System.Security.Principal;
using System.Text;
using System.Threading.Tasks;
using System.Windows.Forms;namespace _03_1
{public partial class Form1 : Form{public Form1(){InitializeComponent();}public int _ID;public int _RowIndex;public string[,] _CellContext;/// <summary>/// 初始化Form1/// </summary>private void Form1_Load(object sender, EventArgs e){button1.Text = "提交修改";button1.Size = new Size(70, 23);dataGridView1.AllowUserToAddRows = true;dataGridView1.AllowUserToDeleteRows = true;dataGridView1.AllowUserToResizeColumns = false;dataGridView1.AllowUserToResizeRows = false;dataGridView1.ReadOnly = false;dataGridView1.RowHeadersVisible = false;dataGridView1.ColumnHeadersVisible = true;dataGridView1.SelectionMode = DataGridViewSelectionMode.FullRowSelect;          //全行选中dataGridView1.DefaultCellStyle.SelectionBackColor = Color.Red;                              //选中行红色背景                                                                                    using (db_EMSEntities db_ = new db_EMSEntities()){dataGridView1.DataSource = db_.tb_CNStudent.ToList();dataGridView1.Columns[3].DefaultCellStyle.Format = "yyyy-MM-dd HH:mm:ss";   //显示秒数格式 };}/// <summary>/// 按下按键,执行修改/// 如果实例表不为空,则对选中行的cell执行修改/// 主键cell不能修改/// 如果实例是空表,其修改就用Add()方法增加到数据库/// </summary>private void Button1_Click(object sender, EventArgs e){using (db_EMSEntities db_ = new db_EMSEntities()){              tb_CNStudent _CNStudent =db_.tb_CNStudent.Where(W => W.学生编号 == _ID).FirstOrDefault();    //获取指定编号学生信息 if (_CNStudent!=null){db_.tb_CNStudent.Attach(_CNStudent);textBox1.Text = dataGridView1.Rows[_RowIndex].Cells[1].Value.ToString();         //测试 _CNStudent.学生编号 = Convert.ToInt32(dataGridView1.Rows[_RowIndex].Cells[0].Value.ToString());_CNStudent.学生姓名 = dataGridView1.Rows[_RowIndex].Cells[1].Value.ToString();_CNStudent.性别 = dataGridView1.Rows[_RowIndex].Cells[2].Value.ToString();string _Str = dataGridView1.Rows[_RowIndex].Cells[3].Value.ToString();string _DateStr = Convert.ToDateTime(_Str).ToString("yyyy-MM-dd HH:mm:ss");textBox13.Text = _DateStr;                                                                            //测试时间格式_CNStudent.出生年月 = DateTime.ParseExact(_DateStr, "yyyy-MM-dd HH:mm:ss", null);_CNStudent.年龄 = (int)dataGridView1.Rows[_RowIndex].Cells[4].Value;         //等效语句//_CNStudent.年龄 = Convert.ToInt32(dataGridView1.Rows[_RowIndex].Cells[4].Value.ToString());_CNStudent.所在学院 = dataGridView1.Rows[_RowIndex].Cells[5].Value.ToString();_CNStudent.所学专业 = dataGridView1.Rows[_RowIndex].Cells[6].Value.ToString();_CNStudent.家庭住址 = dataGridView1.Rows[_RowIndex].Cells[7].Value.ToString();_CNStudent.统招否 = (bool)dataGridView1.Rows[_RowIndex].Cells[8].Value;//等效语句//_CNStudent.统招否 = Convert.ToBoolean(dataGridView1.Rows[_RowIndex].Cells[8].Value.ToString());_CNStudent.备注信息 = dataGridView1.Rows[_RowIndex].Cells[9].Value.ToString();db_.Entry(_CNStudent).Property("学生编号").IsModified = true;db_.Entry(_CNStudent).Property(_ => _.学生姓名).IsModified = true;         //等效语句db_.Entry(_CNStudent).Property(_ => _.性别).IsModified = true;                //等效语句db_.Entry(_CNStudent).Property("出生年月").IsModified = true;                 //依此类推db_.Entry(_CNStudent).Property("年龄").IsModified = true;db_.Entry(_CNStudent).Property("所在学院").IsModified = true;db_.Entry(_CNStudent).Property("所学专业").IsModified = true;db_.Entry(_CNStudent).Property("家庭住址").IsModified = true;db_.Entry(_CNStudent).Property("统招否").IsModified = true;db_.Entry(_CNStudent).Property("备注信息").IsModified = true;db_.SaveChanges();dataGridView1.DataSource = db_.tb_CNStudent.ToList();}               else {db_.tb_CNStudent.Add(_CNStudent);db_.SaveChanges();dataGridView1.DataSource = db_.tb_CNStudent.ToList();}}}/// <summary>/// 点击单元格事件/// 定义单元格二维数组,全局变量,并由选中行的EF实体模型单元格的内容给赋值/// </summary>private void DataGridView1_CellClick(object sender, DataGridViewCellEventArgs e){_CellContext = new string[dataGridView1.Rows.Count, dataGridView1.Columns.Count];_ID = Convert.ToInt32(dataGridView1[0, e.RowIndex].Value);                                                                  //获取选中行的编号_RowIndex = dataGridView1.CurrentRow.Index;textBox12.Text = _RowIndex.ToString();                                                                                                  //测试行号using (db_EMSEntities db_ = new db_EMSEntities()){tb_CNStudent _CNStudent = db_.tb_CNStudent.Where(W => W.学生编号 == _ID).FirstOrDefault();  //获取指定编号学生信息 //_CellContext[_RowIndex, 0] = dataGridView1.Rows[_RowIndex].Cells[0].Value.ToString();                 //等效语句_CellContext[_RowIndex, 0] = _ID.ToString();                                                                                    //等效语句//_CellContext[_RowIndex, 0] = _CNStudent.学生编号.ToString();                                                      //等效语句_CellContext[_RowIndex, 1] = _CNStudent.学生姓名.ToString();_CellContext[_RowIndex, 2] = _CNStudent.性别.ToString();//_CellContext[_RowIndex, 3] = _CNStudent.出生年月.ToString(); //格式不标准1991/2/12 0:00:00_CellContext[_RowIndex, 3] = Convert.ToDateTime(_CNStudent.出生年月).ToString("yyyy-MM-dd HH:mm:ss");       //格式标准//string _DateStr = dataGridView1.Rows[_RowIndex].Cells[3].Value.ToString();                                                          //标准格式等价语句//Convert.ToDateTime(_DateStr).ToString("yyyy-MM-dd HH:mm:ss");_CellContext[_RowIndex, 4] = _CNStudent.年龄.ToString();_CellContext[_RowIndex, 5] = _CNStudent.所在学院.ToString();_CellContext[_RowIndex, 6] = _CNStudent.所学专业.ToString();_CellContext[_RowIndex, 7] = _CNStudent.家庭住址.ToString();_CellContext[_RowIndex, 8] = _CNStudent.统招否.ToString();_CellContext[_RowIndex, 9] = _CNStudent.备注信息.ToString();textBox2.Text = _CellContext[_RowIndex, 0];textBox3.Text = _CellContext[_RowIndex, 1];textBox4.Text = _CellContext[_RowIndex, 2];textBox5.Text = _CellContext[_RowIndex, 3];textBox6.Text = _CellContext[_RowIndex, 4];textBox7.Text = _CellContext[_RowIndex, 5];textBox8.Text = _CellContext[_RowIndex, 6];textBox9.Text = _CellContext[_RowIndex, 7];textBox10.Text = _CellContext[_RowIndex, 8];textBox11.Text = _CellContext[_RowIndex, 9];string _Str = dataGridView1.Rows[_RowIndex].Cells[3].Value.ToString();                   //测试string _DateStr = Convert.ToDateTime(_Str).ToString("yyyy-MM-dd HH:mm:ss");textBox13.Text = _DateStr;                                                                                      //测试时间格式}}}
}
源码中,第4列,出生年月,编程时和修改时要注意格式一致,有一点不一致也不会放过你的,会报警。
按钮按下后的[行,列]值是修改后的内容,读取数据表的是修改前的内容,编程时一定要注意区别,否则也会出现警告,不让你修改SQL。
正常设计时,不必设计DataGridView1_CellClick()。所有全局变量定义放到Button1_Click()中,取消所有测试用语句和等效语句,EF实体模型访问SQL的程序会更简便易懂。
(2)生成效果
Form1.cs[设计] 
DEBUG生成 ,选中行3,修改各cell:张*飞哥哥,男子汉,2023-12-25 00:00:00,35,机电工程学院,车辆工程,吉林省长春市(不变),true,全日制。
各个cell,想修改那个就修改哪个,不必全都修改。都不修改就不更新SQL。
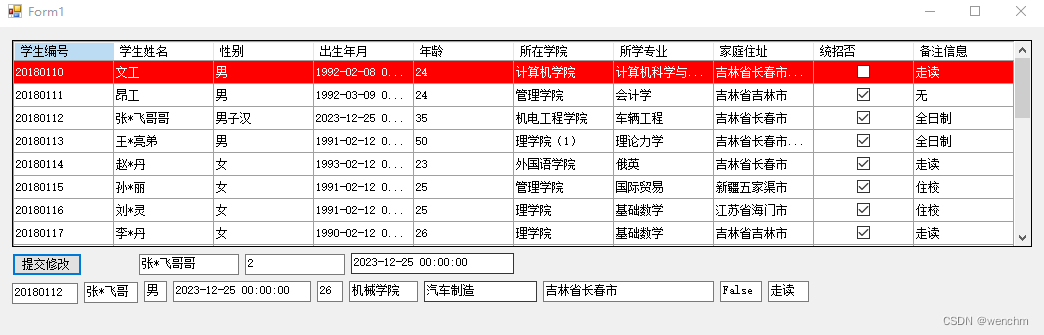
对应更新SQL后的效果。 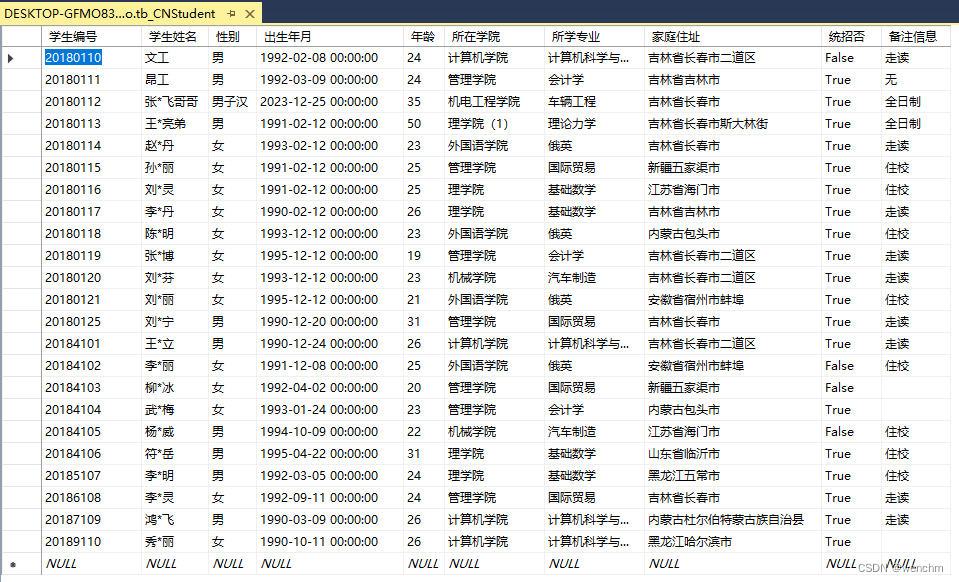
这篇关于C#的DataGridView数据控件(直接访问SQL vs 通过EF实体模型访问SQL)的文章就介绍到这儿,希望我们推荐的文章对编程师们有所帮助!


