本文主要是介绍c++ 实现 膨胀(dilate)腐蚀(erode),希望对大家解决编程问题提供一定的参考价值,需要的开发者们随着小编来一起学习吧!
膨胀原理:
-
此操作将图像
 与任意形状的内核 (
 ),通常为正方形或圆形,进行卷积。
 -
内核
 有一个可定义的锚点, 通常定义为内核中心点。
 -
进行膨胀操作时,将内核
 划过图像,将内核
 覆盖区域的最大相素值提取,并代替锚点位置的相素。显然,这一最大化操作将会导致图像中的亮区开始”扩展” (因此有了术语膨胀dilation )。对上图采用膨胀操作我们得到:
-
腐蚀在形态学操作家族里是膨胀操作的孪生姐妹。它提取的是内核覆盖下的相素最小值。
-
进行腐蚀操作时,将内核
 划过图像,将内核
 覆盖区域的最小相素值提取,并代替锚点位置的相素。
 -
以与膨胀相同的图像作为样本,我们使用腐蚀操作。从下面的结果图我们看到亮区(背景)变细,而黑色区域(字母)则变大了。
步骤:
1、用OpenCV load 图片;
2、将BRG各式图片转成灰度图
3、将图片像素放入imageBuffer中
4、进行腐蚀或者膨胀
5、将经过腐蚀或者膨胀后的像素 显示
代码如下:
int main()
{  Mat img=imread("lena.jpg");  cv::cvtColor(img,img,CV_BGR2GRAY);int imageWidth = img.cols;int imageHeight = img.rows;showImage("src",img);uchar * imageBuffer = (uchar *) malloc(imageHeight * imageWidth);memset(imageBuffer,0,imageHeight * imageWidth);if (img.depth() == 3){}else{for (int i = 0; i< imageHeight; i++){for (int j = 0; j < imageWidth;j++){imageBuffer[i*imageWidth + j] =  img.at(i,j);}}dilateTest(imageBuffer,imageBuffer,imageWidth,imageHeight);for (int i = 0; i< imageHeight; i++){for (int j = 0; j < imageWidth;j++){img.at(i,j) = imageBuffer[i*imageWidth + j];}}}Mat copyImage;// = img.clone();//与opencv dilate 比较//int dilation_type =0;//int//if( dilation_elem == 0 ){ dilation_type = MORPH_RECT; }//else if( dilation_elem == 1 ){ dilation_type = MORPH_CROSS; }//else if( dilation_elem == 2) { dilation_type = MORPH_ELLIPSE; }//Mat element = getStructuringElement( 0,//	Size( 2*0 + 1, 2*0+1 ),//	Point( 0, 0 ) );/膨胀操作//dilate( img, copyImage, element );//showImage("copyImage",copyImage);
showImage("testcv",img);waitKey(100000);
}  void dilateTest(uchar *imageBuffer,uchar *outBuffer,int imageWidth,int imageHeight)
{uchar *dilateBuffer = (uchar *)malloc((imageWidth+1)*(1+imageHeight));memset(dilateBuffer,0,(imageHeight+1)*(imageWidth+1));for (int i = 0;i < imageHeight;i++){for (int j = 0 ; j < imageWidth; j++){dilateBuffer[i*(imageWidth+1)+j+1] = imageBuffer[i*imageWidth + j];}}uchar *srcImage = dilateBuffer;for (int i = 0;i < imageWidth; i++){for (int j = 0;j < imageHeight;j++){uchar tempNum = 0;srcImage = (dilateBuffer + (i*(imageWidth +1)+j));for (int m = 0;m<3;m++){for (int n = 0; n < 3;n++){if (tempNum < srcImage[n]){tempNum = srcImage[n];}}srcImage = (srcImage + m*(imageWidth +1));}outBuffer[i*imageWidth +j] = tempNum;}}
}
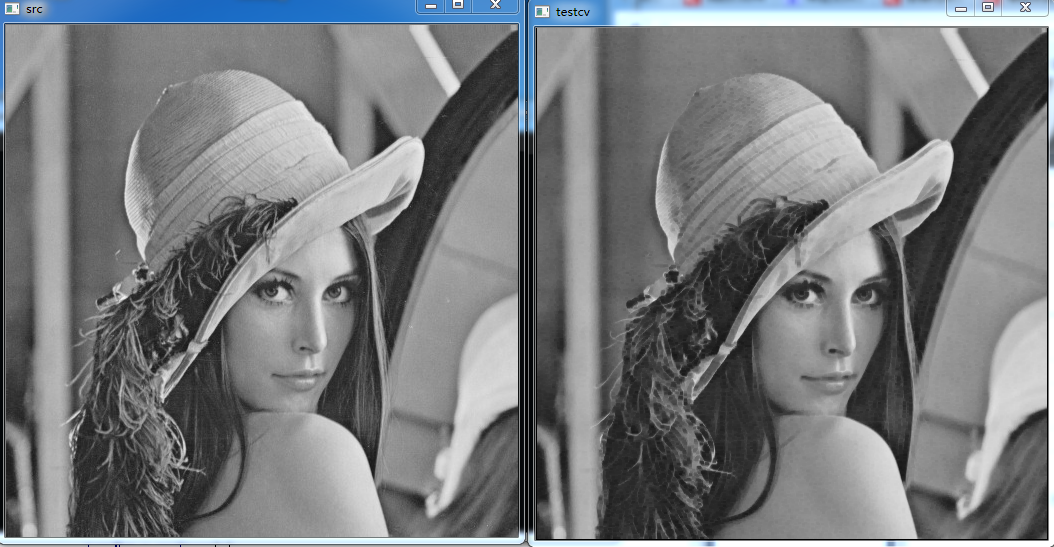
经过dilateTest 膨胀 后与原图对比:
经过腐蚀后与原图对比:
这篇关于c++ 实现 膨胀(dilate)腐蚀(erode)的文章就介绍到这儿,希望我们推荐的文章对编程师们有所帮助!


