本文主要是介绍java 设计模式:外观设计模式,希望对大家解决编程问题提供一定的参考价值,需要的开发者们随着小编来一起学习吧!
1、概念
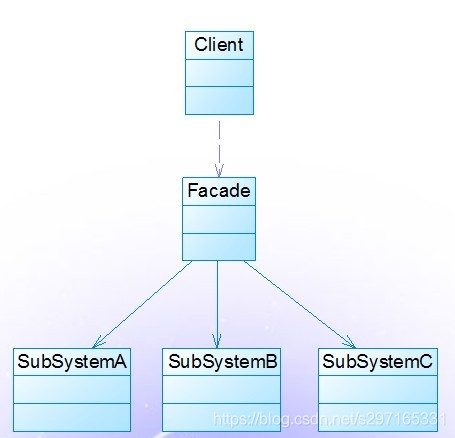
外观设计模式的主要目的在于让外部减少与子系统内部多个模块的交互,从而让外部能够更简单的使用子系统。他负责把客户端的请求转发给子系统内部的各个模块进行处理。
2、使用场景
- 当你要为一个复杂子系统提供一个简单接口时
- 客户程序与抽象类的实现部分之间存在很大的依赖性。引入外观类可以将子系统与客户端解耦,从而提高子系统的独立性和可移植性。
- 当你需要构建一个层次结构的子系统时; 在层次化结构中,可以使用外观模式定义系统中每一层的入口,层与层之间不直接产生联系,而通过外观类建立联系,降低层之间的耦合度。
3、UML结构图分析
4、实际代码分析
/*** 模块A*/
public class SubSystemA {public void testFunA(){System.out.println("testFunA");}}
/*** 模块B*/
public class SubSystemB {public void testFunB(){System.out.println("testFunB");}
}
/*** 模块C*/
public class SubSystemC {public void testFunC(){System.out.println("testFunC");}
}
/*** Facade */
public class Facade {private SubSystemA subSystemA;private SubSystemB subSystemB;private SubSystemC subSystemC;private Facade(){subSystemA = new SubSystemA();subSystemB = new SubSystemB();subSystemC = new SubSystemC();}private static Facade instance;public static Facade getInstance(){if(instance==null){instance = new Facade();}return instance;}public void tastOperation(){subSystemA.testFunA();subSystemB.testFunB();subSystemC.testFunC();}
}//运行Facade.getInstance().tastOperation();
由于外观类维持了对多个子系统类的引用,外观对象在系统运行时将占用较多的系统资源,因此需要对外观对象的数量进行限制,避免系统资源的浪费。可以结合单例模式对外观类进行改进,将外观类设计为一个单例类。通过对外观模式单例化,可以确保系统中只有唯一一个访问子系统的入口,降低系统资源的消耗。
我在项目中的实践:
在项目中经常会出现,网络请求,缓存本地,本地有缓存用本地缓存,而且网络请求经常会在多个地方调用,如果不采用外观模式设计,则会出现客户端的代码异常复杂,而且不利于维护。于是我就进行了如下改变,建立中间仓库类来进行数据切换,客户端只需要进行对仓库数据进行调用,不用关心仓库里数据怎样生成的。
/*** 建立仓库接口类* TestApiDataSource*/
public interface TestApiDataSource {/*** 登陆接口* @param params* @return*/Observable<GetLoginResponse> getLogin(GetLoginParams params);
}
/*** 建立本地数据源(主要是为了方便客户端调用)* TestApiLocalDataSource*/
public class TestApiLocalDataSource extends BaseLocalDataSource implements TestApiDataSource {@Overridepublic Observable<GetLoginResponse> getLogin(GetLoginParams params) {Observable<GetLoginResponse> observable = Observable.create(new ObservableOnSubscribe<GetLoginResponse>() {@Overridepublic void subscribe(ObservableEmitter<GetLoginResponse> subscriber)  throws Exception {subscriber.onComplete();}});return observable;}}/*** 建立网络数据源* TestApiRemoteDataSource*/
public class TestApiRemoteDataSource extends BaseRemoteDataSource implements TestApiDataSource {/**** 请求网络* @param params* @return*/@Overridepublic Observable<GetLoginResponse> getLogin(GetLoginParams params) {return ApiSource.getApiService(AppHuanJingFactory.getAppModel().getApi()).getApi2Service().getLogin(params);}}/*** 建立单例仓库类* TestApiRepository*/
public class TestApiRepository extends BaseRepository<TestApiLocalDataSource,TestApiRemoteDataSource> implements TestApiDataSource {public static volatile TestApiRepository instance;public static TestApiRepository getInstance(){if(instance==null){synchronized (TestApiRepository.class){if(instance==null){instance = new TestApiRepository(new TestApiLocalDataSource(),new TestApiRemoteDataSource());}}}return instance;}protected TestApiRepository(TestApiLocalDataSource localDataSource, TestApiRemoteDataSource remoteDataSource) {super(localDataSource, remoteDataSource);}/*** 数据源切换* #getLogin#* @param params* @return*/@Overridepublic Observable<GetLoginResponse> getLogin(GetLoginParams params) {Observable<GetLoginResponse> observable = Observable.concat(localDataSource.getLogin(params),remoteDataSource.getLogin(params).doOnNext(new Consumer<GetLoginResponse>() {@Overridepublic void accept(GetLoginResponse response) throws Exception {/*** cache*/}})).compose(RxTransformerHelper.<GetLoginResponse>ioToUI()).firstOrError().toObservable();return observable;}}
//客户端执行,不需要考虑具体实现
TestApiRepository.getInstance().getLogin(new GetLoginParams()).subscribe(new BaseRxNetworkResponseObserver<GetLoginResponse>() {@Overridepublic void onResponse(GetLoginResponse getLoginResponse) {}@Overridepublic void onResponseFail(Exception e) {}@Overrideprotected void onBeforeResponseOperation() {}@Overridepublic void onSubscribe(Disposable d) {add(d);}});
优点:
- 由于Facade类封装了各个模块交互过程,如果今后内部模块调用关系发生了变化,只需要修改facade实现就可以了
- facade实现是可以被多个客户端调用的
- 使得客户端和子系统之间解耦,让子系统内部的模块功能更容易扩展和维护;客户端根本不需要知道子系统内部的实现,或者根本不需要知道子系统内部的构成,它只需要跟Facade类交互即可。
这篇关于java 设计模式:外观设计模式的文章就介绍到这儿,希望我们推荐的文章对编程师们有所帮助!


