小弟英语功底不是很好,不敢乱翻译,但是此方式是可行的,而且也很容易看懂,大家自己研究下吧
要是打不开也可以在:www.ywrj.net/a/NET/SL_WPF/20120519/11085.html 中查看
Increase your trust with signed xaps
Out of browser applications are for sure, one of the better features introduced in Silverlight. They give the ability of writing applications that seamlessly integrate with your desktop, making the separation between the web apps and the standalone apps something indistinguishable. Since the feature was released in the release 3.0, only when Silverlight 4.0 entered the scene, OOB becomes a real opportunity in writing applications. Before this release, out of browser applications was nothing more of an extension of the browser on the desktop but in Silverlight 4.0 we got the ability of deploy elevated trust applications that can take advantage of a increased set of privileges that goes out of the sandbox where Silverlight apps are closed while in the browser.
The so called full-trust applications were the true milestone in out of browser, but they opened to the problem of being trusted by end users, because they are asked of granting this elevated trust during the installation phase. It is the reason that moved the team to add to Silverlight 4.0 the ability of sign the XAP files to improve the trust of these applications.
Have I to sign my XAPs?
If you ever tried to run an out of browser application probably you are aware of the installation prompt you get when you enable the elevated trust flag in configuration. I placed a capture on the right side of the page.
The "security Warning" we get is something threatening, since it use hot colors and symbols to warn the user of a simple thing: the application is asking for an elevated trust on your PC but there is not any evidence you can trust it.
So, the concept of trust may be long discussed but the main point here is not about what the application will really do on your PC, but about the fact that you are not aware of the publisher of the application so you should not grant trusts that let the application harm your computer or steal sensitive information from it.
Since you are developing your application there is not any reason of being worried about this window, and I've also saw many cases where incautious customers agree to install applications that do not grant a minimum layer of trust during this delicate phase, only to spare some money, but I always suggest to end-users to not underestimate the meaning of this message and to developers to sign their XAPs.
 Signing XAPs is the sole way you have to give the end-user a more pleasant (and trustable) installation experience. Once you signed the XAP file, you get a completely different message, that use a more quiet color and shows the name of an authority that grants, under the Publisher field, about the origin of the software you are about to install. Again, it grants about the origin, and not about what the application does.
The process of signing a XAP involve the use of a digital certificate. For the purpose of this article I've used a self-signed certificate you can create using the "makecert" utility, so in the publisher field you read the name and the domain of the user currently logged when the certificate was created but in production environment it is recommended you use a certificate bought from a trusted authority. Usually these certificates are not so expensive and have a duration of one year.
If you use a self-signed certificate, like I did for test purpose, remember that you have to add it to the "Trusted Root Certification Authorities" node in the store. Right click the pfx file and hit install. During the installation select the right store so when you perform your tests your certificate will be trusted and the right installation dialog will be prompted.
Mostly important to remember is that once you signed a XAP with a certificate it have to be used to sign also all the updates you will issue for your application. Differently these updates will not be trusted and will be rejected.
Signing XAPs with Visual Studio
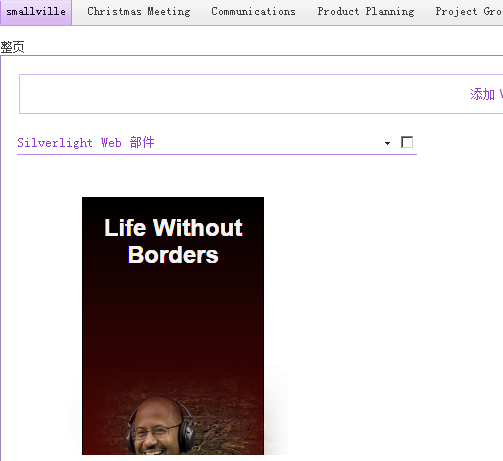
As usual Visual Studio is the perfect tool for developing software and also in the case of Signed XAPs, it demonstrates to by really friendly. In every Silverlight project - the type of project that produces a XAP file - there is a page that helps for every task required to sign the XAP. To access this page you have to double click the Properties node in the project and hit the "Signing" tab on the left side. Then you will be prompted with the following dialog:

Into this dialog, that you can configure differently for debug or release purposes, there is the full set of signing tools. First of all you have to check the "Sign the Xap file" checkbox, then you have to provide the certificate to use for the signature. This means selecting it from the local store, import it from a PFX file or finally generate a certificate you can use for test purposes. Once you have imported the certificate the dialog will show the information from it. If you generate a test certificate, the PFX file will be placed into the project you are configuring. So, primary for testing and development, this utility solves all your needs.
Signing XAPs manually
Unfortunately, as often happens, the simplest things are beautiful but does not solve all the real world needs. The Visual Studio's dialog is wonderful but there is many cases when the process of signing the XAP cannot be made this way. A certificate used for signing purposes is a sensitive document and companies should have to protect this key from being stolen because it will mean to lose trust of all installed applications. So many times the process of signing XAPs have to be completely separated from the development environment, simply because it is unacceptable to spread the certificate on multiple development machines making it less secure.
So, the better is to let developers work without using a certificate, or with a self-signed certificate and demand the final signature to a command line utility used by a single person that will apply the final and more trustable signature a moment before publishing the application to the staging or production environment.
For this purpose the .NET framework have a command line utility called "signtool.exe". To access this utility you have to open a Visual Studio 2010 command prompt and simply type signtool.exe and you will see the full help of this utility.
To apply a signature you have to know the path of the XAP and of the PFX file then you can type the following into the command prompt:
signtool ^
sign ^
/f <full path to the pfx>\SignedXapSample_TemporaryKey.pfx ^
/p <password> ^
<full path to the XAP>\SignedXapSample.xap
First of all a note: the "exponentiation" sign at the end of every line is used to continue the command on the following line. In a batch it is useful for readability. In the snippet you have to replace the parts marked with angular braces with the corresponding parameter. /f indicates the location where you have stored the PFX file representing the certificate. /p indicates the password that corresponds to the certificate and finally the last part indicate the XAP that have to be signed. If you want you can use also the /v flag (verbose) so the signtool display some useful information during the signature.
My suggestion is to prepare a batch you can run easily on the publish folder just a moment before deploy to the production environment. So, the process can be performed by everyone that is able to understand how to launch this batch.
Please remember that every time you compile the application the XAP is completely regenerated so the process of apply a signature must be the very last action before deploying it.
The benefit of signing
It may sounds strange but the signing of XAPs is often an underestimated practice. In my experience there are many cases when people prefer to spare a few money and not buy a valid certificate. Since it may be understood for little applications, the benefit of making the user trust your deployed XAPs is really important, not only because it gives to the end user a better feeling but also to really protect him from unwanted malicious attacks. So please take in serious consideration this practice and remember to educate your end user to double check what he is installing.


![数字签名是什么?[转]](https://i-blog.csdnimg.cn/blog_migrate/a4c26d1e5885305701be709a3d33442f.gif)