本文主要是介绍Electron项目配合 electron-builder + electron-updater + NSIS 打包.exe安装程序包 构建后实现自动更新,希望对大家解决编程问题提供一定的参考价值,需要的开发者们随着小编来一起学习吧!
Electron项目配合 electron-builder + electron-updater + NSIS 打包.exe安装程序包 构建后实现自动更新
- 项目主要目录结构
- 如何使用
- 1、安装 electron-builder 依赖模块
- 2、配置 package.json 文件
- 3、尝试打包
- 4、配置自动更新
项目本身就是Electron-vue项目了,关于 Electron 和 Electron-builder 的基础部分这里不做介绍,可自行百度或推荐看这篇文章
项目主要目录结构
├─src               web 应用源码目录
├─electron          Native 应用构建相关的源码目录
│  ├─resources      各种资源文件
│  └─src            Native 逻辑源码目录
├─dist
│  ├─electron       构建APP所有需要的资源都需先输出至该目录
│  │  ├─app         dist/webapp 的副本,用于打包进 Native App 中的本地应用
│  │  └─resources
│  └─webapp         web 应用构建输出后的资源目录
如何使用
- package.json中直接配置使用(比较常用,我们下面着重来讲这个)
- 指定electron-builder.yml文件
1、安装 electron-builder 依赖模块
cnpm install electron-builder --save
- electron-builder 比较 electron-packager 存在的优势
- electron-packager 可以简单方便地打包出各种系统环境下 未压缩的免安装版本 。然后再使用其他工具将这些免安装目录打包成安装程序,即可达到目的。
- electron-builder 有 更丰富的的功能,支持更多的平台,支持自动更新,打出的包更为轻量,并且可以打包出不暴露源码的setup安装程序。
2、配置 package.json 文件
- 基础配置
{"name": "client-projerct", //项目名"productName": "client-projerct","version": "0.0.1", //版本号"author": "***","description": "***","license": "ISC","main": "./dist/electron/main.js", //electron-builder 打包主程序的入口文件,这里的路径是使用 webpack 压缩项目后文件输出的位置"scripts": {//脚本 "build": "node .electron-vue/build.js && electron-builder",//生产环境,压缩打包项目。先运行 .electron-vue 文件夹下的 build.js 脚本对项目进行压缩,输出的位置在 dist 文件夹下,然后再使用配置好的 electron-builder 对 dist 文件夹下的文件进行打包生成应用的安装包。"dev": "node .electron-vue/dev-runner.js" //开发环境,可以运行我们的项目并测试。这里使用了热更新,改动代码不需要刷新即可看到应用的改变。}
}- electron-builder 配置项
详细配置可见参考文档
"build": {"productName": "client-projerct", //项目工程名(.exe文件的前缀名)"appId": "com.example.app", // 应用程序id(建议设置显式ID)"copyright":"xxxx",//版权 信息"directories": {"output": "build" //生成的安装包输出目录}},
- 更新配置
下面这个是给更新用的配置,主要是为了生成 lastest.yaml 配置文件
build: {"publish": [{"provider": "generic",// 服务器提供商"url": "http://qiniu.***.com/download/"// 服务器地址}]
}
- NSIS配置
build: {"nsis": {"oneClick": false, // 是否一键安装"perMachine": false,//perMachine 可能会影响自动更新的安装权限问题(windows7不受影响)"allowElevation": true,// 允许请求提升。 如果为false,则用户必须使用提升的权限重新启动安装程序。"allowToChangeInstallationDirectory": true,// 允许修改安装目录"installerIcon": "./build/icons/icon.ico",// 安装图标"uninstallerIcon": "./build/icons/icon.ico",//卸载图标"installerHeaderIcon": "./build/icons/icon.ico",// 安装时头部图标"createDesktopShortcut": true, // 创建桌面图标"createStartMenuShortcut": true,// 创建开始菜单图标"runAfterFinish": true,// 安装完成后是否运行项目"shortcutName": "client-ico",// 图标名称"include": "build/script/installer.nsh" // 自定义nsis脚本},"win": {"icon": "build/icons/icon.ico", //安装程序包图标路径 "artifactName": "${productName}_setup_${version}.${ext}",//安装程序包名称"target": [{"target": "nsis",//我们要的目标安装包"arch": [// 这个意思是打出来32 bit + 64 bit的包,但是要注意:这样打包出来的安装包体积比较大,所以建议直接打32的安装包。"x64", "ia32"]}]}
}
备注:perMachine 影响Electron AutoUpdater自动更新问题
- 完整配置
{"name": "client-projerct","productName": "client-projerct","version": "0.0.1","author": "****","description": "***","license": "ISC","main": "./dist/electron/main.js","scripts": {"build": "node .electron-vue/build.js && electron-builder","dev": "node .electron-vue/dev-runner.js","postinstall": "electron-builder install-app-deps"},"build": {"productName": "client-projerct","appId": "com.example.app","copyright":"出品公司:******","directories": {"output": "build"},"nsis": {"oneClick": false,"perMachine": false,"allowElevation": true,"allowToChangeInstallationDirectory": true,"installerIcon": "./build/icons/icon.ico","uninstallerIcon": "./build/icons/icon.ico","installerHeaderIcon": "./build/icons/icon.ico","createDesktopShortcut": true,"createStartMenuShortcut": true,"runAfterFinish": true,"shortcutName": "client-ico"},"publish": [{"provider": "generic","url": "http://qiniu.****.com/download/"}],"files": ["dist/electron/**/*"],"dmg": {"contents": [{"x": 410,"y": 150,"type": "link","path": "/Applications"},{"x": 130,"y": 150,"type": "file"}]},"mac": {"target": ["dmg","zip"],"icon": "build/icons/icon.ico","artifactName": "${productName}_setup_${version}.${ext}"},"win": {"icon": "build/icons/icon.ico","artifactName": "${productName}_setup_${version}.${ext}","target": [{"target": "nsis","arch": ["ia32"]}]},"linux": {"icon": "build/icons/icon.ico","artifactName": "${productName}_setup_${version}.${ext}"}},"dependencies": {},"devDependencies": {}
}
3、尝试打包
项目根目录运行命令:
cnpm/npm run build
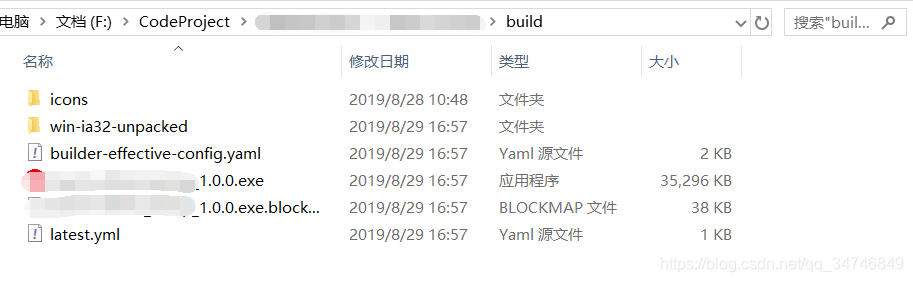
若成功会在build文件夹有如图文件生成
4、配置自动更新
这里先手动将 ***_setup_1.0.0.exe 和文件 latest.yml丢到七牛云,二者缺一不可。
- 安装 electron-updater 依赖模块
cnpm install electron-updater --save
- 配置主进程main中的index.js文件
备注: 这里也可以配置主进程main.js文件,二者都可以,但绝不能是其它文件。
'use strict';import {app, BrowserWindow, ipcMain} from 'electron';function createWindow() {//electron updateupdateHandle();
}// 引入自动更新模块 注意这个autoUpdater不是electron中的autoUpdater
import {autoUpdater} from 'electron-updater';
import {QiNiu_IMAGE_URL} from '../renderer/libs/QiNiuUtil';let message = [//状态返回值{//errorcode: 1,msg: '检查更新出错,请联系开发人员',},{//checkingcode: 2,msg: '正在检查更新……',},{//updateAvacode: 3,msg: '已检测到新版本',},{//updateNotAvacode: 4,msg: '现在使用的就是最新版本,不用更新',},{//isUpdateNowcode: 5,msg: '检测到新版本,是否现在更新?',},{//downloadedcode: 6,msg: '最新版本已下载,将在重启程序后更新',},];// 主进程监听渲染进程传来的信息,更新检查,这种方式更新检查会出现多次回调事件
// ipcMain.on('checkForUpdate', (e, arg) => {
//   updateHandle();
// });// 检测更新,在你想要检查更新的时候执行,renderer事件触发后的操作自行编写
function updateHandle() {//配置更新服务器autoUpdater.setFeedURL(QiNiu_IMAGE_URL());//当检查更新发生错误时触发autoUpdater.on('error', function(error) {console.log('当检查更新发生错误时触发:', error);sendUpdateMessage(message[0]);});//当开始检查更新的时候触发autoUpdater.on('checking-for-update', function(info) {console.log('当开始检查更新的时候触发:', info);sendUpdateMessage(message[1]);});//当发现一个可用更新的时候触发,更新包下载会自动开始autoUpdater.on('update-available', function(info) {console.log('当发现一个可用更新的时候触发,更新包下载会自动开始:', info);sendUpdateMessage(message[2]);});//当没有可用更新的时候触发autoUpdater.on('update-not-available', function(info) {console.log('当没有可用更新的时候触发:', info);sendUpdateMessage(message[3]);});autoUpdater.on('update-downloaded', function(event, releaseNotes, releaseName, releaseDate, updateUrl, quitAndUpdate) {console.log('检测到更新版本:', event);sendUpdateMessage(message[4], event);});ipcMain.on('isUpdateNow', (e, arg) => {console.log(arguments);console.log('开始更新');//在下载完成后,重启当前的应用并且安装更新autoUpdater.quitAndInstall();});// 更新下载进度事件autoUpdater.on('download-progress', function(progressObj) {console.log('下载进度', progressObj);mainWindow.webContents.send('downloadProgress', progressObj);});ipcMain.on('checkForUpdate', () => {//执行自动更新检查autoUpdater.checkForUpdates();});
}// 通过main进程发送事件给renderer进程,提示更新信息
function sendUpdateMessage(data, vObj) {mainWindow.webContents.send('result', data, vObj);
}
注意:
网上确实有两种方式触发检查更新的方法updateHandle(),但我这里会建议使用在createWindow()中调用更新。为什么呢?实际操作过程中(按钮点击触发更新,没有在application启动时候自动更新),当我通过视图层调用如下监听的时候,
ipcMain.on('checkForUpdate', (e, arg) => {updateHandle();
});
按钮点击第一次回调message正常,当继续第二次点击事件时候,却发生了多次回调的事情,导致message通知也是多次的,所以,这里不采用此调用,即如下的方式
function createWindow() {//electron updateupdateHandle();
}
主进程main.js配置代码如上,可仔细看注释,然后通过view层调用即可。
- 视图层
视图层只需要根据自己页面及开发需要,进行内容填充就好,贴一下view核心代码。
<style lang="less">.ivu-load-loop {-webkit-animation: ani-load-loop 1s linear infinite;animation: ani-load-loop 1s linear infinite;color: rgb(250, 238, 17);}
</style><template><MenuItem name="checkUpdate"><Icon type="loop" v-bind:class="{ 'ivu-load-loop': isUpdate === true }"></Icon>检查更新 {{ downloadPercent === 0 ? '' : downloadPercent }}</MenuItem>
</template><script>import {ipcRenderer} from 'electron';import {formatDate} from '../libs/date.js'methods: {navigateTo(name) {if (name === 'checkUpdate') {//检查更新if (this.isUpdate) {return this.$Notice.warning({title: '版本更新通知',desc: '正在检查更新,请稍后尝试...',});}this.isUpdate = true;//手动检查更新console.log("手动检查更新")ipcRenderer.send('checkForUpdate');}},downloadBtn() {//立即更新ipcRenderer.send('isUpdateNow');},},mounted() {//检查更新ipcRenderer.on('result', (event, data,vObj) => {console.log('data:', data);let title = '版本更新通知';switch (data.code) {case 1:this.$Notice.error({//errorname:'error',title: title,desc: data.msg,duration: 0,});this.isUpdate = false;break;case 2:this.$Notice.info({//checkingname:'checking',title: title,desc: data.msg,});break;case 3:this.$Notice.info({//updateAvaname:'updateAva',title: title,desc: data.msg,duration: 0,});break;case 4:this.$Notice.info({//updateNotAvaname:'updateNotAva',title: title,desc: data.msg,duration: 0,});this.isUpdate = false;break;case 5:this.$Notice.open({name:'isUpdateNow',title: title,duration: 0,render: h => {const confirmIco = h('div', [h('span', data.msg),h('span', {style: {fontSize: '14px',color: '#2d8cf0',marginLeft: '10px',cursor: 'pointer'},on: {click: () => {this.downloadVersionModel = true;//版本更新内容this.updateVersionInfo.version = vObj.version;this.updateVersionInfo.releaseDate = formatDate(new Date(vObj.releaseDate), 'yyyy-MM-dd hh:mm:ss');this.updateVersionInfo.releaseNotes = "";},},},'查看'),h('span', {style: {fontSize: '14px',color: '#19be6b',marginLeft: '16px',cursor: 'pointer'},on: {click: () => {console.log('取消更新');this.downloadPercent = 0;this.$Notice.destroy();//销毁notice组件},},},'忽略'),]);return h('div', [confirmIco,]);},});this.isUpdate = false;this.downloadPercent = 100;break;case 6:this.$Notice.info({//downloadedname:'downloaded',title: title,desc: data.msg,duration: 0,});this.isUpdate = false;break;}});//项目启动自动检查更新(不用)/*ipcRenderer.send('checkForUpdate');//如果已有下载的新版本,将会强制更新(不用)ipcRenderer.send('isUpdateNow');*///下载进度 注意:“downloadProgress”事件可能存在无法触发的问题,只需要限制一下下载网速就好了ipcRenderer.on('downloadProgress', (event, progressObj) => {this.downloadPercent = progressObj.percent || 0;})},watch: {//下载进度downloadPercent(newVal, oldVal) {if(0 != newVal){this.downloadPercent = parseFloat(newVal).toFixed(2) + " %";}}},
</script>
效果图如下:
更新的安装包默认保存在 C:\Users\CANONYANG\AppData\Roaming\***
常见错误:
1、项目路径若含有 中文字符 会导致NSIS步骤无法执行,从而无法打包setup.exe安装程序。
2、版本更新出错:
Error: TypeError: this.app.whenReady is not a functionat ElectronAppAdapter.whenReady (webpack:///./node_modules/_electron-updater@4.1.2@electron-updater/out/ElectronAppAdapter.js?:28:21)at NsisUpdater.getUpdateInfoAndProvider (webpack:///./node_modules/_electron-updater@4.1.2@electron-updater/out/AppUpdater.js?:476:20)at NsisUpdater.doCheckForUpdates (webpack:///./node_modules/_electron-updater@4.1.2@electron-updater/out/AppUpdater.js?:503:31)at NsisUpdater.checkForUpdates (webpack:///./node_modules/_electron-updater@4.1.2@electron-updater/out/AppUpdater.js?:349:35)at EventEmitter.eval (webpack:///./src/main/index.js?:109:66)at emitOne (events.js:116:13)at EventEmitter.emit (events.js:211:7)at WebContents.<anonymous> (F:\CodeProject\FulailaiProject\device-client\node_modules\_electron@2.0.18@electron\dist\resources\electron.asar\browser\api\web-contents.js:287:1
3)at emitTwo (events.js:126:13)at WebContents.emit (events.js:214:7)(node:13512) UnhandledPromiseRejectionWarning: Unhandled promise rejection (rejection id: 18): TypeError: this.app.whenReady is not a function
原因:
项目是 Electron-vue 项目,所依赖的版本太低,导致更不上官网更新的 Electron-builder 和 Electron-updater 的较新版本,最终报错。什么意思呢?Electron-vue是坊间一位大神写的基于Vue和Electron的脚手架,所以更新并不同步 Electron 本身的更新速度。
解决:
知道问题原因解决就很容易了,首先 cnpm uninstall electron-builder@较新版本/electron-updater@较新版本 ,然后把依赖退了几个版本,这里我把electron-builder退到了@21.0.0,electron-updater退到了@3.0.0 。
3、版本更新:现在使用的就是最新版本,不用更新?
控制台提示:
┏ Electron -------------------Update for version 2.0.18 is not available (latest version: 1.0.0, downgrade is disallowed).┗ ----------------------------上传七牛的版本为1.1.0,本地开启的服务版本为1.0.0,这里提示版本不允许降级。
原因:
在检查更新的时候,electron 会把 electron 的版本当作当前应用版本(package.json)。当前应用是基于 electron@2.0.X,应用版本为1.0.0,而服务器上应用版本低于2.0.X,进而提示不允许降级操作。
解决:
这个bug是由于 electron 配置启动地址错误造成的。把 /.electron-vue/dev-runner.js 中 startElectron 路径 path.join(__dirname, '../dist/electron/main.js') 改成 ‘.’
4、版本下载:项目根目录需要 dev-app-update.yml 文件,可是从头到尾都没有见过这个文件,怎么回事呢?
┏ Electron -------------------Error: Error: ENOENT: no such file or directory, open 'F:\CodeProject\****\****\dev-app-update.yml'at Promise.longStackTracesCaptureStackTrace [as _captureStackTrace] (webpack:///./node_modules/_bluebird@3.5.5@bluebird/js/release/debuggability.js?:411:19)at new PromiseSpawn (webpack:///./node_modules/_bluebird@3.5.5@bluebird/js/release/generators.js?:43:17)at eval (webpack:///./node_modules/_bluebird@3.5.5@bluebird/js/release/generators.js?:197:21)at NsisUpdater._checkForUpdates (webpack:///./node_modules/_electron-updater@4.0.0@electron-updater/out/AppUpdater.js?:444:7)at NsisUpdater.checkForUpdates (webpack:///./node_modules/_electron-updater@4.0.0@electron-updater/out/AppUpdater.js?:356:35)at EventEmitter.eval (webpack:///./src/main/index.js?:126:66)at emitOne (events.js:116:13)at EventEmitter.emit (events.js:211:7)at WebContents.<anonymous> (F:\CodeProject\FulailaiProject\device-client\node_modules\_electron@2.0.18@electron\dist\resources\electron.asar\browser\api\web-contents.js:287:1
3)at emitTwo (events.js:126:13)at WebContents.emit (events.js:214:7)┗ ----------------------------
原因: 跟上面提到的第2个问题一样,这次是 electron-updater 版本过高导致的问题。
解决: 直接降低版本为:"electron-updater": "3.0.0", 成功解决问题。
5、在使用electron-builder进行打包时,提示以下错误信息:
Error: Unresolved node modules: jquery, vue
原因: 网上百度以及google给出的原因是使用淘宝镜像进行依赖包的安装造成的。但追根溯源,这并不是问题的根本原因,经过多次的删除node_modules文件夹以及cnpm/npm install发现,是cnpm install 下载依赖未下载完全导致的,可能是因为网络不稳定的原因。所以造成 npm run build 编译未通过,导致报错。
解决:反复删除node_modules文件夹,然后使用cnpm install 重新安装依赖包,在配合 npm run build 进行打包测试,这个地方没办法,真的很坑
未完待续…
这篇关于Electron项目配合 electron-builder + electron-updater + NSIS 打包.exe安装程序包 构建后实现自动更新的文章就介绍到这儿,希望我们推荐的文章对编程师们有所帮助!


