本文主要是介绍【kubernetes系列学习】如何使pod和host主机的时间保持一致?,希望对大家解决编程问题提供一定的参考价值,需要的开发者们随着小编来一起学习吧!
文章目录
- 【kubernetes系列学习】如何使pod和host主机的时间保持一致?
- 问题及主要目的
- 实验环境信息
- 实验1:正常创建pod,pod和host的时间不一致
- 实验2:挂载主机的/usr/share/zoneinfo/Asia/Shanghai
- 实验3:挂载主机的/etc/localtime
- 参考
【kubernetes系列学习】如何使pod和host主机的时间保持一致?
问题及主要目的
pod内输出的当前date与host主机上输出的date是不一致的,这样有时候看pod的日志会有迷惑性,下面来解决一下~
实验环境信息
[root@ningan ~]# uname -a
Linux ningan 5.4.0-131-generic #147~18.04.1-Ubuntu SMP Sat Oct 15 13:10:18 UTC 2022 x86_64 x86_64 x86_64 GNU/Linux
在Ubuntu上,/etc/localtime是系统的本地时区设置文件,影响到系统的当前date输出。
Ubuntu 18.04上,/etc/localtime是一个symbolic link,链接到文件:/usr/share/zoneinfo/Asia/Shanghai
/usr/share/zoneinfo下存储着真正的时区设置文件,/usr/share/zoneinfo/Asia/Shanghai也是一个符号链接,指向的是/usr/share/zoneinfo/PRC
[root@ningan ~]# ls -l /etc/localtime
lrwxrwxrwx 1 root root 33 Sep 24 10:18 /etc/localtime -> /usr/share/zoneinfo/Asia/Shanghai
[root@ningan ~]#
[root@ningan ~]# ls -l /usr/share/zoneinfo/Asia/Shanghai
lrwxrwxrwx 1 root root 6 Aug 30 16:20 /usr/share/zoneinfo/Asia/Shanghai -> ../PRC
[root@ningan ~]#
[root@ningan ~]# ls -l /usr/share/zoneinfo/PRC
-rw-r--r-- 1 root root 582 Aug 30 16:20 /usr/share/zoneinfo/PRC
[root@ningan ~]# file /etc/localtime
/etc/localtime: symbolic link to /usr/share/zoneinfo/Asia/Shanghai[root@ningan ~]# file /usr/share/zoneinfo/Asia/Shanghai
/usr/share/zoneinfo/Asia/Shanghai: symbolic link to ../PRC[root@ningan ~]# file /usr/share/zoneinfo/PRC
/usr/share/zoneinfo/PRC: timezone data, version 2, 3 gmt time flags, 3 std time flags, no leap seconds, 29 transition times, 3 abbreviation chars
实验1:正常创建pod,pod和host的时间不一致
[root@ningan ~]# cat nginx.yaml
apiVersion: apps/v1
kind: Deployment
metadata:name: nginx-deploymentlabels:app: nginx
spec:replicas: 3selector:matchLabels:app: nginxtemplate:metadata:labels:app: nginxspec:containers:- name: nginximage: nginx:1.14.2imagePullPolicy: Alwaysports:- containerPort: 80
---
apiVersion: v1
kind: Service
metadata:labels:app: nginxname: nginx
spec:ports:- port: 9000name: nginx-svcprotocol: TCPtargetPort: 80selector:app: nginx
### 下发yaml,创建pod
[root@ningan ~]# kubectl apply -f nginx.yaml
deployment.apps/nginx-deployment created
### 查看启动的pod和svc
[root@ningan ~]# kubectl get pod,svc -A |grep nginx
default                pod/nginx-deployment-68d5f6d6b7-4rhj4            1/1     Running            0                20s
default                pod/nginx-deployment-68d5f6d6b7-5dm2f            1/1     Running            0                20s
default                pod/nginx-deployment-68d5f6d6b7-mvhpg            1/1     Running            0                20s
default                service/nginx                       ClusterIP   11.254.209.126   <none>        9000/TCP                       20s
### 进入到容器中,查看容器的当前时间
[root@ningan ~]# kubectl exec -it nginx-deployment-68d5f6d6b7-4rhj4 -- sh
# uname -a
Linux nginx-deployment-68d5f6d6b7-4rhj4 5.4.0-131-generic #147~18.04.1-Ubuntu SMP Sat Oct 15 13:10:18 UTC 2022 x86_64 GNU/Linux
# ls -l /etc/localtime
lrwxrwxrwx 1 root root 27 Mar 26 2019 /etc/localtime -> /usr/share/zoneinfo/Etc/UTC
# date
Fri Oct 28 15:37:43 UTC 2022
# exit
### 到主机上,查看主机的当前时间
[root@ningan ~]# date
Fri Oct 28 23:37:49 CST 2022
可以看到,pod内的时间和host主机的时间是相差了8个小时的。
实验2:挂载主机的/usr/share/zoneinfo/Asia/Shanghai
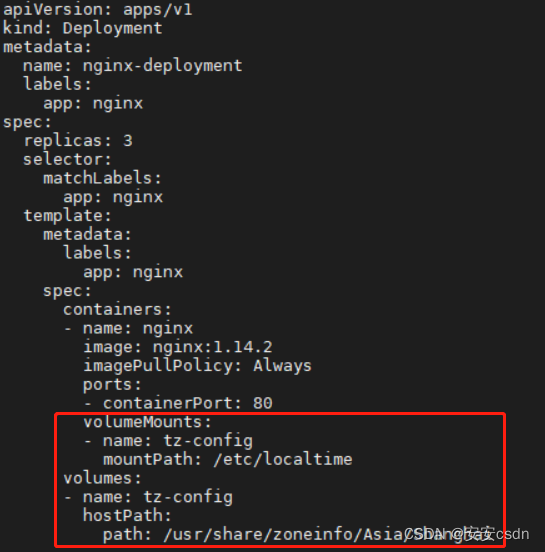
修改pod的yaml文件,挂载主机的/usr/share/zoneinfo/Asia/Shanghai到pod的/etc/localtime,保证pod和host的时间一致
[root@ningan ~]# cat nginx-date-test.yaml
apiVersion: apps/v1
kind: Deployment
metadata:name: nginx-deploymentlabels:app: nginx
spec:replicas: 3selector:matchLabels:app: nginxtemplate:metadata:labels:app: nginxspec:containers:- name: nginximage: nginx:1.14.2imagePullPolicy: Alwaysports:- containerPort: 80volumeMounts:- name: tz-configmountPath: /etc/localtimevolumes:- name: tz-confighostPath:path: /usr/share/zoneinfo/Asia/Shanghai
---
apiVersion: v1
kind: Service
metadata:labels:app: nginxname: nginx
spec:ports:- port: 9000name: nginx-svcprotocol: TCPtargetPort: 80selector:app: nginx
在之前的yaml里新加了挂载文件,如下:
### 重新下发yaml
[root@ningan ~]# kubectl apply -f nginx-date-test.yaml
deployment.apps/nginx-deployment configured
service/nginx unchanged
### 查看启动的pod和svc
[root@ningan ~]# kubectl get pod,svc -owide -A |grep nginx
default pod/nginx-deployment-ff5879d6b-lxb5h 1/1 Running 0 3m55s 192.169.219.76 master <none> <none>
default pod/nginx-deployment-ff5879d6b-tr2h6 1/1 Running 0 3m59s 192.169.219.75 master <none> <none>
default pod/nginx-deployment-ff5879d6b-zjmzf 1/1 Running 0 4m4s 192.169.219.74 master <none> <none>
default service/nginx ClusterIP 11.254.209.126 <none> 9000/TCP 28m app=nginx
### 进入到容器中,查看容器的当前时间
[root@ningan ~]# kubectl exec -it nginx-deployment-ff5879d6b-lxb5h -- date
Sat Oct 29 00:03:02 CST 2022
### 到主机上,查看主机的当前时间
[root@ningan ~]# date
Sat Oct 29 00:03:08 CST 2022
已经修改成功,大功告成!
实验3:挂载主机的/etc/localtime
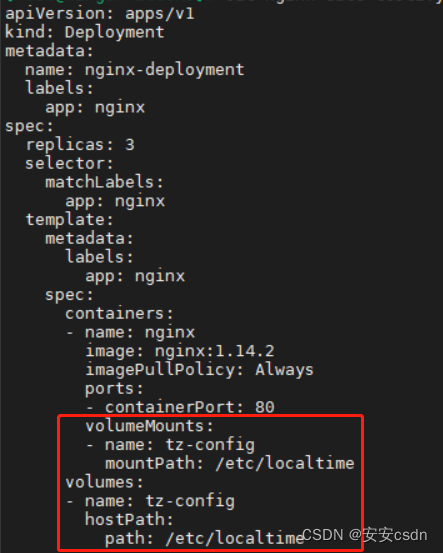
修改pod的yaml文件,挂载主机的/etc/localtime到pod的/etc/localtime,保证pod和host的时间一致
[root@ningan addons]# cat nginx-date-test2.yaml
apiVersion: apps/v1
kind: Deployment
metadata:name: nginx-deploymentlabels:app: nginx
spec:replicas: 3selector:matchLabels:app: nginxtemplate:metadata:labels:app: nginxspec:containers:- name: nginximage: nginx:1.14.2imagePullPolicy: Alwaysports:- containerPort: 80volumeMounts:- name: tz-configmountPath: /etc/localtimevolumes:- name: tz-confighostPath:path: /etc/localtime
---
apiVersion: v1
kind: Service
metadata:labels:app: nginxname: nginx
spec:ports:- port: 9000name: nginx-svcprotocol: TCPtargetPort: 80selector:app: nginx
在实验1的yaml里新加了挂载文件,如下:
在实验2的yaml里修改了挂载文件,如下:

### 删除之前pod
[root@ningan addons]# kubectl delete -f nginx-date-test.yaml
deployment.apps "nginx-deployment" deleted
service "nginx" deleted[root@ningan addons]# kubectl get pod,svc -owide -A |grep nginx
[root@ningan addons]#
### 下发新的yaml
[root@ningan addons]# kubectl get pod,svc -owide -A |grep nginx
default pod/nginx-deployment-b85dc87bc-6zds7 1/1 Running 0 54s 192.169.219.77 master <none> <none>
default pod/nginx-deployment-b85dc87bc-httb5 1/1 Running 0 54s 192.169.219.79 master <none> <none>
default pod/nginx-deployment-b85dc87bc-n4rfm 1/1 Running 0 54s 192.169.219.78 master <none> <none>
default service/nginx ClusterIP 11.254.240.43 <none> 9000/TCP 54s app=nginx
### 进入到容器中,查看容器的当前时间
[root@ningan addons]# kubectl exec -it nginx-deployment-b85dc87bc-6zds7 -- date
Sat Oct 29 00:15:08 CST 2022
### 到主机上,查看主机的当前时间
[root@ningan addons]# date
Sat Oct 29 00:15:10 CST 2022
大功告成~
参考
Kubernetes集群Pod使用Host的本地时区设置
这篇关于【kubernetes系列学习】如何使pod和host主机的时间保持一致?的文章就介绍到这儿,希望我们推荐的文章对编程师们有所帮助!


