本文主要是介绍Qt自定义组合按钮,实现相机拍照,光学变焦,希望对大家解决编程问题提供一定的参考价值,需要的开发者们随着小编来一起学习吧!
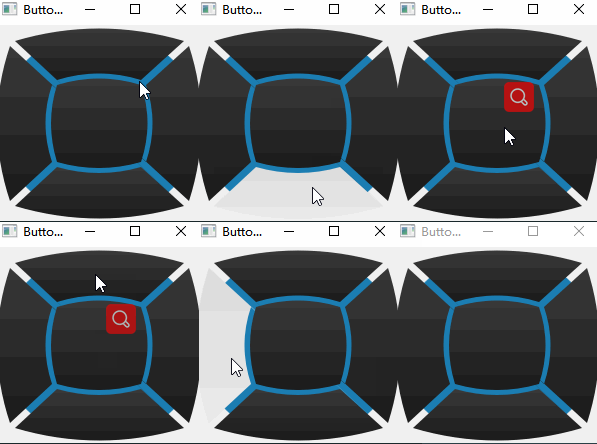
效果如下:

核心代码:
void CameraButton::paintEvent(QPaintEvent *)
{QPainter painter(this);m_arcPathList.clear();initializeInterface();painter.setRenderHint(QPainter::Antialiasing);painter.translate(width()/2, height()/2);QRect blueRect(0, 0, this->width()-10, this->height()-10);blueRect.moveCenter(QPoint(0, 0));painter.setPen(colorLine);painter.setBrush(colorLine);painter.drawEllipse(blueRect);painter.setPen(Qt::NoPen);QLinearGradient lgUp;QRect pprect = m_arcPathList.at(0).boundingRect().toRect();lgUp.setStart(pprect.topLeft());lgUp.setFinalStop(pprect.bottomLeft());painter.translate(0, -5);if(m_pressIndex == 0){lgUp.setColorAt(0, colorSectorUpPress);lgUp.setColorAt(1, colorSectorDownPress);painter.setBrush(lgUp);painter.drawPath(m_arcPathList.at(0));painter.drawPixmap(m_arcPathList.at(0).controlPointRect().center().x()-23,m_arcPathList.at(0).controlPointRect().center().y()-20,mPixmapUpPress);}else{lgUp.setColorAt(0, colorSectorUpNormal);lgUp.setColorAt(1, colorSectorDownNormal);painter.setBrush(lgUp);painter.drawPath(m_arcPathList.at(0));painter.drawPixmap(m_arcPathList.at(0).controlPointRect().center().x()-23,m_arcPathList.at(0).controlPointRect().center().y()-20,mPixmapUpNormal);}painter.translate(0, 5);QLinearGradient lgDown;pprect = m_arcPathList.at(1).boundingRect().toRect();lgDown.setStart(pprect.topLeft());lgDown.setFinalStop(pprect.bottomLeft());painter.translate(0, 5);if(m_pressIndex == 1){lgDown.setColorAt(0, colorSectorUpPress);lgDown.setColorAt(1, colorSectorDownPress);painter.setBrush(lgDown);painter.drawPath(m_arcPathList.at(1));painter.drawPixmap(m_arcPathList.at(1).controlPointRect().center().x()-23,m_arcPathList.at(1).controlPointRect().center().y()-20,mPixmapDownPress);}else{lgDown.setColorAt(0, colorSectorUpNormal);lgDown.setColorAt(1, colorSectorDownNormal);painter.setBrush(lgDown);painter.drawPath(m_arcPathList.at(1));painter.drawPixmap(m_arcPathList.at(1).controlPointRect().center().x()-23,m_arcPathList.at(1).controlPointRect().center().y()-20,mPixmapDownNormal);}painter.translate(0, -5);QLinearGradient lgLeft;pprect = m_arcPathList.at(2).boundingRect().toRect();lgLeft.setStart(pprect.topLeft());lgLeft.setFinalStop(pprect.bottomLeft());painter.translate(-5,0);if(m_pressIndex == 2){lgLeft.setColorAt(0, colorSectorUpPress);lgLeft.setColorAt(1, colorSectorDownPress);painter.setBrush(lgLeft);painter.drawPath(m_arcPathList.at(2));painter.drawPixmap(m_arcPathList.at(2).controlPointRect().center().x()-89,m_arcPathList.at(2).controlPointRect().center().y()-20,mPixmapLeftPress);}else{lgLeft.setColorAt(0, colorSectorUpNormal);lgLeft.setColorAt(1, colorSectorDownNormal);painter.setBrush(lgLeft);painter.drawPath(m_arcPathList.at(2));painter.drawPixmap(m_arcPathList.at(2).controlPointRect().center().x()-89,m_arcPathList.at(2).controlPointRect().center().y()-20,mPixmapLeftNormal);}painter.translate(5, 0);QLinearGradient lgRight;pprect = m_arcPathList.at(3).boundingRect().toRect();lgRight.setStart(pprect.topLeft());lgRight.setFinalStop(pprect.bottomLeft());painter.translate(5, 0);if(m_pressIndex == 3){lgRight.setColorAt(0, colorSectorUpPress);lgRight.setColorAt(1, colorSectorDownPress);painter.setBrush(lgRight);painter.drawPath(m_arcPathList.at(3));painter.drawPixmap(m_arcPathList.at(3).boundingRect().center().x()+43,m_arcPathList.at(3).boundingRect().center().y()-20,mPixmapRightPress);}else{lgRight.setColorAt(0, colorSectorUpNormal);lgRight.setColorAt(1, colorSectorDownNormal);painter.setBrush(lgRight);painter.drawPath(m_arcPathList.at(3));painter.drawPixmap(m_arcPathList.at(3).boundingRect().center().x()+43,m_arcPathList.at(3).boundingRect().center().y()-20,mPixmapRightNormal);}painter.translate(-5, 0);QRect ppcenterBtnRect = m_arcPathList.at(4).boundingRect().toRect();QLinearGradient lgCenter;lgCenter.setStart(ppcenterBtnRect.topLeft());lgCenter.setFinalStop(ppcenterBtnRect.bottomLeft());if(m_pressIndex == 4){lgCenter.setColorAt(0, colorSectorUpPress);lgCenter.setColorAt(1, colorSectorDownPress);painter.setBrush(lgCenter);painter.drawPath(m_arcPathList.at(4));painter.drawPixmap(m_arcPathList.at(4).controlPointRect().center().x()-30,m_arcPathList.at(4).controlPointRect().center().y()-25,mPixmapCenterPress);}else{lgCenter.setColorAt(0, colorSectorUpNormal);lgCenter.setColorAt(1, colorSectorDownNormal);painter.setBrush(lgCenter);painter.drawPath(m_arcPathList.at(4));painter.drawPixmap(m_arcPathList.at(4).controlPointRect().center().x()-30,m_arcPathList.at(4).controlPointRect().center().y()-25,mPixmapCenterNormal);}}
void CameraButton::setWidgetStyle(QString style)
{if(style == "dark"){colorLine = QColor(27,126,179);colorSectorUpPress = QColor(219,219,219);colorSectorDownPress = QColor(235,235,235);colorSectorUpNormal = QColor(58,58,58);colorSectorDownNormal = QColor(26,26,26);}else{colorLine = QColor(53,193,229);colorSectorUpPress = QColor(217,217,217);colorSectorDownPress = QColor(235,235,235);colorSectorUpNormal = QColor(240,243,248);colorSectorDownNormal = QColor(178,184,194);}update();
}
完整代码:https://download.csdn.net/download/yu_20501253/11192951
这篇关于Qt自定义组合按钮,实现相机拍照,光学变焦的文章就介绍到这儿,希望我们推荐的文章对编程师们有所帮助!


