本文主要是介绍Ubuntu安装CUDA8.0+cuDNN7,希望对大家解决编程问题提供一定的参考价值,需要的开发者们随着小编来一起学习吧!
文章目录
-
- 一、准备
-
- 1.1 检查是否支持CUDA
- 1.2 查看gcc是否安装
- 1.3 检查内核版本
- 二、安装显卡驱动
- 三、安装CUDA
-
- 3.1 CUDA对应的NVIDIA驱动版本对照表
- 3.2 下载适合的CUDA8.0
- 3.3 安装
- 3.4 验证安装的正确性
- 四、安装cuDNN
-
- 4.1 查找对应CUDA版本的cuDNN版本。
- 4.2 到官网下载对应的cuDNN软件
- 4.3 安装
- 4.4 测试
- 五、问题
-
- 5.1 nvcc warning警告
- 5.2 无法获取 dpkg 前端锁
- 5.3 No MPI compiler found
- 5.4 cudnn.h: 没有那个文件或目录
一、准备
1.1 检查是否支持CUDA
输入下面命令查看电脑的NVIDIA型号:
(CCNet36) bit@bit-613:~/下载$ lspci | grep -i nvidia
01:00.0 VGA compatible controller: NVIDIA Corporation GM107 [GeForce GTX 745] (rev a2)
01:00.1 Audio device: NVIDIA Corporation Device 0fbc (rev a1)显示型号是:GeForce GTX 745
1.2 查看gcc是否安装
bit@bit-613:~$ gcc --version
gcc (Ubuntu 5.4.0-6ubuntu1~16.04.12) 5.4.0 20160609
Copyright (C) 2015 Free Software Foundation, Inc.
This is free software; see the source for copying conditions.  There is NO
warranty; not even for MERCHANTABILITY or FITNESS FOR A PARTICULAR PURPOSE.gcc安装的版本:Ubuntu 5.4.0
1.3 检查内核版本
(CCNet36) bit@bit-613:~$ uname -r
4.15.0-123-generic内核版本:4.15
二、安装显卡驱动
详细过程:
Ubuntu如何查看显卡信息及安装NVDIA显卡驱动
ubuntu 怎么查看显卡型号及安装显卡驱动
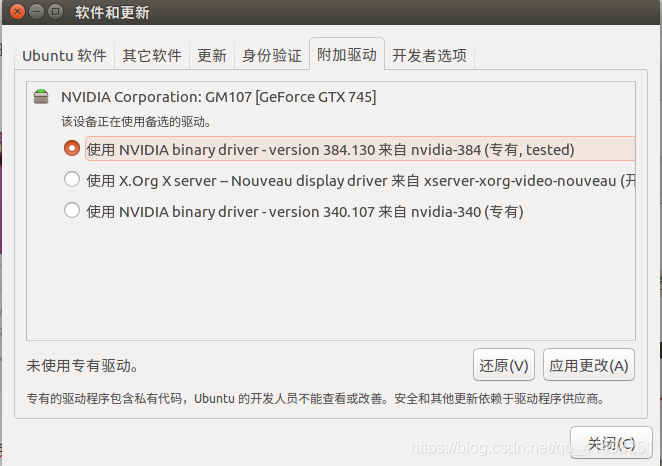
1、首先,进入ubuntu系统桌面,单击左上bai角的“搜索”选项,du搜索“驱动”,然后打开搜索到的驱动程序,如下图所示,然后进入下一步。

2、接着,完成上述步骤后,将显示计算机每个设备的驱动程序。
如果在其中找到显卡设备,则可以查看显卡并安装驱动程序,点击“应用更改”按钮,如下图所示,然后进入下一步。
3、输入ubuntu系统密码,然后单击“授权”按钮以开始安装驱动程序,如下图所示,然后进入下一步。
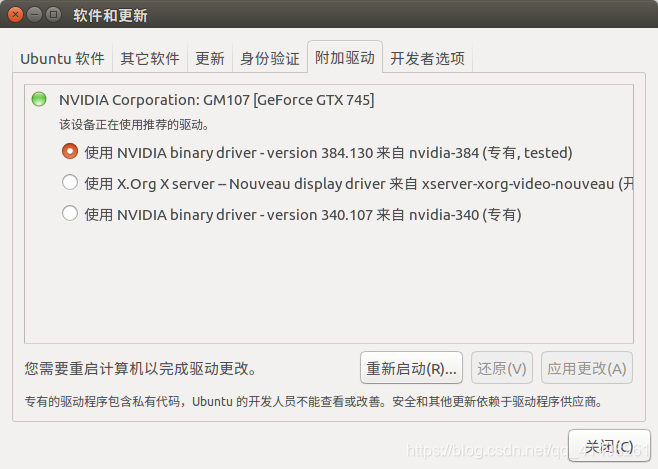
 4、系统将自动下载并安装驱动程序。
 5、安装后单击“重新启动”按钮以重新启动计算机。
6、重新启动计算机后,可以在搜索范围内查看已安装的插件驱动程序。

若不存在显卡,则去官网下载显卡驱动。网址地址。
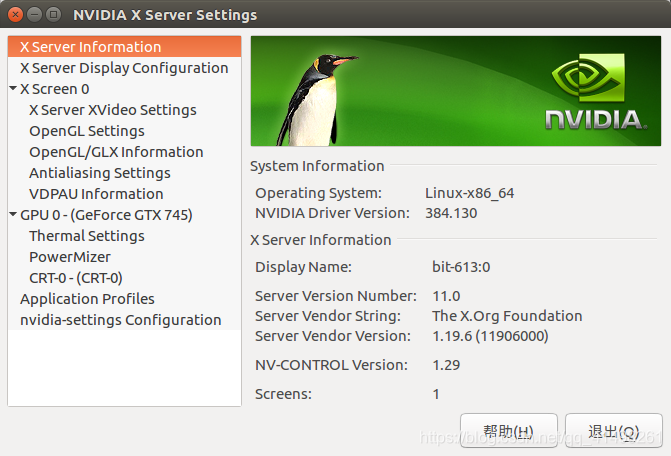
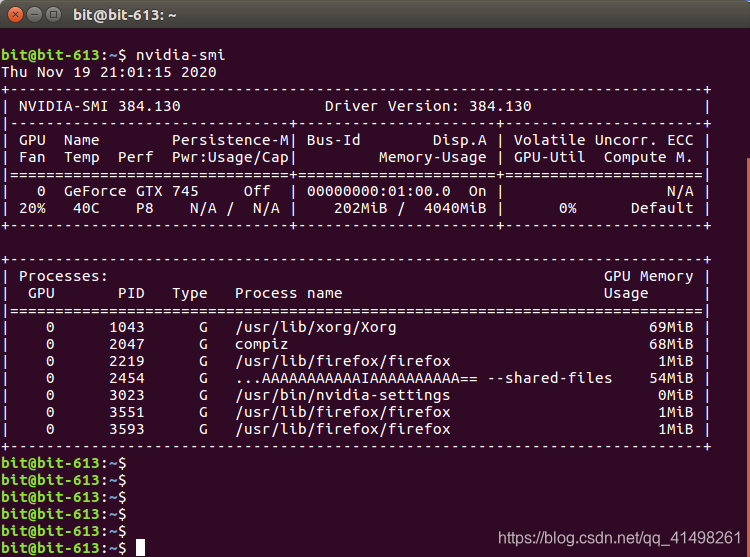
7、成功安装驱动后,可以进行查询:
三、安装CUDA
安装之前首先要确认你需要安装的cuda。
TensorFlow+cudnn、cuda、Python的配套关系_包含所有操作系统
3.1 CUDA对应的NVIDIA驱动版本对照表

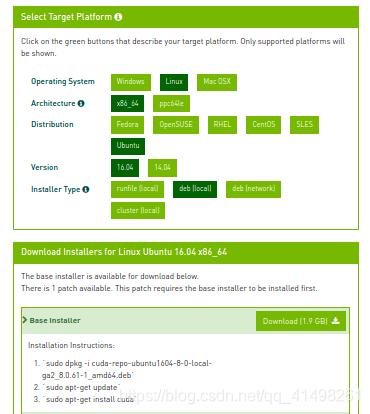
3.2 下载适合的CUDA8.0
下载地址:CUDA Toolkit 8.0 - Feb 2017
3.3 安装
1、安装:
sudo dpkg -i cuda-repo-ubuntu1604-8-0-local-ga2_8.0.61-1_amd64 (1).deb
sudo apt-key add /var/cuda-repo-8-0-local-ga2/7fa2af80.pub
sudo apt-get update
sudo apt-get -y install cuda
- 1
- 2
- 3
- 4
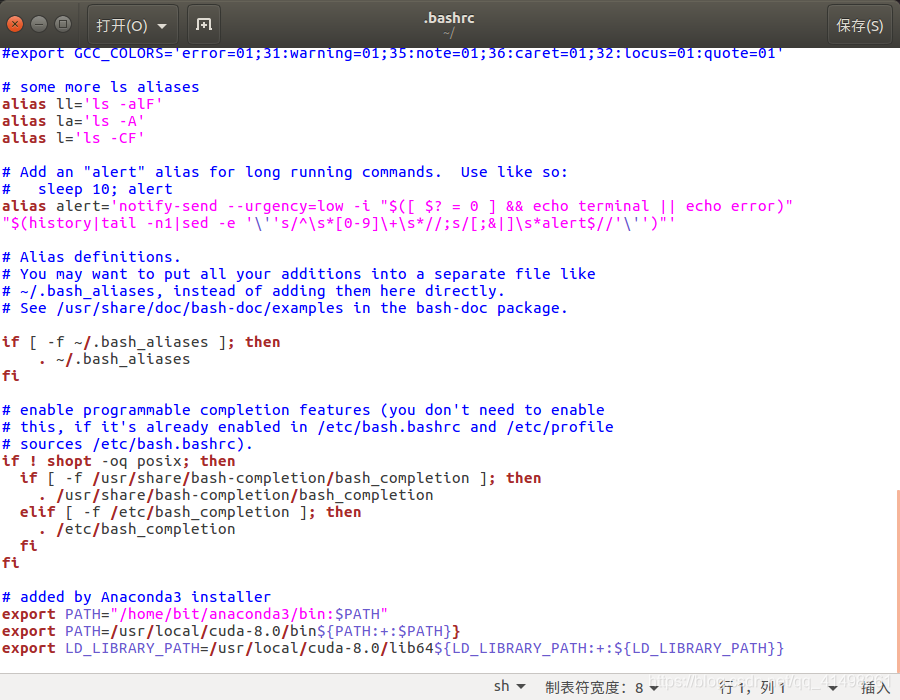
2、添加环境变量:
sudo gedit ~/.bashrc
- 1
在文件中追加:
export PATH=/usr/local/cuda-8.0/bin${PATH:+:$PATH}}
export LD_LIBRARY_PATH=/usr/local/cuda-8.0/lib64${LD_LIBRARY_PATH:+:${LD_LIBRARY_PATH}}
- 1
- 2
3.4 验证安装的正确性
1、
cd /usr/local/cuda-8.0/samples/1_Utilities/deviceQuerysudo make./deviceQuerybit@bit-613:/usr/local/cuda-8.0/samples/1_Utilities/deviceQuery$ sudo make
/usr/local/cuda-8.0/bin/nvcc -ccbin g++ -I../../common/inc -m64 -gencode arch=compute_20,code=sm_20 -gencode arch=compute_30,code=sm_30 -gencode arch=compute_35,code=sm_35 -gencode arch=compute_37,code=sm_37 -gencode arch=compute_50,code=sm_50 -gencode arch=compute_52,code=sm_52 -gencode arch=compute_60,code=sm_60 -gencode arch=compute_60,code=compute_60 -o deviceQuery.o -c deviceQuery.cpp
nvcc warning : The 'compute_20', 'sm_20', and 'sm_21' architectures are deprecated, and may be removed in a future release (Use -Wno-deprecated-gpu-targets to suppress warning).
/usr/local/cuda-8.0/bin/nvcc -ccbin g++ -m64 -gencode arch=compute_20,code=sm_20 -gencode arch=compute_30,code=sm_30 -gencode arch=compute_35,code=sm_35 -gencode arch=compute_37,code=sm_37 -gencode arch=compute_50,code=sm_50 -gencode arch=compute_52,code=sm_52 -gencode arch=compute_60,code=sm_60 -gencode arch=compute_60,code=compute_60 -o deviceQuery deviceQuery.o
nvcc warning : The 'compute_20', 'sm_20', and 'sm_21' architectures are deprecated, and may be removed in a future release (Use -Wno-deprecated-gpu-targets to suppress warning).
mkdir -p ../../bin/x86_64/linux/release
cp deviceQuery ../../bin/x86_64/linux/release
bit@bit-613:/usr/local/cuda-8.0/samples/1_Utilities/deviceQuery$
bit@bit-613:/usr/local/cuda-8.0/samples/1_Utilities/deviceQuery$ ./deviceQuery
./deviceQuery Starting...CUDA Device Query (Runtime API) version (CUDART static linking)Detected 1 CUDA Capable device(s)Device 0: "GeForce GTX 745"CUDA Driver Version / Runtime Version 9.0 / 8.0CUDA Capability Major/Minor version number: 5.0Total amount of global memory: 4041 MBytes (4237164544 bytes)( 3) Multiprocessors, (128) CUDA Cores/MP: 384 CUDA CoresGPU Max Clock rate: 1032 MHz (1.03 GHz)Memory Clock rate: 900 MhzMemory Bus Width: 128-bitL2 Cache Size: 2097152 bytesMaximum Texture Dimension Size (x,y,z) 1D=(65536), 2D=(65536, 65536), 3D=(4096, 4096, 4096)Maximum Layered 1D Texture Size, (num) layers 1D=(16384), 2048 layersMaximum Layered 2D Texture Size, (num) layers 2D=(16384, 16384), 2048 layersTotal amount of constant memory: 65536 bytesTotal amount of shared memory per block: 49152 bytesTotal number of registers available per block: 65536Warp size: 32Maximum number of threads per multiprocessor: 2048Maximum number of threads per block: 1024Max dimension size of a thread block (x,y,z): (1024, 1024, 64)Max dimension size of a grid size (x,y,z): (2147483647, 65535, 65535)Maximum memory pitch: 2147483647 bytesTexture alignment: 512 bytesConcurrent copy and kernel execution: Yes with 1 copy engine(s)Run time limit on kernels: YesIntegrated GPU sharing Host Memory: NoSupport host page-locked memory mapping: YesAlignment requirement for Surfaces: YesDevice has ECC support: DisabledDevice supports Unified Addressing (UVA): YesDevice PCI Domain ID / Bus ID / location ID: 0 / 1 / 0Compute Mode:< Default (multiple host threads can use ::cudaSetDevice() with device simultaneously) >deviceQuery, CUDA Driver = CUDART, CUDA Driver Version = 9.0, CUDA Runtime Version = 8.0, NumDevs = 1, Device0 = GeForce GTX 745
Result = PASS若结果是result=pass,就说明成功。
2、查看安装的版本:
bit@bit-613:/$ nvcc -V
nvcc: NVIDIA (R) Cuda compiler driver
Copyright (c) 2005-2016 NVIDIA Corporation
Built on Tue_Jan_10_13:22:03_CST_2017
Cuda compilation tools, release 8.0, V8.0.61
3、编译cuda例子:
https://blog.csdn.net/u014106566/article/details/94728593
四、安装cuDNN
4.1 查找对应CUDA版本的cuDNN版本。
查找对应CUDA版本的cuDNN版本:
- Cuda compilation tools, release 8.0, V8.0.61
- Driver Version: 384.130
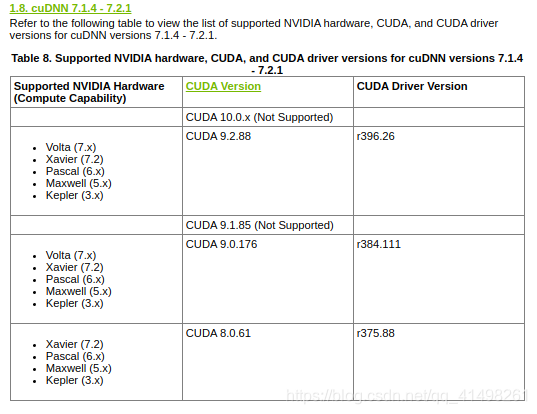
cuda8.0.61 对应的cuDNN版本为 7.1.4-7.2.1.
4.2 到官网下载对应的cuDNN软件
cuDNN Archive

发现有3个对应的Ubuntu版本的cuDNN:
cuDNN v7.1.4 Runtime Library for Ubuntu16.04 (Deb)
cuDNN v7.1.4 Developer Library for Ubuntu16.04 (Deb)
cuDNN v7.1.4 Code Samples and User Guide for Ubuntu16.04 (Deb)
Runtime 和 Developer 版本区别
- developer library 包含了在Ubuntu系统上开发深度学习时所需的cuDNN头文件,如果你不需要开发编译任何深度学习程序,而只是将其用于运行某些深度学习应用,那么只下载“runtime library”就足够了。
最好分别安装这3个文件。
Ubuntu系统—CUDA+cuDNN 安装
4.3 安装
安装指导:官网链接
安装deb格式的文件,找到相关的安装指南:安装指南
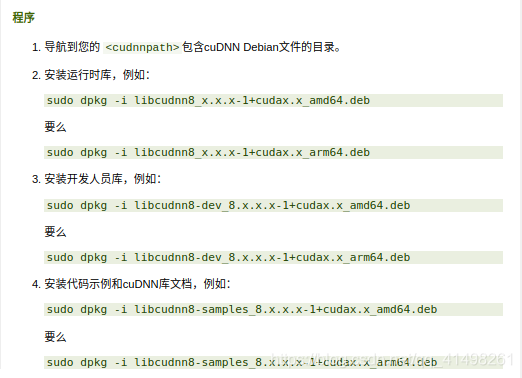
bit@bit-613:~/下载$ sudo dpkg -i libcudnn7_7.1.4.18-1+cuda8.0_amd64.deb
[sudo] bit 的密码:
正在选中未选择的软件包 libcudnn7。
(正在读取数据库 ... 系统当前共安装有 268504 个文件和目录。)
正准备解包 libcudnn7_7.1.4.18-1+cuda8.0_amd64.deb  ...
正在解包 libcudnn7 (7.1.4.18-1+cuda8.0) ...
正在设置 libcudnn7 (7.1.4.18-1+cuda8.0) ...
正在处理用于 libc-bin (2.23-0ubuntu11.2) 的触发器 ...
bit@bit-613:~/下载$ sudo dpkg -i libcudnn7-dev_7.1.4.18-1+cuda8.0_amd64.deb
正在选中未选择的软件包 libcudnn7-dev。
(正在读取数据库 ... 系统当前共安装有 268511 个文件和目录。)
正准备解包 libcudnn7-dev_7.1.4.18-1+cuda8.0_amd64.deb  ...
正在解包 libcudnn7-dev (7.1.4.18-1+cuda8.0) ...
正在设置 libcudnn7-dev (7.1.4.18-1+cuda8.0) ...
update-alternatives: 使用 /usr/include/x86_64-linux-gnu/cudnn_v7.h 来在自动模式中提供 /usr/include/cudnn.h (libcudnn)
bit@bit-613:~/下载$ sudo dpkg -i libcudnn7-doc_7.1.4.18-1+cuda8.0_amd64.deb
正在选中未选择的软件包 libcudnn7-doc。
(正在读取数据库 ... 系统当前共安装有 268517 个文件和目录。)
正准备解包 libcudnn7-doc_7.1.4.18-1+cuda8.0_amd64.deb  ...
正在解包 libcudnn7-doc (7.1.4.18-1+cuda8.0) ...
正在设置 libcudnn7-doc (7.1.4.18-1+cuda8.0) ...
bit@bit-613:~/下载$
bit@bit-613:~/下载$
bit@bit-613:~/下载$ sudo cp cuda-repo-ubuntu1604-8-0-local-ga2_8.0.61-1_amd64.deb
Anaconda3-5.2.0-Linux-x86_64.sh
cuda-repo-ubuntu1604-8-0-local-ga2_8.0.61-1_amd64.deb
libcudnn7_7.1.4.18-1+cuda8.0_amd64.deb
libcudnn7-dev_7.1.4.18-1+cuda8.0_amd64.deb
libcudnn7-doc_7.1.4.18-1+cuda8.0_amd64.deb
sogoupinyin_2.3.1.0112_amd64.deb
未确认 514476.crdownload
bit@bit-613:~/下载$ ls
4.4 测试
cp -r /usr/src/cudnn_samples_v7/  /home/bit/
cd  /home/bit/cudnn_samples_v7/mnistCUDNN
make clean && make
./mnistCUDNN发现输出Test passed!后,说明成功:
bit@bit-613:~/cudnn_samples_v7/mnistCUDNN$ make clean && make
nvcc warning : The 'compute_20', 'sm_20', and 'sm_21' architectures are deprecated, and may be removed in a future release (Use -Wno-deprecated-gpu-targets to suppress warning).
rm -rf *o
rm -rf mnistCUDNN
nvcc warning : The 'compute_20', 'sm_20', and 'sm_21' architectures are deprecated, and may be removed in a future release (Use -Wno-deprecated-gpu-targets to suppress warning).
/usr/local/cuda/bin/nvcc -ccbin g++ -I/usr/local/cuda/include -IFreeImage/include  -m64    -gencode arch=compute_30,code=sm_30 -gencode arch=compute_35,code=sm_35 -gencode arch=compute_50,code=sm_50 -gencode arch=compute_53,code=sm_53 -gencode arch=compute_53,code=compute_53 -o fp16_dev.o -c fp16_dev.cu
g++ -I/usr/local/cuda/include -IFreeImage/include   -o fp16_emu.o -c fp16_emu.cpp
g++ -I/usr/local/cuda/include -IFreeImage/include   -o mnistCUDNN.o -c mnistCUDNN.cpp
/usr/local/cuda/bin/nvcc -ccbin g++   -m64      -gencode arch=compute_30,code=sm_30 -gencode arch=compute_35,code=sm_35 -gencode arch=compute_50,code=sm_50 -gencode arch=compute_53,code=sm_53 -gencode arch=compute_53,code=compute_53 -o mnistCUDNN fp16_dev.o fp16_emu.o mnistCUDNN.o  -LFreeImage/lib/linux/x86_64 -LFreeImage/lib/linux -lcudart -lcublas -lcudnn -lfreeimage -lstdc++ -lm
bit@bit-613:~/cudnn_samples_v7/mnistCUDNN$
bit@bit-613:~/cudnn_samples_v7/mnistCUDNN$ ./mnistCUDNN
cudnnGetVersion() : 7104 , CUDNN_VERSION from cudnn.h : 7104 (7.1.4)
Host compiler version : GCC 5.4.0
There are 1 CUDA capable devices on your machine :
device 0 : sms  3  Capabilities 5.0, SmClock 1032.5 Mhz, MemSize (Mb) 4040, MemClock 900.0 Mhz, Ecc=0, boardGroupID=0
Using device 0Testing single precision
Loading image data/one_28x28.pgm
Performing forward propagation ...
Testing cudnnGetConvolutionForwardAlgorithm ...
Fastest algorithm is Algo 1
Testing cudnnFindConvolutionForwardAlgorithm ...
^^^^ CUDNN_STATUS_SUCCESS for Algo 0: 0.036864 time requiring 0 memory
^^^^ CUDNN_STATUS_SUCCESS for Algo 1: 0.039200 time requiring 3464 memory
^^^^ CUDNN_STATUS_SUCCESS for Algo 2: 0.058112 time requiring 57600 memory
^^^^ CUDNN_STATUS_SUCCESS for Algo 4: 0.211584 time requiring 207360 memory
^^^^ CUDNN_STATUS_SUCCESS for Algo 7: 0.559648 time requiring 2057744 memory
Resulting weights from Softmax:
0.0000000 0.9999399 0.0000000 0.0000000 0.0000561 0.0000000 0.0000012 0.0000017 0.0000010 0.0000000
Loading image data/three_28x28.pgm
Performing forward propagation ...
Resulting weights from Softmax:
0.0000000 0.0000000 0.0000000 0.9999288 0.0000000 0.0000711 0.0000000 0.0000000 0.0000000 0.0000000
Loading image data/five_28x28.pgm
Performing forward propagation ...
Resulting weights from Softmax:
0.0000000 0.0000008 0.0000000 0.0000002 0.0000000 0.9999820 0.0000154 0.0000000 0.0000012 0.0000006 Result of classification: 1 3 5Test passed!Testing half precision (math in single precision)
Loading image data/one_28x28.pgm
Performing forward propagation ...
Testing cudnnGetConvolutionForwardAlgorithm ...
Fastest algorithm is Algo 1
Testing cudnnFindConvolutionForwardAlgorithm ...
^^^^ CUDNN_STATUS_SUCCESS for Algo 0: 0.032224 time requiring 0 memory
^^^^ CUDNN_STATUS_SUCCESS for Algo 1: 0.043744 time requiring 3464 memory
^^^^ CUDNN_STATUS_SUCCESS for Algo 2: 0.082944 time requiring 28800 memory
^^^^ CUDNN_STATUS_SUCCESS for Algo 4: 0.218880 time requiring 207360 memory
^^^^ CUDNN_STATUS_SUCCESS for Algo 7: 0.560992 time requiring 2057744 memory
Resulting weights from Softmax:
0.0000001 1.0000000 0.0000001 0.0000000 0.0000563 0.0000001 0.0000012 0.0000017 0.0000010 0.0000001
Loading image data/three_28x28.pgm
Performing forward propagation ...
Resulting weights from Softmax:
0.0000000 0.0000000 0.0000000 1.0000000 0.0000000 0.0000714 0.0000000 0.0000000 0.0000000 0.0000000
Loading image data/five_28x28.pgm
Performing forward propagation ...
Resulting weights from Softmax:
0.0000000 0.0000008 0.0000000 0.0000002 0.0000000 1.0000000 0.0000154 0.0000000 0.0000012 0.0000006 Result of classification: 1 3 5Test passed!
五、问题
5.1 nvcc warning警告
nvcc warning : The 'compute_20', 'sm_20', and 'sm_21' architectures are deprecated, and may be removed in a future release (Use -Wno-deprecated-gpu-targets to suppress warning).原因是,Makefile中采用了CUDA的compute capability 2.0和2.1,这是两种计算能力。安装的CUDA版本是8.0,但 从CUDA 8.0开始compute capability 2.0和2.1被弃用了,所以可以将-gencode arch=compute_20,code=sm_20 和-gencode arch=compute_20,code=sm_21这两行删除即可。
nvcc编译器警告’compute_20’………。
5.2 无法获取 dpkg 前端锁
bit@bit-613:~/tmp/NVIDIA_CUDA-8.0_Samples$ sudo apt install cmake
E: 无法获得锁 /var/lib/dpkg/lock-frontend - open (11: 资源暂时不可用)
E: 无法获取 dpkg 前端锁 (/var/lib/dpkg/lock-frontend),是否有其他进程正占用它?
解决:
bit@bit-613:~/tmp/NVIDIA_CUDA-8.0_Samples$ ps -e|grep apt1448 ?        00:00:00 apt.systemd.dai1700 ?        00:00:00 apt.systemd.dai
bit@bit-613:~/tmp/NVIDIA_CUDA-8.0_Samples$ sudo kill 1448
bit@bit-613:~/tmp/NVIDIA_CUDA-8.0_Samples$ sudo kill 1700
5.3 No MPI compiler found
-------------------------------------------------------------------------------------
WARNING - No MPI compiler found.
-------------------------------------------------------------------------------------
CUDA Sample "simpleMPI" cannot be built without an MPI Compiler.
This will be a dry-run of the Makefile.
For more information on how to set up your environment to build and run this
sample, please refer the CUDA Samples documentation and release notes
-------------------------------------------------------------------------------------
ubuntu 16.04 mpi安装: mpi、ubuntu 虚拟机下配置MPI
sudo apt-get install gfortran
wget http://www.mpich.org/static/downloads/3.3/mpich-3.3.tar.gzsudo tar -zxvf mpich-3.2.tar.gz
cd mpich-3.3
./configure
make
make install
5.4 cudnn.h: 没有那个文件或目录
cat /usr/local/cuda/include/cudnn.h | grep CUDNN_MAJOR -A 2
cat: /usr/local/cuda/include/cudnn.h: 没有那个文件或目录
1、找cudnn.h文件
find / -name cudnn.h
- 1
这个命令会列出所有的cudnn.h文件
找到自己安装cuda时的虚拟环境中的cudnn.h,我的是:/usr/include/cudnn.h

2、将找到的cudnn.h文件复制到
cp /usr/include/cudnn.h /usr/local/cuda/include/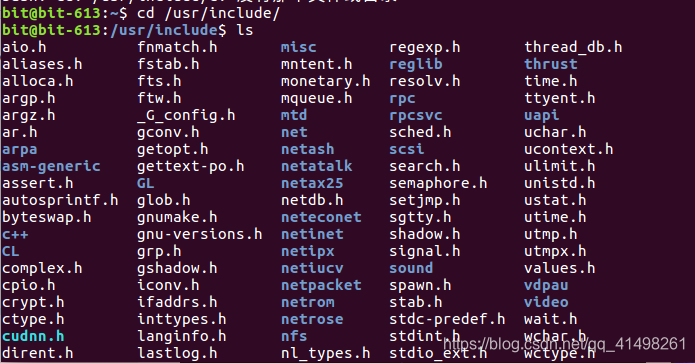
3、查询cudnn的版本:
root@bit-613:~# cat /usr/local/cuda/include/cudnn.h | grep CUDNN_MAJOR -A 2
#define CUDNN_MAJOR 7
#define CUDNN_MINOR 1
#define CUDNN_PATCHLEVEL 4
--
#define CUDNN_VERSION    (CUDNN_MAJOR * 1000 + CUDNN_MINOR * 100 + CUDNN_PATCHLEVEL)#include "driver_types.h"
4、 查询
find / -name libcudnn.so文件在:/usr/lib/x86_64-linux-gnu/libcudnn.so
复制到:
cp /usr/lib/x86_64-linux-gnu/libcudnn.so /usr/local/cuda-8.0/lib64然后make,生成了可执行文件darknet和libdarknet.so及库libdarknet.a
大功告成。
这篇关于Ubuntu安装CUDA8.0+cuDNN7的文章就介绍到这儿,希望我们推荐的文章对编程师们有所帮助!


