本文主要是介绍Spring Cloud Gateway2之路由详解,希望对大家解决编程问题提供一定的参考价值,需要的开发者们随着小编来一起学习吧!
Spring Cloud Gateway路由
文章目录
- 1. 前言
- 2. Gateway路由的基本概念
- 3. 三种路由
- 1. 静态路由
- 2. 动态路由
- 1. 利用外部存储
- 2. API动态路由
- 3. 服务发现路由(自动路由)
- 3.1. 配置方式
- 3.2 自动路由(服务发现)原理
- 核心源码
- GatewayDiscoveryClientAutoConfiguration
- `DiscoveryClientRouteDefinitionLocator`核心方法`getRouteDefinitions`
- 4. Gateway路由的核心组件
- 4.1 路由断言
- 组合并生效相当于并且的关系
- 如果要或的关系需要分配多个路由
- 4.2 路由过滤器
- 路由过滤器概念
- 路由过滤器工厂
- 内置路由过滤器
- 自定义路由过滤器
- 5. 路由的动态刷新
- 5.1. 添加依赖
- 5.2. 配置application.yml
- 5.3. 创建Config Server
- 5.4. 在远程Git仓库中添加配置文件
- 5.5. 启动Gateway服务
- 5.6. 动态刷新路由信息
- 6. 处理路由失败和异常
- 6.1 处理请求失败和异常
- 6.2 配置回退和重试策略
- 7. 高级路由功能
- 8. 参考文档
1. 前言
其实Spring Cloud Gateway2.x 的官网文档写的已经很全面了,如果想要了解,可以访问 《Spring Cloud Gateway》
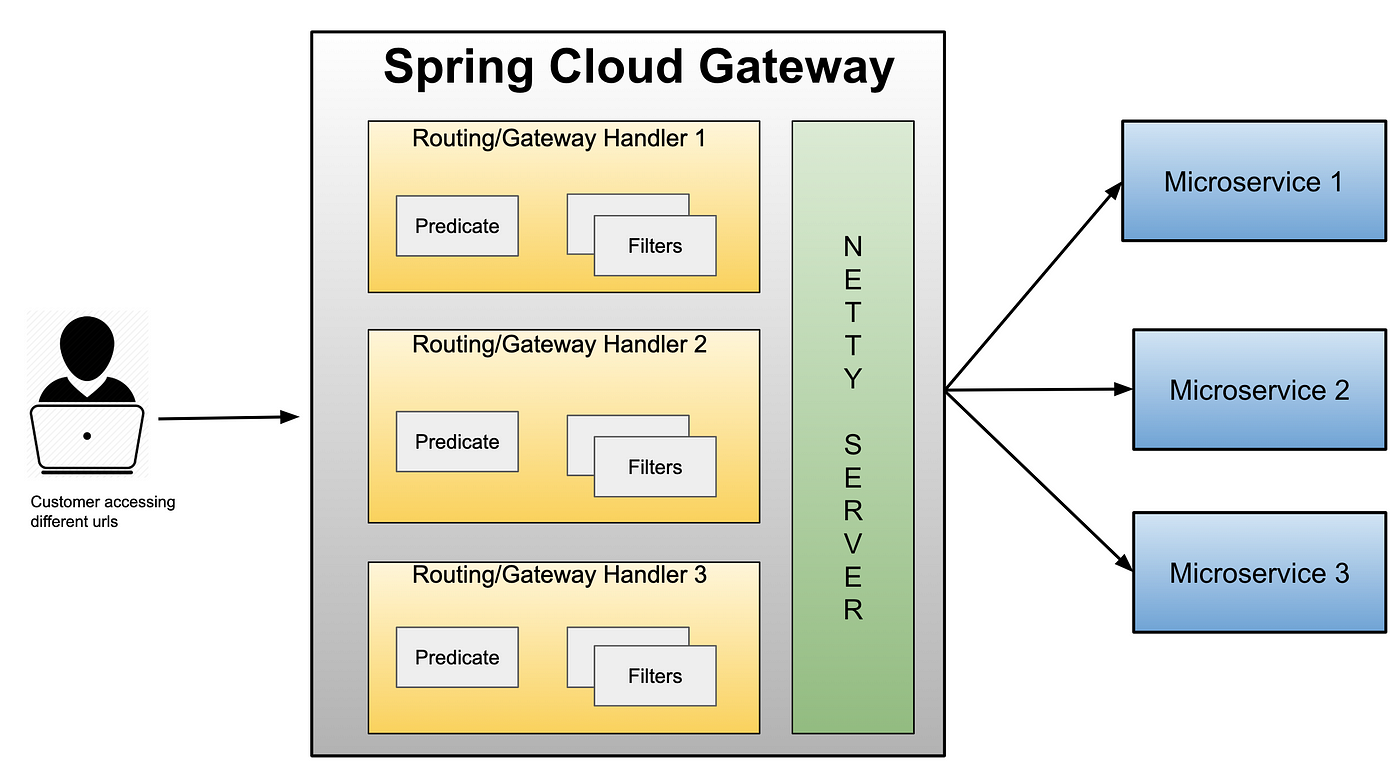
Spring Cloud Gateway是一个基于Spring Boot构建的API网关,主要用于微服务架构中。它提供了一种简单而高效的方式来对请求进行路由、过滤和转发,从而实现对服务的统一访问入口和流量管理。Spring Cloud Gateway通过一个高度可配置的路由规则集,支持各种复杂的请求处理场景。
与传统的API网关(如Zuul)相比,Spring Cloud Gateway提供了更好的性能和丰富的功能。它基于响应式编程模型(Reactive)和Spring WebFlux框架构建,能够提供非阻塞的异步I/O处理,并且能够很好地与其他Spring Cloud组件进行集成。此外,Spring Cloud Gateway还提供了很多现成的功能,如负载均衡、熔断、限流等,可以帮助开发者快速搭建一个完善的API网关。
图片来自Spring Cloud Gateway2 官网 https://cloud.spring.io/spring-cloud-gateway/2.0.x/single/spring-cloud-gateway.html
2. Gateway路由的基本概念
- 2.1 路由的定义和作用
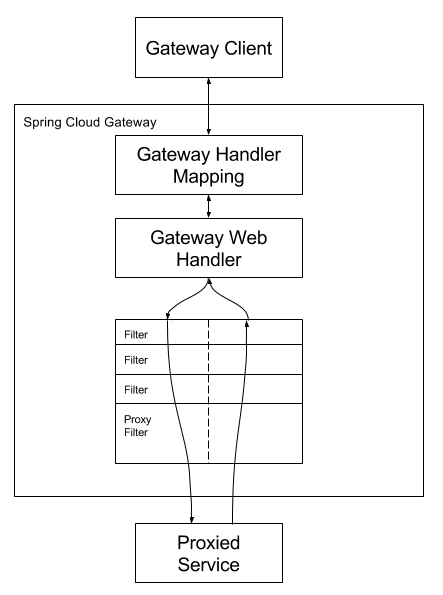
路由是一个HTTP请求的处理过程。在Spring Cloud Gateway中,每个请求都会经过一系列的过滤器,最后转发到目标URI。
路由配置由三部分组成:ID、目标URI、一系列的断言和过滤器。ID是路由的唯一标识,目标URI是请求的最终目的地,断言是用来匹配HTTP请求的规则,过滤器是用来处理HTTP请求的组件。
在Spring Cloud Gateway中配置路由有两种方式:通过配置文件和通过代码。
- 通过配置文件配置路由:
在application.yml文件中添加如下配置:
spring:cloud:gateway:routes:- id: user_routeuri: http://localhost:8080predicates:- Path=/user/**
以上面的配置为例,id为user_route的路由会匹配所有路径为/user/的请求,然后将其转发到http://localhost:8080。
- 通过代码配置路由:
在配置类中添加如下配置:
@Bean
public RouteLocator customRouteLocator(RouteLocatorBuilder builder) {return builder.routes().route("user_route", r -> r.path("/user/**").uri("http://localhost:8080")).build();
}
以上面的配置为例,id为user_route的路由会匹配所有路径为/user/的请求,然后将其转发到http://localhost:8080。
- 2.2 如何在Spring Cloud Gateway中配置路由
3. 三种路由
根据路由的创建方式和使用场景,可以将路由分类为以下三种:
1. 静态路由
在Spring Cloud Gateway启动时,通过配置文件或Java代码定义的路由规则。这些路由规则在运行时是不可修改的。
可以通过配置文件定义静态路由:这段配置会将所有以/user开始的请求转发到http://localhost:8080。
spring:cloud:gateway:routes:- id: user_routeuri: http://localhost:8080predicates:- Path=/user/**
Spring Cloud Gateway的静态路由实现的原理主要通过Reactive模式下的Netty处理方式,以及Project Reactor中的Flux和Mono模型来处理并发请求。此外,它还使用了Spring 5的核心Webflux框架进行路由分发。
具体来说,当请求到来时,Spring Cloud Gateway会根据配置文件中的静态路由信息,将请求转发到相应的目标地址。
核心的代码主要集中在RoutePredicateHandlerMapping和FilteringWebHandler类中。
// RoutePredicateHandlerMapping用于处理请求的映射关系
public class RoutePredicateHandlerMapping extends AbstractHandlerMapping {public RoutePredicateHandlerMapping(GatewayProperties properties, RouteLocator routeLocator, ProxyExchangeArgumentResolver proxyExchangeArgumentResolver, ServerCodecConfigurer serverCodecConfigurer, Environment environment) {...}...
}// FilteringWebHandler用于处理各种过滤器
public class FilteringWebHandler implements WebHandler {private final List<GlobalFilter> globalFilters;public FilteringWebHandler(List<GlobalFilter> globalFilters) {this.globalFilters = globalFilters;}...
}
实际上,配置静态路由的主要工作量在于编写配置文件和理解路由断言,Spring Cloud Gateway已经为处理了复杂的路由转发和过滤器操作。
具体的路由匹配和转发过程则由Spring Cloud Gateway框架自动处理。在处理请求时,Gateway会依次经过负载均衡器、过滤器链和路由断言的处理,并最终将请求转发到配置的目标地址。
2. 动态路由
动态路由通常可以理解为两种方式,一种通过外部配置存储动态更新网关路由,另一种是通过API 的方式动态新增修改删除网关路由。
1. 利用外部存储
动态路由与静态路由的主要区别在于,动态路由允许在运行时更新路由配置,而不需要重启应用。Spring Cloud Gateway支持通过配置中心(如Spring Cloud Config)。
实现动态路由的原理主要是通过监听配置中心的变化,当配置发生变化时,使用Event机制触发路由信息的更新。Spring Cloud Gateway会自动处理新的路由配置并更新其内部的路由表。
核心代码主要集中在以下几个类中:
当配置中心发生更改时,RouteRefreshListener会监听到相关事件,触发RefreshRoutesEvent事件,从而使CachingRouteLocator更新路由信息。这样,Spring Cloud Gateway就可以在运行时动态地处理新的路由配置。
CachingRouteLocator:它负责缓存和管理路由信息,同时也会处理路由信息的更新。
public abstract class CachingRouteLocator implements RouteLocator, ApplicationListener<RefreshRoutesEvent> {public abstract Flux<Route> fetch();@Overridepublic void onApplicationEvent(RefreshRoutesEvent event) {// 当收到一个RefreshRoutesEvent事件时,将会触发路由信息的更新this.resetRoutes().subscribe();}...
}
RouteDefinitionRouteLocator:它继承自CachingRouteLocator,并负责从RouteDefinitionLocator中获取路由定义,然后根据路由定义创建路由。
public class RouteDefinitionRouteLocator extends CachingRouteLocator {public RouteDefinitionRouteLocator(RouteDefinitionLocator routeDefinitionLocator, List<GatewayFilterFactory> gatewayFilters, List<RoutePredicateFactory> routePredicates, RouteDefinitionHandlerFilter routeDefinitionHandlerFilter, ConfigurationService configurationService, GatewayProperties properties) {...}...
}
- RouteRefreshListener:它负责监听配置中心的变化,并在检测到更改时发布一个RefreshRoutesEvent事件。
@Configuration
public class RouteRefreshListener {@Beanpublic ApplicationListener<?> routeChangeListener(RouteDefinitionRouteLocator routeDefinitionRouteLocator) {return new ApplicationListener<RefreshRoutesResultEvent>() {@Overridepublic void onApplicationEvent(RefreshRoutesResultEvent event) {routeDefinitionRouteLocator.onApplicationEvent(new RefreshRoutesEvent(this));}};}
}
要实现动态路由,还需要在配置文件中配置相应的配置中心,例如使用Spring Cloud Config:
spring:cloud:gateway:discovery:locator:enabled: trueroutes:- id: dynamic_routeuri: lb://service-idpredicates:- Path=/dynamic_path/**config:uri: http://config-server-urilabel: mastername: gateway
2. API动态路由
在Spring Cloud Gateway运行时,通过调用API动态创建和修改的路由规则。这种路由规则可以根据需要进行实时的修改。动态路由通常需要通过编程方式创建。
在Spring Cloud Gateway中,可以通过调用Gateway API来动态地创建和修改路由规则。这些路由规则可以在运行时进行实时修改。要实现这一功能,需要使用RouteDefinitionWriter接口,它提供了添加、删除和更新路由定义的方法。
Spring Cloud Gateway中动态地创建和修改路由规则
依赖
<dependency><groupId>org.springframework.cloud</groupId><artifactId>spring-cloud-starter-gateway</artifactId>
</dependency>
创建一个RouteController来处理动态路由的创建、更新和删除操作
@RestController
@RequestMapping("/route")
public class RouteController {@Autowiredprivate RouteDefinitionWriter routeDefinitionWriter;@Autowiredprivate RouteDefinitionLocator routeDefinitionLocator;@PostMappingpublic Mono<Void> add(@RequestBody RouteDefinition routeDefinition) {return routeDefinitionWriter.save(Mono.just(routeDefinition)).then();}@PutMappingpublic Mono<Void> update(@RequestBody RouteDefinition routeDefinition) {return routeDefinitionWriter.delete(Mono.just(routeDefinition.getId())).then(routeDefinitionWriter.save(Mono.just(routeDefinition))).then();}@DeleteMapping("/{id}")public Mono<Void> delete(@PathVariable String id) {return routeDefinitionWriter.delete(Mono.just(id));}@GetMappingpublic Flux<RouteDefinition> getRoutes() {return routeDefinitionLocator.getRouteDefinitions();}
}
在这个例子中,使用RouteDefinitionWriter保存、更新和删除路由定义。当定义新的路由规则或者更新现有的路由规则时,会自动触发路由表的刷新。
现在就可以使用HTTP API来动态地创建、修改和删除路由规则了:
-
添加一个新的路由规则:
POST /route {"id": "my_route","uri": "http://example.com","predicates": [{"name": "Path","args": {"pattern": "/mypath/**"}}],"filters": [{"name": "RewritePath","args": {"regexp": "/mypath/(?<segment>.*)","replacement": "/${segment}"}}] } -
更新现有的路由规则:
PUT /route {"id": "my_route","uri": "http://example.com","predicates": [{"name": "Path","args": {"pattern": "/mypath_v2/**"}}],"filters": [{"name": "RewritePath","args": {"regexp": "/mypath_v2/(?<segment>.*)","replacement": "/${segment}"}}] } -
删除现有的路由规则:
DELETE /route/my_route
通过这种方法,可以在Spring Cloud Gateway运行时动态地创建和修改路由规则,以满足不断变化的业务需求。
3. 服务发现路由(自动路由)
3.1. 配置方式
这是一种特殊的动态路由,其路由规则是根据服务发现机制来自动创建的。
在微服务架构中,服务发现是一种特别重要的机制,它让微服务能够自动地发现网络中的其他服务,并知道如何与它们进行交互。Spring Cloud Gateway通过与服务注册中心(如Eureka、Consul等)集成,实现了自动的服务发现路由功能。
当一个新的服务实例被注册到服务注册中心时,Spring Cloud Gateway会自动发现它,并创建一个新的路由规则,将请求转发到这个服务。同样,当一个服务实例下线或被注销时,对应的路由规则也会被自动删除,这就是所谓的服务发现路由或者自动路由。
这种机制可以极大地简化服务间的交互,因为不需要手动地为每一个服务定义路由规则。
在Spring Cloud Gateway中使用服务发现的一个简单示例
添加 Spring Cloud Gateway和 Eureka的依赖:
<dependency><groupId>org.springframework.cloud</groupId><artifactId>spring-cloud-starter-netflix-eureka-client</artifactId>
</dependency>
<dependency><groupId>org.springframework.cloud</groupId><artifactId>spring-cloud-starter-gateway</artifactId>
</dependency>
application.yml文件中配置Eureka和Gateway:
spring:cloud:gateway:discovery:locator:enabled: true # 启用服务发现路由application:name: gateway-service
eureka:client:service-url:defaultZone: http://localhost:8761/eureka/
启动Eureka Server和的服务,然后启动Spring Cloud Gateway,Gateway就会自动发现注册在Eureka中的服务,并为它们创建路由规则。例如有一个名为user-service的服务,那么就可以通过http://localhost:8080/user-service来访问。
3.2 自动路由(服务发现)原理
在Spring Cloud Gateway中实现服务发现路由的核心类是DiscoveryClientRouteDefinitionLocator。这个类负责从注册中心获取服务实例信息,并基于这些信息创建路由定义。当服务实例发生变化时,DiscoveryClientRouteDefinitionLocator会自动更新路由定义。
服务发现路由的底层原理主要包括以下几个方面:
-
集成服务发现组件:Spring Cloud Gateway可以与多种服务注册中心(如Eureka、Consul等)集成。这些集成是通过实现
DiscoveryClient接口来完成的。DiscoveryClient提供了获取服务实例信息的方法,例如getInstances(String serviceId)。这使得Gateway可以获取到注册中心中所有服务的实例信息。 -
创建路由定义:
DiscoveryClientRouteDefinitionLocator会将从DiscoveryClient获取到的服务实例信息转换为RouteDefinition对象。这些RouteDefinition对象包含了路由的基本信息,如ID、URI、断言和过滤器等。通过这些信息,Gateway可以知道如何将请求路由到特定的服务实例。 -
路由规则更新:当注册中心中的服务实例发生变化时,
DiscoveryClientRouteDefinitionLocator会自动更新路由规则。这是通过监听服务实例变化事件来实现的。当接收到服务实例变化事件后,DiscoveryClientRouteDefinitionLocator会重新获取服务实例信息,并更新RouteDefinition对象。这样,Gateway就能实时地感知到服务实例的变化,并相应地调整路由规则。 -
请求转发:当Gateway接收到一个请求时,它会根据
DiscoveryClientRouteDefinitionLocator提供的路由定义匹配相应的路由规则。然后,Gateway会将请求转发到匹配的服务实例。这个转发过程是通过NettyRoutingFilter完成的,它会根据RouteDefinition中的URI信息转发请求。
核心源码
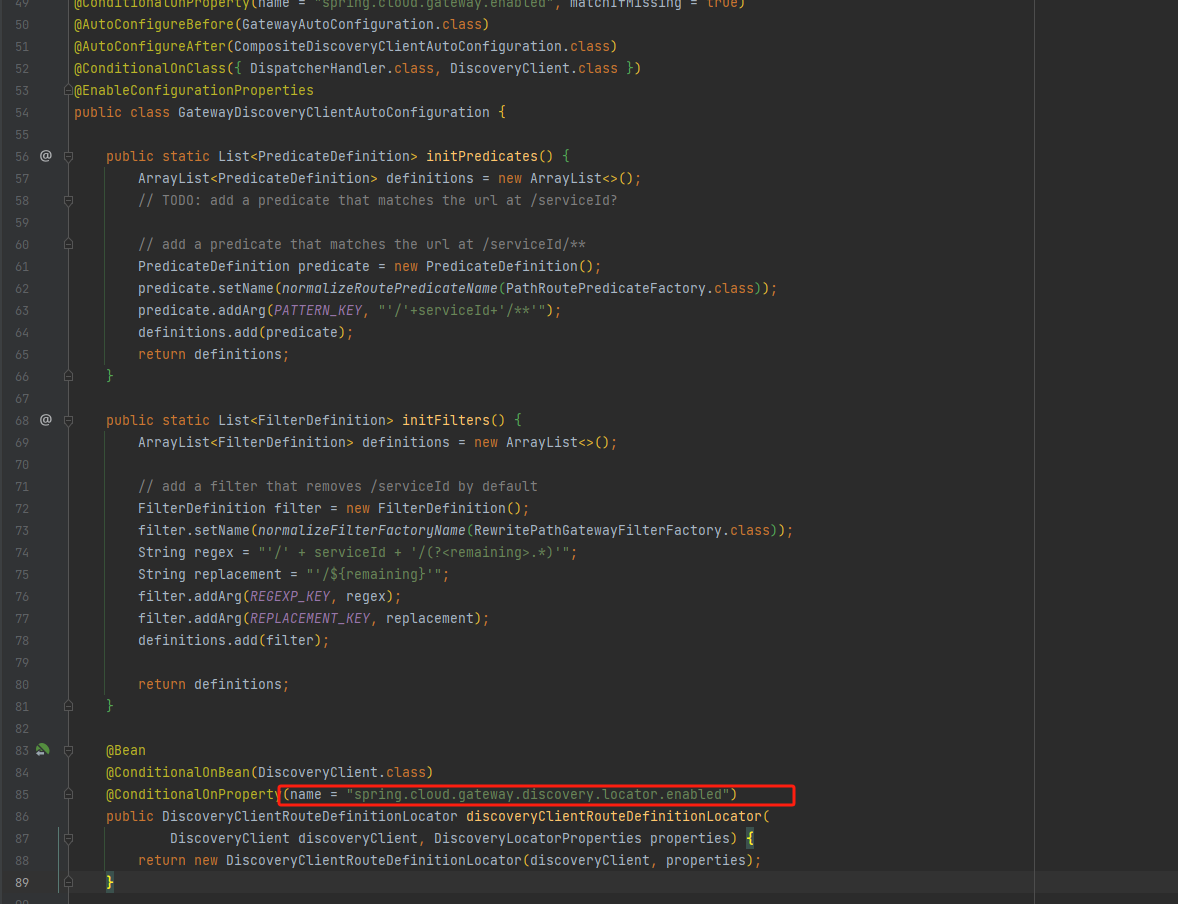
GatewayDiscoveryClientAutoConfiguration
我们可以看到 当 DiscoveryClient 存在并且 spring.cloud.gateway.discovery.locator.enabled 为 true 时,创建一个 DiscoveryClientRouteDefinitionLocator Bean,允许 Spring Cloud Gateway 动态地从服务注册中心发现路由定义。
DiscoveryClientRouteDefinitionLocator核心方法getRouteDefinitions
getRouteDefinitions方法的主要目的是从 DiscoveryClient 获取服务实例信息并将其转换为路由定义。首先解析 includeExpression 和 urlExpression,然后根据 includeExpression 创建一个用于判断服务实例是否需要被包含在路由定义中的 Predicate。接着从 DiscoveryClient 获取所有服务实例信息,并转换为 RouteDefinition。转换过程中会生成 PredicateDefinition 和 FilterDefinition。最后返回一个包含所有路由定义的 Flux 对象。
@Override
public Flux<RouteDefinition> getRouteDefinitions() {// 创建一个 SpelExpressionParser 用于解析表达式SpelExpressionParser parser = new SpelExpressionParser();// 解析 includeExpression,用于判断服务实例是否需要被包含在路由定义中Expression includeExpr = parser.parseExpression(properties.getIncludeExpression());// 解析 urlExpression,用于生成服务实例对应的 URIExpression urlExpr = parser.parseExpression(properties.getUrlExpression());// 根据 includeExpression 创建一个 Predicate,用于判断服务实例是否需要被包含在路由定义中Predicate<ServiceInstance> includePredicate;if (properties.getIncludeExpression() == null || "true".equalsIgnoreCase(properties.getIncludeExpression())) {includePredicate = instance -> true;} else {includePredicate = instance -> {Boolean include = includeExpr.getValue(evalCtxt, instance, Boolean.class);if (include == null) {return false;}return include;};}// 从 DiscoveryClient 获取所有服务实例信息并转换为路由定义return Flux.fromIterable(discoveryClient.getServices()).map(discoveryClient::getInstances) // 获取每个服务的所有实例.filter(instances -> !instances.isEmpty()) // 过滤掉没有实例的服务.map(instances -> instances.get(0)) // 获取每个服务的第一个实例.filter(includePredicate) // 过滤掉不需要被包含在路由定义中的服务实例.map(instance -> { // 将服务实例转换为 RouteDefinitionString serviceId = instance.getServiceId();RouteDefinition routeDefinition = new RouteDefinition();routeDefinition.setId(this.routeIdPrefix + serviceId);// 获取服务实例对应的 URIString uri = urlExpr.getValue(evalCtxt, instance, String.class);routeDefinition.setUri(URI.create(uri));final ServiceInstance instanceForEval = new DelegatingServiceInstance(instance, properties);// 生成 PredicateDefinitionfor (PredicateDefinition original : this.properties.getPredicates()) {PredicateDefinition predicate = new PredicateDefinition();predicate.setName(original.getName());for (Map.Entry<String, String> entry : original.getArgs().entrySet()) {String value = getValueFromExpr(evalCtxt, parser, instanceForEval, entry);predicate.addArg(entry.getKey(), value);}routeDefinition.getPredicates().add(predicate);}// 生成 FilterDefinitionfor (FilterDefinition original : this.properties.getFilters()) {FilterDefinition filter = new FilterDefinition();filter.setName(original.getName());for (Map.Entry<String, String> entry : original.getArgs().entrySet()) {String value = getValueFromExpr(evalCtxt, parser, instanceForEval, entry);filter.addArg(entry.getKey(), value);}routeDefinition.getFilters().add(filter);}return routeDefinition;});
}
4. Gateway路由的核心组件
4.1 路由断言
路由断言(Route Predicates)是Spring Cloud Gateway中的一个核心概念,它负责匹配HTTP请求的属性,并决定是否将请求路由到特定的服务。
使用断言,可以基于许多不同的请求属性定义路由规则,包括:
- 请求路径:比如请求的URL。
- 请求方法:GET、POST等。
- 请求头:可以匹配特定的请求头字段和值。
- 查询参数:可以匹配URL的查询参数。
- Cookie:可以匹配特定的cookie。
断言的定义通常在Spring配置文件(如application.yaml)中,作为路由定义的一部分。每个断言都是一种谓词(Predicate),这是一个返回true或false的函数。
路由断言的示例:
spring:cloud:gateway:routes:- id: user_serviceuri: http://localhost:8080/userpredicates:- Path=/user/**- Method=GET- Header=X-Request-User, \d+
在这个例子中,定义了一个名为"user_service"的路由,其目标URI为"http://localhost:8080/user"。定义了三个断言:
- Path断言:只有当请求路径以"/user/"开头时,才会触发该路由。
- Method断言:只有当HTTP请求方法为GET时,才会触发该路由。
- Header断言:只有当请求头中存在名为"X-Request-User"的字段,并且其值为数字时,才会触发该路由。
只有当所有的断言都返回true时,该请求才会被路由到目标服务。否则,Spring Cloud Gateway将返回404错误。
组合并生效相当于并且的关系
在这个示例中,只有满足以下所有条件的请求才会路由到http://localhost:8080/:
- 请求路径以/api/开头
- 请求方法为GET
- 请求头中包含X-Request-Id,且其值为数字
- 查询参数中包含debug,并且其值为true
- Cookie中包含sessionId,并且其值不为空
spring:cloud:gateway:routes:- id: host_routeuri: http://localhost:8080/predicates:- Path=/api/**- Method=GET- Header=X-Request-Id, \d+- Query=debug, true- Cookie=sessionId, .+
如果要或的关系需要分配多个路由
如果想要以"或"的关系生效,需要定义多个路由。考虑到Spring Cloud Gateway的工作方式,一个请求只能被一个路由处理。这意味着谓词是以"与"的方式工作的,而不是"或"。如果想要一个请求被多个谓词处理,需要创建多个路由。每个路由有一个谓词,这样一个请求可以匹配多个路由。
在以下的配置中,如果请求路径以/api/开头, 或请求方法为GET, 或请求头中包含X-Request-Id且其值为数字, 或查询参数中包含debug且其值为true, 或Cookie中包含sessionId且其值不为空,任何一个条件满足,请求都会路由到http://localhost:8080/。
spring:cloud:gateway:routes:- id: host_route1uri: http://localhost:8080/predicates:- Path=/api/**- id: host_route2uri: http://localhost:8080/predicates:- Method=GET- id: host_route3uri: http://localhost:8080/predicates:- Header=X-Request-Id, \d+- id: host_route4uri: http://localhost:8080/predicates:- Query=debug, true- id: host_route5uri: http://localhost:8080/predicates:- Cookie=sessionId, .+
4.2 路由过滤器
Spring Cloud Gateway作为一个API网关,提供了很多功能,如路由转发、断路器、限流等。其中,路由过滤器是其核心功能之一,它允许我们在请求被路由之前或之后对请求进行处理。本文将详细介绍Spring Cloud Gateway的路由过滤器。
路由过滤器概念
路由过滤器是一个Java类,用于修改进入或退出网关的HTTP请求和响应。它包含两种类型的过滤器:
- Global Filter:全局过滤器,对所有路由请求生效。
- GatewayFilter:网关过滤器,只对特定路由请求生效。
Spring Cloud Gateway中的过滤器基于WebFilter接口实现,并且实现了Ordered接口来控制过滤器的执行顺序。过滤器可以在请求被路由之前(Pre过滤器)或之后(Post过滤器)进行处理。
路由过滤器工厂
Spring Cloud Gateway的过滤器是通过工厂创建的。这些工厂实现了GatewayFilterFactory接口,这个接口包含两个方法:
apply(T config):将配置信息传递给过滤器,并创建过滤器实例。getConfigClass():返回过滤器所使用的配置类。
内置路由过滤器
Spring Cloud Gateway提供了许多内置过滤器,可以覆盖大部分基本功能。以下是一些常用的内置过滤器:
- AddRequestHeader:添加请求头。
- AddRequestParameter:添加请求参数。
- AddResponseHeader:添加响应头。
- PrefixPath:添加前缀路径。
- RewritePath:重写请求路径。
- Retry:重试。
- SetPath:设置请求路径。
- SetResponseHeader:设置响应头。
- StripPrefix:去掉前缀。
- Hystrix:使用Hystrix断路器。
自定义路由过滤器
除了内置过滤器以外,我们还可以自定义过滤器。自定义过滤器需要实现GatewayFilter接口,并重写filter(ServerWebExchange exchange, GatewayFilterChain chain)方法。下面是一个简单的自定义过滤器示例:
创建了一个名为 CustomGatewayFilterFactory 的类,实现了 GatewayFilterFactory<GatewayFilterFactory.Args> 接口,并重写了 apply 和 name 方法。在 apply 方法中,我们返回一个新的 CustomGatewayFilter 实例。在 name 方法中,我们返回过滤器的名称,这个名称需要与配置文件中的 filters 部分所引用的名称相匹配。最后,我们将 CustomGatewayFilterFactory 注册为一个 Bean。
public class CustomGatewayFilter implements GatewayFilter {@Overridepublic Mono<Void> filter(ServerWebExchange exchange, GatewayFilterChain chain) {// 在请求被路由之前执行的逻辑System.out.println("Custom Gateway Filter Pre");return chain.filter(exchange).then(Mono.fromRunnable(() -> {// 在请求被路由之后执行的逻辑System.out.println("Custom Gateway Filter Post");}));}
}
要在配置文件中为特定路由配置 CustomGatewayFilter,需要在 Spring Cloud Gateway 的配置文件(如 application.yml 或 application.properties)中定义路由规则,并在 filters 部分引用的 CustomGatewayFilter。以下是一个在 application.yml 中配置 CustomGatewayFilter 的示例:
spring:cloud:gateway:routes:- id: my_routeuri: http://example.com # 目标服务的地址predicates:- Path=/my_path/** # 路由条件,例如路径匹配filters:- name: CustomFilter # 在这里引用的自定义过滤器
需要先将 CustomGatewayFilter 注册为一个全局过滤器。为了达到这个目的,需要创建一个 GatewayFilterFactory,并将其注册为一个 Bean。请参考以下示例:
@Configuration
public class CustomGatewayFilterConfiguration {@Beanpublic CustomGatewayFilterFactory customGatewayFilterFactory() {return new CustomGatewayFilterFactory();}public static class CustomGatewayFilterFactory implements GatewayFilterFactory<GatewayFilterFactory.Args> {@Overridepublic GatewayFilter apply(GatewayFilterFactory.Args args) {return new CustomGatewayFilter();}@Overridepublic String name() {return "CustomFilter";}}
}
5. 路由的动态刷新
我们写一个简化的教程来看下如何在Spring Cloud Gateway中实现动态路由刷新。
5.1. 添加依赖
在Gateway服务的pom.xml文件中添加以下依赖:
<dependency><groupId>org.springframework.cloud</groupId><artifactId>spring-cloud-starter-config</artifactId>
</dependency>
<dependency><groupId>org.springframework.cloud</groupId><artifactId>spring-cloud-starter-bus-amqp</artifactId>
</dependency>
这里我们使用RabbitMQ作为消息代理,如果想使用其他消息代理,请替换相应的依赖。
5.2. 配置application.yml
在Gateway服务的src/main/resources/application.yml中添加以下配置:
spring:cloud:gateway:discovery:locator:enabled: trueroutes:- id: user-serviceuri: lb://user-servicepredicates:- Path=/user-service/**config:uri: http://localhost:8888rabbitmq:host: localhostport: 5672username: guestpassword: guestbus:id: ${spring.application.name}:${server.port}
这里我们配置了一个名为user-service的路由,路由的配置信息将从Config Server(地址为http://localhost:8888)获取。
5.3. 创建Config Server
创建一个新的Spring Boot项目,名为config-server。在pom.xml文件中添加以下依赖:
<dependency><groupId>org.springframework.cloud</groupId><artifactId>spring-cloud-config-server</artifactId>
</dependency>
在src/main/resources/application.yml中添加以下配置:
server:port: 8888
spring:cloud:config:server:git:uri: https://github.com/your-username/your-repo.git
这里配置了Config Server从远程Git仓库获取配置信息。
在src/main/java/com/example/configserver/ConfigServerApplication.java中添加@EnableConfigServer注解以启动Config Server:
@SpringBootApplication
@EnableConfigServer
public class ConfigServerApplication {public static void main(String[] args) {SpringApplication.run(ConfigServerApplication.class, args);}
}
启动Config Server。
5.4. 在远程Git仓库中添加配置文件
在的远程Git仓库中添加一个名为gateway-service.yml的文件,内容如下:
spring:cloud:gateway:routes:- id: user-serviceuri: lb://user-servicepredicates:- Path=/user-service/**
这里配置了一个名为user-service的路由。
5.5. 启动Gateway服务
现在启动的Gateway服务,它将从Config Server获取最新的路由信息。可以通过访问http://localhost:8080/user-service/some-api来测试路由是否生效。
5.6. 动态刷新路由信息
当gateway-service.yml文件发生变化并推送到远程Git仓库后,可以发送一个POST请求到http://localhost:8080/actuator/refresh端点以刷新Gateway的路由信息。
也可以在config-server项目中添加Spring Cloud Bus的依赖,并添加相应的配置,以实现自动广播路由变更消息。
6. 处理路由失败和异常
如何处理路由失败和异常也是大家在写一个高可用,健壮性良好的网关服务的基本要求。那么在本教程中,我们来了解一下Spring Cloud Gateway中如何处理路由失败和异常,以及如何配置回退和重试策略。
6.1 处理请求失败和异常
当路由转发过程中发生异常,例如目标服务不可用,可以使用Gateway的全局异常处理器来捕获异常并返回一个友好的错误响应。默认情况下,Gateway会使用org.springframework.cloud.gateway.handler.GlobalErrorWebExceptionHandler作为全局异常处理器。可以通过实现ErrorWebExceptionHandler接口并注册为Spring Bean来自定义全局异常处理器。
写一个简单的例子可供参考
自定义CustomGlobalExceptionHandler继承了AbstractErrorWebExceptionHandler并覆盖了getRoutingFunction方法,以自定义错误响应。
@Component
public class CustomGlobalExceptionHandler extends AbstractErrorWebExceptionHandler {public CustomGlobalExceptionHandler(ErrorAttributes errorAttributes,WebProperties.Resources resources,ApplicationContext applicationContext,ServerCodecConfigurer serverCodecConfigurer) {super(errorAttributes, resources, applicationContext);setMessageWriters(serverCodecConfigurer.getWriters());setMessageReaders(serverCodecConfigurer.getReaders());}@Overrideprotected RouterFunction<ServerResponse> getRoutingFunction(ErrorAttributes errorAttributes) {return RouterFunctions.route(RequestPredicates.all(), this::renderErrorResponse);}private Mono<ServerResponse> renderErrorResponse(ServerRequest request) {Throwable error = getError(request);// 自定义响应体Map<String, Object> errorAttributes = new HashMap<>();errorAttributes.put("message", error.getMessage());errorAttributes.put("status", HttpStatus.INTERNAL_SERVER_ERROR.value());errorAttributes.put("timestamp", LocalDateTime.now());return ServerResponse.status(HttpStatus.INTERNAL_SERVER_ERROR).contentType(MediaType.APPLICATION_JSON).body(BodyInserters.fromValue(errorAttributes));}
}
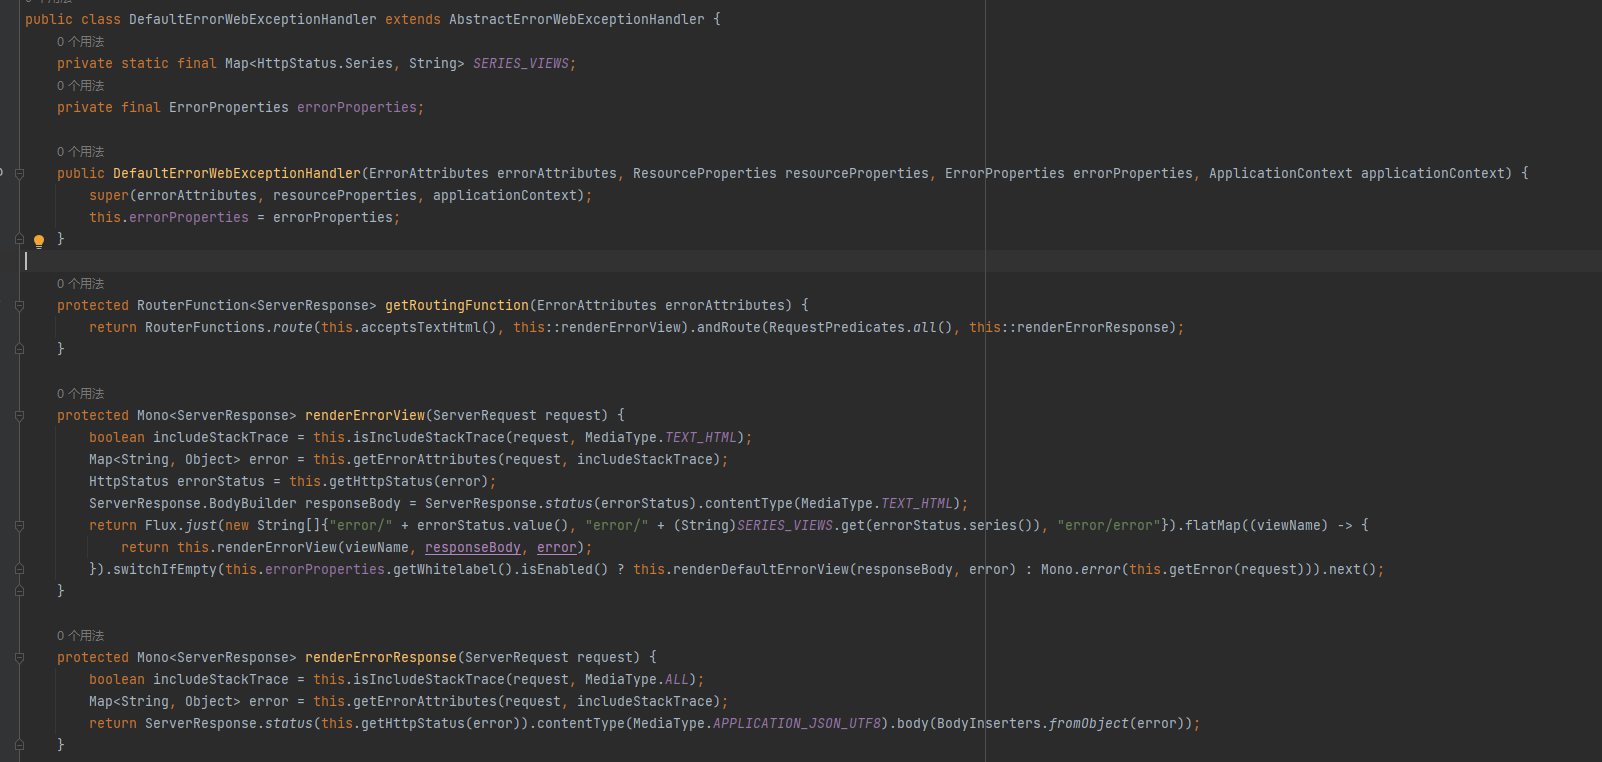
默认实现是DefaultErrorWebExceptionHandler
6.2 配置回退和重试策略
使用Spring Cloud Gateway,可以为路由配置回退和重试策略。回退策略允许在转发请求失败时返回一个预定义的响应。重试策略允许在请求失败时尝试重新发送请求。
为了配置回退策略,可以在路由配置中添加fallbackUri属性。
spring:cloud:gateway:routes:- id: user-serviceuri: lb://user-servicepredicates:- Path=/user-service/**filters:- name: Hystrixargs:name: user-servicefallbackUri: forward:/fallback
为user-service路由配置了一个回退URI,它会将请求转发到/fallback端点。需要在的Gateway服务中实现这个端点,并返回一个预定义的响应。
为了配置重试策略,可以在路由配置中添加Retry过滤器。
为user-service路由配置了一个重试策略。当请求方法为GET且服务器返回500 Internal Server Error状态时,Gateway会尝试重新发送请求,最多重试3次。
spring:cloud:gateway:routes:- id: user-serviceuri: lb://user-servicepredicates:- Path=/user-service/**filters:- name: Retryargs:retries: 3statuses: INTERNAL_SERVER_ERRORmethods: GET
7. 高级路由功能
写不动了,路由详解就到这儿,后面有时间补充一下高级路由功能。
- 7.1 如何配置负载均衡
- 7.2 如何配置熔断器
- 7.3 如何配置速率限制
8. 参考文档
Spring Cloud Gateway官方文档 https://cloud.spring.io/spring-cloud-gateway/2.0.x/single/spring-cloud-gateway.html
这篇关于Spring Cloud Gateway2之路由详解的文章就介绍到这儿,希望我们推荐的文章对编程师们有所帮助!


