本文主要是介绍Android 6.0 Phone MO(去电)流程分析(应用层),希望对大家解决编程问题提供一定的参考价值,需要的开发者们随着小编来一起学习吧!
写在前面的话
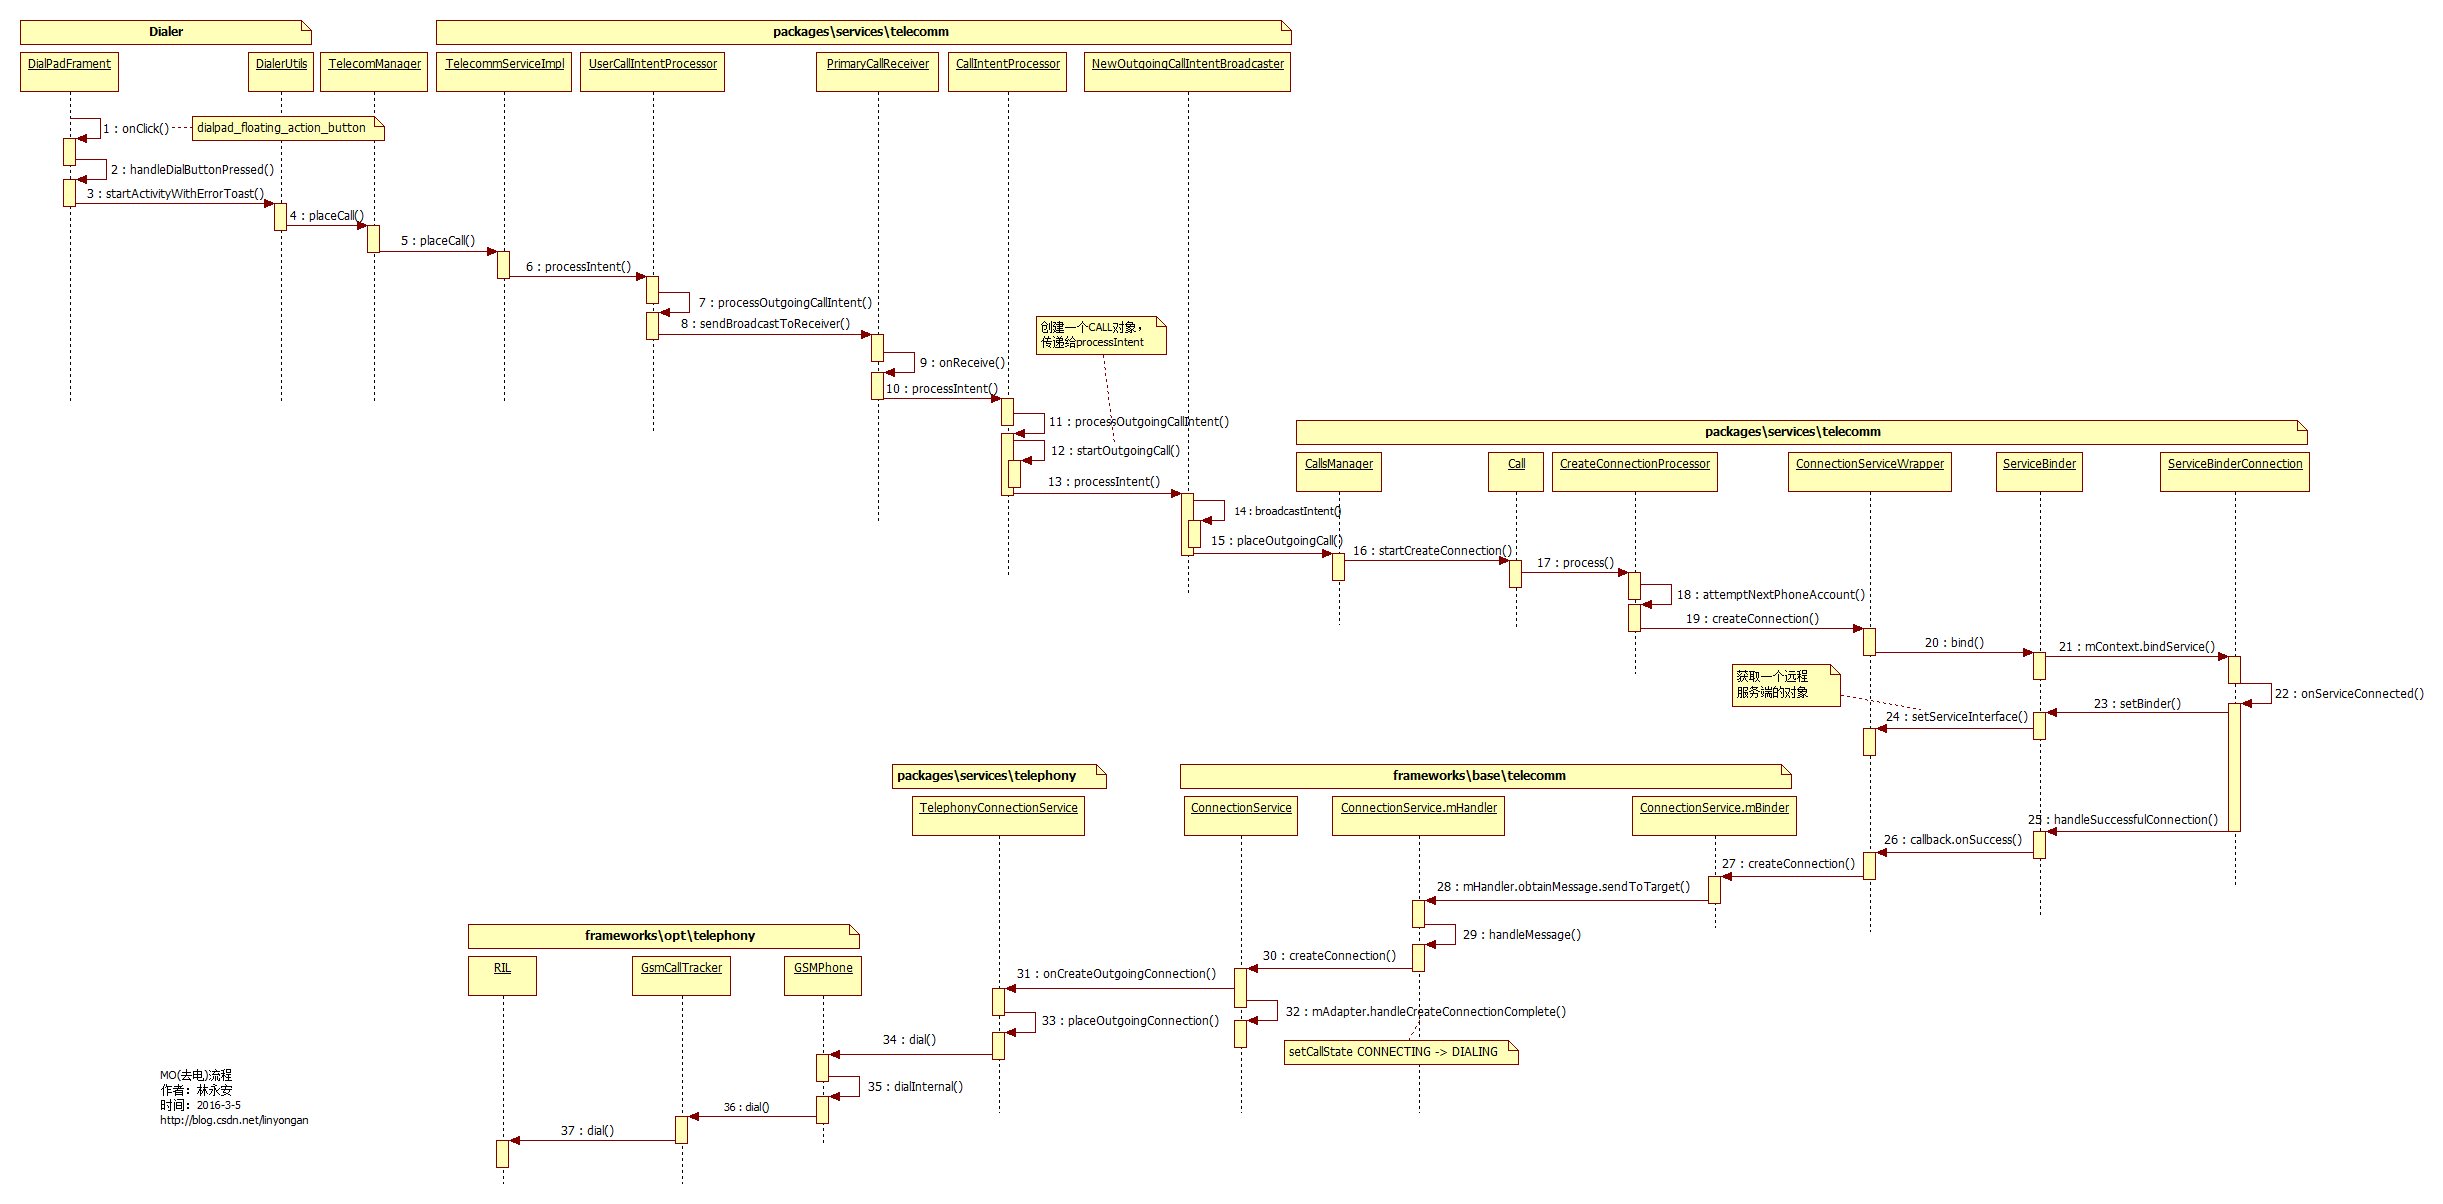
本文主要分析MO(去电)的流程,研究的代码是Android 6.0的,目前只关注应用层,以GSM为例。
本文来自 http://blog.csdn.net/linyongan ,转载请务必注明出处。
步骤1:当用户点击拨号键盘按钮(DialtactsActivity的floating_action_button),弹出拨号盘,输入完电话号码,再点击拨号按钮,此时打电话的流程开始,因此打电话流程的入口就在DialpadFragment.java(packages\apps\dialer\src\com\android\dialer\dialpad)的onClick()方法
public void onClick(View view) {switch (view.getId()) {case R.id.dialpad_floating_action_button:mHaptic.vibrate();handleDialButtonPressed();...
}步骤2:在handleDialButtonPressed()方法里,会先判断用户是否已输入号码,假如号码为空,则调用handleDialButtonClickWithEmptyDigits()方法显示上一次拨打过的号码。然后第一次获取到要拨打的number,在这里可以对number做一些判断或者自定义处理。
步骤11,12:在CallIntentProcessor.java的processOutgoingCallIntent()方法里,调用 CallsManager.java 的startOutgoingCall()方法创建一个Call实例
Call call = callsManager.startOutgoingCall(handle, phoneAccountHandle, clientExtras);
(这就是Call对象的来源),最后传递给NewOutgoingCallIntentBroadcaster。
步骤13:在NewOutgoingCallIntentBroadcaster.java的processIntent()方法里,第二次获取到要拨打的number,这里也是对number进行一些定制操作的好地方。在这里会调用isPotentialEmergencyNumber()方法判断number是否是潜在的紧急号码,如果是紧急号码会直接走步骤15。
/*** Processes the supplied intent and starts the outgoing call broadcast process relevant to the* intent.** This method will handle three kinds of actions:** - CALL (intent launched by all third party dialers)* - CALL_PRIVILEGED (intent launched by system apps e.g. system Dialer, voice Dialer)* - CALL_EMERGENCY (intent launched by lock screen emergency dialer)** @return {@link DisconnectCause#NOT_DISCONNECTED} if the call succeeded, and an appropriate* {@link DisconnectCause} if the call did not, describing why it failed.*/int processIntent() {...//第二次获取到numberString number = PhoneNumberUtils.getNumberFromIntent(intent, mContext);//判断是不是EmergencyNumberfinal boolean isPotentialEmergencyNumber = isPotentialEmergencyNumber(number);Log.v(this, "isPotentialEmergencyNumber = %s", isPotentialEmergencyNumber);// True for certain types of numbers that are not intended to be intercepted or modified// by third parties (e.g. emergency numbers).boolean callImmediately = false;if (Intent.ACTION_CALL.equals(action)) {if (isPotentialEmergencyNumber) {if (!mIsDefaultOrSystemPhoneApp) {//拦截第三方软件拨打的紧急号码Log.w(this, "Cannot call potential emergency number %s with CALL Intent %s "+ "unless caller is system or default dialer.", number, intent);launchSystemDialer(intent.getData());//弹出系统拨号盘return DisconnectCause.OUTGOING_CANCELED;} else {callImmediately = true;//紧急电话的标志}}} else if (Intent.ACTION_CALL_EMERGENCY.equals(action)) {if (!isPotentialEmergencyNumber) {//拦截在紧急拨号盘拨打的非紧急电话Log.w(this, "Cannot call non-potential-emergency number %s with EMERGENCY_CALL "+ "Intent %s.", number, intent);return DisconnectCause.OUTGOING_CANCELED;}callImmediately = true; //紧急电话的标志} else {Log.w(this, "Unhandled Intent %s. Ignoring and not placing call.", intent);return DisconnectCause.INVALID_NUMBER;}if (callImmediately) {//处理紧急号码Log.i(this, "Placing call immediately instead of waiting for "+ " OutgoingCallBroadcastReceiver: %s", intent);String scheme = isUriNumber ? PhoneAccount.SCHEME_SIP : PhoneAccount.SCHEME_TEL;boolean speakerphoneOn = mIntent.getBooleanExtra(TelecomManager.EXTRA_START_CALL_WITH_SPEAKERPHONE, false);int videoState = mIntent.getIntExtra(TelecomManager.EXTRA_START_CALL_WITH_VIDEO_STATE,VideoProfile.STATE_AUDIO_ONLY);mCallsManager.placeOutgoingCall(mCall, Uri.fromParts(scheme, number, null), null,speakerphoneOn, videoState);//快速处理紧急电话,但是并不return。// Don't return but instead continue and send the ACTION_NEW_OUTGOING_CALL broadcast// so that third parties can still inspect (but not intercept) the outgoing call. When// the broadcast finally reaches the OutgoingCallBroadcastReceiver, we'll know not to// initiate the call again because of the presence of the EXTRA_ALREADY_CALLED extra.}Log.i(this, "Sending NewOutgoingCallBroadcast for %s", mCall);//普通电话走这里if (isSkipSchemaParsing) {broadcastIntent(intent, handle.toString(), !callImmediately);} else {broadcastIntent(intent, number, !callImmediately);}return DisconnectCause.NOT_DISCONNECTED;}步骤15:在这里调用了 CallsManage.java 的placeOutgoingCall()方法,在这里会调用TelephonyUtil.java的shouldProcessAsEmergency()方法判断是不是紧急拨号,在这里也可以对紧急号码做定制。
 /*** Attempts to issue/connect the specified call.** @param handle Handle to connect the call with.* @param gatewayInfo Optional gateway information that can be used to route the call to the*        actual dialed handle via a gateway provider. May be null.* @param speakerphoneOn Whether or not to turn the speakerphone on once the call connects.* @param videoState The desired video state for the outgoing call.*/void placeOutgoingCall(Call call, Uri handle, GatewayInfo gatewayInfo, boolean speakerphoneOn,int videoState) {//判断是不是紧急电话boolean isEmergencyCall = TelephonyUtil.shouldProcessAsEmergency(mContext,call.getHandle());……if (isEmergencyCall) {// Emergency -- CreateConnectionProcessor will choose accounts automaticallycall.setTargetPhoneAccount(null);}if (call.getTargetPhoneAccount() != null || isEmergencyCall) {if (!isEmergencyCall) {updateLchStatus(call.getTargetPhoneAccount().getId());}// If the account has been set, proceed to place the outgoing call.// Otherwise the connection will be initiated when the account is set by the user.call.startCreateConnection(mPhoneAccountRegistrar);}    }
}
步骤16: call实例被传送到这里,终于派上用场了,进入 Call.java 的startCreateConnection()方法
 /*** Starts the create connection sequence. Upon completion, there should exist an active* connection through a connection service (or the call will have failed).** @param phoneAccountRegistrar The phone account registrar.*/void startCreateConnection(PhoneAccountRegistrar phoneAccountRegistrar) {Preconditions.checkState(mCreateConnectionProcessor == null);mCreateConnectionProcessor = new CreateConnectionProcessor(this, mRepository, this,phoneAccountRegistrar, mContext);mCreateConnectionProcessor.process();
}步骤17和18:继续把Call传递给 CreateConnectionProcessor.java ,并且new一个CreateConnectionProcessor实例,调用它的process()方法,通过attemptNextPhoneAccount()方法,调用到 service.createConnection ,这个service的类型是ConnectionServiceWrapper,它是IConnectionService的子类
private void attemptNextPhoneAccount() {...if (mResponse != null && attempt != null) {Log.i(this, "Trying attempt %s", attempt);ConnectionServiceWrapper service = mRepository.getService(attempt.connectionManagerPhoneAccount.getComponentName());if (service == null) {Log.i(this, "Found no connection service for attempt %s", attempt);attemptNextPhoneAccount();} else {mCall.setConnectionManagerPhoneAccount(attempt.connectionManagerPhoneAccount);mCall.setTargetPhoneAccount(attempt.targetPhoneAccount);mCall.setConnectionService(service);Log.i(this, "Attempting to call from %s", service.getComponentName());service.createConnection(mCall, new Response(service));}}
}
这样的话,Call对象就被传递到ConnectionServiceWrapper里了。
(读者最好先学习一下AIDL相关知识再继续阅读)
步骤20,21,22:这里调用了ConnectionServiceWrapper的父类ServiceBinder的bind()方法,先new一个ServiceConnection对象,然后绑定一个远程服务端服务。如果绑定成功的话,在ServiceBinder的内部类ServiceBinderConnection的onServiceConnected()方法就被调用。
在这里做了两件事:
1、步骤23和24:通过setBinder()方法,回调ConnectionServiceWrapper的setServiceInterface()方法,通过mServiceInterface = IConnectionService.Stub.asInterface(binder);
这行代码获取一个远程服务端的对象mServiceInterface 。
2、步骤25和26:再通过调用handleSuccessfulConnection()方法回调callback 的onSuccess()方法,也就又回到ConnectionServiceWrapper的createConnection()方法里。
步骤27:最后通过这一行mServiceInterface.createConnection();
,调用 ConnectionService.java 里mBinder的createConnection()方法。
private final IBinder mBinder = new IConnectionService.Stub() {...@Overridepublic void createConnection(PhoneAccountHandle connectionManagerPhoneAccount,String id,ConnectionRequest request,boolean isIncoming,boolean isUnknown) {SomeArgs args = SomeArgs.obtain();args.arg1 = connectionManagerPhoneAccount;args.arg2 = id;args.arg3 = request;args.argi1 = isIncoming ? 1 : 0;args.argi2 = isUnknown ? 1 : 0;mHandler.obtainMessage(MSG_CREATE_CONNECTION, args).sendToTarget();}...
}步骤28:在这里把传进来的参数封装到Message里再发送出去,然后在 ConnectionService.java 里mHandler的handleMessage()方法里处理这个Message
private final Handler mHandler = new Handler(Looper.getMainLooper()) {@Overridepublic void handleMessage(Message msg) {switch (msg.what) {case MSG_CREATE_CONNECTION: {SomeArgs args = (SomeArgs) msg.obj;try {final PhoneAccountHandle connectionManagerPhoneAccount =(PhoneAccountHandle) args.arg1;final String id = (String) args.arg2;final ConnectionRequest request = (ConnectionRequest) args.arg3;final boolean isIncoming = args.argi1 == 1;final boolean isUnknown = args.argi2 == 1;if (!mAreAccountsInitialized) {Log.d(this, "Enqueueing pre-init request %s", id);mPreInitializationConnectionRequests.add(new Runnable() {@Overridepublic void run() {createConnection(connectionManagerPhoneAccount,id,request,isIncoming,isUnknown);}});} else {createConnection(connectionManagerPhoneAccount,id,request,isIncoming,isUnknown);}} finally {args.recycle();}break;}...
}步骤29,30,31:在这里就把Message里的数据取出来,然后传递到ConnectionService的createConnection()方法里。接着onCreateOutgoingConnection()会被调用到,这个方法被TelephonyConnectionService重写,TelephonyConnectionService是ConnectionService的实例,所以进入 TelephonyConnectionService.java 的onCreateOutgoingConnection()方法,在这里第三次取出number,会再次判断是不是紧急号码,如果是的话,会turn on radio关闭飞行模式再拨打紧急电话。phone 对象和connection 对象也是在这时候被创建。
public Connection onCreateOutgoingConnection(PhoneAccountHandle connectionManagerPhoneAccount,final ConnectionRequest request) {...// 判断是不是紧急号码boolean isEmergencyNumber = PhoneNumberUtils.isLocalEmergencyNumber(this, number);// Get the right phone object from the account data passed in.//创建phone 对象final Phone phone = getPhoneForAccount(request.getAccountHandle(), isEmergencyNumber);if (phone == null) {Log.d(this, "onCreateOutgoingConnection, phone is null");return Connection.createFailedConnection(DisconnectCauseUtil.toTelecomDisconnectCause(android.telephony.DisconnectCause.OUT_OF_SERVICE, "Phone is null"));}...//创建connection对象final TelephonyConnection connection =createConnectionFor(phone, null, true /* isOutgoing */, null);if (connection == null) {return Connection.createFailedConnection(DisconnectCauseUtil.toTelecomDisconnectCause(android.telephony.DisconnectCause.OUTGOING_FAILURE,"Invalid phone type"));}connection.setAddress(handle, PhoneConstants.PRESENTATION_ALLOWED);connection.setInitializing();connection.setVideoState(request.getVideoState());if (useEmergencyCallHelper) {if (mEmergencyCallHelper == null) {mEmergencyCallHelper = new EmergencyCallHelper(this);}//打开Radio,关闭飞行模式mEmergencyCallHelper.startTurnOnRadioSequence(phone,new EmergencyCallHelper.Callback() {@Overridepublic void onComplete(boolean isRadioReady) {if (connection.getState() == Connection.STATE_DISCONNECTED) {// If the connection has already been disconnected, do nothing.} else if (isRadioReady) {//Radio已被打开,可以拨打紧急电话connection.setInitialized();placeOutgoingConnection(connection, phone, request);} else {Log.d(this, "onCreateOutgoingConnection, failed to turn on radio");connection.setDisconnected(DisconnectCauseUtil.toTelecomDisconnectCause(android.telephony.DisconnectCause.POWER_OFF,"Failed to turn on radio."));connection.destroy();}}});} else {placeOutgoingConnection(connection, phone, request);}   return connection;
}步骤32:在步骤30createConnection()方法的最后,调用了ConnectionServiceAdapter.java的handleCreateConnectionComplete()方法继续执行了一段流程,在创建Connection完成之后,会把Call的状态从CONNECTING更新为 DIALING。此段流程就不详说了。
步骤34~37:紧接着步骤33,最后通过phone.dial进行拨号,之后的流程就进入到Framework层了。
本文就写到这里。
如果想继续了解Framework层的流程,请看《Android 5.1 Phone MO(去电)流程分析(Framework层) 》
这篇关于Android 6.0 Phone MO(去电)流程分析(应用层)的文章就介绍到这儿,希望我们推荐的文章对编程师们有所帮助!


