本文主要是介绍优酷播放按钮动画原理解析,希望对大家解决编程问题提供一定的参考价值,需要的开发者们随着小编来一起学习吧!
一、动画过程分析
1、拆分动画
正常动画效果如下:
| 操作 | 现象 | 结论 |
|---|---|---|
| 放慢动画 | 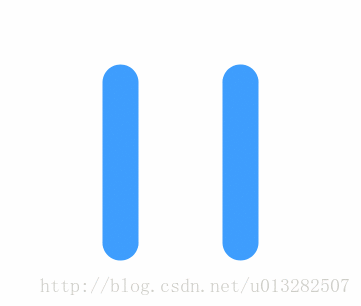 | 可以看出动画是由外侧的蓝色部分和中间的红色三角组成。 |
| 去掉旋转 | 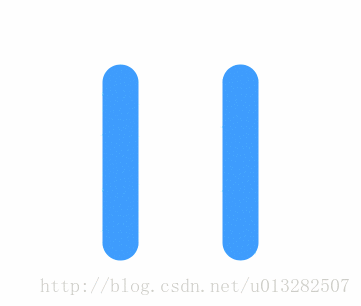 | 可以看出核心的东西就是竖和弧线的缩进、三角形的透明度变化。 |
| 只保一侧留竖线和圆弧 | 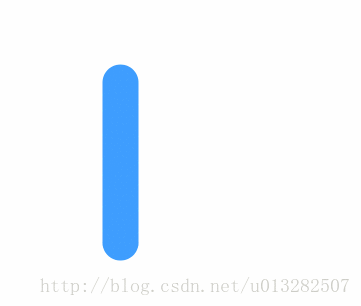 | 可以看出竖线的动画时长大概是圆弧动动画时长的一半;弧线的运动角度是π/2,两个弧线正好组成一个完整的圆环。 |
| 只保留三角动画 |  | 三角动画比较简单,就是两条半透明直线组成的三角,交叉处颜色会变深。然后添加改变其透明度的动画。 |
2、总结
动画是由四部分组成:
1、直线的缩放
2、弧线的缩放
3、三角的透明度变化
4、整体的旋转。
三个部分中执行时间最长的是弧线的缩放,找到这个很重要,这样就可以确定其他动画的开始时间和持续时间了,这个会在下面解释。
二、动画开发
1、竖线动画
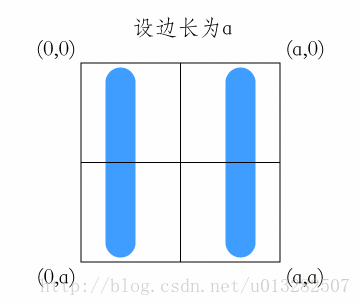
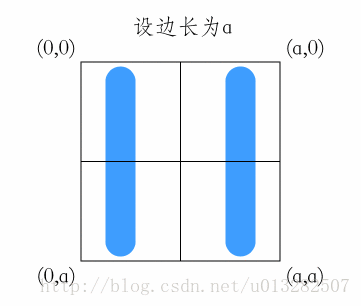
在开发这类动画的时候,一般是先在外面个框框和辅助线,帮助我们更好的完成开发。
这里设整个“容器”的边长是a,坐标系的原点为容器的左上角。
设从暂停—>播放的状态为正向,从播放—>暂停为逆向。
效果入下:
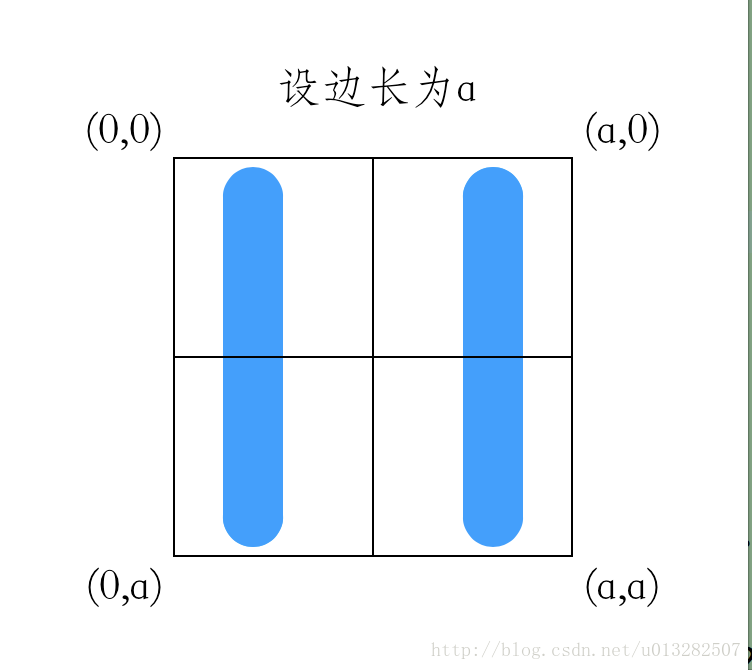
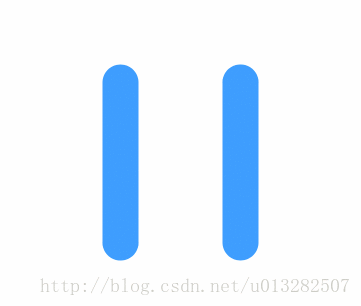
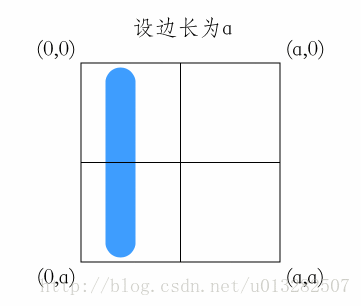
确定好坐标系后,我们来添加一条竖线。并且给竖线添加一个缩放的动画。
分析:这个动画的整体只不过是从暂停状态到播放状态的转换过程以及逆向过程。所以不能单单的通过bounds和position属性来绘制这个layer,需要用到的是CAShapeLayer+UIBezierPath来创建这个layer,并通过改变layer的strokeEnd属性进行对竖线的缩放操作。
设左侧直线的起点为:(a*0.2,a*0.9),终点为:(a*0.2,a*0.1)
(之所以这样设定是为了更贴近原版优酷按钮的效果,以及计算上的方便。)
- (void)addLeftLineLayer {CGFloat a = self.layer.bounds.size.width;//创建竖线路径UIBezierPath *path = [UIBezierPath bezierPath];[path moveToPoint:CGPointMake(a*0.2,a*0.9)];[path addLineToPoint:CGPointMake(a*0.2,a*0.1)];//创建竖线显示层_leftLineLayer = [CAShapeLayer layer];_leftLineLayer.path = path.CGPath;_leftLineLayer.fillColor = [UIColor clearColor].CGColor;_leftLineLayer.strokeColor = BLueColor.CGColor;_leftLineLayer.lineWidth = [self lineWidth];//终点类型为圆形_leftLineLayer.lineCap = kCALineCapRound;//连接点为圆形_leftLineLayer.lineJoin = kCALineJoinRound;[self.layer addSublayer:_leftLineLayer];
}
这样就添加了一条竖线,且竖线的起点在下,终点在上,是因为从暂停向播放转换时是向下缩放,逆向时是向上缩放。
为了代码的简洁性,写了一个单独的strokeEnd属性动画方法:
/**执行strokeEnd动画参数为执行时间,起始值,被添加的layer*/
- (CABasicAnimation *)strokeEndAnimationFrom:(CGFloat)fromValue to:(CGFloat)toValue onLayer:(CALayer *)layer duration:(CGFloat)duration{CABasicAnimation *strokeEndAnimation = [CABasicAnimation animationWithKeyPath:@"strokeEnd"];strokeEndAnimation.duration = duration;strokeEndAnimation.fromValue = @(fromValue);strokeEndAnimation.toValue = @(toValue);//这两个属性设定保证在动画执行之后不自动还原strokeEndAnimation.fillMode = kCAFillModeForwards;strokeEndAnimation.removedOnCompletion = NO;[layer addAnimation:strokeEndAnimation forKey:nil];return strokeEndAnimation;
}
在正向动画的过程中左侧竖线strokeEnd属性从1到0:
[self strokeEndAnimationFrom:1 to:0 onLayer:_leftLineLayer duration:animationDuration/2];在逆向动画的过程中左侧竖线strokeEnd属性从0到1:
[self strokeEndAnimationFrom:0 to:1 onLayer:_leftLineLayer duration:animationDuration/2];效果如下:
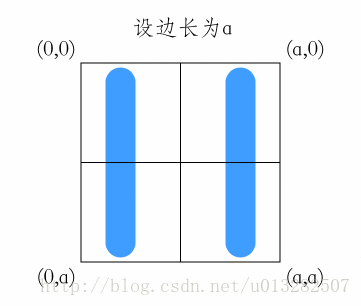
同理添加右侧竖线,注意右侧竖线的终点在下,起点在上。并添加动画后效果如下:
2、圆弧动画
再确定两条直线后,弧线就比较容易添加了,在正向动画过程中:
左侧弧线是从左侧竖线的起点逆时针到右侧竖线的起点
右侧弧线是从右侧竖线的起点顺时针到左侧竖线的起点
如下图所示,添加左侧弧线效果
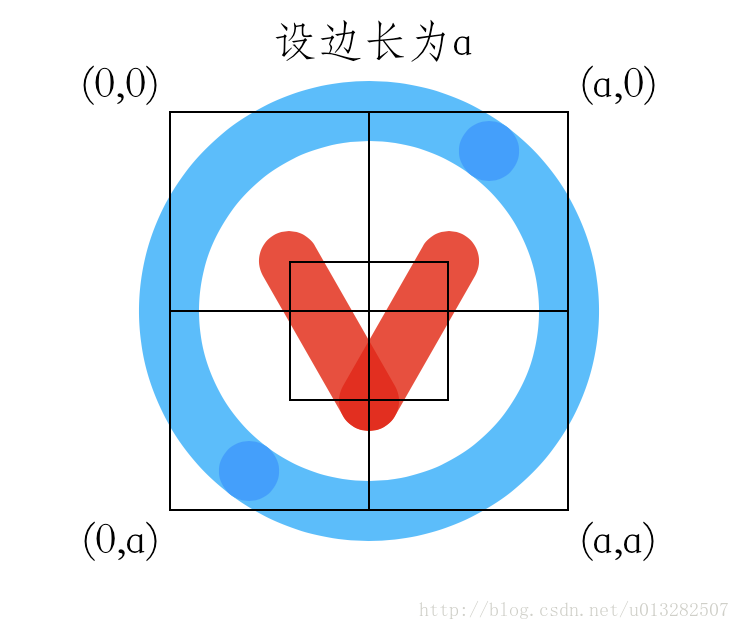
要绘制一个圆弧最好的方式是通过半径和起始角度+结束角度这种方式来确定的。
下面看一下示意图

如图所示,直角三角形的边长为0.3a、0.4a、0.5a,
所以根据反三角函数,角θ为acos(0.4a/0.5a)
通过这几点可以确定:
弧线的半径为0.5a
起始角度为:CGFloat startAngle = acos(4.0/5.0) + M_PI_2;
结束角度为:CGFloat endAngle = startAngle - M_PI;
添加弧线代码:
- (void)addLeftCircle {CGFloat a = self.layer.bounds.size.width;UIBezierPath *path = [UIBezierPath bezierPath];[path moveToPoint:CGPointMake(a*0.2,a*0.9)];CGFloat startAngle = acos(4.0/5.0) + M_PI_2;CGFloat endAngle = startAngle - M_PI;[path addArcWithCenter:CGPointMake(a*0.5, a*0.5) radius:0.5*a startAngle:startAngle endAngle:endAngle clockwise:false];_leftCircle = [CAShapeLayer layer];_leftCircle.path = path.CGPath;_leftCircle.fillColor = [UIColor clearColor].CGColor;_leftCircle.strokeColor = LightBLueColor.CGColor;_leftCircle.lineWidth = [self lineWidth];_leftCircle.lineCap = kCALineCapRound;_leftCircle.lineJoin = kCALineJoinRound;_leftCircle.strokeEnd = 0;[self.layer addSublayer:_leftCircle];
}
*这里注意弧线暂停时是隐藏的,所以strokeEnd为0;
正向过程执行strokeEnd动画:
[self strokeEndAnimationFrom:0 to:1 onLayer:_leftLineLayer duration:animationDuration];逆向过程:
[self strokeEndAnimationFrom:1 to:0 onLayer:_leftCircle duration:animationDuration ];*这里需要注意的是,弧线动画执行的时长是直线动画的二倍,即整个动画的执行时间就是弧线的动画时间animationDuration,所以直线的动画时间为:animationDuration/2。后面的旋转动画时长也是通过animationDuration确定的。
添加左右弧线后的动画效果:

3、三角动画
三角动画相对于之前的竖线和圆弧的动画比较简单,就是通过两条直线确定一个三角形
添加这个三角形前,还是先创建一个放置三角形的“容器”,然后通过这个容器确定三角形两条边的起点和终点,如图所示:
如图可以看出,三角两条边的起点为“容器”的底边中点,两条边的终点分别为“容器”的左上角及右上角。
代码如下:
- (void)addCenterTriangleLayer {CGFloat a = self.layer.bounds.size.width;//初始化容器_triangleCotainer = [CALayer layer];_triangleCotainer.bounds = CGRectMake(0, 0, 0.4*a, 0.35*a);_triangleCotainer.position = CGPointMake(a*0.5, a*0.55);_triangleCotainer.opacity = 0;_triangleCotainer.borderWidth = 1;[self.layer addSublayer:_triangleCotainer];//容器宽高CGFloat b = _triangleCotainer.bounds.size.width;CGFloat c = _triangleCotainer.bounds.size.height;//第一条边UIBezierPath *path1 = [UIBezierPath bezierPath];[path1 moveToPoint:CGPointMake(0,0)];[path1 addLineToPoint:CGPointMake(b/2,c)];CAShapeLayer *layer1 = [CAShapeLayer layer];layer1.path = path1.CGPath;layer1.fillColor = [UIColor clearColor].CGColor;layer1.strokeColor = RedColor.CGColor;layer1.lineWidth = [self lineWidth];layer1.lineCap = kCALineCapRound;layer1.lineJoin = kCALineJoinRound;layer1.strokeEnd = 1;[_triangleCotainer addSublayer:layer1];//第二条边UIBezierPath *path2 = [UIBezierPath bezierPath];[path2 moveToPoint:CGPointMake(b,0)];[path2 addLineToPoint:CGPointMake(b/2,c)];CAShapeLayer *layer2 = [CAShapeLayer layer];layer2.path = path2.CGPath;layer2.fillColor = [UIColor clearColor].CGColor;layer2.strokeColor = RedColor.CGColor;layer2.lineWidth = [self lineWidth];layer2.lineCap = kCALineCapRound;layer2.lineJoin = kCALineJoinRound;layer2.strokeEnd = 1;[_triangleCotainer addSublayer:layer2];
}
添加透明度动画
- (void)actionTriangleOpacityAnimationFrom:(CGFloat)from to:(CGFloat)to duration:(CGFloat)duration{CABasicAnimation *alphaAnimation = [CABasicAnimation animationWithKeyPath:@"opacity"];alphaAnimation.duration = duration; // 持续时间alphaAnimation.fromValue = @(from);alphaAnimation.toValue = @(to);alphaAnimation.fillMode = kCAFillModeForwards;alphaAnimation.removedOnCompletion = NO;[alphaAnimation setValue:@"alphaAnimation" forKey:@"animationName"];[_triangleCotainer addAnimation:alphaAnimation forKey:nil];
}
效果如下:
4、旋转动画
- (void)actionRotateAnimationClockwise:(BOOL)clockwise {//逆时针旋转CGFloat startAngle = 0.0f;CGFloat endAngle = -M_PI_2;CGFloat duration = 0.75 * animationDuration;//顺时针旋转if (clockwise) {startAngle = -M_PI_2;endAngle = 0.0;duration = animationDuration;}CABasicAnimation *roateAnimation = [CABasicAnimation animationWithKeyPath:@"transform.rotation"];roateAnimation.duration = duration; // 持续时间roateAnimation.fromValue = [NSNumber numberWithFloat:startAngle];roateAnimation.toValue = [NSNumber numberWithFloat:endAngle];roateAnimation.fillMode = kCAFillModeForwards;roateAnimation.removedOnCompletion = NO;[roateAnimation setValue:@"roateAnimation" forKey:@"animationName"];[self.layer addAnimation:roateAnimation forKey:nil];
}
最终效果如下:
三、小结
所有的看起来复杂的动画只要拆分成各个模块都是比较简单的,只要把各个模块做好在拼凑到一起就可以了。
四、代码
Github:https://github.com/mengxianliang/XLPlayButton
五、延伸
爱奇艺播放按钮动画解析
这篇关于优酷播放按钮动画原理解析的文章就介绍到这儿,希望我们推荐的文章对编程师们有所帮助!


