本文主要是介绍用VLD调查VC内存泄漏,希望对大家解决编程问题提供一定的参考价值,需要的开发者们随着小编来一起学习吧!
一、发现内存泄漏
使用VS2022,发现提示有内存泄漏,检查了所有的new,确认都有相应的delete释放。
Detected memory leaks!
Dumping objects ->
{1914} normal block at 0x0000021FDFFBD2E0, 48 bytes long.Data: <`               > 60 E2 FB DF 1F 02 00 00 CD CD CD CD CD CD CD CD
{1907} normal block at 0x0000021FDFFC22C0, 16 bytes long.Data: <8               > 38 F5 FA DF 1F 02 00 00 00 00 00 00 00 00 00 00
{1838} normal block at 0x0000021FDFFBCE10, 48 bytes long.Data: <                > 90 DF FB DF 1F 02 00 00 CD CD CD CD CD CD CD CD
{1831} normal block at 0x0000021FDFFCCE10, 16 bytes long.Data: <8               > 38 FB FA DF 1F 02 00 00 00 00 00 00 00 00 00 00
{1699} normal block at 0x0000021FDFFBCB00, 48 bytes long.Data: <@               > 40 BB F8 DF 1F 02 00 00 88 BB F8 DF 1F 02 00 00
{1692} normal block at 0x0000021FDFFCD450, 16 bytes long.Data: <8               > 38 F9 FA DF 1F 02 00 00 00 00 00 00 00 00 00 00
{1683} normal block at 0x0000021FDFFBD0B0, 48 bytes long.Data: <        X       > 10 AF F8 DF 1F 02 00 00 58 AF F8 DF 1F 02 00 00
{1676} normal block at 0x0000021FDFFCCDC0, 16 bytes long.Data: <                > B8 F4 FA DF 1F 02 00 00 00 00 00 00 00 00 00 00
Object dump complete.
手工很难排查,需要使用工具了。
二、安装VLD
从往上搜索下载VLD,Visual Leak Detector | Enhanced Memory Leak Detection for Visual C++
下载最新版,双击安装,默认路径在C:\Program Files (x86)\Visual Leak Detector\下。
三、设置编译环境
在主程序的stdafx.h文件中,afxwin.h头文件之前,加入vld.h头文件。
// 关闭 MFC 对某些常见但经常可放心忽略的警告消息的隐藏
#define _AFX_ALL_WARNINGS#include "vld.h"#include <afxwin.h>         // MFC 核心组件和标准组件
#include <afxext.h>         // MFC 扩展#include <afxdisp.h>        // MFC 自动化类
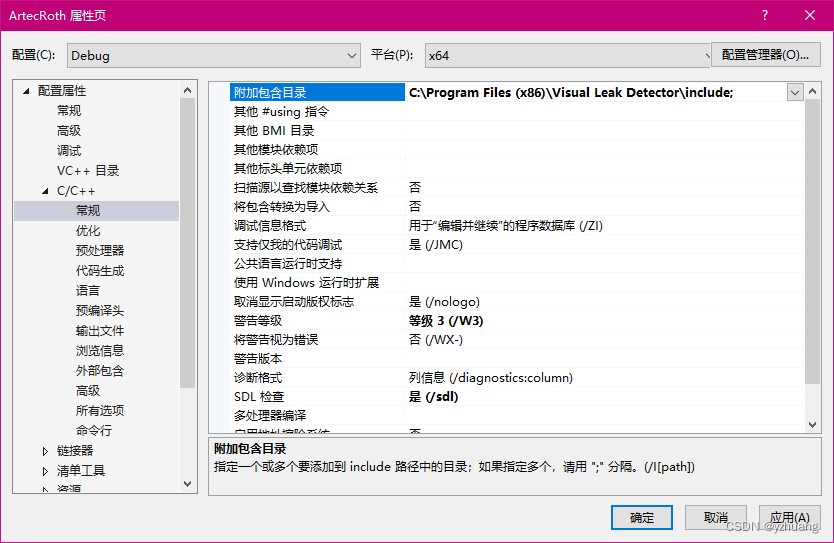
添加头文件路径:C:\Program Files (x86)\Visual Leak Detector\include;

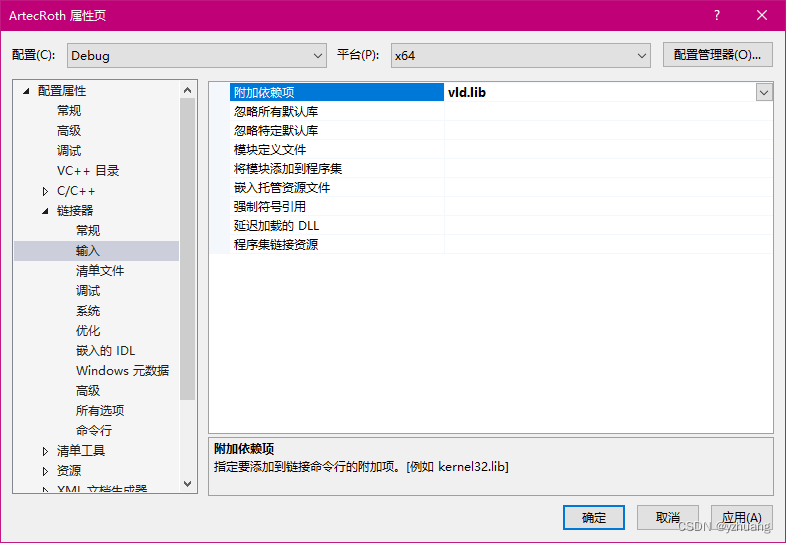
添加vld.lib类库应用

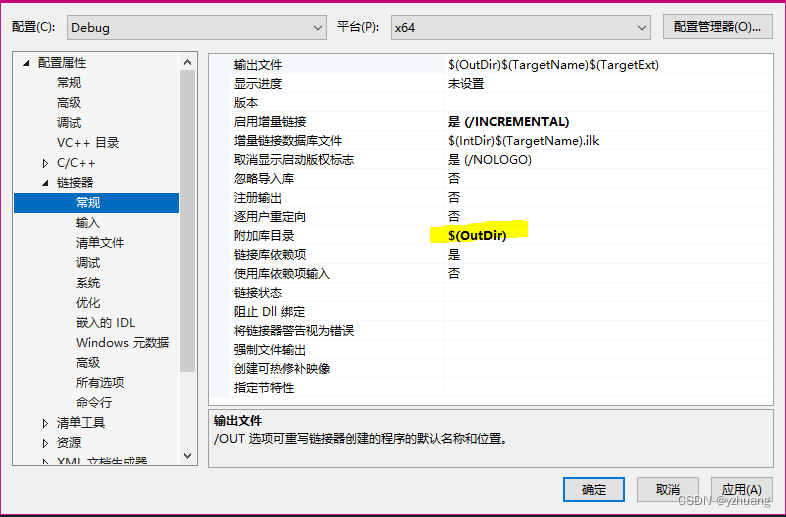
把C:\Program Files (x86)\Visual Leak Detector\bin\Win64和C:\Program Files (x86)\Visual Leak Detector\lib\Win64目录下的所有文件都复制到当前工程的.\x64\Debug路径下。添加类库的路径:

然后编译即可。
四、检测内存泄漏
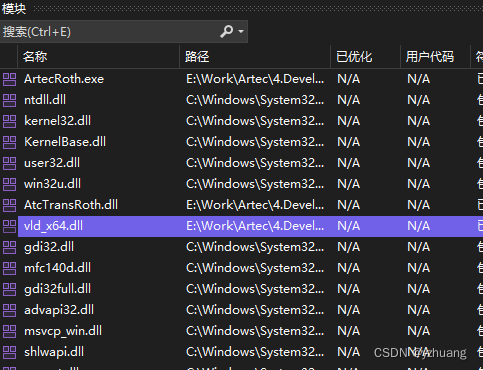
运行之后,查看程序加载的模块,确认vld类库加载成功

退出程序,显示VLD已经检测出内存泄漏,单给出的信息不明所以。。
WARNING: Visual Leak Detector detected memory leaks!
---------- Block 22 at 0x00000000962B2B80: 248 bytes ----------Leak Hash: 0x656456F1, Count: 1, Total 248 bytesCall Stack (TID 19720):ucrtbased.dll!malloc_dbg()mfc140d.dll!0x00007FFFC44332DA()mfc140d.dll!0x00007FFFC4579350()mfc140d.dll!0x00007FFFC457938D()mfc140d.dll!0x00007FFFC49A8C95()mfc140d.dll!0x00007FFFC4908D3A()mfc140d.dll!0x00007FFFC4908430()mfc140d.dll!0x00007FFFC4A2C92C()mfc140d.dll!0x00007FFFC4A26474()mfc140d.dll!0x00007FFFC4531F05()mfc140d.dll!0x00007FFFC451D9E0()mfc140d.dll!0x00007FFFC451C1B8()mfc140d.dll!0x00007FFFC444839B()mfc140d.dll!0x00007FFFC47A163E()E:\Work\09.SourceCode\ArtecRoth.cpp (71): ArtecRoth.exe!CArtecRothApp::InitInstance()mfc140d.dll!0x00007FFFC4A2CA3C()D:\a\_work\1\s\src\vctools\VC7Libs\Ship\ATLMFC\Src\MFC\appmodul.cpp (26): ArtecRoth.exe!WinMain()D:\a\_work\1\s\src\vctools\crt\vcstartup\src\startup\exe_common.inl (107): ArtecRoth.exe!invoke_main()D:\a\_work\1\s\src\vctools\crt\vcstartup\src\startup\exe_common.inl (288): ArtecRoth.exe!__scrt_common_main_seh() + 0x5 bytesD:\a\_work\1\s\src\vctools\crt\vcstartup\src\startup\exe_common.inl (331): ArtecRoth.exe!__scrt_common_main()D:\a\_work\1\s\src\vctools\crt\vcstartup\src\startup\exe_winmain.cpp (17): ArtecRoth.exe!WinMainCRTStartup()KERNEL32.DLL!BaseThreadInitThunk() + 0x14 bytesntdll.dll!RtlUserThreadStart() + 0x21 bytesData:00 00 00 00    00 00 00 00    08 80 30 96    28 01 00 00     ........ ..0.(...28 1A 10 6F    00 00 00 00    58 75 D0 C4    FF 7F 00 00     (..o.... Xu......28 0A 2E 96    28 01 00 00    FD 19 10 11    00 00 00 00     (...(... ........C8 75 D0 C4    FF 7F 00 00    88 2B 2B 96    28 01 00 00     .u...... .++.(...B3 14 10 C4    FF FF FF FF    98 75 D0 C4    FF 7F 00 00     ........ .u......10 0A 2E 96    28 01 00 00    20 1A 10 3E    00 00 00 00     ....(... ...>....A8 75 D0 C4    FF 7F 00 00    00 00 00 00    00 00 00 00     .u...... ........91 18 10 01    00 00 00 00    68 75 D0 C4    FF 7F 00 00     ........ hu......40 0A 2E 96    28 01 00 00    4B 1A 10 65    00 00 00 00     @...(... K..e....88 75 D0 C4    FF 7F 00 00    E8 2B 2B 96    28 01 00 00     .u...... .++.(...22 1A 10 3C    00 00 00 00    B8 75 D0 C4    FF 7F 00 00     "..<.... .u......E0 09 2E 96    28 01 00 00    50 1A 30 1B    00 00 00 00     ....(... P.0.....D8 75 D0 C4    FF 7F 00 00    70 0A 2E 96    28 01 00 00     .u...... p...(...12 17 30 FD    FF FF FF FF    E8 75 D0 C4    FF 7F 00 00     ..0..... .u......48 2C 2B 96    28 01 00 00    47 1A 30 53    00 00 00 00     H,+.(... G.0S....F8 75 D0 C4    FF 7F 00 00                                   .u...... ........
说明内存泄露没有发生在主程序中,把上面的编译设置从主程序中去除,在下面调用的dll工程中按同样的方法设置,多个dll工程的话,需要挨个试。
在dll工程中设置,重新编译后,运行结果果然找到了具体位置。
---------- Block 3747 at 0x00000000C2B10AD0: 48 bytes ----------Leak Hash: 0x60ABD716, Count: 1, Total 48 bytesCall Stack (TID 20788):mfc140d.dll!0x00007FFFC4093200()C:\Program Files\Microsoft Visual Studio\2022\Professional\VC\Tools\MSVC\14.34.31933\include\xmemory (78): AtcTransRoth.dll!std::_Default_allocate_traits::_Allocate()C:\Program Files\Microsoft Visual Studio\2022\Professional\VC\Tools\MSVC\14.34.31933\include\xmemory (235): AtcTransRoth.dll!std::_Allocate<16,std::_Default_allocate_traits,0>() + 0xC bytesC:\Program Files\Microsoft Visual Studio\2022\Professional\VC\Tools\MSVC\14.34.31933\include\xmemory (836): AtcTransRoth.dll!std::allocator<TransCoil *>::allocate()C:\Program Files\Microsoft Visual Studio\2022\Professional\VC\Tools\MSVC\14.34.31933\include\vector (1673): AtcTransRoth.dll!std::vector<TransCoil *,std::allocator<TransCoil *> >::_Reallocate_exactly() + 0x10 bytesC:\Program Files\Microsoft Visual Studio\2022\Professional\VC\Tools\MSVC\14.34.31933\include\vector (1750): AtcTransRoth.dll!std::vector<TransCoil *,std::allocator<TransCoil *> >::reserve()E:\Work\AtcArray.h (114): AtcTransRoth.dll!vector<TransCoil *>::Reserve() + 0x13 bytesE:\Work\AtcRothData.cpp (182): AtcTransRoth.dll!CAtcRothData::GetCoils()E:\Work\AtcRothData.cpp (831): AtcTransRoth.dll!CAtcRothData::CreateElement() + 0x1B bytesE:\Work\AtcRothData.cpp (616): AtcTransRoth.dll!CAtcRothData::LoadSchemaFromXml() + 0x13 bytesE:\Work\AtcRothData.cpp (34): AtcTransRoth.dll!CAtcRothData::LoadData() + 0x21 bytesE:\Work\ArtecRothDlg.cpp (207): ArtecRoth.exe!CArtecRothDlg::OnEnChangeMfceditbrowse1() + 0x41 bytesmfc140d.dll!0x00007FFFC44A21CC()mfc140d.dll!0x00007FFFC44A1A06()mfc140d.dll!0x00007FFFC4508F2C()从提示的信息上看是vector申请的内存没有释放。通过仔细查看, 确认是TransWindingElementCoil 结构体中出现了内存泄漏,问题出在了结构体的继承上。
struct TransWindingElement
{CString chName;CString chLabel;AemTransElement emType;AemTransJoint emJoint;
};struct TransWindingElementCoil : TransWindingElement
{vector<TransCoil*> arCoil;
};
在delete释放TransWindingElementCoil 对象是,由于保存的是父结构体的指针,只调用了TransWindingElement的析构函数,而没有调用TransWindingElementCoil 对象的析构函数,造成了vector对象所在内存空间的泄漏。
五、处理方法
给父结构体加虚析构函数
struct TransWindingElement
{virtual ~TransWindingElement() {}CString chName;CString chLabel;AemTransElement emType;AemTransJoint emJoint;
};struct TransWindingElementCoil : TransWindingElement
{vector<TransCoil*> arCoil;
};
运行再无内存泄漏。
六、结束
在编程是需要时刻观察内存泄漏信息,出现内存泄漏要及时处理。堆积时间越长,则越难处理,尤其在运行计算的大循环中,调式内存泄漏极其麻烦。
这篇关于用VLD调查VC内存泄漏的文章就介绍到这儿,希望我们推荐的文章对编程师们有所帮助!


