本文主要是介绍IOS Core Data框架初探,希望对大家解决编程问题提供一定的参考价值,需要的开发者们随着小编来一起学习吧!
在IOS系统中已经集成了关系型数据库SqLite3数据库,但是由于在OC中直接操作C语言风格的SqLite3相对繁琐,因此Apple贴心的提供了一个ORM(Object Relational Mapping对象关系映射)框架——Core Data让我们在程序中以面向对象的方式,操作数据库。Core Data框架提供的功能相当强大,属于入门容易精通难的东西,值得我们用心专研。现在,就先记录一下我对该框架的初步认识。
有关Core Data的基本概念
由于Core Data是一个封装了SqLite3操作的面向对象OC框架,因此,先了解其相关的基本概念,是必要的。
Core Data中,比较重要的有如下几个概念:
1、Persistent store。持久化存储,或者是我们一般意义上的数据库,持久化存储数据的地方,即使App关闭或设备关闭,其内容也不会丢失。(我们可以看到其存储在设备上的文件,一般是在Document目录下的.sqlite文件)。
2、ManagedObject。Core Data将持久化存储中被存储数据抽象为ManagedObject(托管)对象,每一条被存放的数据,可以看做一个Managed Object对象(通常是表的一个条目,而对于一张表来说,可以看做是Managed Object的集合,Managed Objects)。
3、Managed Object Context。托管对象上下文。一提起上下文这个概念,总感觉很抽象。我们可以这么理解,存储在Persistent Store中的数据,其是存在于设备硬件上的,不能直接与其交互,需要将各种Managed Object加载到内存中,而Managed Object Context则代表了这么一块内存,它提供了我们与Managed Object交互的场所。因此,在程序中,我们对Manged Object的操作,多也是通过Managed Object Context对象实现的。
4、Persistent Store Coordinator。从其名字来看,就是一个中间协调转换的角色。在Core Data框架中,Apple为我们在Persistent Store和Managed Object Context中间又加了一个Persistent Store Coordinator层,用于调整配置数据由内存(Managed Object Context)到物理存储(Persistent Store)的行为。好高大上的样子,有待研究。
5、Entity。实体,我们可以在Xcode中配置添加Entity,并添加其属性(字段)以及和其他Entity的关系。这对应着我们数据库中的表的概念。
6、Attribute。Entity的属性,就是表的字段,可以配置字段的数据类型,最大最小值默认值啥的。
7、Relationship。Entity间的关系,对应于数据库中的关系。
8、Fetch Request。在数据库中,我们可以通过查询语句来将数据从数据库中读出。而Core Data作为面向对象的框架,则将其封装为了Fetch Request类,并通过配置谓语Predicate(查询条件)来获取对应的Managed Objects。
9、Predicate。如前所述,用于配置Fetch Request对象,来按条件查询获取Managed Objects。
10、Sort Descriptor。改类用于帮助我们对查询到的Managed Object进行排序。
11、Managed Object Model。可以是一个不常用到的概念。我们可以通过Xcode的数据模型编辑器来创建Entity及配置其属性与关系。而Manage Object Model则负责在运行时加载及表示我们之前定义的数据模型。通常不需要我们之间与Manged Object Model交互,而是有Core Data类在后台使用。
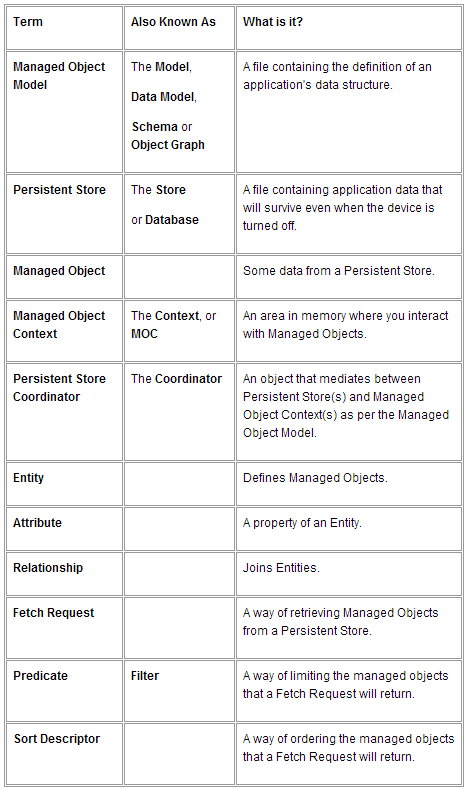
下面的一张表很好的解释了这些概念的定义,摘至老外的博客:
Core Data的使用实例
OK,了解了Core Data的基本概念后,我们就看看Core Data是如何在XCode中使用的。
下面就用《精通IOS开发》中的一个例子,来简单的介绍一下Core Data的使用。
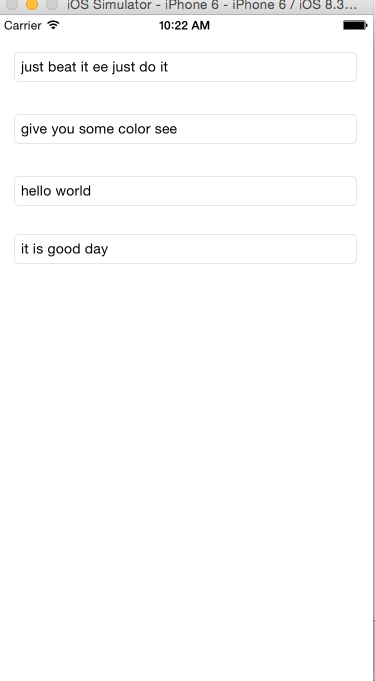
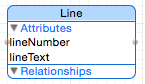
例子很简单,就是一个App里面有四个Text Field,用于我们输入四行文字,而对应的Entity(数据库表)叫做Line,其有两个属性lineNumber(Integer16),lineText(String),分别记录Text Field的行号与显示内容。当我们在Text Field中输入内容后,程序就会在App进入后台或关闭时,对文字内容进行永久性存储,这样,下次打开App时,我们就可以在数据库中读出文字并显示出来。
程序界面及Entity如下图:
在工程中添加对Core Data的支持
若要在工程中添加对Core Data的支持,还是需要做一番配置的。不过XCode为我们贴心的提供了模板,只要在创建工程时,勾选对Core Data的支持,生成的代码中就会自动添加必要的对于Core Data的配置与代码。
当我们勾选了支持Core Data功能后,XCode工程中会多出一个.xcdatamodeld文件,这就是用于定义Entity的数据模型编辑器,先不去理会。
而在Appdelegate文件中,会发现多了几行代码,这就是XCode为我们方便使用Core Data生成的代码,分别用
#pragma mark Core Data stack
#pragma mark Core Saving support
来mark。
其在.h中的声明如下
@property (readonly, strong, nonatomic) NSManagedObjectContext *managedObjectContext;
@property (readonly, strong, nonatomic) NSManagedObjectModel *managedObjectModel;
@property (readonly, strong, nonatomic) NSPersistentStoreCoordinator *persistentStoreCoordinator;- (void)saveContext;
- (NSURL *)applicationDocumentsDirectory;
主要是为我们声明了Core Data中三个重要的类ManagedObjectContext, ManagedObjectModel, PersistentStoreCoordinator的对象属性。这三个属性可以说是全局性的,我们可以在程序的任何地方通过sharedApplication.delegate.属性名称来将我们的数据进行持久化操作。(注意,由于是全局性的属性,我们要注意线程安全的问题,ManagedObjectContext并不是线程安全的)
同时,XCode还定义了保存数据到永久性存储的saveContext方法。
Xcode为每个属性,都定义了GETTER方法,我们先大致看一下。
- (NSManagedObjectContext *)managedObjectContext {<span style="color:#ff6666;">// Returns the managed object context for the application (which is already bound to the persistent store coordinator for the application.)</span>if (_managedObjectContext != nil) {return _managedObjectContext;}NSPersistentStoreCoordinator *coordinator = [self persistentStoreCoordinator];if (!coordinator) {return nil;}_managedObjectContext = [[NSManagedObjectContext alloc] init];<span style="color:#ff6666;">[_managedObjectContext setPersistentStoreCoordinator:coordinator]</span>;return _managedObjectContext;
}
以上是ManagedObjectContex属性的Getter方法,可以看到,_managedObjectContext通过PersistentStoreCoordinator进行了配置后,才返回给使用者的。
那么,PersistentStoreCoordinator都做了哪些配置呢,我们再来看看PersistentStoreCoordinator属性的Getter方法
- (NSPersistentStoreCoordinator *)persistentStoreCoordinator {// The persistent store coordinator for the application. This implementation creates and return a coordinator, having added the store for the application to it.if (_persistentStoreCoordinator != nil) {return _persistentStoreCoordinator;}// Create the coordinator and store_persistentStoreCoordinator = [[NSPersistentStoreCoordinator alloc] initWithManagedObjectModel:<span style="color:#ff6666;">[self managedObjectModel]];</span>NSURL *storeURL = [[self applicationDocumentsDirectory] URLByAppendingPathComponent:@"Core_Data_Persistence.sqlite"];NSError *error = nil;NSString *failureReason = @"There was an error creating or loading the application's saved data.";if (![_persistentStoreCoordinator <span style="color:#ff6666;">addPersistentStoreWithType:NSSQLiteStoreType configuration:nil URL:storeURL options:nil error:&error]) {</span>// Report any error we got.NSMutableDictionary *dict = [NSMutableDictionary dictionary];dict[NSLocalizedDescriptionKey] = @"Failed to initialize the application's saved data";dict[NSLocalizedFailureReasonErrorKey] = failureReason;dict[NSUnderlyingErrorKey] = error;error = [NSError errorWithDomain:@"YOUR_ERROR_DOMAIN" code:9999 userInfo:dict];// Replace this with code to handle the error appropriately.// abort() causes the application to generate a crash log and terminate. You should not use this function in a shipping application, although it may be useful during development.NSLog(@"Unresolved error %@, %@", error, [error userInfo]);abort();}return _persistentStoreCoordinator;
}
可以看出 PersistentStoreCoordinator的GETTER函数做了两件事情:
1、通过self managedObjectModel初始化了自己。
2、通过addPersistentStroeWithType方法,将一个指定类型与位置的PersistentStore与PersistentStoreCoordinator绑定。这里绑定的PersistentStore就是我们将数据存储的地方。可以看到其是NSSQLiteStoreType类型的,而存储位置则默认在Document目录下,其物理文件名字为Core_Data_Persistentce.sqlite。这里我们可以手动修改其存储路径与文件名称。
而用于初始化PersistentStoreCoordinator的managedObjectModel又是如何呢,让我们看它的GETTER函数
- (NSManagedObjectModel *)managedObjectModel {// The managed object model for the application. It is a fatal error for the application not to be able to find and load its model.if (_managedObjectModel != nil) {return _managedObjectModel;}NSURL *modelURL = [[NSBundle mainBundle] URLForResource:@"Core_Data_Persistence" withExtension:@"momd"];_managedObjectModel = [[NSManagedObjectModel alloc] initWithContentsOfURL:modelURL];return _managedObjectModel;
}
Managed Object Model的初始化方法很简单,就是通过指定数据模型文件momd的路径,通过其文件来初始化自己。关于Managed Object Model也不是很了解,就先知道这些吧。
OK,以上就是Xcode为我们使用Core Data自动生成的三个属性及对应的GETTER方法,而在使用中,我们多是通过Managed Object Context属性来对持久性存储做操作。
同时,Xcode还为数据到持久性存储保存提供了方法:saveContext。让我们也看一下其实现
<span style="font-size:14px;">- (void)saveContext {NSManagedObjectContext *managedObjectContext = self.managedObjectContext;if (managedObjectContext != nil) {NSError *error = nil;if ([managedObjectContext hasChanges] && ![managedObjectContext save:&error]) {// Replace this implementation with code to handle the error appropriately.// abort() causes the application to generate a crash log and terminate. You should not use this function in a shipping application, although it may be useful during development.NSLog(@"Unresolved error %@, %@", error, [error userInfo]);abort();}}
}</span>
saveContext方法主要是通过调用self.managedObjectContext的save方法来保存数据的,同时,它还顺带检查了内容是否有改变,如没有改变,则不执行存储操作。
另外,还有一个小细节,就是在AppDelegate的程序退出相应函数
<span style="font-size:14px;">- (void)applicationWillTerminate:(UIApplication *)application {// Called when the application is about to terminate. Save data if appropriate. See also applicationDidEnterBackground:.// Saves changes in the application's managed object context before the application terminates.[self saveContext];
}</span>
XCode自动给我们加上了一句[self saveContext],保证程序即将退出时,我们的数据会保存到持久化存储中。
在代码中运用Core Data保存/提取数据
在Core Data中读取数据
要读取数据,
首先,要制定一个NSFetchRequest对象,让该对象来描述我们想要什么数据。
然后,将NSFetchRequest对象作为参数传给NSManagedObjectContext对象,让其执行查找,并返回NSArray结果。
例如,获取Line表中所有的数据:
AppDelegate *delegate = [UIApplication sharedApplication].delegate;NSManagedObjectContext *context = delegate.managedObjectContext;NSFetchRequest *request = [[NSFetchRequest alloc] initWithEntityName:kLineEntityName];NSError *error;NSArray *objects = [context executeFetchRequest:request error:&error];if (objects == nil) {NSLog(@"There was an Error!!");}
查询的返回值会以 NSManagedObject数组的形式保存在objects中。
下面,我们就遍历这个数组,并获取每一个数据条目的值,注意,因为Core Data将保存的每一份数据条目都抽象为NSManagedObject类对象,因此我们可以指明NSArray的数组成员为NSManagedObject类型:
for (NSManagedObject *oneObject in objects ) {int lineNum = [[oneObject valueForKey:kLineNumberKey] intValue];NSString *lineText = [oneObject valueForKey:kLineTextKey];UITextField *theField = self.lineFields[lineNum];theField.text = lineText;}若要查询指定的数据库条目,则需要为NSFetchRequest对象指定查询的谓词(Predicate),例如要获取指定的lineNum的数据条目,则可以如下配置:
<span style="white-space:pre"> </span>NSFetchRequest *request = [[NSFetchRequest alloc] initWithEntityName:kLineEntityName];NSPredicate *pred = [NSPredicate predicateWithFormat:@"%K = %d", kLineNumberKey, i];[request setPredicate:pred]; // 设置谓词NSArray *objects = [context executeFetchRequest:request error:&error];if (objects == nil) {NSLog(@"There is something wrong");}将数据通过Core Data保存到持久化存储中
将数据写入到持久化存储中,就是在Core Data中将数据插入到被抽象化为实例Entity中(在这里Entity可以看做一张表,存储Managed Objects)。那么,操作就是:将一个NSManaged Object对象,插入到Entity中。
实例代码如下,我们先将NSManaged Object通过
insertNewObjectForEntityForName
方法插入到Entity,同时要注意指定你是在那个交互内存区(就是指明Managed Object Context对象)的Entity。
然后,我们在设置NSManagedObject对象具体的值,
最后,不要忘记使用saveContext方法保存该对象。
NSManagedObject *theLine = nil;// 将NSManagedObject插入到Entity中theLine = [NSEntityDescription insertNewObjectForEntityForName:kLineEntityName inManagedObjectContext:context];//设置内容 [theLine setValue:[NSNumber numberWithInt:i] forKey:kLineNumberKey];[theLine setValue:theFiled.text forKey:kLineTextKey];// 保存[delegate saveContext];
参考资料
http://www.informit.com/articles/article.aspx?p=2160906
这篇关于IOS Core Data框架初探的文章就介绍到这儿,希望我们推荐的文章对编程师们有所帮助!


