本文主要是介绍前端DatePicker组件设置默认日期并限制可选日期范围,希望对大家解决编程问题提供一定的参考价值,需要的开发者们随着小编来一起学习吧!
前言
在前端 element-ui 组件库中有一款组件叫做 DatePicker,是一个灵活选择日期的封装组件,它既能选择单个日期,也能选择一个日期范围(两个日期的组合),后者的应用场景主要有以下两类:1、作为一个搜索条件来查询特定日期范围内的数据;2、作为一个表单用来输入一份协议等文件的生效日期和结束日期并提交到后台。
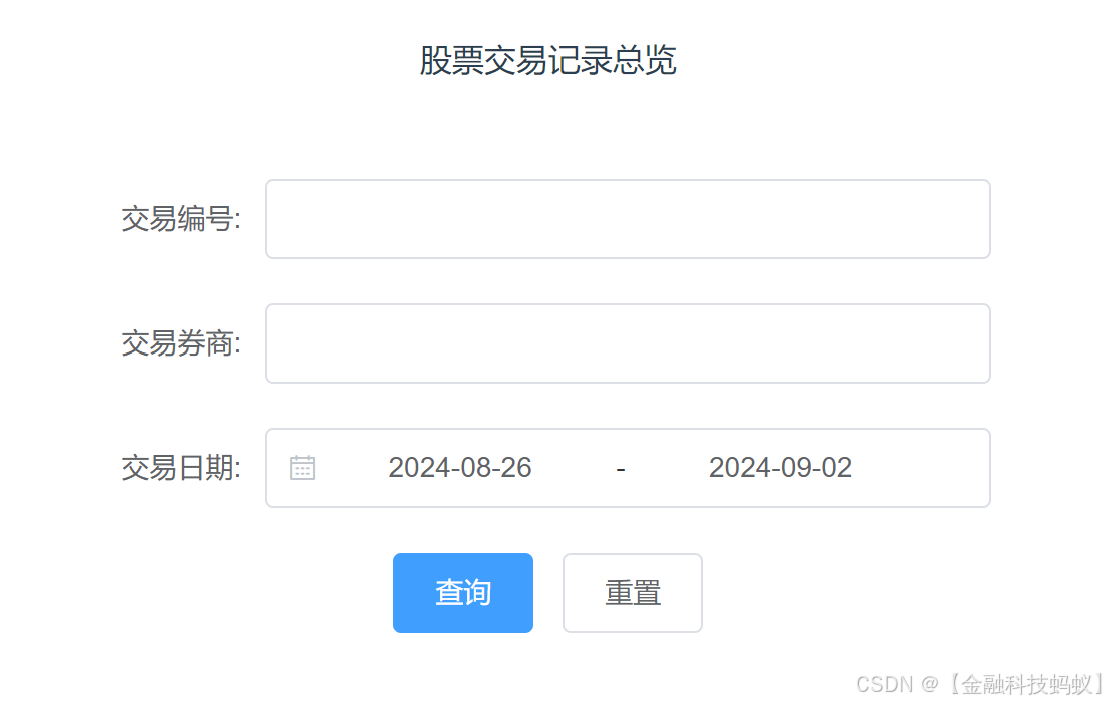
经验告诉我们,业务同事也好产品经理也罢基本都会要求前端开发者在进入涉及选择日期的页面时,必须给日期赋个初始值,一来省去了用户手动选择日期范围的时间,二来避免了做查询操作时因为日期为空而进行的全表查询,导致查询速度慢,用户体验感差。鉴于此,本文将讲述在使用DatePicker 组件时,如何一进页面就给日期设置一个默认范围,并且限制用户可以选择查询日期的范围,主要功能如下(全网最全):
1、首次进入页面设置默认查询日期范围为近 7 天(若要默认展示其他天数读者可自行修改代码)
2、日期设置为不可清除、不可编辑,防止用户恶意输入导致全表查询,影响效率
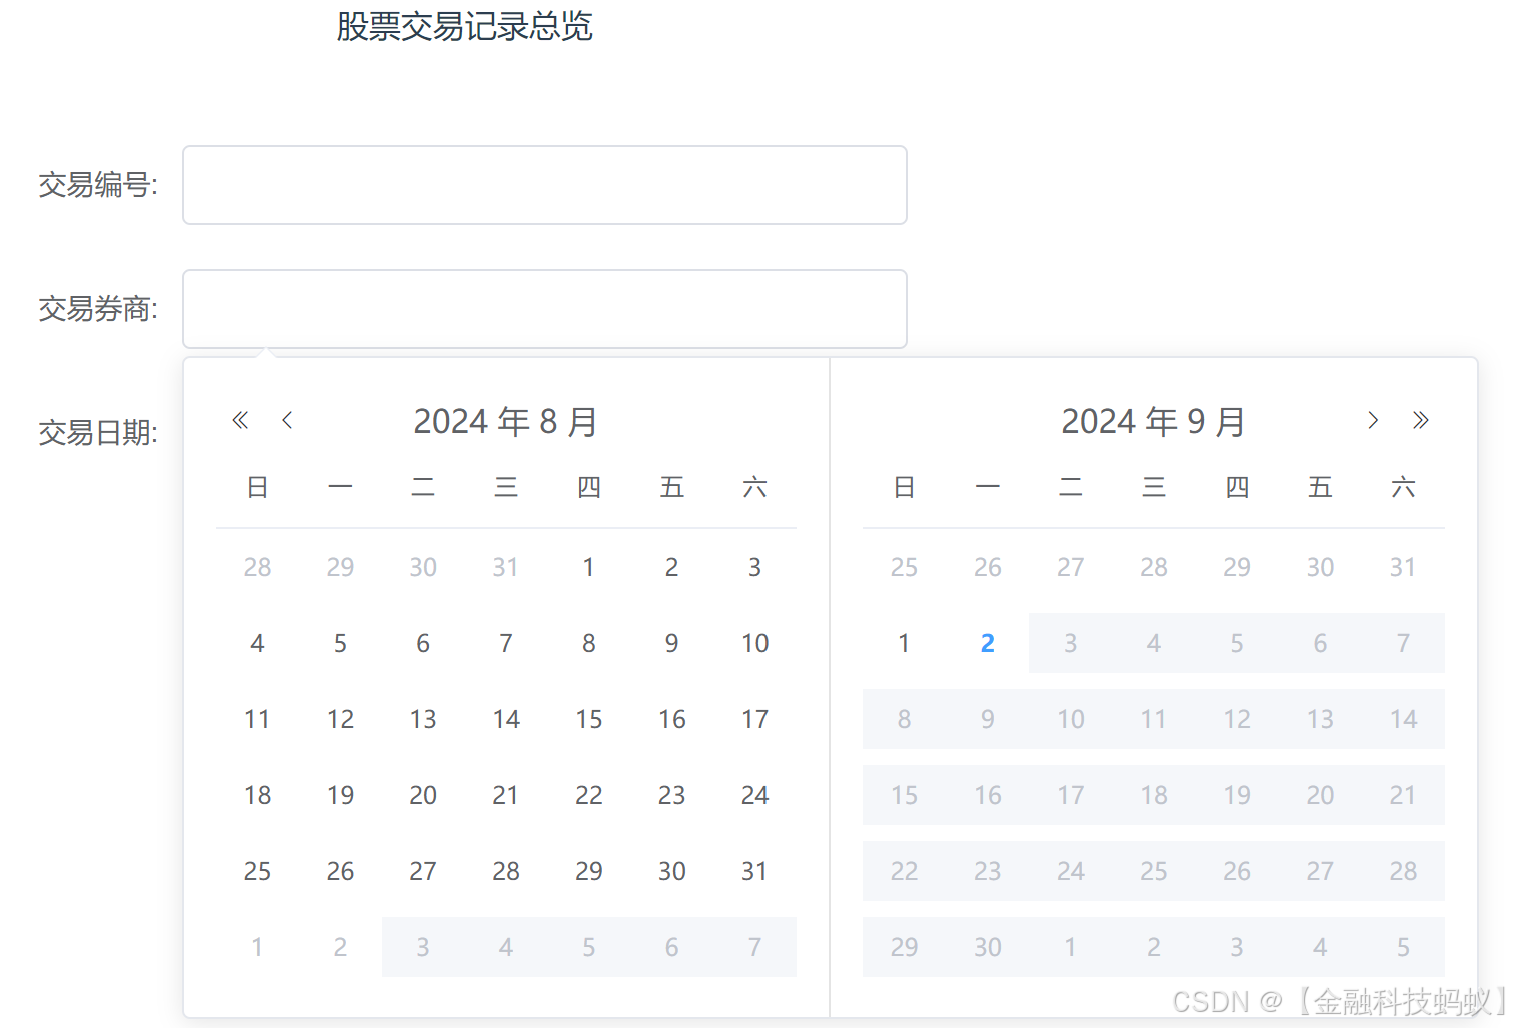
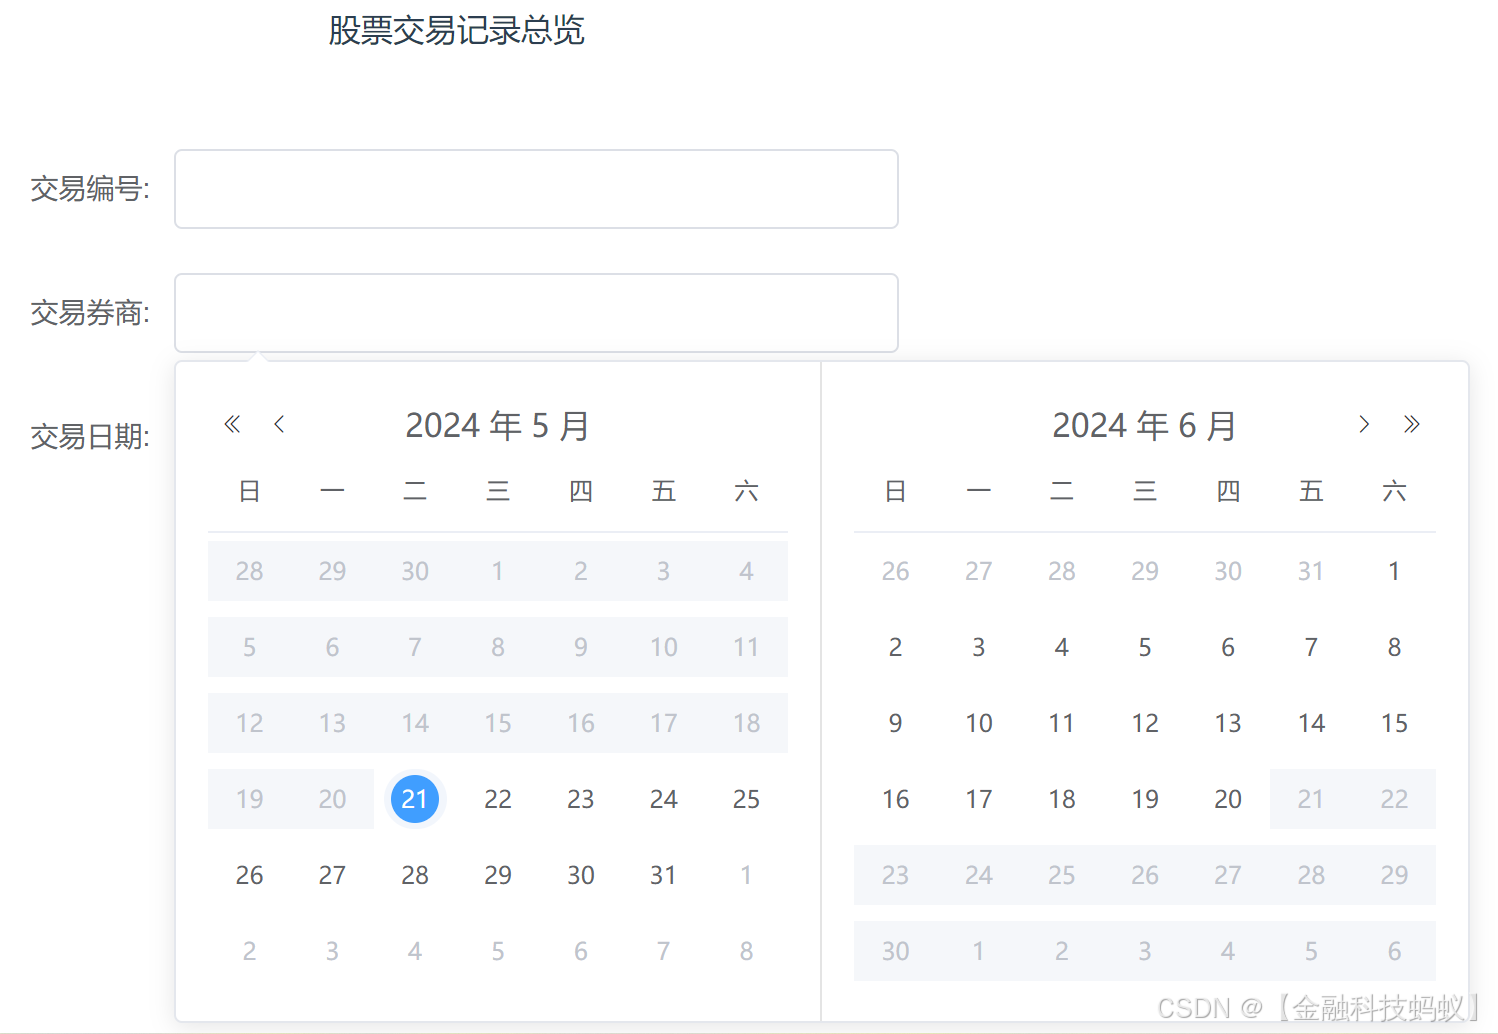
3、限制可选日期范围:以下日期均置灰不可选:
(1)大于当前系统日期(不可能查询未来的数据);
(2)小于选中的第一个日期(即起始日期)的日期(大部分作者都没考虑到这一点,目的是强制使第一次选择的日期为起始日期,第二次选择的日期必须大于起始日期,防止用户先选择结束日期再往前选择起始日期,这会造成用户可以查询任意日期范围的数据);
(3)大于选中的第一个日期(即起始日期)+30 天后的日期
4、选中第一个日期后未选择第二个日期就点击空白处关闭选择器,再次点击日期框选择日期时必须正确展示日期的可选范围(这一点同样很多作者没有考虑到,实现方法就是在 el-date-picker 元素中添加 @blur 事件去刷新日期)
效果图


完整代码
<template><div><p>股票交易记录总览</p><el-form ref="searchFormRef" :model="searchForm" label-width="80px"><el-form-item prop="businessNo" label="交易编号:"><el-input v-model="searchForm.businessNo"></el-input></el-form-item><el-form-item prop="brokerName" label="交易券商:"><el-input v-model="searchForm.brokerName"></el-input></el-form-item><el-form-item label="交易日期:"><el-date-pickerv-model="tradeDate"type="daterange":editable="false":clearable="false"start-placeholder="Start Date"end-placeholder="End Date"format="yyyy-MM-dd"value-format="yyyy-MM-dd":picker-options="pickerDisabled"@blur="refreshDate"></el-date-picker></el-form-item></el-form><span slot="footer"><el-button type="primary" @click="search">查询</el-button><el-button @click="resetForm">重置</el-button></span></div>
</template><script>
import { DatePicker } from 'element-ui'
export default {components: { DatePicker },data() {return {tradeDate: '', // 交易日期,格式:['2024-08-26','2024-09-02']choiceDate: '', // 选择的第一个日期,即起始日期,格式为时间戳searchForm: {businessNo: '',brokerName: '',startDate: '', // 起始日期,格式:['2024-08-26']endDate: '', // 结束日期,格式:['2024-09-02']},pickerDisabled: {// 选中日期时触发的方法onPick: ({ maxDate, minDate }) => {this.choiceDate = minDate.getTime()// 当选择终止日期后将选择日期置空,防止重新输入日期时无法选择if (maxDate) {this.choiceDate = ''}},// 筛选出置灰不可选的日期disabledDate: (time) => {const now = new Date().getTime() // 当前日期if (this.choiceDate) {// 限制查询的时间范围最多是一个月(30天来算),乘以1000是时间戳与秒的转换积数const timeRange = 30 * 24 * 3600 * 1000const maxTime = this.choiceDate + timeRange// 对大于当前日期或者大于(选择的起始日期+30天)或者小于选择的起始日期的日期置为灰不可选// 注:小于选择的起始日期的日期也置为灰的原因是强制使第一次选择的日期为起始日期,第二次选择的日期必须大于起始日期,防止用户先选择结束日期再往前选择起始日期,这会造成用户可以查询任意日期范围的数据return (time.getTime() > now || time.getTime() > maxTime || time.getTime() < this.choiceDate)} else {// 如果还未选择起始日期,则只将大于当前日期的日期置为灰return time.getTime() > now}},},}},mounted() {// 初始化交易日期,格式['2024-08-23','2024-08-30']this.tradeDate = this.initTradeDate()// 首次进入页面自动做一次查询操作this.search()},methods: {// 刷新日期,避免输入单个日期就关闭选择器然后再重新打开选择器时日期置灰出现错误的问题refreshDate() {if (this.choiceDate) {// 如果choiceDate有值则表明只选择了单个日期,此时需要初始化日期并将choiceDate置空this.tradeDate = this.initTradeDate()this.choiceDate = ''}},initTradeDate() {let currentDate = new Date() // 当前日期let beginDate = new Date(currentDate.getTime() - 7 * 24 * 3600 * 1000) // 7天前的日期// getMonth获取的月份从0开始,1月则为0,12月则为11,故需要加1后做判断,如果月份为个位数需在前面补0let beginMonth = beginDate.getMonth() + 1 > 9 ? beginDate.getMonth() + 1 : '0' + (beginDate.getMonth() + 1)// getDate获取的号数从1开始,1号则为1,31号则为31,故不需要加1做判断,如果号数为个位数同样需在前面补0let beginDay = beginDate.getDate() > 9 ? beginDate.getDate() : '0' + beginDate.getDate()// 日期格式转换,Date类型转换为字符串String类型('2024-08-26')beginDate = beginDate.getFullYear() + '-' + beginMonth + '-' + beginDay// 对当前日期做同样处理let currentMonth = currentDate.getMonth() + 1 > 9 ? currentDate.getMonth() + 1 : '0' + (currentDate.getMonth() + 1)let currentDay = currentDate.getDate() > 9 ? currentDate.getDate() : '0' + currentDate.getDate()currentDate = currentDate.getFullYear() + '-' + currentMonth + '-' + currentDayreturn [beginDate, currentDate]},resetForm() {// 将searchForm对象里的属性值重置为空this.$refs['searchFormRef'].resetFields()// 交易日期tradeDate不是searchForm对象中的属性,所以需要单独重置this.tradeDate = this.initTradeDate()},search() {// 查询前先将交易日期数组拆分为起始日期和结束日期两个变量再送给后台解析this.searchForm.startDate = this.tradeDate[0]this.searchForm.endDate = this.tradeDate[1]this.$nextTick(() => {axios({method: 'post',url: '/stockInfo/getList',params: this.searchForm,}).then(function (response) {// 处理响应数据 }).catch(function (error) {console.log(error)})})},},
}
</script>
分析解读
上述每一步代码做的事都用详尽的注释标注出来了,没有冗余功能的代码,使用代码过程中需注意以下几点:
1、el-date-picker 元素中的 :editable="false" 和 :clearable="false" 两个属性一定要设为 false,避免用户任意输入;
2、el-date-picker 元素中的 @blur 事件需要添加一下,避免输入一个日期就关闭选择框再次打开选择框时发现可选日期范围不对的情况发生;
3、使用日期方法 getMonth 进行日期类型转换时一定要记得 +1,月份 1 月 - 12 月对应的是数字 0-11,而号数(日)则不需要;
4、search() 方法中有以下赋值操作 this.searchForm.startDate = this.tradeDate[0]、 this.searchForm.endDate = this.tradeDate[1],因为后台接口一般都是用两个参数来接收起始查询日期和结束查询日期,故本文将查询日期数组拆分成两个变量后再调后台接口,如果后端开发者会在后端程序中自己处理这个日期数组,那我们就可以将这两行代码删掉,直接将 this.tradeDate 参数传给后端就行了。
这篇关于前端DatePicker组件设置默认日期并限制可选日期范围的文章就介绍到这儿,希望我们推荐的文章对编程师们有所帮助!


