本文主要是介绍OpenCV学习笔记(20)关于opencv新版本中rows和cols的理解,希望对大家解决编程问题提供一定的参考价值,需要的开发者们随着小编来一起学习吧!
rows:行
cols:列(column)
对于读入的一张图片SrcImage2,(图像分辨率对应为400×200像素)
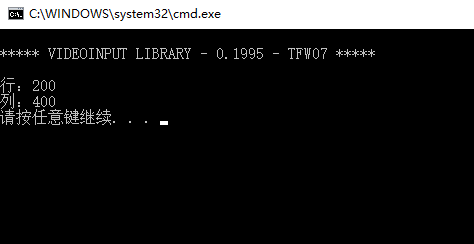
SrcImage2.rows=200 (行)——(有200行像素)
SrcImage2.cols=400 (列)——(有400列像素)
测试程序:
Mat SrcImage2;SrcImage2 = imread("400.jpg");std::cout <<"行:"<< SrcImage2.rows << std::endl;std::cout <<"列:"<< SrcImage2.cols << std::endl;
如果想创建一个跟图片宽和高相同的图片,可以使用.create方法
C++: void Mat::create(int rows, int cols, int type)
C++: void Mat::create(Size size, int type)
C++: void Mat::create(int ndims, const int* sizes, int type)
Parameters:
ndims – New array dimensionality.
rows – New number of rows.
cols – New number of columns.
size – Alternative new matrix size specification: Size(cols, rows)
sizes – Array of integers specifying a new array shape.
type – New matrix type.
测试程序:
SrcImage.create(SrcImage2.rows, SrcImage2.cols, CV_8UC3);如果想创建一个矩形框或者矩形
查看官方文档可以知道
template<typename _Tp>
cv::Rect_< _Tp >::Rect_	(_Tp 	_x,_Tp 	_y,
_Tp 	_width,
_Tp 	_height
)
因此,创建一个矩形框或者矩形是一定要当心,注意是以宽和高来定义,与前面的创建窗口使用的行和列有所不同。
测试程序:
#include <opencv2/core/core.hpp>
#include<opencv2/highgui/highgui.hpp>
#include"opencv2/imgproc/imgproc.hpp"
#include <iostream>  using namespace cv;void test()
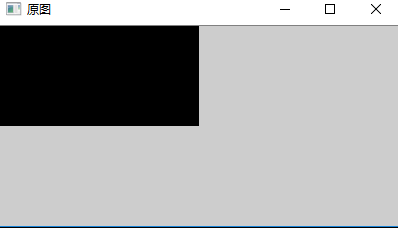
{Mat SrcImage;//Mat GrayImage;//Mat BinaryImage;//const int IMAGE_WIDTH = 400;//const int IMAGE_HEIGHT = 200;//对比图像Mat SrcImage2;SrcImage2 = imread("400.jpg");std::cout <<"行:"<< SrcImage2.rows << std::endl;std::cout <<"列:"<< SrcImage2.cols << std::endl;//创建图像/*SrcImage.create(IMAGE_HEIGHT, IMAGE_WIDTH, CV_8UC3);*/SrcImage.create(SrcImage2.rows, SrcImage2.cols, CV_8UC3);//填充成白色rectangle(SrcImage, Rect(0, 0, SrcImage2.cols/2, SrcImage2.rows/2), CV_RGB(0, 0, 0), CV_FILLED);namedWindow("原图");imshow("原图", SrcImage);}
void main()
{test();waitKey();
}
这篇关于OpenCV学习笔记(20)关于opencv新版本中rows和cols的理解的文章就介绍到这儿,希望我们推荐的文章对编程师们有所帮助!


