本文主要是介绍caffe源码解析-inner_product_layer,希望对大家解决编程问题提供一定的参考价值,需要的开发者们随着小编来一起学习吧!
打开inner_product_layer.hpp文件,发现全连接层是非常清晰简单的,我们主要关注如下四个函数就行。
- LayerSetUp(SetUp的作用一般用于初始化,比如网络结构参数的获取)
- Reshape
- Forward_cpu
- Backward_cpu
**
inner_product_layer.hpp
**
namespace caffe {
template <typename Dtype>
class InnerProductLayer : public Layer<Dtype> {public:explicit InnerProductLayer(const LayerParameter& param): Layer<Dtype>(param) {}virtual void LayerSetUp(const vector<Blob<Dtype>*>& bottom,const vector<Blob<Dtype>*>& top);virtual void Reshape(const vector<Blob<Dtype>*>& bottom,const vector<Blob<Dtype>*>& top);virtual inline const char* type() const { return "InnerProduct"; }virtual inline int ExactNumBottomBlobs() const { return 1; }virtual inline int ExactNumTopBlobs() const { return 1; }protected:virtual void Forward_cpu(const vector<Blob<Dtype>*>& bottom,const vector<Blob<Dtype>*>& top);virtual void Forward_gpu(const vector<Blob<Dtype>*>& bottom,const vector<Blob<Dtype>*>& top);virtual void Backward_cpu(const vector<Blob<Dtype>*>& top,const vector<bool>& propagate_down, const vector<Blob<Dtype>*>& bottom);virtual void Backward_gpu(const vector<Blob<Dtype>*>& top,const vector<bool>& propagate_down, const vector<Blob<Dtype>*>& bottom);int M_;//batchsizeint K_;//输入神经元数目int N_;//输出神经元数目bool bias_term_;Blob<Dtype> bias_multiplier_;//一般是全为1的向量,方便利用矩阵乘法进行向量的拷贝bool transpose_;  ///< if true, assume transposed weights
};}  // namespace caffe
**
LayerSetUp
**
template <typename Dtype>
//SetUp的作用一般用于初始化,比如网络结构参数的获取
void InnerProductLayer<Dtype>::LayerSetUp(const vector<Blob<Dtype>*>& bottom,const vector<Blob<Dtype>*>& top)
{//获取输出神经元个数const int num_output = this->layer_param_.inner_product_param().num_output();//bool类型,是否存在偏置项bias_term_ = this->layer_param_.inner_product_param().bias_term();// bool类型,是否对权重矩阵进行转置transpose_ = this->layer_param_.inner_product_param().transpose();N_ = num_output;//optional int32 axis = 5 [default = 1];所以默认情况,axis=1const int axis = bottom[0]->CanonicalAxisIndex(this->layer_param_.inner_product_param().axis());// Dimensions starting from "axis" are "flattened" into a single// length K_ vector. For example, if bottom[0]'s shape is (N, C, H, W),// and axis == 1, N inner products with dimension CHW are performed.//K_=C*H*WK_ = bottom[0]->count(axis);// Check if we need to set up the weights//blobs_这个成员变量一般是存放layer的权重和偏置if (this->blobs_.size() > 0){LOG(INFO) << "Skipping parameter initialization";}else{if (bias_term_){//如果有偏置,则申请两块区域this->blobs_.resize(2);}else{//否则就只申请权重的偏置this->blobs_.resize(1);}// Initialize the weightsvector<int> weight_shape(2);if (transpose_){weight_shape[0] = K_;weight_shape[1] = N_;}else{weight_shape[0] = N_;weight_shape[1] = K_;}//根据权重的大小,开辟内存//一般权重的是1*1*K*N,其中K是输入神经元,N是输出神经元this->blobs_[0].reset(new Blob<Dtype>(weight_shape));// fill the weights//shared_ptr是智能指针,这行的作用是根据配置文件,获取权重初始化函数shared_ptr<Filler<Dtype> > weight_filler(GetFiller<Dtype>(this->layer_param_.inner_product_param().weight_filler()));//利用初始化函数进行权重的初始值填充weight_filler->Fill(this->blobs_[0].get());// If necessary, intiialize and fill the bias termif (bias_term_){vector<int> bias_shape(1, N_);this->blobs_[1].reset(new Blob<Dtype>(bias_shape));shared_ptr<Filler<Dtype> > bias_filler(GetFiller<Dtype>(this->layer_param_.inner_product_param().bias_filler()));bias_filler->Fill(this->blobs_[1].get());}}  // parameter initializationthis->param_propagate_down_.resize(this->blobs_.size(), true);
}
*Reshape*
这个函数具体是干嘛的,我不是特别清楚,但是看代码的意思就是为top[0]和偏置申请了内存资源。
template <typename Dtype>
void InnerProductLayer<Dtype>::Reshape(const vector<Blob<Dtype>*>& bottom,const vector<Blob<Dtype>*>& top)
{// Figure out the dimensionsconst int axis = bottom[0]->CanonicalAxisIndex(this->layer_param_.inner_product_param().axis());const int new_K = bottom[0]->count(axis);CHECK_EQ(K_, new_K)<< "Input size incompatible with inner product parameters.";// The first "axis" dimensions are independent inner products; the total// number of these is M_, the product over these dimensions.M_ = bottom[0]->count(0, axis);// The top shape will be the bottom shape with the flattened axes dropped,// and replaced by a single axis with dimension num_output (N_).vector<int> top_shape = bottom[0]->shape();top_shape.resize(axis + 1);top_shape[axis] = N_;top[0]->Reshape(top_shape);// Set up the bias multiplierif (bias_term_){vector<int> bias_shape(1, M_);bias_multiplier_.Reshape(bias_shape);caffe_set(M_, Dtype(1), bias_multiplier_.mutable_cpu_data());}
}
**
Forward_cpu
**
template <typename Dtype>
void InnerProductLayer<Dtype>::Forward_cpu(const vector<Blob<Dtype>*>& bottom,const vector<Blob<Dtype>*>& top)
{//获得输入数据的指针bottom_dataconst Dtype* bottom_data = bottom[0]->cpu_data();//获得输出数据的指针top_dataDtype* top_data = top[0]->mutable_cpu_data();//获得权重数据的指针weightconst Dtype* weight = this->blobs_[0]->cpu_data();//调用矩阵乘法完成y=w*x,其中x是输入神经元,y是输出神经元caffe_cpu_gemm<Dtype>(CblasNoTrans, transpose_ ? CblasNoTrans : CblasTrans,M_, N_, K_, (Dtype)1.,bottom_data, weight, (Dtype)0., top_data);if (bias_term_){//加上偏置caffe_cpu_gemm<Dtype>(CblasNoTrans, CblasNoTrans, M_, N_, 1, (Dtype)1.,bias_multiplier_.cpu_data(),this->blobs_[1]->cpu_data(), (Dtype)1., top_data);}
}
补充一下:caffe矩阵乘法调用的是cblas_dgemm这个函数,而这个函数的定义和用法可以参照该网址;
//该函数主要完成C=alpha*A*B+beta*C的任务
template<>
void caffe_cpu_gemm<double>(const CBLAS_TRANSPOSE TransA,const CBLAS_TRANSPOSE TransB,const int M,const int N,const int K,const double alpha,const double* A,const double* B,const double beta,double* C)
{int lda = (TransA == CblasNoTrans) ? K : M;int ldb = (TransB == CblasNoTrans) ? N : K;cblas_dgemm(CblasRowMajor,//行优先还是列优先,caffe中的数据都默认为行优先TransA,//A矩阵是否转置TransB,//B矩阵是否转置M,//A默认情况的行,C的行N,//B默认情况的列,C的列K,//A的列,B的行,这三个参数是不随矩阵是否转置发生变化的alpha,A,//A矩阵默认为M*K,如果是K*M则需要设置TransA对矩阵进行转置lda,//代表A矩阵转置前的列数B,ldb,//代表B矩阵转置前的列数beta,C,N);//代表C矩阵的列
}
**
Backward_cpu
**
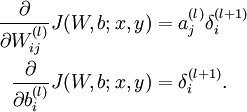
BP算法可以分解为三部分:
- 先获得权重的增量,这个根据BP的原理,等于输入值和残差的乘积加和
- 然后获得偏置bias的增量,这个根据BP的原理,直接等于输出的残差
- 最后是更新输入的残差,这样才能逐层反向传递
对应的数学公式如下:

template <typename Dtype>
void InnerProductLayer<Dtype>::Backward_cpu(const vector<Blob<Dtype>*>& top,const vector<bool>& propagate_down,const vector<Blob<Dtype>*>& bottom)
{//如果进行反向传播,这个标志的意义在于,预训练时有可能某些layer不需要进行反向传播if (this->param_propagate_down_[0]){//获得输出的残差const Dtype* top_diff = top[0]->cpu_diff();//获得输入数据const Dtype* bottom_data = bottom[0]->cpu_data();// Gradient with respect to weight,起始反向转播可以分为三步//1.先获得权重的增量,这个根据BP的原理,等于输入值和残差的乘积加和//权重进行转置if (transpose_){//bottom_data是输入数据,是一个M*K的矩阵//top_diff是输出的残差,是一个M*N的矩阵//this->blobs_[0]->mutable_cpu_diff()是权重的增量,是一个K*N的矩阵caffe_cpu_gemm<Dtype>(CblasTrans, CblasNoTrans,K_, N_, M_,(Dtype)1., bottom_data, top_diff,(Dtype)1., this->blobs_[0]->mutable_cpu_diff());}//权重不进行转置else{caffe_cpu_gemm<Dtype>(CblasTrans, CblasNoTrans,N_, K_, M_,(Dtype)1., top_diff, bottom_data,(Dtype)1., this->blobs_[0]->mutable_cpu_diff());}}if (bias_term_ && this->param_propagate_down_[1]){const Dtype* top_diff = top[0]->cpu_diff();// Gradient with respect to bias//2.然后获得偏置bias的增量,这个根据BP的原理,直接等于输出的残差//bias_multiplier_.cpu_data()是一个1*M的单位向量caffe_cpu_gemv<Dtype>(CblasTrans, M_, N_, (Dtype)1., top_diff,bias_multiplier_.cpu_data(), (Dtype)1.,this->blobs_[1]->mutable_cpu_diff());}if (propagate_down[0]){const Dtype* top_diff = top[0]->cpu_diff();// Gradient with respect to bottom data//3.最后是更新输入的残差,这样才能逐层反向传递if (transpose_){//根据BP原理,输出(下一层)的残差是权重和输出(上一层)//残差的加权和,再乘以激活函数的导数。但是这个激活函数的//caffe丢给了激活函数层,所以这里就不需要//top_diff 是输出残差//this->blobs_[0]->cpu_data()是权重//bottom[0]->mutable_cpu_diff()便是输入的残差caffe_cpu_gemm<Dtype>(CblasNoTrans, CblasTrans,M_, K_, N_,(Dtype)1., top_diff, this->blobs_[0]->cpu_data(),(Dtype)0., bottom[0]->mutable_cpu_diff());}else{caffe_cpu_gemm<Dtype>(CblasNoTrans, CblasNoTrans,M_, K_, N_,(Dtype)1., top_diff, this->blobs_[0]->cpu_data(),(Dtype)0., bottom[0]->mutable_cpu_diff());}}
}
这篇关于caffe源码解析-inner_product_layer的文章就介绍到这儿,希望我们推荐的文章对编程师们有所帮助!


