本文主要是介绍黑屏环境下,如何利用OBD部署OceanBase企业版集群,希望对大家解决编程问题提供一定的参考价值,需要的开发者们随着小编来一起学习吧!
一、前言
OBD,作为OceanBase官方推出的部署工具,显著简化了OB单机及集群的部署流程。此前,OBD能够支持对社区版OB进行一键部署,那OBD是否同样支持OB企业版的部署呢?
本文为大家介绍通过OBD,在OB企业版集群部署过程中遇到的一些问题和解决方案,希望能为大家提供一些参考。
二、部署准备
| 开发机资源 | cpu与内存 | 存储大小 |
| 阿里云AY1 | 2C8G | 40G |
| 阿里云AY2 | 2C8G | 40G |
| 阿里云AY3 | 2C8G | 40G |
| 资源包 | 版本 |
| OceanBase企业版 | 4.2.2.0 |
| OB-Deploy | 2.4.1(2.5以上不支持商业版,2.4.1可兼容431版本的OB,预计3.0开始支持商业版) |
| OBProxy | 4.2.3.0 |
| OBClient | 2.2.6 |
注意⚠️:本篇文档部署的是企业版OceanBase,并非社区版
前置条件:为了方便OBD远程部署,需要将集群内开发机的SSH登录用户名和密码改为一样的,如:
username:root
password:xxxxx在一台机器上先准备如下四个文件(如下载到AY1上),点击前往 mirror 网站搜索下载

三、部署流程
📖 以下部署流程只需要在一台机器上完成即可,如我所用的机器是 AY1,其 IP 为 192.168.0.167
解压 ob-deploy 文件
rpm -ivh ob-depoly.xxxxxx.rpm然后将所有的 rpm 加入 OBD 的镜像当中
rpm mirror remote disable
rpm mirror clone *.rpm
rpm mirror list local
查看是否添加成功

进入 /usr/obd/example 目录下,编辑 mini-distribute-withe-obproxy-example.yaml 文件
## Only need to configure when remote login is required
user:username: 你设置的用户名,一般是rootpassword: 你设置的密码
#   key_file: your ssh-key file path if needport: 22timeout: 30
oceanbase:servers:- name: server1# Please don't use hostname, only IP can be supportedip: 192.168.18.207- name: server2ip: 192.168.18.205- name: server3ip: 192.168.18.206global:# Starting from observer version 4.2, the network selection for the observer is based on the 'local_ip' parameter, and the 'devname' parameter is no longer mandatory.# If the 'local_ip' parameter is set, the observer will first use this parameter for the configuration, regardless of the 'devname' parameter.# If only the 'devname' parameter is set, the observer will use the 'devname' parameter for the configuration.# If neither the 'devname' nor the 'local_ip' parameters are set, the 'local_ip' parameter will be automatically assigned the IP address configured above.# devname: eth0cluster_id: 1 # please set memory limit to a suitable value which is matching resource.memory_limit: 6G # The maximum running memory for an observersystem_memory: 1G # The reserved system memory. system_memory is reserved for general tenants. The default value is 30G.datafile_size: 2G # Size of the data file.datafile_next: 2G # the auto extend step. Please enter an capacity, such as 2Gdatafile_maxsize: 20G # the auto extend max size. Please enter an capacity, such as 20Glog_disk_size: 13G # The size of disk space used by the clog files.cpu_count: 16production_mode: falseenable_syslog_wf: false # Print system logs whose levels are higher than WARNING to a separate log file. The default value is true.enable_syslog_recycle: true # Enable auto system log recycling or not. The default value is false.max_syslog_file_count: 4 # The maximum number of reserved log files before enabling auto recycling. The default value is 0.# observer cluster name, consistent with obproxy's cluster_nameappname: obcluster# root_password: # root user password, can be empty# proxyro_password: # proxyro user pasword, consistent with obproxy's observer_sys_password, can be emptyserver1:mysql_port: 2881 # External port for OceanBase Database. The default value is 2881. DO NOT change this value after the cluster is started.rpc_port: 2882 # Internal port for OceanBase Database. The default value is 2882. DO NOT change this value after the cluster is started.#  The working directory for OceanBase Database. OceanBase Database is started under this directory. This is a required field.home_path: /root/observer# The directory for data storage. The default value is $home_path/store.# data_dir: /data# The directory for clog, ilog, and slog. The default value is the same as the data_dir value.# redo_dir: /redozone: zone1server2:mysql_port: 2881 # External port for OceanBase Database. The default value is 2881. DO NOT change this value after the cluster is started.rpc_port: 2882 # Internal port for OceanBase Database. The default value is 2882. DO NOT change this value after the cluster is started.#  The working directory for OceanBase Database. OceanBase Database is started under this directory. This is a required field.home_path: /root/observer# The directory for data storage. The default value is $home_path/store.# data_dir: /data# The directory for clog, ilog, and slog. The default value is the same as the data_dir value.# redo_dir: /redozone: zone2server3:mysql_port: 2881 # External port for OceanBase Database. The default value is 2881. DO NOT change this value after the cluster is started.rpc_port: 2882 # Internal port for OceanBase Database. The default value is 2882. DO NOT change this value after the cluster is started.#  The working directory for OceanBase Database. OceanBase Database is started under this directory. This is a required field.home_path: /root/observer# The directory for data storage. The default value is $home_path/store.# data_dir: /data# The directory for clog, ilog, and slog. The default value is the same as the data_dir value.# redo_dir: /redozone: zone3
obproxy:# Set dependent components for the component.# When the associated configurations are not done, OBD will automatically get the these configurations from the dependent components.depends:- oceanbaseservers:- 192.168.18.207global:listen_port: 2883 # External port. The default value is 2883.prometheus_listen_port: 2884 # The Prometheus port. The default value is 2884.home_path: /root/obproxy# oceanbase root server list# format: ip:mysql_port;ip:mysql_port. When a depends exists, OBD gets this value from the oceanbase-ce of the depends.# rs_list: 192.168.1.2:2881;192.168.1.3:2881;192.168.1.4:2881enable_cluster_checkout: false# observer cluster name, consistent with oceanbase-ce's appname. When a depends exists, OBD gets this value from the oceanbase-ce of the depends.# cluster_name: obclusterskip_proxy_sys_private_check: trueenable_strict_kernel_release: falseproxy_id: 100client_session_id_version: 2# obproxy_sys_password: # obproxy sys user password, can be empty. When a depends exists, OBD gets this value from the oceanbase-ce of the depends.# observer_sys_password: # proxyro user pasword, consistent with oceanbase-ce's proxyro_password, can be empty. When a depends exists, OBD gets this value from the oceanbase-ce of the depends.
编辑好文件后我们就可以部署 obcluster 这个集群了
obd cluster deploy obcluster -c mini-distributed-with-obproxy-example.yaml部署成功截图
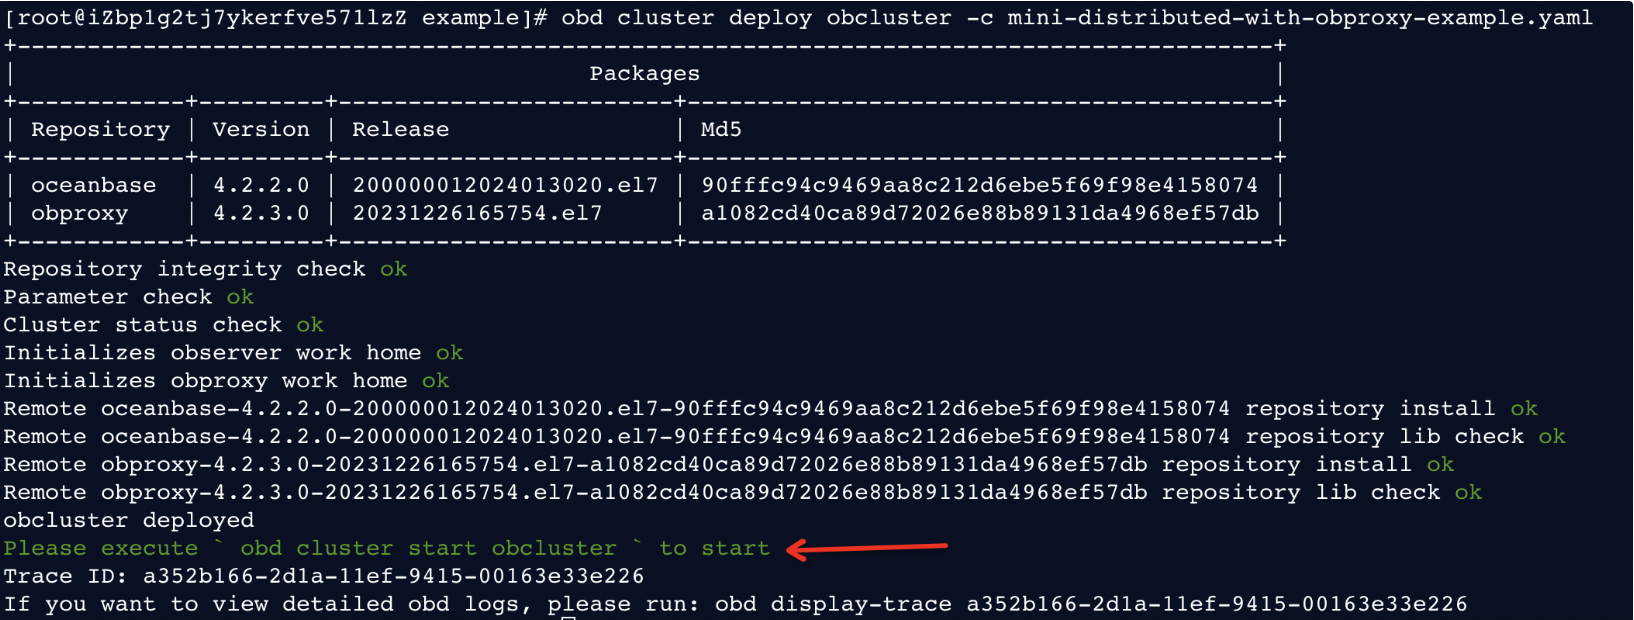
此时启动 obcluster 可能会报错
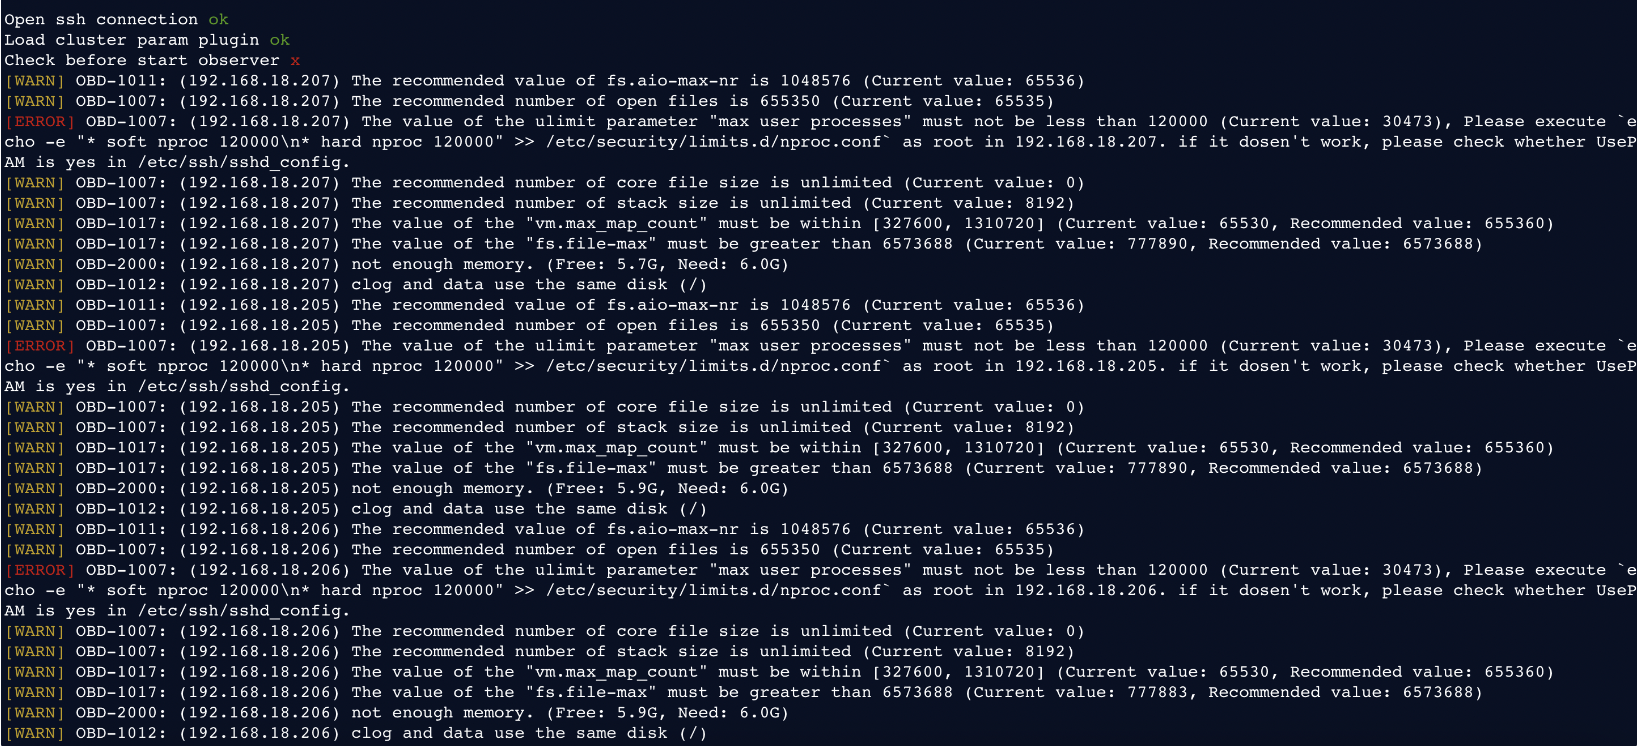
what❓
针对此问题有两种解决方法
方法一
- 如果对安全检查不是很在意,且仅仅是简单测试的话可以试试该方法,如下直接删除安全检查脚本即可(结果可能不稳定,且也需要每台机器运行一遍,故不推荐该方法)
rm -rf ~/.obd/plugins/oceanbase/*/start_check.py方法二
- 比较推荐的方法,只需要每台机器执行一遍如下命令
echo -e "* soft nproc 120000\n* hard nproc 120000" >> /etc/security/limits.d/20-nproc.conf
source /etc/profile本篇文档使用方法二进行部署,随后重新执行启动集群命令
obd cluster start obcluster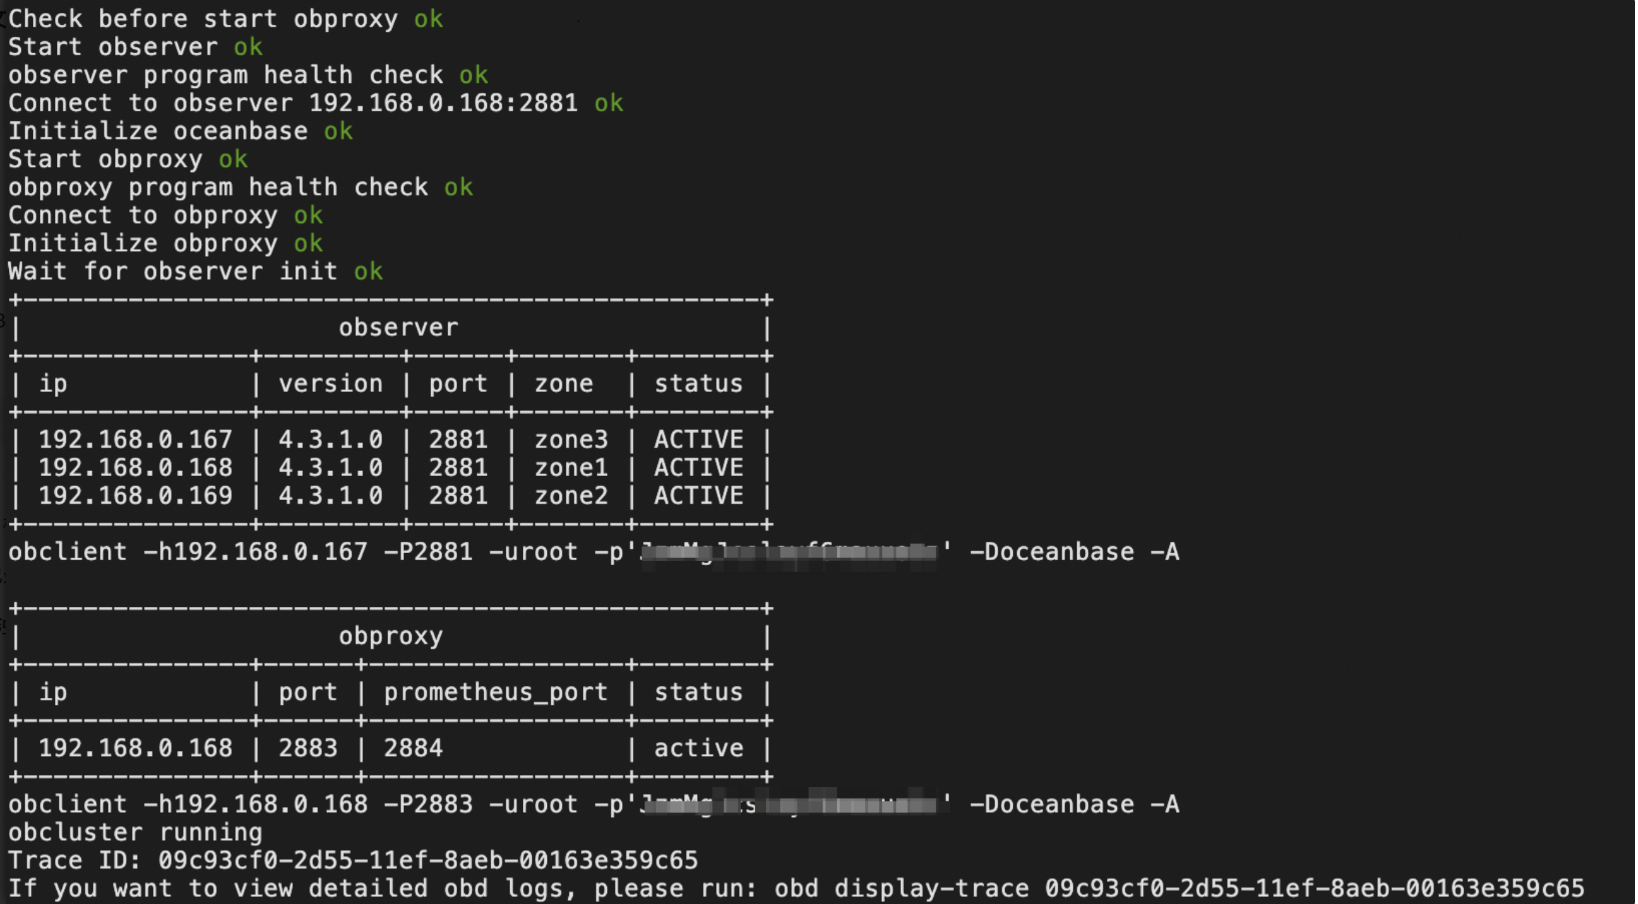
按照提示登录 OB 即可检验是否拉起分布式环境

最终集群结果分析:
| 开发机 | 内网IP | 节点角色 |
| AY1 | 192.168.0.167 | Observer + OBproxy |
| AY2 | 192.168.0.168 | Observer |
| AY3 | 192.168.0.169 | Observer |
💡OBD 全程部署需要等待的时间大约为3分钟。若您想获取源码及更多详情,请访问我们的 GitHub 仓库:GitHub - oceanbase/obdeploy: A deployer and package manager for OceanBase open-source software.。
这篇关于黑屏环境下,如何利用OBD部署OceanBase企业版集群的文章就介绍到这儿,希望我们推荐的文章对编程师们有所帮助!


