本文主要是介绍Cesium 自定义MaterialProperty原理解析,希望对大家解决编程问题提供一定的参考价值,需要的开发者们随着小编来一起学习吧!
MaterialProperty是一个抽象接口类,它定义了Entity图元的材质要实现的属性和函数。这些属性和函数主要是cesium 内部调用,用于减少cesium 内部对材质的重复创建和缓存,减少内存开销。
1. Property 类
Property类是所有属性的抽象接口类,它将属性和时间关联起来,可以动态获取或者设置属性的值。其接口结构如下:
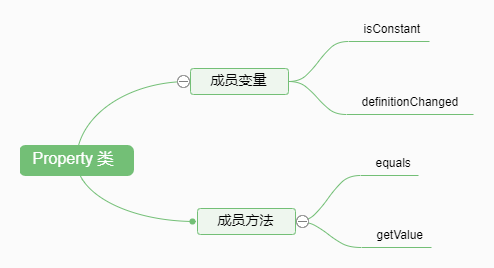
- isConstant: 用来判断该属性是否会随时间变化,是一个布尔值。Cesium会通过这个变量来决定是否需要在场景更新的每一帧中都获取该属性的数值,从而来更新三维场景中的物体。如果isConstant为true,则只会获取一次数值,除非definitionChanged事件被触发。
- definitionChanged :是一个事件,可以通过该事件,来监听该Property自身所发生的变化,比如数值发生修改。
- getValue:用来获取某个时间点的特定属性值。它有两个参数:第一个是time,用来传递一个时间点;第二个是result,用来存储属性值。改方法在渲染每一帧时都会调用。
- equals: 用来检测属性值是否相等。如果相等,就不会重复创建该属性。
通过上面的描述可能还是不太理解其机制,下面通过自定义MaterialProperty类来理解上面的描述。
2. MaterialProperty 类
MaterialProperty是用来专门表示材质的Property,继承自Property类,增加了getType方法,用来获取材质类型。在渲染场景时,Cesium内部通过调用该方法,查找内存中的材质shader,作用于使用该材质的图元。

cesium 内部实现的MaterialProperty材质有以下几种:

参照ColorMaterialProperty的源码,这里通过自定义CustomColorMaterialProperty类的使用为例,来理解MaterialProperty的机制。
2.1. 自定义 CustomColorMaterialProperty 类
/** @Description: * @Author: maizi* @Date: 2024-08-22 16:06:29* @LastEditTime: 2024-08-22 16:43:31* @LastEditors: maizi*/function CustomColorMaterialProperty(options={}) {this._definitionChanged = new Cesium.Event();this._color = undefined;this._colorSubscription = undefined;this.color = options.color;
}Object.defineProperties(CustomColorMaterialProperty.prototype, {isConstant: {get: function () {return Cesium.Property.isConstant(this._color);},},definitionChanged: {get: function () {return this._definitionChanged;},},color: Cesium.createPropertyDescriptor("color"),
});CustomColorMaterialProperty.prototype.getType = function (time) {return "CustomColor";
};CustomColorMaterialProperty.prototype.getValue = function (time, result) {if (!Cesium.defined(result)) {result = {};}result.color = Cesium.Property.getValueOrClonedDefault(this._color,time,Cesium.Color.WHITE,result.color);return result;
};CustomColorMaterialProperty.prototype.equals = function (other) {return (this === other || //(other instanceof CustomColorMaterialProperty && //Cesium.Property.equals(this._color, other._color)));
};
export default CustomColorMaterialProperty;
2.2. 材质shader
uniform vec4 color;
czm_material czm_getMaterial(czm_materialInput materialInput){czm_material material = czm_getDefaultMaterial(materialInput);material.alpha = color.a;material.diffuse = color.rgb;return material;
}
定义好材质后,需要添加该材质到Cesium材质缓存中。
2.3. 添加到缓存
import CustomColorMaterial from '../shader/CustomColorMaterial.glsl'Cesium.Material.CustomColor = 'CustomColor'
Cesium.Material._materialCache.addMaterial(Cesium.Material.CustomColor,{fabric: {type: Cesium.Material.CustomColor,uniforms: {color: new Cesium.Color(1.0, 0.0, 0.0, 0.7),},source: CustomColorMaterial,},translucent: function (material) {return true},}
)
通过上面的操作,我们就可以使用自定义材质了。下面将我们自定义的材质作用于一个圆。
3. 完整示例代码
CustomColorCircle.js
/** @Description:* @Author: maizi* @Date: 2022-05-27 11:36:22* @LastEditTime: 2024-08-22 17:23:31* @LastEditors: maizi*/
const merge = require('deepmerge')
import { CustomColorMaterialProperty } from '../materialProperty/index.js'
const defaultStyle = {color: "#ffff00",opacity: 0.6,radius: 100
}class CustomColorCircle {constructor(viewer, coords, options = {}) {this.viewer = viewerthis.coords = coords;this.options = options;this.props = this.options.props;this.style = merge(defaultStyle, this.options.style || {});this.baseHeight = this.coords[2] || 1;this.entity = null;this.material = nullthis.points = []this.init();}init() {this.createMaterial();this.entity = new Cesium.Entity({id: Math.random().toString(36).substring(2),type: "custom_color_circle",position: Cesium.Cartesian3.fromDegrees(this.coords[0], this.coords[1], this.baseHeight),ellipse: {semiMinorAxis: this.style.radius,semiMajorAxis: this.style.radius,material: this.material}});}addPoints() {const point = new Cesium.Entity({position: Cesium.Cartesian3.fromDegrees(this.coords[0], this.coords[1], this.baseHeight),point: {color: Cesium.Color.DARKBLUE.withAlpha(.4),pixelSize: 6,outlineColor: Cesium.Color.YELLOW.withAlpha(.8),outlineWidth: 4}     }); this.viewer.entities.add(point)this.points.push(point)}removePoints() {this.points.forEach((point) => {this.viewer.entities.remove(point)})this.points = []}createMaterial() {this.material = new CustomColorMaterialProperty({color:new Cesium.Color.fromCssColorString(this.style.color).withAlpha(this.style.opacity)});console.log("isConstant=>", this.material.isConstant)this.material.definitionChanged.addEventListener(function(material, property) {console.log('Material property changed:', property);});}updateStyle(style) {this.style = merge(defaultStyle, style);this.material.color = new Cesium.Color.fromCssColorString(this.style.color).withAlpha(this.style.opacity)this.entity.ellipse.semiMinorAxis = this.style.radiusthis.entity.ellipse.semiMajorAxis = this.style.radius}setSelect(enabled) {if (enabled) {this.addPoints()} else {this.removePoints()}}
}export {CustomColorCircle
}
MapWorks.js
import GUI from 'lil-gui';
// 初始视图定位在中国
import { CustomColorCircle } from './CustomColorCircle'Cesium.Camera.DEFAULT_VIEW_RECTANGLE = Cesium.Rectangle.fromDegrees(90, -20, 110, 90);const gui = new GUI();
const params = {color : '#ffff00',opacity: 0.6,radius: 100
}let viewer = null;
let circleLayer = null
let circleList = []
let selectGraphic = null
let eventHandler = nullfunction initMap(container) {viewer = new Cesium.Viewer(container, {animation: false,baseLayerPicker: false,fullscreenButton: false,geocoder: false,homeButton: false,infoBox: false,sceneModePicker: false,selectionIndicator: false,timeline: false,navigationHelpButton: false, scene3DOnly: true,orderIndependentTranslucency: false,contextOptions: {webgl: {alpha: true}}})viewer._cesiumWidget._creditContainer.style.display = 'none'viewer.scene.fxaa = trueviewer.scene.postProcessStages.fxaa.enabled = trueif (Cesium.FeatureDetection.supportsImageRenderingPixelated()) {// 判断是否支持图像渲染像素化处理viewer.resolutionScale = window.devicePixelRatio}// 移除默认影像removeAll()// 地形深度测试viewer.scene.globe.depthTestAgainstTerrain = true// 背景色viewer.scene.globe.baseColor = new Cesium.Color(0.0, 0.0, 0.0, 0)// 太阳光照viewer.scene.globe.enableLighting = true;// 初始化图层initLayer()// 初始化鼠标事件initClickEvent()//gui面板initGui()//调试window.viewer = viewer
}function initGui() {gui.title("参数设置")gui.addColor(params, 'color').onChange(function (value) {if(selectGraphic) {selectGraphic.updateStyle(params)}})gui.add(params, 'radius', 1, 1000).step(1).onChange(function (value) {if(selectGraphic) {selectGraphic.updateStyle(params)}})gui.add(params, 'opacity', 0, 1).step(0.01).onChange(function (value) {if(selectGraphic) {selectGraphic.updateStyle(params)}})
}function initLayer() {const layerProvider = new Cesium.ArcGisMapServerImageryProvider({url: 'https://services.arcgisonline.com/ArcGIS/rest/services/World_Imagery/MapServer'});viewer.imageryLayers.addImageryProvider(layerProvider);circleLayer = new Cesium.CustomDataSource('circleLayer')viewer.dataSources.add(circleLayer)
}function loadCircle(circles) {circles.forEach(circle => {const customColorCircle= new CustomColorCircle(viewer, circle.coords, {style: {radius: circle.radius}})circleList.push(customColorCircle)circleLayer.entities.add(customColorCircle.entity)});viewer.flyTo(circleLayer)
}function initClickEvent() {eventHandler = new Cesium.ScreenSpaceEventHandler(viewer.scene.canvas);initLeftClickEvent()
}function initLeftClickEvent() {eventHandler.setInputAction((e) => {if (selectGraphic) {selectGraphic.setSelect(false)selectGraphic = null}let pickedObj = viewer.scene.pick(e.position);if (pickedObj && pickedObj.id) {if (pickedObj.id.type === 'custom_color_circle') {selectGraphic = getCircleById(pickedObj.id.id)if (selectGraphic) {selectGraphic.setSelect(true)}}}},Cesium.ScreenSpaceEventType.LEFT_CLICK)
}function getCircleById(id) {let circle = nullfor (let i = 0; i < circleList.length; i++) {if (circleList[i].entity.id === id) {circle = circleList[i]break} }return circle
}function removeAll() {viewer.imageryLayers.removeAll();
}function destroy() {viewer.entities.removeAll();viewer.imageryLayers.removeAll();viewer.destroy();
}export {initMap,loadCircle,destroy
}
CustomColorMaterialView.vue
<!--* @Description: * @Author: maizi* @Date: 2023-04-07 17:03:50* @LastEditTime: 2024-08-22 16:51:06* @LastEditors: maizi
--><template><div id="container"></div>
</template><script>
import * as MapWorks from './js/MapWorks'
export default {name: 'CustomColorMaterialView',mounted() {this.init();},methods:{init(){let container = document.getElementById("container");MapWorks.initMap(container)//创建let circles = [{coords: [ 104.07434461, 30.66941864 ],radius: 100},// {//   coords: [ 104.068822, 30.655807],//   radius: 100// },];MapWorks.loadCircle(circles)}},beforeDestroy(){//实例被销毁前调用,页面关闭、路由跳转、v-if和改变key值MapWorks.destroy();}
}
</script><style lang="scss" scoped>
#container{width: 100%;height: 100%;background: rgba(7, 12, 19, 1);overflow: hidden;background-size: 40px 40px, 40px 40px;background-image: linear-gradient(hsla(0, 0%, 100%, 0.05) 1px, transparent 0), linear-gradient(90deg, hsla(0, 0%, 100%, 0.05) 1px, transparent 0);
}</style>
4. 运行结果
5. MaterialProperty机制理解
5.1. isConstant
上诉示例中,我们对材质的颜色赋值如下:
this.material = new CustomColorMaterialProperty({color:new Cesium.Color.fromCssColorString(this.style.color).withAlpha(this.style.opacity)
});
这里给颜色赋值了一个常量类型的值,cesium内部会将常量类型的值转为ConstantProperty类型的值,这个就代表值不会随时间变化,这样在渲染的时候就不用每次更新颜色值,除非我们人为的修改颜色值。这样当我们创建材质后,打印isConstant属性,控制台输出的结果为:
![]()
当我们修改上面的颜色赋值如下:
this.material = new CustomColorMaterialProperty({//color:new new Cesium.Color.fromCssColorString(this.style.color).withAlpha(this.style.opacity)color: new Cesium.CallbackProperty(() => {return new Cesium.Color.fromCssColorString(this.style.color).withAlpha(this.style.opacity)}),
});
这里我们使用CallbackProperty类,让颜色值不在是一个常量类型,打印isConstant属性,控制台输出的结果为:
![]()
这样就表示在渲染的时候需要更新颜色值。
5.2. definitionChanged
当我们重新给颜色赋值(注意这里说的是赋值,而不是改变, 因为CallbackProperty会每帧都是获取的最新的值,不必手动对颜色属性再赋值,这样就无法触发该事件)的时候,该事件会被触发。为了方便监测该事件的触发,我们初始时给颜色赋值一个常量类型的值。当我们修改颜色时调用如下的函数,会对颜色属性重新赋值。
updateStyle(style) {this.style = merge(defaultStyle, style);this.material.color = new Cesium.Color.fromCssColorString(this.style.color).withAlpha(this.style.opacity)this.entity.ellipse.semiMinorAxis = this.style.radiusthis.entity.ellipse.semiMajorAxis = this.style.radius}监听该事件
this.material.definitionChanged.addEventListener(function(material, property) {console.log('Material property changed:', property);
});
控制台会输出:

说明该事件触发了。
5.3. getValue
该函数在渲染的每一帧都会被调用,会获取该材质的所有属性的最新值。
5.4. equals
上诉代码我们只是创建了1个圆,当我们创建多个个圆,使用同一个材质时,会调用该函数,判断两个材质当前属性值是否相同,如果相同就共用材质内存,节省空间。当不同时就会再创建一个该材质。
5.5. getType
该函数和getValue一样,在渲染的每一帧都会被调用。
总之,因为Property机制,cesium 内部对材质的使用流程,要比原生webgl和threejs等库复杂,通过上诉的2个属性和3个函数,优化材质缓存的内存空间,提高性能。
这篇关于Cesium 自定义MaterialProperty原理解析的文章就介绍到这儿,希望我们推荐的文章对编程师们有所帮助!


