本文主要是介绍Android Toolbar 使用,希望对大家解决编程问题提供一定的参考价值,需要的开发者们随着小编来一起学习吧!
概述
自从Google 推出 Material Design 发展至今,市面上大多的App都逐步采用了这种设计方式。其中新版本的5.X SDK中推荐使用AppCompatActivity代替了ActionBarActivity。对于ActionBar 本人并没有深入研究过。目前新版本的SDK也已经弃用了。取而代之的是ToolBar。
ToolBar 位于android.support.v7.widget.Toolbar,提供了低版本的兼容,包含了大多的ActionBar操作。并且ToolBar可以直接在布局文件中声明。相对ActionBar灵活很多。
ToolBar共有2中使用方式:
- 将ToolBar作为ActionBar使用
- 将ToolBar作为单独控件使用,意味着ToobBar可以和ActionBar共存。
本文主要说的是第一种方式,代替ActionBar。
使用ToolBar
隐藏ActionBar
App的主题需要继承 Theme.AppCompat.Light.NoActionBar
<style name="Theme.MaterialDesign" parent="Theme.AppCompat.Light.NoActionBar"><item name="colorPrimary">@color/app_primary_color</item><item name="colorPrimaryDark">@color/app_primary_dark_color</item><item name="colorAccent">@color/app_primary_color</item><item name="android:textSize">16sp</item><item name="android:windowBackground">@color/white</item>
</style>
此处我使用了一些Color Palette ,对应Material Design
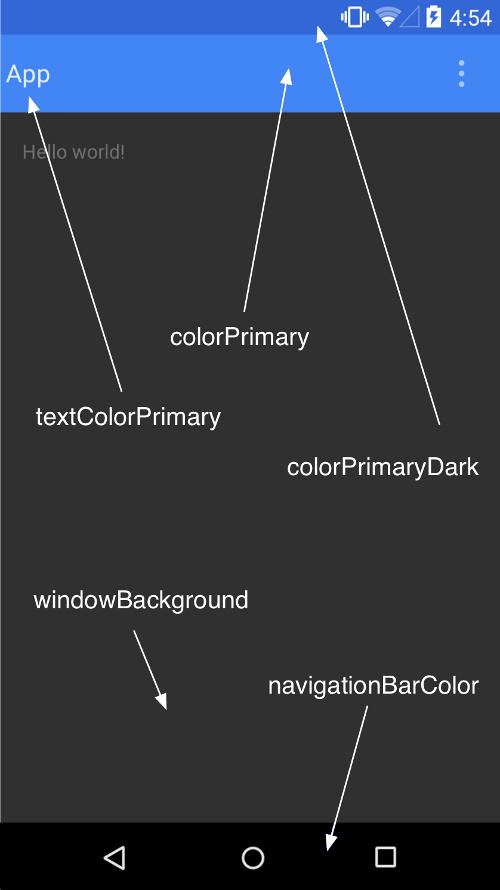
其中各种颜色的对应如下图:
其中navigationBarColor 属性5.0以下设备可能会失效,可以通过定义values-v21来设定。
在xml中声明ToolBar
<android.support.v7.widget.Toolbar xmlns:android="http://schemas.android.com/apk/res/android"android:id="@id/toolbar"style="@style/ToolBarStyle"><TextView
        android:id="@id/toolbar_title"android:layout_width="wrap_content"android:layout_height="wrap_content"android:layout_gravity="center"android:ellipsize="end"android:singleLine="true"android:textColor="@color/white"android:textSize="20sp" />
</android.support.v7.widget.Toolbar>
由于本质上ToolBar是一个ViewGroud ,并且在ToolBar中的Title 属性显示的标题是在左上角的,所以我在这里定义了一个TextView用于显示标题
其中Toolbar 需要设定样式,ToolBarStyle
<style name="ToolBarStyle"><item name="android:layout_width">match_parent</item><item name="android:layout_height">45dp</item><item name="android:minHeight">45dp</item><item name="android:background">?attr/colorPrimary</item><item name="android:theme">@style/PopWindowStyle</item></style>ToolBar 需要设定 background 这里设为 colorPrimary 的值,跟上面Material Design Theme 设定的ActionBar颜色一致。
<style name="PopWindowStyle" parent="@style/ThemeOverlay.AppCompat.Dark.ActionBar"><item name="android:colorBackground">@color/white</item><item name="android:textColorPrimary">@color/red</item>
</style>
这里设定了ToolBar的背景颜色和文字颜色。
在代码中使用ToolBar
首先,当然需要findViewById找到ToolBar
toolbar = (Toolbar) findViewById(R.id.toolbar);
其次我这里有个title的TextView也需要找到:
toolbar_title = (TextView) findViewById(R.id.toolbar_title);
然后代替ActionBar
setSupportAction(toolbar);
注意,调用了 setSupportActionBar 之后,菜单的加载只能在onCreateOptionsMenu中加载了,然后在onOptionsItemSelected 处理菜单的点击事件。
假如你不需要ActionBar的功能,只需要作为标题和一些菜单的作用,你也可以不调用setSupportActionBar 然后直接用ToolBar 加载Menu 。
toolbar.inflateMenu(menuId);
toolbar.setOnMenuItemClickListener(new Toolbar.OnMenuItemClickListener() {@Overridepublic boolean onMenuItemClick(MenuItem item) {return false;}});
通过setOnMenuItemClickListener来处理菜单的点击时间。
在实验过程中,也碰到一些问题。 假如我需要实现在ToolBar右边显示一个图标,点击之后会弹出相应的菜单选项出来,我采用的是定义Menu的二级菜单,然后用ToolBar加载。效果实现了,但是弹出来的选项框会出现在ToolBar顶部,而且把ToolBar的右边部分遮住了,我的需求是,选项框会在TooBar的右下方显示。(现在大多App都是这样的,毕竟不能挡住了菜单栏) 但是我发现并没有方法,最后想了个折中的方法,使用PopupWindow 在菜单点击的时候弹出来显示在ToolBar下方。目前没有找到ToolBar本事的实现方式。
例子
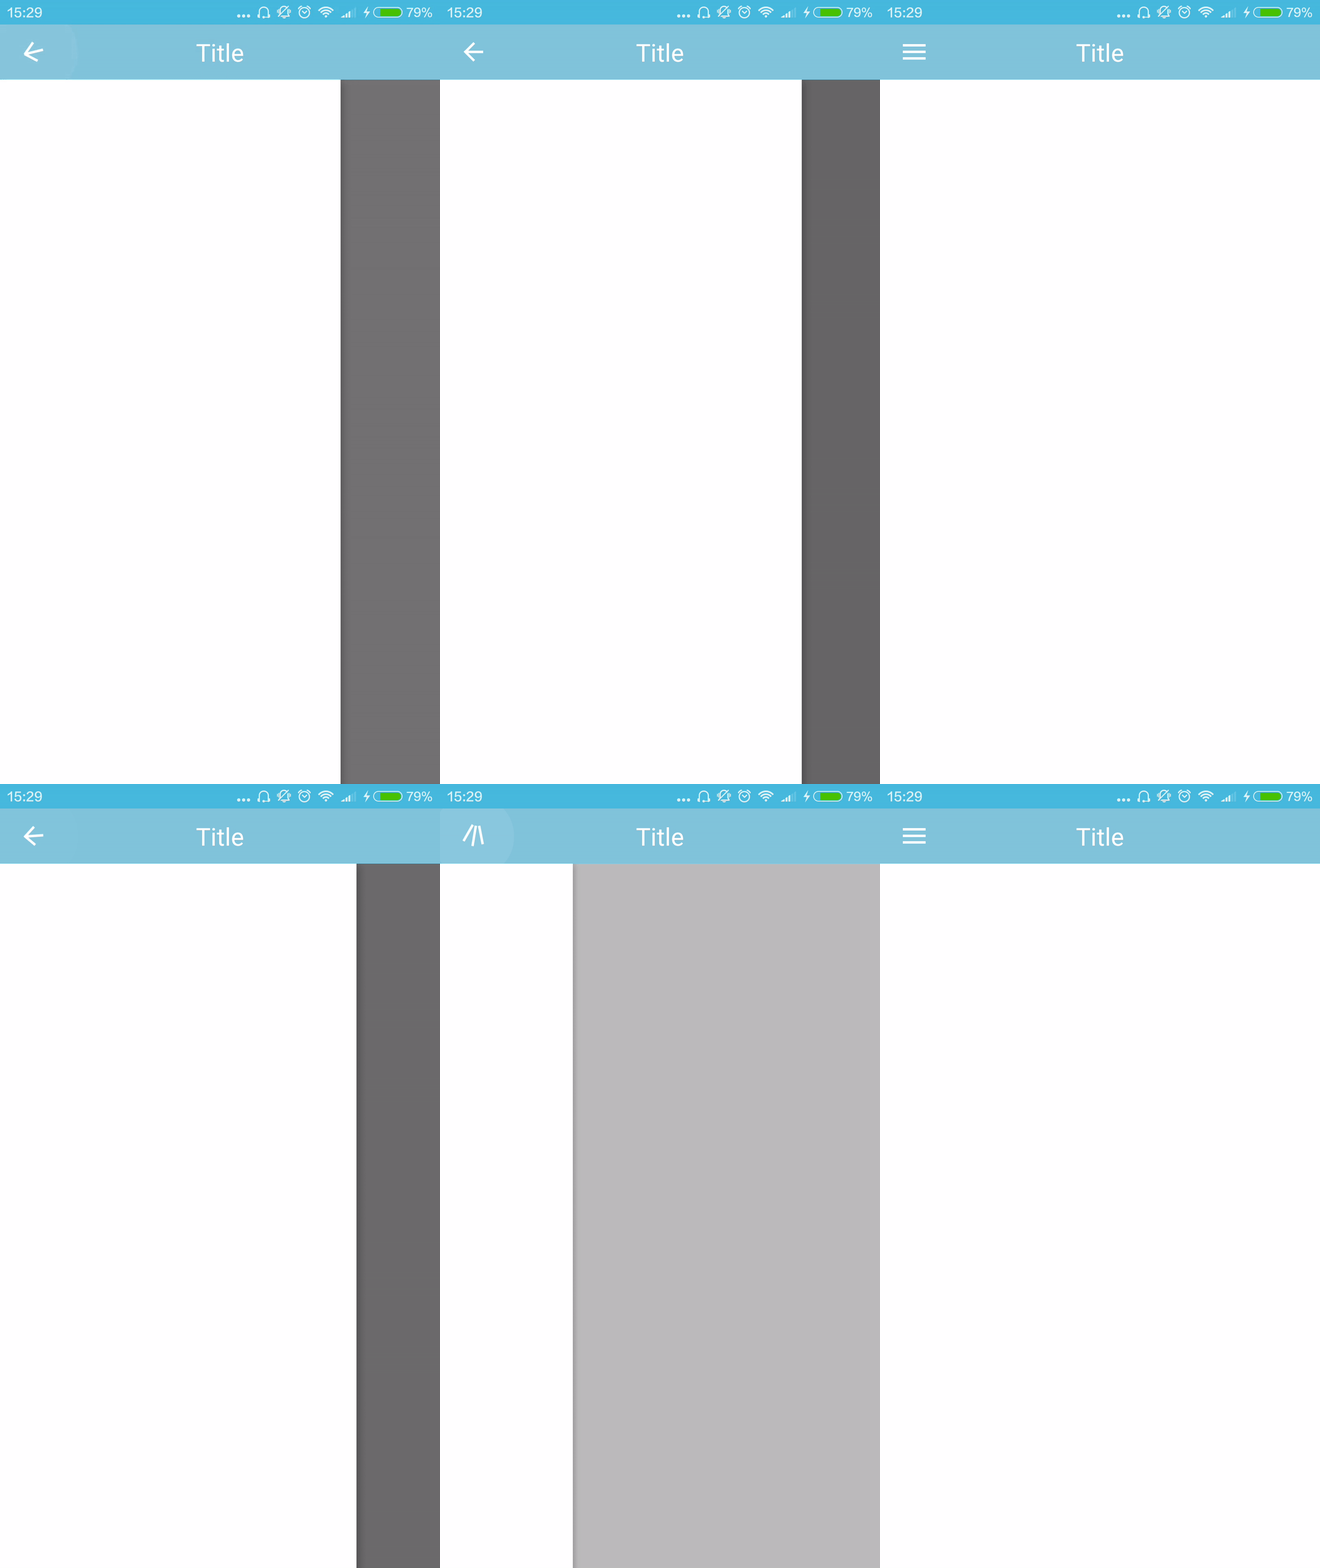
本例子实现ToolBar和DrawerLayout结合,左右两边都简单加载一个空白的Fragment,效果图:
例子实现起来非常简单。
首先是布局文件:
<?xml version="1.0" encoding="utf-8"?>
<LinearLayout xmlns:android="http://schemas.android.com/apk/res/android"android:layout_width="match_parent"android:layout_height="match_parent"android:orientation="vertical"><include layout="@layout/widget_toolbar" /><android.support.v4.widget.DrawerLayout
        android:id="@+id/drawerlayout"android:layout_width="match_parent"android:layout_height="match_parent"><FrameLayout
            android:id="@+id/drawer_content"android:layout_width="match_parent"android:layout_height="match_parent"></FrameLayout><FrameLayout
            android:id="@+id/drawer_menu"android:layout_width="match_parent"android:layout_height="match_parent"android:layout_gravity="left"android:background="@color/white"></FrameLayout></android.support.v4.widget.DrawerLayout></LinearLayout>
接下来是Activity代码:
package com.crxz.sample;import android.os.Bundle;
import android.support.annotation.Nullable;
import android.support.v4.widget.DrawerLayout;
import android.support.v7.app.ActionBarDrawerToggle;
import android.support.v7.app.AppCompatActivity;
import android.support.v7.widget.Toolbar;
import android.widget.TextView;import com.crxz.R;/*** Created by Crxz on 16-4-29* Description:*/
public class DrawerToolbarActivity extends AppCompatActivity {Toolbar mToolbar;TextView mToolbar_title;DrawerLayout mDrawerLayout;SampleFragment leftFragment;SampleFragment contentFragment;ActionBarDrawerToggle mActionBarDrawerToggle;@Overrideprotected void onCreate(@Nullable Bundle savedInstanceState) {super.onCreate(savedInstanceState);setContentView(R.layout.activity_drawer_toolbar);initToolBar();initViews();}private void initViews() {mDrawerLayout = (DrawerLayout) findViewById(R.id.drawerlayout);mActionBarDrawerToggle = new ActionBarDrawerToggle(this, mDrawerLayout, mToolbar, R.string.open, R.string.close);mActionBarDrawerToggle.syncState();mDrawerLayout.setDrawerListener(mActionBarDrawerToggle);leftFragment = new SampleFragment();contentFragment = new SampleFragment();getSupportFragmentManager().beginTransaction().add(R.id.drawer_menu,leftFragment,"left").commit();getSupportFragmentManager().beginTransaction().add(R.id.drawer_content,contentFragment,"left").commit();}private void initToolBar() {mToolbar = (Toolbar) findViewById(R.id.toolbar);mToolbar.setTitle("");mToolbar_title = (TextView) findViewById(R.id.toolbar_title);mToolbar_title.setText("Title");setSupportActionBar(mToolbar);mToolbar.setNavigationIcon(R.drawable.ic_toolbar_back);}}
几十行代码即可实现ToolBar + DrawerLayou结合 ,是不是很方便!!!
曾经我纠结过ToolBar 左上角的图标是怎么实现的,现在看来是因为ActionBarDrawerToggle自带的。
这篇关于Android Toolbar 使用的文章就介绍到这儿,希望我们推荐的文章对编程师们有所帮助!


