SpringBoot的RabbitMQ消息队列: 一、消息发送接收第一印象

本文主要是介绍SpringBoot的RabbitMQ消息队列: 一、消息发送接收第一印象,希望对大家解决编程问题提供一定的参考价值,需要的开发者们随着小编来一起学习吧!

1.在原来项目的基础上.

修改pom.xml配置,导入jar包

增加配置

<dependency>
<groupId>org.springframework.boot</groupId>
<artifactId>spring-boot-starter-amqp</artifactId>
</dependency>

2.

修改系统配置文件application.properties,编制RabbitMQ的链接参数

spring.application.name=rabbitmq-hello
spring.rabbitmq.host=127.0.0.1
spring.rabbitmq.port=5672
spring.rabbitmq.username=admin
spring.rabbitmq.password=123456


ps:这里特别注意,mq的账号和密码都正常,还提示连接不上,这个时候就需要注意改账号的权限问题.

在打开localhost:15672 使用上述配置的账号密码登陆,进入admin选项卡,查看是否有权限,

Can access virtual hosts
 看这个是否有赋予对应的权限.....没有则需要加上,不然是访问不到的.


编制RabbitMQ配置、发送、接受的代码

1、编写配置文件类

在com.example包中增加类,名称为HelloRabbitConfig,并修改代码为

[java]  view plain copy
  1. package com.example;  
  2.   
  3. import org.springframework.amqp.core.Queue;  
  4. import org.springframework.context.annotation.Bean;  
  5. import org.springframework.context.annotation.Configuration;  
  6.   
  7. @Configuration  
  8. public class HelloRabbitConfig {  
  9.   
  10.     @Bean  
  11.     public Queue helloQueue() {  
  12.         return new Queue("hello");  
  13.     }  
  14. }  

2、编写发送消息类

在com.example包中增加类,名称为HelloSender,并修改代码为

[java]  view plain copy
  1. package com.example;  
  2.   
  3. import java.util.Date;  
  4.   
  5. import org.slf4j.Logger;  
  6. import org.slf4j.LoggerFactory;  
  7. import org.springframework.amqp.core.AmqpTemplate;  
  8. import org.springframework.beans.factory.annotation.Autowired;  
  9. import org.springframework.stereotype.Component;  
  10.   
  11. @Component  
  12. public class HelloSender {  
  13.   
  14.     protected static Logger logger=LoggerFactory.getLogger(HelloSender.class);   
  15.       
  16.     @Autowired  
  17.     private AmqpTemplate rabbitTemplate;  
  18.   
  19.     public String send(String name) {  
  20.         String context = "hello "+name+" --" + new Date();  
  21.         logger.debug("HelloSender: " + context);  
  22.         this.rabbitTemplate.convertAndSend("hello", context);  
  23.         return context;  
  24.     }  
  25. }  

3、编写接受消息类

在com.example包中增加类,名称为HelloReceiver,并修改代码为

[html]  view plain copy
  1. package com.example;  
  2.   
  3. import org.slf4j.Logger;  
  4. import org.slf4j.LoggerFactory;  
  5. import org.springframework.amqp.rabbit.annotation.RabbitHandler;  
  6. import org.springframework.amqp.rabbit.annotation.RabbitListener;  
  7. import org.springframework.stereotype.Component;  
  8.   
  9. @Component  
  10. @RabbitListener(queues = "hello")  
  11. public class HelloReceiver {  
  12.     protected static Logger logger = LoggerFactory.getLogger(HelloReceiver.class);  
  13.   
  14.     @RabbitHandler  
  15.     public void process(String hello) {  
  16.         logger.debug("HelloReceiver : " + hello);  
  17.     }  
  18. }  

4、编写RestController,调用发送消息

在com.example包中增加类,名称为HelloController,并修改代码为

[java]  view plain copy
  1. package com.example;  
  2.   
  3. import org.slf4j.Logger;  
  4. import org.slf4j.LoggerFactory;  
  5. import org.springframework.beans.factory.annotation.Autowired;  
  6. import org.springframework.web.bind.annotation.PathVariable;  
  7. import org.springframework.web.bind.annotation.RequestMapping;  
  8. import org.springframework.web.bind.annotation.RestController;  
  9.   
  10. @RestController   
  11. public class HelloController {  
  12.     protected static Logger logger=LoggerFactory.getLogger(HelloController.class);   
  13.       
  14.     @Autowired  
  15.         private HelloSender helloSender;  
  16.       
  17.     @RequestMapping("/send/{name}")  
  18.     public String helloworld(@PathVariable String name) {  
  19.         return helloSender.send(name);  
  20.     }  
  21. }  

5、运行测试

A、启动Docker中容器rabbitmq5672。docker start rabbitmq5672   (如果已启动,则忽略)

B、启动工程。在工程所在的文件夹打开命令行,且在命令行中执行 mvn spring-boot:run

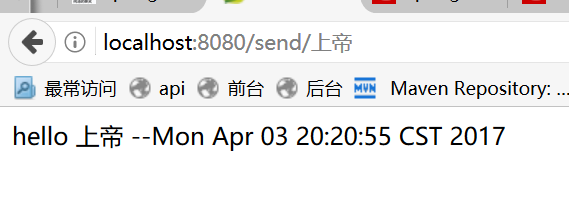
C、在浏览器中输入 http://localhost:8080/send/上帝

浏览器中显示

控制台中显示,成功发送、接收消息

三、小结

1、rabbitmq连接

1.1 springboot,在启动时,根据系统配置文件的参数建立一个rabbitmq连接。参看控制台日志:

 (MBeanExporter.java:431)- Registering beans for JMX exposure on startup

(MBeanExporter.java:916)- Bean with name 'rabbitConnectionFactory' has been autodetected for JMX exposure

 (MBeanExporter.java:678)- Located managed bean 'rabbitConnectionFactory': registering with JMX server as MBean [org.springframework.amqp.rabbit.connection:name=rabbitConnectionFactory,type=CachingConnectionFactory]

(DefaultLifecycleProcessor.java:343)- Starting beans in phase -2147482648

(DefaultLifecycleProcessor.java:343)- Starting beans in phase 2147483647

(AbstractConnectionFactory.java:347)- Created new connection: SimpleConnection@7075a8f1 [delegate=amqp://test@127.0.0.1:5672/, localPort= 62881]

1.2、在springboot启动之后,查看rabbitmq(http://localhost:15672/)的connections,也可以查看到。当然,你也可以停止springboot去看链接(停止之后,当然就没有链接了).
1.3、把logbak.xml的root的等级修改为debug,你会发现监听在不断的链接reabitmq;它就是一个心跳。通过这个心跳,rabbitmq也知道存在哪些监听器在监听那个队列。

2、配置文件

在配置文件中,仅仅配置了一个名为hello的队列。以后发送、接收都与这个队列相关。

3、发送消息

3.1、发送消息使用模板机制,用springboot自动注入的rabbitTemplate,它已经封装好链接、管道、转换等。

3.2、消息转换和发送

void convertAndSend(String routingKey, Object message) throws AmqpException;

它的注释是:Convert a Java object to an Amqp {@link Message} and send it to a default exchange with a specific routing key.

转换一个Java对象为Amqp消息,然后再用缺省的交换机指定路由键发送消息。

4、接受消息

4.1、监听消息

在类上声明@RabbitListener(queues = "hello"),表示监听hello队列

4.2、消息处理句柄

在接收处理消息的方法上声明@RabbitHandler

Annotation that marks a method to be the target of a Rabbit message  listener within a class that is annotated with {@link RabbitListener}.

5、印象

整个工程比较简单,没有什么特殊的配置,仅仅三个类文件即可实现消息的发送和接受。


这篇关于SpringBoot的RabbitMQ消息队列: 一、消息发送接收第一印象的文章就介绍到这儿,希望我们推荐的文章对编程师们有所帮助!


http://www.chinasem.cn/article/1095396

相关文章

JVM 的类初始化机制

前言 当你在 Java 程序中new对象时,有没有考虑过 JVM 是如何把静态的字节码(byte code)转化为运行时对象的呢,这个问题看似简单,但清楚的同学相信也不会太多,这篇文章首先介绍 JVM 类初始化的机制,然后给出几个易出错的实例来分析,帮助大家更好理解这个知识点。 JVM 将字节码转化为运行时对象分为三个阶段,分别是:loading 、Linking、initialization

Spring Security 基于表达式的权限控制

前言 spring security 3.0已经可以使用spring el表达式来控制授权,允许在表达式中使用复杂的布尔逻辑来控制访问的权限。 常见的表达式 Spring Security可用表达式对象的基类是SecurityExpressionRoot。 表达式描述hasRole([role])用户拥有制定的角色时返回true (Spring security默认会带有ROLE_前缀),去

浅析Spring Security认证过程

类图 为了方便理解Spring Security认证流程,特意画了如下的类图,包含相关的核心认证类 概述 核心验证器 AuthenticationManager 该对象提供了认证方法的入口,接收一个Authentiaton对象作为参数; public interface AuthenticationManager {Authentication authenticate(Authenti

Spring Security--Architecture Overview

1 核心组件 这一节主要介绍一些在Spring Security中常见且核心的Java类,它们之间的依赖,构建起了整个框架。想要理解整个架构,最起码得对这些类眼熟。 1.1 SecurityContextHolder SecurityContextHolder用于存储安全上下文(security context)的信息。当前操作的用户是谁,该用户是否已经被认证,他拥有哪些角色权限…这些都被保

Spring Security基于数据库验证流程详解

Spring Security 校验流程图 相关解释说明(认真看哦) AbstractAuthenticationProcessingFilter 抽象类 /*** 调用 #requiresAuthentication(HttpServletRequest, HttpServletResponse) 决定是否需要进行验证操作。* 如果需要验证,则会调用 #attemptAuthentica

Spring Security 从入门到进阶系列教程

Spring Security 入门系列 《保护 Web 应用的安全》 《Spring-Security-入门(一):登录与退出》 《Spring-Security-入门(二):基于数据库验证》 《Spring-Security-入门(三):密码加密》 《Spring-Security-入门(四):自定义-Filter》 《Spring-Security-入门(五):在 Sprin

Java架构师知识体认识

源码分析 常用设计模式 Proxy代理模式Factory工厂模式Singleton单例模式Delegate委派模式Strategy策略模式Prototype原型模式Template模板模式 Spring5 beans 接口实例化代理Bean操作 Context Ioc容器设计原理及高级特性Aop设计原理Factorybean与Beanfactory Transaction 声明式事物

Java进阶13讲__第12讲_1/2

多线程、线程池 1.  线程概念 1.1  什么是线程 1.2  线程的好处 2.   创建线程的三种方式 注意事项 2.1  继承Thread类 2.1.1 认识  2.1.2  编码实现  package cn.hdc.oop10.Thread;import org.slf4j.Logger;import org.slf4j.LoggerFactory

hdu1180(广搜+优先队列)

此题要求最少到达目标点T的最短时间,所以我选择了广度优先搜索,并且要用到优先队列。 另外此题注意点较多,比如说可以在某个点停留,我wa了好多两次,就是因为忽略了这一点,然后参考了大神的思想,然后经过反复修改才AC的 这是我的代码 #include<iostream>#include<algorithm>#include<string>#include<stack>#include<

JAVA智听未来一站式有声阅读平台听书系统小程序源码

智听未来,一站式有声阅读平台听书系统 🌟&nbsp;开篇:遇见未来,从“智听”开始 在这个快节奏的时代,你是否渴望在忙碌的间隙,找到一片属于自己的宁静角落?是否梦想着能随时随地,沉浸在知识的海洋,或是故事的奇幻世界里?今天,就让我带你一起探索“智听未来”——这一站式有声阅读平台听书系统,它正悄悄改变着我们的阅读方式,让未来触手可及! 📚&nbsp;第一站:海量资源,应有尽有 走进“智听