本文主要是介绍WebDriver基本操作入门及UI自动化练手页面,希望对大家解决编程问题提供一定的参考价值,需要的开发者们随着小编来一起学习吧!
在这里集中了我们在做UI自动化时常见的一些控件操作。希望能对新手有帮助。
下载地址:http://files.cnblogs.com/zhangfei/demo.rar
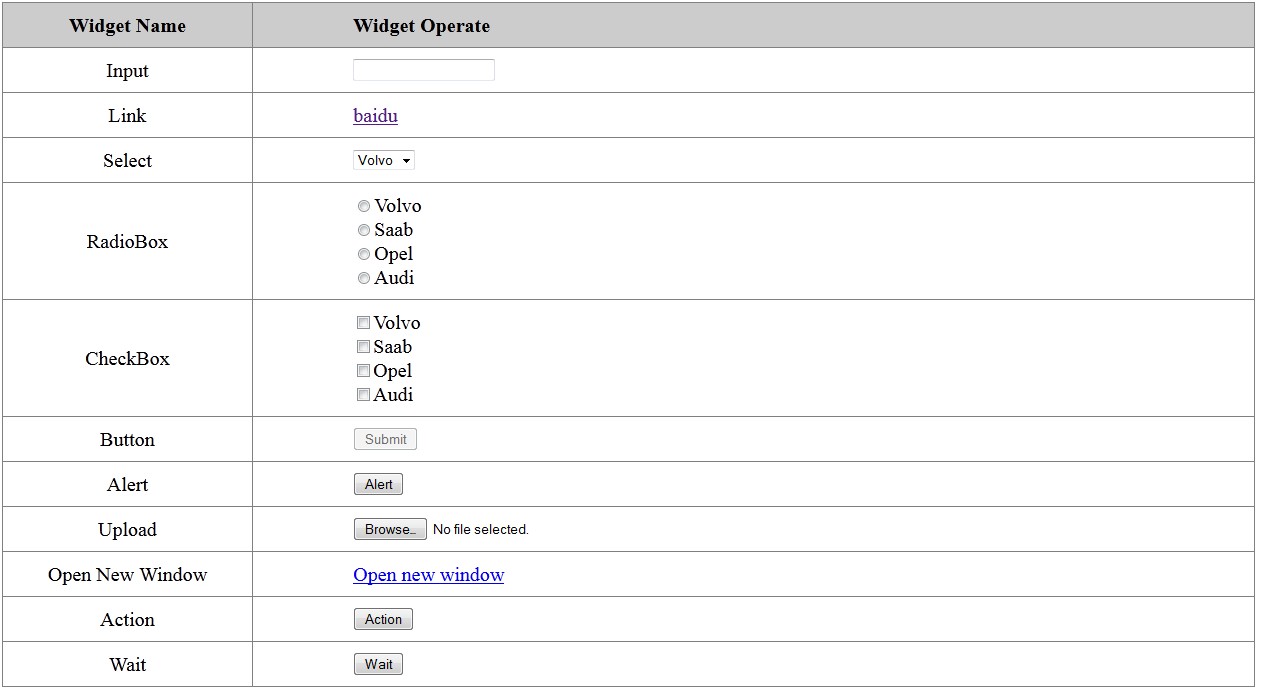

package com.test;import java.util.List;
import java.util.Set;import org.openqa.selenium.Alert;
import org.openqa.selenium.By;
import org.openqa.selenium.JavascriptExecutor;
import org.openqa.selenium.WebDriver;
import org.openqa.selenium.WebElement;
import org.openqa.selenium.firefox.FirefoxDriver;
import org.openqa.selenium.interactions.Actions;
import org.openqa.selenium.support.ui.ExpectedCondition;
import org.openqa.selenium.support.ui.Select;
import org.openqa.selenium.support.ui.WebDriverWait;public class Demo {public WebDriver driver;public Demo() {// ProfilesIni allProfiles = new ProfilesIni();// FirefoxProfile profile = allProfiles.getProfile("default");// driver = new FirefoxDriver(profile);driver = new FirefoxDriver();}public void testBaidu() {WebDriver driver = new FirefoxDriver();driver.navigate().to("http://www.baidu.com");driver.quit();}public void testGoTo(String url) {driver.navigate().to(url);driver.manage().window().maximize();}public void testQuit() {// driver.close();
        driver.quit();}public void testInput(String value) {WebElement element = driver.findElement(By.id("user"));element.sendKeys(value);element.clear();element.sendKeys(value);String text = element.getAttribute("value");System.out.println(text);}public void testLink() {WebElement element = driver.findElement(By.className("baidu"));String href = element.getAttribute("href");System.out.println(href);String text = element.getText();System.out.println(text);element.click();driver.navigate().back();}public void testSelect(String value) {WebElement element = driver.findElement(By.name("select"));Select select = new Select(element);select.selectByValue(value);String text = select.getFirstSelectedOption().getText();System.out.println(text);}public void testRadioBox(int index) {List<WebElement> elements = driver.findElements(By.name("identity"));elements.get(index).click();boolean select = elements.get(index).isSelected();System.out.println(select);}public void testCheckBox(int index) {List<WebElement> elements = driver.findElements(By.xpath("//div[@id='checkbox']/input"));WebElement element = elements.get(index);element.click();boolean check = element.isSelected();System.out.println(check);}public void testButton() {WebElement element = driver.findElement(By.className("button"));element.click();boolean button = element.isEnabled();System.out.println(button);}public void testAlert() {WebElement element = driver.findElement(By.className("alert"));Actions action = new Actions(driver);action.click(element).perform();Alert alert = driver.switchTo().alert();String text = alert.getText();System.out.println(text);alert.accept();}public void testUpload(String filePath) {WebElement element = driver.findElement(By.id("load"));        element.sendKeys(filePath);        }public void testJavaScript(){JavascriptExecutor j = (JavascriptExecutor)driver;j.executeScript("alert('hellow rold!')");Alert alert = driver.switchTo().alert();String text = alert.getText();System.out.println(text);alert.accept();}public void testMultiWindow() {WebElement element = driver.findElement(By.className("open"));element.click();Set<String> handles = driver.getWindowHandles();String handle = driver.getWindowHandle();handles.remove(driver.getWindowHandle());WebDriver d = driver.switchTo().window(handles.iterator().next());        d.close();    driver.switchTo().window(handle);}public void testAction() {WebElement element = driver.findElement(By.className("over"));Actions action = new Actions(driver);action.moveToElement(element).perform();String text = driver.findElement(By.id("over")).getText();System.out.println(text);}public void testWait() {WebElement element = driver.findElement(By.className("wait"));element.click();
//        driver.manage().timeouts().implicitlyWait(12, TimeUnit.SECONDS);boolean wait = new WebDriverWait(driver, 10).until(new ExpectedCondition<Boolean>() {public Boolean apply(WebDriver d) {return d.findElement(By.className("red")).isDisplayed();}});System.out.println(wait);System.out.println(driver.findElement(By.className("red")).getText());}public static void main(String[] args) {Demo d = new Demo();d.testGoTo("http://ip/demo.html");d.testInput("hello");d.testLink();d.testRadioBox(2);d.testSelect("opel");d.testCheckBox(2);d.testButton();d.testUpload("c:\\test.txt");d.testAlert();d.testAction();d.testJavaScript();d.testWait();d.testQuit();}}
这篇关于WebDriver基本操作入门及UI自动化练手页面的文章就介绍到这儿,希望我们推荐的文章对编程师们有所帮助!


