本文主要是介绍一个实用的注解,用来加载properties文件中的值到controller中 @Value,希望对大家解决编程问题提供一定的参考价值,需要的开发者们随着小编来一起学习吧!
spring容器中properties文件的注入
<util:properties id="xxx" location="classpath:xxx.properties"></util:properties>1、properties文件中:
username=root
Java类中为属性赋值方式:@Value("xxx.username")
domain.url.name=https://www.baidu.com
Java类中为属性赋值方式:@Value("xxx['domain.url.name']")
在我们项目中往往会使用到properties配置文件来定义一些跟系统环境有关的配置,因此今天我们学习使用spring中的@Value注解来快速方便地将我们配置文件中的变量值赋值给java类的属性值。
1.首先我们先在项目中建一个properties配置文件,然后定义好我们需要的变量名和对应的值

2.然后我们需要在spring-mybatis.xml配置文件中将这个配置文件添加到spring项目中,代码:
<!--测试@Value注解的配置文件--><context:property-placeholder location="classpath:config/value.properties" ignore-unresolvable="true"/>
3.我们需要一个Java类来申明我们需要的Java变量,在变量的前面标注注解@Value("${xxx}"),xxx就是配置文件中的变量名称,该注解只能使用在类属性值上面,代码:
package com.ssm.config;import org.springframework.beans.factory.annotation.Value;
import org.springframework.stereotype.Component;/*** Created by viking on 2018/09/01* 系统常量配置类*/
@Component
public class SystemConfig {@Value("${value.name}")public String sys_name;@Value("${value.value}")public  String sys_value;@Value("${value.type}")public  String sys_type;
}
4.现在看似我们的操作就做完了,其实不然,我们还需要一个重要的步骤,我们需要将我们的Java类注入到spring容器中,这样@Value注解才能生效,毕竟是spring的注解嘛,这些操作只有让它自己来做才行的。在spring-mybatis.xml中注入Java类的实例,我使用的是@Component注解加包扫描的方式,当然你也可以直接配置一个bean在xml文件中,效果都一样,代码:
<!--spring扫描注入bean--><context:component-scan base-package="com.ssm.config"/>
5.该做的操作都做完了,下面开始测试阶段,让我们看看这个靠不靠谱吧!编写一个测试类,代码:
package com.ssm.controller;import com.ssm.config.SystemConfig;
import org.springframework.beans.factory.annotation.Autowired;
import org.springframework.web.bind.annotation.RequestMapping;
import org.springframework.web.bind.annotation.RestController;import java.util.HashMap;
import java.util.Map;/*** Created by viking on 2018/09/01* 测试Controller*/
@RestController
@RequestMapping("test")
public class TestController {@Autowiredprivate SystemConfig systemConfig;@RequestMapping("value")public Object testValue(){Map<String,String> map = new HashMap<String, String>();map.put("sys_name",systemConfig.sys_name);map.put("sys_value",systemConfig.sys_value);map.put("sys_type",systemConfig.sys_type);return map;}
}
运行效果:

这样就实现了在spring中使用@Value注解直接获取properties文件中的变量值。
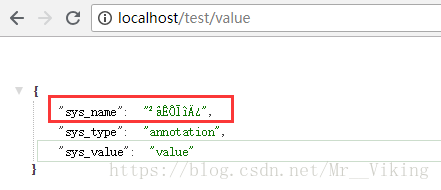
但是,这里还有一个问题,如果我在配置文件中配置了中文汉字,会发生什么情况呢?如图:

运行结果:

出现乱码了,这个问题怎么解决呢?很简单,在向spring中引入properties配置文件是加上这个:
<!--测试@Value注解的配置文件-->
<context:property-placeholder location="classpath:config/value.properties" file-encoding="UTF-8" ignore-unresolvable="true"/>
把UTF-8换成你自己项目中使用的编码方式即可。
运行结果:

这篇关于一个实用的注解,用来加载properties文件中的值到controller中 @Value的文章就介绍到这儿,希望我们推荐的文章对编程师们有所帮助!


