本文主要是介绍Tailwindcss 提取组件,希望对大家解决编程问题提供一定的参考价值,需要的开发者们随着小编来一起学习吧!
背景
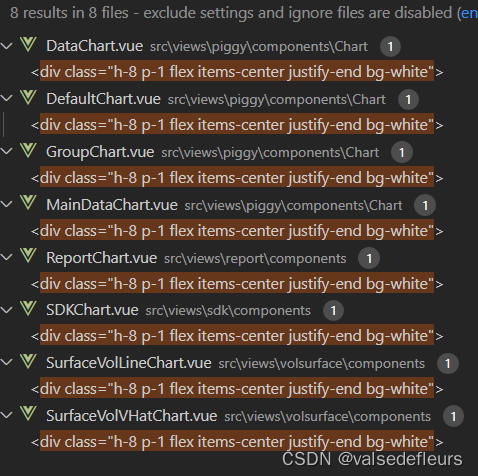
随着项目的发展,您不可避免地会发现自己需要重复使用常用样式,以便在许多不同的地方重新创建相同的组件。这在小组件(如按钮、表单元素、徽章等)中最为明显。在我的项目中是图表标题样式如下:
<div class="h-8 p-1 flex items-center justify-end bg-white">

在许多组件实例中保持一长串样式类class,同步很快就会成为真正的维护负担,因此当您开始遇到像这样的痛苦重复时,提取一个组件是一个好主意。
可选方案
查阅 Tailwindcss 官方文档
1. 提取模板组件
不推荐做法:不要依赖 CSS 类来提取复杂的组件
因为这样依然无法避免复制同样的HTML结构,如下:

<style>.vacation-card { /* ... */ }.vacation-card-info { /* ... */ }.vacation-card-eyebrow { /* ... */ }.vacation-card-title { /* ... */ }.vacation-card-price { /* ... */ }
</style><!-- Even with custom CSS, you still need to duplicate this HTML structure -->
<div class="vacation-card"><img class="vacation-card-image" src="..." alt="Beach in Cancun"><div class="vacation-card-info"><div><div class="vacation-card-eyebrow">Private Villa</div><div class="vacation-card-title"><a href="/vacations/cancun">Relaxing All-Inclusive Resort in Cancun</a></div><div class="vacation-card-price">$299 USD per night</div></div></div>
</div>
因此,将可重复使用的 UI 部分提取到模板部分或JavaScript 组件中通常比编写自定义 CSS 类更好。
通过为模板创建单一真实来源,您可以继续使用实用程序类,而无需承担因在多个地方重复相同的类而产生的维护负担。
推荐做法:创建模板部分或 JavaScript 组件
<!-- In use -->
<VacationCardimg="/img/cancun.jpg"imgAlt="Beach in Cancun"eyebrow="Private Villa"title="Relaxing All-Inclusive Resort in Cancun"pricing="$299 USD per night"url="/vacations/cancun"
/><!-- ./components/VacationCard.vue -->
<template><div><img class="rounded" :src="img" :alt="imgAlt"><div class="mt-2"><div><div class="text-xs text-gray-600 uppercase font-bold">{{ eyebrow }}</div><div class="font-bold text-gray-700 leading-snug"><a :href="url" class="hover:underline">{{ title }}</a></div><div class="mt-2 text-sm text-gray-600">{{ pricing }}</div></div></div></div>
</template><script>export default {props: ['img', 'imgAlt', 'eyebrow', 'title', 'pricing', 'url']}
</script>
上面的例子使用了Vue,但同样的方法也可以用于React 组件、ERB partials、Blade 组件、Twig 包含等等。
2. 使用@apply提取组件类
对于按钮和表单元素等小组件,与简单的 CSS 类相比,创建模板部分或 JavaScript 组件通常会感觉太重。
在这些情况下,您可以使用 Tailwind 的 @apply 指令轻松地将常见的实用程序模式提取到 CSS 组件类中。
下面是btn-indigo使用@apply现有实用程序组成的类的示例:

<button class="btn-indigo">Click me
</button><style>.btn-indigo {@apply py-2 px-4 bg-indigo-500 text-white font-semibold rounded-lg shadow-md hover:bg-indigo-700 focus:outline-none focus:ring-2 focus:ring-indigo-400 focus:ring-opacity-75;}
</style>
为了避免意外的特殊性问题,我们建议使用指令包装自定义组件样式,@layer components { ... } 以告诉 Tailwind这些样式属于哪个层:
@tailwind base;
@tailwind components;
@tailwind utilities;@layer components {.btn-blue {@apply py-2 px-4 bg-blue-500 text-white font-semibold rounded-lg shadow-md hover:bg-blue-700 focus:outline-none focus:ring-2 focus:ring-blue-400 focus:ring-opacity-75;}
}
Tailwind 会自动将这些样式移动到与 相同的位置@tailwind components,因此您不必担心在源文件中获取正确的顺序。
使用该@layer指令还将指示 Tailwind 在清除层时考虑清除这些样式components
3. 编写组件插件
除了直接在 CSS 文件中编写组件类之外,你还可以通过编写自己的插件将组件类添加到 Tailwind:
// tailwind.config.js
const plugin = require('tailwindcss/plugin')module.exports = {plugins: [plugin(function({ addComponents, theme }) {const buttons = {'.btn': {padding: `${theme('spacing.2')} ${theme('spacing.4')}`,borderRadius: theme('borderRadius.md'),fontWeight: theme('fontWeight.600'),},'.btn-indigo': {backgroundColor: theme('colors.indigo.500'),color: theme('colors.white'),'&:hover': {backgroundColor: theme('colors.indigo.600')},},}addComponents(buttons)})]
}
如果您想将 Tailwind 组件发布为库或更轻松地在多个项目之间共享组件,这可能是一个不错的选择。
在组件插件文档中了解更多信息
最终方案
因为我的使用场景,是针对图表的标题,虽然出现次数多,但将该组件提取出来会显得代码繁重,我最终决定在tailwindcss.css用@apply定义一个类,并在组件中重复使用这个类名
1. Tailwindcss.css文件做以下class配置
@tailwind base;
@tailwind components;
@tailwind utilities;@layer components {.chart-title {@apply h-8 p-1 flex items-center justify-end bg-white;}
}
2. 组件使用class
<div class="chart-title"></div>
这篇关于Tailwindcss 提取组件的文章就介绍到这儿,希望我们推荐的文章对编程师们有所帮助!


